Categories
Business Industry

Google Maps is getting 3 big features to help you plan vacation more easily

[ad_1]

With the summer season just around the corner, people will soon start exploring places for their vacations, which means that the usage of Google Maps is going to shoot up. Right before that happens, Google has announced that it is adding three new features to Google Maps for Android and iOS, which will make the platform more helpful and easier for you to use during your vacation.

First is curated lists for a location, which should help you explore the place in a better way. Second is the ability to allow you to manually arrange places in a list, which will make it easier for you to maintain a list or plan a trip. Third is the ability to show an AI-generated summary of a place, which should help you to explore a place quickly. Let’s take a deeper look at these features.

Google Maps will soon show curated lists

According to Google, now when you search for a location on Google Maps and swipe up on the location card, you will be able to see three lists, the top list, the trending list, and the gems list. The top list will show you the places “the Maps community has consistently loved,” the trending list will contain places that have “recently seen a spike in popularity on Maps,” and the gems list will show you places “that might be a neighborhood’s best-kept secret.

Google Maps Curate Lists

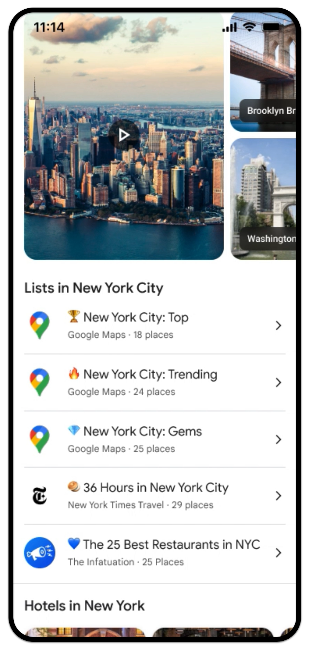
Along with it, Google Maps will show lists from major platforms, such as Lonely Planet, The New York Times, and OpenTable, as well as lists curated by the Google Maps community. All these lists should give you a better idea about a place and help you decide what to explore and what to eat. Google says “You’ll start seeing these lists in more than 40 cities across the U.S. and Canada this week.

You can now reorder places in lists

If you are an avid Google Maps user, you might know that the platform allows you to create lists and add places to them. Up until now, when you added a new place to a list, it used to get added to the bottom of the list. There was no option to reorder places, which was frustrating if you needed to move a place up or down for whatever reasons. Well, Google is fixing that.

Google Maps Customize List Order

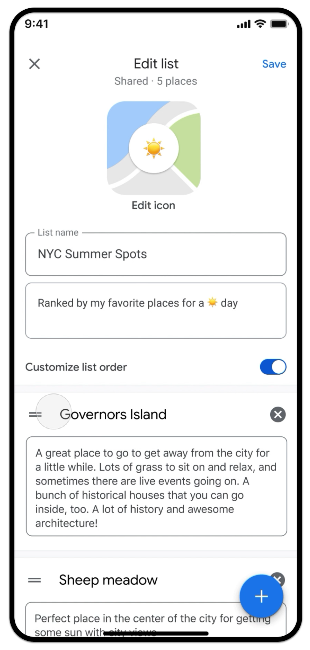
According to Google, you can now “choose the order places appear in your lists,” which should make it easier for you to organise a list to your liking. The company says that with the new feature, “if you’re planning a trip and compiling recommendations, you can organize them chronologically — like an itinerary.” “After you’ve visited places on your list, move them up or down to create a ranked list of your favorite places you visited to help you provide the best recommendations,” it further adds. The feature has gone live on the platform.

AI-generated summary to quickly know a place

Google Maps offers you a lot of information about a place, such as showing you reviews and photos of a place, which helps you get to know it in detail. However, going through each review and photo could be a frustrating task, especially when you are in a hurry and need to know about a place quickly. Well, Google is making the task easier for you with the help of AI.

Google Maps AI-Generated Summary

The company says that now when you swipe up on a place, Google Maps will show you an AI-generated summary of what people think about it. Along with that, when you are scrolling through photos of food, it will use AI to show the name of the dish, and “show you helpful information based on the menu — like what it costs, if it’s popular, and even if it’s vegetarian or vegan — so you know if you want to make a reservation.” At the moment, there’s no information about when this feature will go live.

[ad_2]

Source Article Link

Categories
Business Industry

Galaxy A54’s camera can easily keep up with the newer A55

[ad_1]

Although the new Galaxy A55 from Samsung seems to be wiping the floor with the older Galaxy A54 in the display department, the same cannot be said about the cameras. According to independent reviewer DxOMark, the Galaxy 54 and A55 camera systems perform almost the same.

These results aren’t all that surprising, seeing how the Galaxy A54 and A55 seemingly use the same camera hardware. On paper, they are the same.

The camera setups include 50MP primary cameras with PDAF and OIS, 12MP ultra-wide shooters, 5MP macro cameras, and 32MP selfie sensors — all with identical apertures and pixel sizes across the two phones.

Even so, the Galaxy A55 has a bit of an edge over the Galaxy A54. But not by much, and the difference certainly isn’t as huge as it is for their displays.

The cameras are no reason to upgrade your Galaxy A54

According to DxOMark, the Galaxy A55 camera ranks 15th in the $400-$600 phone segment, whereas your Galaxy A54 ranks 16th. In the global ranking, which includes phones from all price segments, the Galaxy A55 ranks 117th, and the A54 is 122nd.

Thanks to newer software and image processing tricks, the Galaxy A55 appears to perform marginally better than the Galaxy A54 in some areas, including low-light photos and videos.

Interestingly, though, the Galaxy A54 beats the Galaxy A55 in a couple of other categories, such as zoom and bokeh. Surprisingly, the Galaxy A54 appears to be handling depth-of-field better than the newer A55.

If you are still pondering upgrading your Galaxy A54 to the newer Galaxy A55, and if you decide to do it, you will benefit from newer Gorilla Glass Victus+ protection for a more competent display, an aluminum frame instead of a plastic one, a more powerful Exynos 1480 chip, and seamless updates.

However, the camera experience doesn’t seem all that different, and Samsung hasn’t elevated it to a level high enough to warrant a trade-in from the A54 to the A55 at your expense.

If you need a better camera than the one the Galaxy A54 provides, you will have to look at pricier devices, such as the Galaxy S23 FE and up. The Galaxy S23 FE in DxOMark’s camera test ranks 3rd in the $400-$600 price range and 60th globally. It is vastly superior to the Galaxy A54 and A55.

[ad_2]

Source Article Link

Categories
News

Easily convert your old Samsung Galaxy phone into a desktop PC

Easily convert your old Samsung Galaxy phone into a desktop PC

If you are lucky enough to have an old Samsung Galaxy phone collecting dust in a desk drawer or shelf, you might be interested to know that you can re-purpose it to become a desktop PC. The powerful Android phone can easily be transformed into a fully functional desktop computer if your Samsung Galaxy phone ranges from the S8 to the S24. Samsung DeX is the key to converting your smartphone into a powerful and versatile desktop PC, and I’m here to guide you through the process.

To start, you’ll need to gather a few essential accessories. A USB-C to HDMI adapter or a dock will be crucial for connecting your phone to a monitor. You’ll also want to grab a mouse and a keyboard for the full desktop experience. If you’re into gaming, consider adding a controller to your setup. And of course, don’t overlook a power source to keep your phone charged while you use it.

“Maximize your productivity with Samsung DeX on your Samsung Galaxy device. Seamlessly transition from sending messages to friends to watching movies and preparing presentations simultaneously – all on a large screen. Wireless DeX is also available for added convenience. When using a tablet, choose your preferred mode: New DeX or Classic DeX. With New DeX mode, the tablet’s UI remains intact, ensuring a continuation of your tablet experience. Opt for Classic DeX mode to transform your tablet’s interface into a familiar desktop environment. “

Samsung Dex

Using a Samsung Galaxy phone is a desktop computer

Once you have your gear ready, it’s time to connect your phone to an external display. This is where the magic happens. Samsung DeX mode will kick in, presenting you with a desktop interface that you can personalize. Feel free to adjust your settings and organize your apps just the way you like them.

Here are some other articles you may find of interest on the subject of Southern Galaxy phone :

1. Samsung DeX

Samsung DeX allows select Samsung smartphones and tablets to connect to a monitor, TV, or computer, providing a desktop-like experience. This feature is available on devices from the Galaxy S8 and newer, including the Galaxy Note series and certain Galaxy Tab models. It offers a user interface designed for larger screens, supporting keyboard and mouse input for productivity tasks.

2. Requirements

Before you begin, ensure you have the following:

  • A compatible Samsung Galaxy device.
  • A monitor, TV, or computer screen with HDMI input.
  • A USB Type-C to HDMI adapter or dock. Consider one with multiple ports if you plan to connect peripherals like a keyboard, mouse, or external storage.
  • A power source to charge your phone while connected.
  • Optional: A keyboard and mouse, either USB or Bluetooth, for a complete desktop experience.
  • Optional: An external storage device, such as a microSD card or an SSD, if additional storage is needed.

3. Connecting Your Device

Adapter/Dock Connection:

  1. Connect the Adapter/Dock: Plug the USB Type-C end of your adapter or dock into your Samsung Galaxy device.
  2. Display Connection: Connect an HDMI cable from your adapter or dock to your monitor or TV.
  3. Power Connection: If your adapter or dock supports charging, connect a power cable to keep your device charged.
  4. Peripherals Connection: Connect your keyboard and mouse directly to the USB ports on the adapter or dock. For Bluetooth peripherals, pair them through the device’s Bluetooth settings.

Device Setup:

Once connected, your Samsung Galaxy device should automatically launch DeX mode. If it doesn’t:

  • Swipe down from the top of the screen to access the notification panel.
  • Tap on the DeX notification and follow the prompts to start DeX.

4. Customizing Your DeX Experience

Desktop Environment:

  • Wallpaper: Right-click on the desktop to change the wallpaper.
  • Settings: Access DeX settings through the quick panel to adjust resolution, font size, and more.

Apps and Multitasking:

  • Open apps from the app drawer at the bottom of the screen.
  • Multi-window support allows for running multiple apps simultaneously. Resize and reposition windows as needed.

External Storage:

  • If using an SSD or microSD for extra storage, ensure it’s formatted correctly (NTFS for larger file support).
  • Connect the storage device to your phone via the adapter or dock. It should be recognized as external storage.

5. Productivity and Entertainment

Web Browsing and Document Editing:

  • Use the Samsung Internet browser or Google Chrome for web browsing.
  • Edit documents using Microsoft Office, Google Docs, or any Android-compatible office app.

Media Playback:

  • Enjoy video playback on a larger screen. Apps like YouTube, Netflix, and Hulu are compatible with DeX and can stream content in high definition.

Gaming:

  • Play games directly on your desktop setup. Some games may support keyboard and mouse, while others might require a touchscreen or game controller.
  • For more intense gaming, emulation is possible, but performance will vary based on the device’s hardware capabilities.

6. Troubleshooting and Tips

  • App Compatibility: Some apps may not fully support DeX or may not utilize the full screen. Check for app updates or consider alternatives.
  • Performance: Close unnecessary apps to free up resources for a smoother experience.
  • Dock/Adapter Choices: While a simple USB-C to HDMI adapter works, a dock with additional ports offers greater flexibility for peripherals and storage.

Your new desktop setup is now ready to tackle a variety of tasks. Surf the web, watch videos, and edit documents with ease. It’s similar to working on a standard PC, but with the added convenience of a touchscreen. And when it comes to gaming, you’re in for a treat. Your options are vast, with Android games and emulators at your fingertips. Some docks even come with M.2 SSD slots, offering you the possibility of expanding your storage space.

It’s important to note that while Samsung DeX is quite capable, it does have its limitations. You might find multitasking and performing high-performance tasks a bit different from what you’re used to on a traditional computer. However, for everyday activities and entertainment, this setup is a smart and cost-effective solution.

By leveraging Samsung DeX and the appropriate peripherals, you can breathe new life into your older Samsung Galaxy phone. This not only extends the usefulness of your device but also offers you a distinctive computing experience, whether for work or leisure. Your Galaxy phone is more than just a mobile device; it’s a valuable asset in your collection of technology tools.

Image Credit : ETA Prime

Filed Under: Guides, Top News


Latest timeswonderful Deals

Disclosure: Some of our articles include affiliate links. If you buy something through one of these links, timeswonderful may earn an affiliate commission. Learn about our Disclosure Policy.

Categories
News

Easily backup your phone using the PhotoCube PD+

Easily backup your phone using the PhotoCube PD

In today’s digital age, where our mobile phones are brimming with precious memories and critical information, securing our data has become more important than ever. The PhotoCube PD+ emerges as a smart solution for those who want to keep their mobile data safe without relying on cloud storage. This innovative device offers a straightforward way to back up your phone’s data, ensuring that your photos, videos, and documents are protected and readily available whenever you need them.

The PhotoCube PD+ is a versatile backup device that is compatible with a wide array of smartphones, including the latest models with Type-C connectors as well as older iPhones. It boasts a unique On-The-Go (OTG) backup mode that automatically starts backing up data for Type-C devices. Additionally, there’s a Charging Backup mode that allows your phone to back up data while it’s charging, so you can take care of two essential tasks at once.

Early bird packages are now available for the recently launched project from roughly $52 or £44 (depending on current exchange rates), offering a considerable discount of approximately 45% off the list price, while the Kickstarter crowd funding is under way. One of the key advantages of the PhotoCube PD+ is that it offers a secure way to store your data without the risk of data leaks that can sometimes occur with cloud services. Plus, you won’t have to deal with the recurring costs associated with cloud storage subscriptions. The device is designed to work with a range of products, including the iPhone 15, iPad, and various Android phones, ensuring that your data is safe and accessible without an internet connection.

How to backup your phone

When it comes to speed, the PhotoCube PD+ does not disappoint. With data transfer rates of up to 5Gbps, it ensures that your backup process is not only secure but also incredibly fast. The device also supports fast charging with a 60W power delivery feature, so you can quickly power up your phone while managing your backups. It can accommodate Micro-SD cards of up to 2TB, providing plenty of storage space for all your data needs.

The design of the PhotoCube PD+ is both compact and portable, making it an ideal companion for those on the go. It includes a built-in card reader and supports USB 3.2 Gen.1 for efficient data management. The device automatically organizes your files into folders by month and device, and it’s smart enough to avoid duplicating files by continuing from where the last backup ended.

If the PhotoCube PD+ campaign successfully raises its required pledge goal and the project progresses smoothly, worldwide shipping is expected to take place sometime around June 2024. To learn more about the PhotoCube PD+ backup your phone project explore the promotional video below.

PhotoCube PD+ features :

– On-The-Go (OTG) backup mode for Type-C devices, enabling instant auto-backup.
– Charging Backup mode allows for data backup while charging the phone.
– Eliminates the need for monthly cloud backup fees and concerns over data leaks.
– Compatible with iPhone 15, iPad, and Android phones.
– Fast data transfer speeds up to 5Gbps.
– Supports up to 60W power delivery for rapid charging.
– Accommodates up to 2TB Micro-SD cards for extensive storage capacity.
– Portable design with built-in card reader and USB 3.2 Gen.1 support.
– Organizes backed-up data into folders by month and device name.
– Prevents duplicate files by continuing from the last backup point.
– Enhanced from the original PD model with direct plug-in capability for Type-C devices and faster data transfer speeds.
– Available in two new color options.

Next generation backup solution

Improving upon its predecessor, the PhotoCube PD+ introduces a direct plug-in feature for Type-C devices and boasts enhanced data transfer rates. It also comes in a variety of color options, allowing you to choose one that matches your personal style.

For the best performance with the PhotoCube PD+, it’s recommended to use a microSD card that is at least twice the size of your phone’s internal storage. Getting started is simple: insert a microSD card, download the ‘PhotoFast ONE’ app, and connect the device to your phone’s Type-C port. If you prefer, you can also connect it to your phone and charger at the same time to back up your data while charging. The backup process begins automatically upon connection, providing a smooth and hassle-free experience.

The PhotoCube PD+ stands out as a user-friendly backup solution for mobile phone users. It offers a secure and convenient alternative to cloud storage, allowing you to safeguard your data against loss without the need for internet access or monthly fees. With its swift backup capabilities, ample storage options, and ease of use, the PhotoCube PD+ is an excellent choice for anyone looking to protect their mobile data with confidence.

For a complete list of all available special pledges, stretch goals, extra media and performance specifications for the backup your phone, jump over to the official PhotoCube PD+ crowd funding campaign page by going to the link below.

Source : Kickstarter

Disclaimer: Participating in crowdfunding campaigns on sites like Kickstarter and Indiegogo involves inherent risks. While many projects successfully meet their goals, others may fail to deliver due to numerous challenges. Always conduct thorough research and exercise caution when pledging your hard-earned money as you might lose it all if the project fails.

Filed Under: Gadgets News, Top News


Latest timeswonderful Deals

Disclosure: Some of our articles include affiliate links. If you buy something through one of these links, timeswonderful may earn an affiliate commission. Learn about our Disclosure Policy.

Categories
News

Easily manage your dotfiles with GNU Stow

Easily manage your dotfiles with GNU Stow

If you’ve ever found yourself frustrated with the tedious task of managing configuration files, or “dotfiles,” across various systems, you’re not alone. Many developers, system administrators, and tech enthusiasts struggle with keeping their environments consistent. Fortunately, there’s a tool that can help simplify this process: GNU Stow. This utility is designed to streamline the way you handle your configurations, making it easier to maintain a clean and organized home directory.

To start, create a single directory, such as `~/dotfiles`, where you’ll store all your configuration files. This will be your central hub for managing these files. Move all your dotfiles into this directory, ensuring they’re organized in the same way they would be in your home folder. For example, your `.bashrc` file should be placed at `~/dotfiles/.bashrc`. Before proceeding, make sure to either delete or rename the original files in your home directory to avoid any potential conflicts.

Once your dotfiles are in place, it’s time to introduce GNU Stow to the mix. After installing it through your system’s package manager, run Stow from within your `~/dotfiles` directory. Stow will automatically create symbolic links, or symlinks, in your home folder that point back to the files in your dotfiles directory. This clever setup means that any changes you make to the files in `~/dotfiles` will be reflected across your system, without the need to manually update each file.

Using Stow to organize your dotfiles

“GNU Stow is a symlink farm manager which takes distinct packages of software and/or data located in separate directories on the filesystem, and makes them appear to be installed in the same place. For example, /usr/local/bin could contain symlinks to files within /usr/local/stow/emacs/bin, /usr/local/stow/perl/bin etc.,

and likewise recursively for any other subdirectories such as …/share, …/man, and so on. This is particularly useful for keeping track of system-wide and per-user installations of software built from source, but can also facilitate a more controlled approach to management of configuration files in the user’s home directory, especially when coupled with version control systems.”

Check out the tutorial  kindly created by Dreams of Autonomy to learn more about how you can use Stow to more easily manage your dotfiles.

Here are some other articles you may find of interest on the subject of coding :

To keep your configurations consistent across different machines, it’s a good idea to use version control. By initializing a Git repository in your `~/dotfiles` directory, you can keep track of changes, revert to earlier versions when necessary, and even share your configurations with others by pushing to a remote repository. However, be cautious with sensitive information; consider using a private repository to keep your dotfiles secure.

Sometimes, you might encounter existing configuration files that could conflict with your Stow-managed setup. In such cases, Stow’s `–adopt` option can be incredibly useful. It allows Stow to take over these files while keeping their original content intact. It’s crucial to review any changes carefully to ensure you don’t overwrite important settings inadvertently.

Finally, it’s helpful to create a README file that explains how to set up and use your dotfiles. This file should include any necessary prerequisites and offer a clear explanation of your configuration process. A well-written README is not only useful for your reference but also for anyone else who might use your dotfiles in the future.

By following these steps, you’ll have a reliable and streamlined system for managing your dotfiles. GNU Stow, combined with Git, offers a straightforward solution for organizing your settings and keeping them in sync across different environments. With this approach, you can say goodbye to configuration chaos and enjoy a more orderly digital workspace. For more information jump over to the official website or GitHub.

Filed Under: Guides, Top News


Latest timeswonderful Deals

Disclosure: Some of our articles include affiliate links. If you buy something through one of these links, timeswonderful may earn an affiliate commission. Learn about our Disclosure Policy.

Categories
News

Easily integrate AI into your applications for free using CopilotKit

Easily integrate AI into your applications for free using CopilotKit

With new artificial intelligent (AI) applications being developed on a daily basis, staying ahead of the curve is crucial for developers. CopilotKit is a new tool that’s making waves among developers for its ability to seamlessly blend AI into applications. CopilotKit allows developers to create AI-enabled applications by incorporating a GPT-based AI agents into their software. The toolkit has evolved from coding tools like GitHub Copilot to being used in various applications, including productivity software and CRM systems like Salesforce Einstein.

“AI Copilots for your product in hours, not months – CopilotKit

This open-source platform is not just a simple addition to your toolkit; it’s a comprehensive solution that can elevate your projects, whether you’re working on straightforward productivity software or intricate customer relationship management systems. At the heart of CopilotKit is a GPT-based AI core, which is designed to make your applications smarter and more interactive. Imagine creating a program that not only performs tasks but also understands and responds to user needs. That’s the kind of dynamic environment CopilotKit can help you build. With features like Copilot Chat and Copilot Text Area, your applications can become more engaging and intuitive.

AI Copilots

Context – Build smart copilots that understand context.
Actions – Increase productivity and engagement with actions.
Knowledge – Retrieval Augmented Generation (RAG) from any data source.

How to add AI to your apps

The true strength of CopilotKit lies in its ability to integrate with different parts of your application. Whether it’s the user interface, the server-side logic, or connections to other services, CopilotKit is designed to fit right in. This flexibility is key because it lets you tailor the AI’s capabilities to your specific needs, ensuring that the integration is smooth and effective.

Here are some other articles you may find of interest on the subject of integrating and building artificial intelligence powered applications :

One feature that sets CopilotKit apart is its context-aware assistance. This isn’t just an AI that understands code; it understands the situation that the code is used in. This means it can offer relevant suggestions, automate repetitive tasks, and provide support that feels like you’re working with another human. By using retrieval-augmented generation, or RAG, CopilotKit can pull information from various data sources to inform its responses, making it an incredibly useful tool for developers.

Efficiency is at the forefront of what CopilotKit offers. The platform’s debugging features, auto-completion, and context-informed insertions do more than just save time—they improve the quality of your work. These tools help you write better code faster and with fewer mistakes, freeing you up to focus on the more creative aspects of development.

Getting started with CopilotKit is straightforward. You’ll need to be familiar with React for integrating it into the front end, have a code editor like Visual Studio Code, and obtain an API key from OpenAI to access the GPT-based AI. Once you have these components, incorporating CopilotKit into your React application is a breeze. And if you run into any snags, there’s plenty of support available, from GitHub documentation to community forums and dedicated communication channels like Discord.

By choosing to work with CopilotKit, you’re not just developing software; you’re creating intelligent, responsive, and context-aware applications that stand out in today’s digital landscape. This platform is your gateway to the next level of development, where AI is not just a feature but an integral part of the user experience. Embrace the potential of AI with CopilotKit and watch as your applications transform into something truly remarkable.

Filed Under: Guides, Top News


Latest timeswonderful Deals

Disclosure: Some of our articles include affiliate links. If you buy something through one of these links, timeswonderful may earn an affiliate commission. Learn about our Disclosure Policy.

Categories
News

Easily build no-code AI Agent automations using drag-and-drop

build AI automations using no-code drag-and-drop with Flowise

Imagine a world where the power of artificial intelligence (AI) is at your fingertips, even if you’ve never written a line of code. That’s the promise of Flowise, an innovative platform that’s making waves by allowing users to create AI agents with ease. With its intuitive drag-and-drop interface, Flowise is opening doors for those brimming with ideas but lacking in technical skills.

Flowise stands out for its simplicity, enabling users to construct complex language models by arranging components on a digital canvas. This approach is transforming the landscape of AI development, making it accessible to a broader audience, including educators, non-technical individuals, and small businesses. The platform’s user-friendly nature is not just about ease of use; it’s about empowering a diverse group of people to harness the capabilities of AI.

Use Open source LLMs

Run in air-gapped environment with local LLMs, embeddings and vector databases

  • HuggingFace, Ollama, LocalAI, Replicate
  • Llama2, Mistral, Vicuna, Orca, Llava
  • Self host on AWS, Azure, GCP

Flowise AI agent building app

One of the most impressive aspects of Flowise is its ability to process documents. Users can upload documents and let the AI take over, extracting data, responding to questions, or summarizing content. This feature is particularly beneficial for businesses drowning in paperwork, as it automates tedious tasks and frees up staff for more critical, strategic roles.

Build custom AI automations using Flowise

But Flowise’s capabilities don’t end with document processing. The platform also integrates with vector databases like Pinecone and connects with advanced AI models from services such as OpenAI. By using API keys, users can enable their AI agents to perform sophisticated tasks, ranging from conducting semantic searches to generating personalized content recommendations.

The platform is continuously evolving, offering a marketplace with over 100 integrations and ready-to-use templates. These resources are invaluable for users looking to quickly deploy AI agents tailored to a variety of purposes, such as automating customer service or analyzing data.

Flowise App connect LLM is with memory data loaders and more

Getting started with Flowise is straightforward. The platform provides quick start guides to help new users, and for those with some technical background in Docker and Node.js, there’s additional support to make the setup process even smoother. Flowise is committed to staying ahead of the curve, regularly introducing new features and enhancements to ensure users have access to the latest and most effective tools.

Things to consider when building AI Agent automations

  • Define Clear Objectives: Before starting, clarify what you aim to achieve with your AI agent. Whether it’s automating customer service, processing documents, or generating content, a clear understanding of your objectives will guide your design decisions.
  • Identify User Needs: Consider the end-users of your AI agent. Understanding their expectations, challenges, and how they will interact with your AI agent is crucial for creating a user-centric solution.

Design for Scalability and Flexibility

  • Platform Capabilities: Select a no-code platform that supports the type of AI applications you intend to build. Look for features such as integration with large language models, data processing capabilities, and the ability to customize workflows.
  • Integration Options: Your chosen platform should offer easy integration with external APIs, databases, and other tools. This flexibility allows for more complex and powerful automations.
  • Community and Support: A platform with an active community and strong support resources can be invaluable, especially when you encounter challenges or need guidance.
  • Modular Design: Adopt a modular approach to your workflow design, allowing for easy updates and modifications. This approach helps in adapting to changing requirements without needing to overhaul your entire automation.
  • Data Management: Consider how your AI agent will handle data. Efficient data processing, storage, and retrieval mechanisms are crucial, especially for applications that deal with large volumes of information.

Focus on User Experience

  • Simplicity and Intuitiveness: The AI agent should be easy to use, with a clear and intuitive interface. Remember, the end goal is to enhance productivity and provide solutions that meet user needs effectively.
  • Feedback Loops: Incorporate mechanisms for collecting user feedback. This feedback is invaluable for iterative improvement, ensuring that your AI agent remains aligned with user expectations and requirements.
  • Data Protection: Ensure the platform and your AI agent comply with relevant data protection regulations (e.g., GDPR, CCPA). Consider encryption, secure data storage, and access controls to safeguard sensitive information.
  • API Security: When integrating external services, ensure that API keys and credentials are securely managed. Avoid exposing sensitive information within your automation flows.

Testing and Iteration

  • Comprehensive Testing: Test your AI agent thoroughly in various scenarios to ensure reliability and performance. Pay attention to edge cases and unexpected inputs that could disrupt the automation.
  • Iterative Development: Be prepared to iterate on your design based on testing outcomes and user feedback. Continuous improvement is key to maintaining an effective and relevant AI agent.
  • Keep Learning: The field of AI and no-code platforms is rapidly evolving. Stay informed about new tools, best practices, and emerging trends to keep your AI agent automations up-to-date.
  • Be Open to Change: As new technologies emerge, be ready to adapt your AI agent to leverage these advancements. Flexibility and willingness to evolve are crucial for long-term success.

Flowise is a remarkable tool for anyone interested in exploring the possibilities of AI without the need to master complex programming. Its intuitive design, powerful document processing capabilities, and extensive integrations make it a versatile and potent platform for various AI applications. As Flowise continues to grow and improve, it’s clear that it’s a platform worth keeping an eye on for anyone interested in accessible AI solutions.

Filed Under: Guides, Top News


Latest timeswonderful Deals

Disclosure: Some of our articles include affiliate links. If you buy something through one of these links, timeswonderful may earn an affiliate commission. Learn about our Disclosure Policy.

Categories
News

Easily build full stack AI apps using Gradient

Easily build full stack AI applications using Gradient

Developers, engineers and AI enthusiasts looking to build full stack applications powered by artificial intelligence, might be interested to know that the development team at Gradient has introduced a new set of tools known as accelerator blocks. Designed to simplify the process of building full stack AI applications these AI tools are perfect for professionals who want to add sophisticated AI features to their work without getting bogged down by the complexity of the development process.

Gradient’s accelerator blocks come in five distinct types, each serving a specific function: Personalization, Sentiment Analysis, Q&A, Document Summarization, and Entity Extraction. This range of options allows developers to select and customize AI capabilities that best fit the requirements of their projects. Instead of starting from scratch, these pre-built blocks can be used as a foundation, saving valuable time and resources.

Gradient accelerator blocks

One of the standout features of Gradient’s platform is its support for retrieval augmented generation (RAG) collections. This advanced feature enhances the performance of large language models by providing them with additional context, which in turn improves their ability to answer questions accurately. The platform’s versatility is evident in its ability to handle various document formats, including text, PDF, CSV, MD, and DOCX. This flexibility ensures that developers can create RAG collections using a wide range of data, which is essential for developing robust AI models.

How to easily build AI apps

Here are some other articles you may find of interest on the subject of retrieval augmented generation :

Testing AI models is an essential part of the development cycle, and Gradient has made this step easier with a model testing feature that utilizes your uploaded collections. This functionality enables developers to refine their AI applications, ensuring high performance once they are deployed.

Gradient Accelerator Blocks

When it comes to document summarization, Gradient offers developers the ability to control the length of summaries, catering to different information needs. Developers can also train the AI with example summaries to ensure that the output aligns with their quality expectations.

Gradient’s platform is designed with an intuitive user interface, making it accessible to those who prefer a visual method of working with AI features. For those who are more code-savvy, Gradient provides a programmable interface, allowing developers to interact with the platform’s capabilities through code. This dual approach caters to a wide range of users, regardless of their level of technical expertise.

Simplify your AI development process

The tools provided by Gradient for sentiment analysis, personalization, and entity extraction are not just about creating AI workflows; they are also essential for understanding and engaging with audiences effectively. These tools help developers gain insights into user preferences and behaviors, which can be invaluable for tailoring user experiences and improving customer engagement.

A key element of Gradient’s accelerator blocks is their integration. Designed to work in concert, these blocks enable the creation of sophisticated AI workflows that can tackle a multitude of tasks. This integrated approach streamlines the development process, allowing developers to focus on building complex applications with ease.

Currently, Gradient is offering free access to these potent features. Developers can sign up for an account and start using the accelerator blocks right away, taking advantage of the opportunity to enhance their projects with advanced AI capabilities.

For engineers and developers eager to push the boundaries of AI in their applications, Gradient’s accelerator blocks offer a streamlined path to integrating complex AI workflows. With a comprehensive suite of tools at their disposal, developers can focus on what matters most: innovation and creating value. Whether the task at hand involves customizing user experiences, analyzing sentiments, or summarizing documents, Gradient’s technology equips developers to tackle these challenges with efficiency and precisi

Filed Under: Guides, Top News


Latest timeswonderful Deals

Disclosure: Some of our articles include affiliate links. If you buy something through one of these links, timeswonderful may earn an affiliate commission. Learn about our Disclosure Policy.

Categories
News

How to easily fine tune AI to write in your style

How to easily fine tune AI to write in your style

Using the same AI model again and again can produce very similar results. However there are very easy ways to fine-tune artificial intelligence to create better results and write articles, content and even books in your own writing style. Writers now have unprecedented access to sophisticated AI tools that can adapt to their unique styles by fine-tuning AI and the specific requirements of their projects. These fine-tuned AI models are leading the charge, offering a level of personalized assistance that marks a significant shift from the generic AI writing tools that have been available until now.

Generic AI writing tools have their uses, but they often fall short when it comes to capturing an individual’s style or meeting the diverse needs of various writing projects. They are designed to be versatile, but this versatility can come at the expense of a nuanced understanding of language. As a result, the content they produce can sometimes seem impersonal and fail to reflect the author’s unique voice.

Fine tuning AI for more refined results

The personalization of AI in writing is where fine-tuned models shine. These models are trained on datasets that are specifically tailored to certain writing styles or content requirements. This training allows the AI to generate text that not only sounds natural but also captures the intricacies of an author’s voice or the intended tone of a piece. This level of personalization was previously out of reach, but it’s now becoming a reality with fine-tuned AI models. Learn more about how you can find tune your preferred AI models to improve your writing and refine your results thanks to a quick tutorial created by the Nerdy Novelist.

Here are some other articles you may find of interest on the subject of fine tuning AI models :

The expansion of AI writing capabilities doesn’t stop at fine-tuning. Advanced techniques such as prompt engineering and retrieval-augmented generation (RAG) are taking AI writing to new heights. Prompt engineering involves crafting prompts in a way that guides the AI to produce the desired responses. RAG, on the other hand, combines generative AI with information retrieval methods to enhance the accuracy of the content produced.

Even with the most advanced AI, editing the generated text remains a crucial step. To achieve a natural and authentic sound, it’s not enough to simply correct grammatical errors. Editors must also fine-tune the prose to ensure it captures the intended voice and tone, resonating with the target audience.

Fine-tuning AI

Fine-tuning AI models to improve writing and achieve more refined results involves several steps, each tailored to enhance the AI’s ability to mirror specific writing styles, understand nuanced language requirements, and produce content that aligns closely with individual or project-specific needs. This process marks a departure from the use of generic AI writing tools, aiming instead for a personalized writing assistant that can adapt to unique voices and styles. Below is a overview of how to get started fine-tune AI models for writing:

1. Data Collection

The foundation of fine-tuning involves gathering a dataset that reflects the desired writing style or the specific requirements of the writing project. This dataset can include:

  • Books, articles, or other writings by the author to capture their unique style.
  • Industry-specific documents for technical or specialized content needs.
  • High-quality, varied sources that reflect the tone, complexity, and subject matter intended for the AI-generated content.

2. Model Selection

Choosing the right base model is crucial. Larger, more advanced models like GPT-4 offer a broad understanding of language and can be fine-tuned for a variety of applications. The selection should consider:

  • Model capacity, which affects its ability to learn from the fine-tuning dataset.
  • Pre-existing knowledge and how well it aligns with the desired output.
  • Computational requirements for training and deployment.

3. Preprocessing and Data Preparation

Before training, the data must be preprocessed to maximize the model’s learning efficiency. This step includes:

  • Cleaning the data to remove irrelevant or redundant information.
  • Formatting to ensure consistency in how the model receives input during training.
  • Augmentation, in some cases, to enhance the dataset’s diversity without compromising quality.

4. Fine-tuning Process

Fine-tuning adjusts the model’s weights based on the specific dataset prepared for it. Key considerations include:

  • Learning rate: Carefully chosen to balance between retaining pre-learned knowledge and adapting to the new dataset.
  • Epochs: Determining the number of times the model will see the entire dataset to prevent overfitting or underfitting.
  • Evaluation: Using a separate validation set to monitor the model’s performance and adjust training parameters as necessary.

5. Prompt Engineering and Post-processing

After fine-tuning, crafting effective prompts becomes crucial for guiding the AI to generate desired outputs. This involves:

  • Prompt engineering: Designing prompts that clearly convey the task, style, and tone requirements to the AI.
  • Post-processing: Editing and refining AI-generated content to ensure it meets the project’s standards, including style consistency and factual accuracy.

6. Ethical Considerations and Bias Mitigation

Fine-tuning must also address ethical concerns, including:

  • Bias in training data: Ensuring the dataset does not perpetuate harmful stereotypes or biases.
  • Content safety: Implementing filters or checks to prevent the generation of inappropriate or harmful content.

7. Deployment and Iteration

Deploying the fine-tuned model for actual writing tasks, followed by:

  • Feedback loop: Collecting user feedback to identify areas for improvement.
  • Iterative refinement: Continuously updating the model and its training data based on feedback and evolving requirements.

8. Access and Democratization

For individuals and smaller organizations, accessing fine-tuned models can be challenging due to resource requirements. Solutions include:

  • Membership platforms: Providing access to fine-tuned models and resources without needing deep technical knowledge or significant investment.
  • Cloud-based services: Leveraging cloud providers that offer model training and hosting services.

Looking to the future, fine-tuned AI models are set to redefine the role of AI in writing. These tools are overcoming the limitations of generic AI and are tailored to meet the personalized needs of today’s digital age. As platforms that facilitate access to these models become more widespread, they will prove to be invaluable for writers looking to enhance their craft with the support of AI.

The evolution of fine-tuned AI models is a significant step forward in AI-assisted writing. By enabling the creation of content that is personalized and specific to an author’s style, these models address the shortcomings of generic AI tools. They represent a shift towards a future where AI is not just a tool but a collaborative partner in the writing process. The development of platforms that make fine-tuning more accessible is set to make these advanced AI models an essential resource for writers navigating the digital landscape.

Filed Under: Guides, Top News


Latest timeswonderful Deals

Disclosure: Some of our articles include affiliate links. If you buy something through one of these links, timeswonderful may earn an affiliate commission. Learn about our Disclosure Policy.

Categories
News

Easily create AI automations using no-code drag-and-drop

create AI automated workflows using Leap AI

If you are searching for ways to quickly create autonomous AI workflows using an easy-to-use drag-and-drop user interface. To help improve your productivity, business processes or everyday tasks. Leap AI is at the cutting edge of no code AI automations, offering a platform that greatly simplifies the process of creating AI workflows. The Leap AI platform is designed to be user-friendly, allowing even those without a background in coding to design and automate AI-driven processes with ease. By providing an intuitive drag-and-drop interface, Leap AI is making advanced technology more accessible to a wider range of users, from businesses to individual enthusiasts.

At the heart of Leap AI is its visual design dashboard, which is the key to its simplicity. Users can construct complex workflows by dragging and dropping elements, bypassing the need for intricate programming that usually accompanies AI development. This approach is not only user-friendly but also a time-saver, helping users integrate AI into their existing applications or create new automated processes without a steep learning curve.

One of the standout features of Leap AI is its extensive library of templates, which serve as a starting point for various AI projects. These templates are designed to meet a range of needs, making it easier for users to dive into AI without starting from scratch. Additionally, the platform’s compatibility with leading AI models from companies like OpenAI and Microsoft means users can automate a wide array of tasks, from processing text and images to analyzing audio.

Creating no code AI automations using Leap AI

To access workflows, you first need to set up an account at Leap AI and generate an API key. This API key must be included in your request header under the X-Api-Key key to authenticate your account. Leap AI’s integration capabilities extend to large language models, such as those from Hugging Face, which opens up even more possibilities.

Users can engage in a variety of tasks, including summarizing documents, translating spoken language, creating digital avatars, transcribing customer service calls, and automating search engine optimization (SEO) tasks. These capabilities demonstrate the versatility of Leap AI and its potential impact across different industries.

Other articles you may find of interest on the subject of building AI models and automations using artificial intelligence and no-code platforms:

API Access

For developers looking to incorporate AI workflows into their own applications, Leap AI offers API access, which is a critical feature for seamless integration. Workflows can be run within applications using software development kits (SDKs) or direct HTTP endpoint calls. To accommodate different project scales, Leap AI provides a subscription model that includes a free plan, making it suitable for both small experiments and larger projects.

Community support is another pillar of Leap AI’s offering. The platform encourages users to engage with one another, share insights, and improve their AI workflow creation skills through a community supported by Patreon. This emphasis on collaboration and knowledge-sharing is part of what makes Leap AI a valuable resource for those looking to delve into AI.

How to create AI automated workflows

To effectively utilize Leap AI for automating no code AI workflows, follow these steps Or jump over to the official website for the full documentation.

  1. Account Setup and Authentication:
    • Begin by creating an account at the Leap platform through https://app.tryleap.ai.
    • Once your account is set up, generate an API key. This key is crucial as it authenticates your access to the Leap services.
    • For each request you make to the Leap API, include this API key in the request header under the X-Api-Key key to authenticate your account.
  2. Initiating a Workflow:
    • Workflows are initiated either via the SDK’s run method or by sending a POST request to the endpoint https://api.workflows.tryleap.ai/v1/runs.
    • The request body must contain a JSON object that includes:
      • workflow_id: The unique identifier for the workflow you wish to execute.
      • webhook_url: Optionally, a URL where you wish to receive notifications about the workflow’s completion or failure.
      • inputs: A dictionary of inputs required by the workflow, keying each input name to its value.
  3. Understanding the Workflow Run Object:
    • Upon initiating a workflow, the API responds with a Workflow Run object, giving you immediate feedback on the request.
    • If you provided a webhook_url, this object is also sent to that URL upon the workflow’s completion or failure, providing asynchronous updates.
    • The Workflow Run object includes:
      • id: A unique identifier for the workflow run.
      • version_id: Specifies the version of the workflow being executed.
      • status: Indicates the current status of the workflow (completed, running, failed).
      • created_at, started_at, ended_at: Timestamps marking the initiation, actual start, and completion of the workflow.
      • workflow_id: The identifier of the workflow being run.
      • error: Details of any errors that occurred during execution, or null if successful.
      • input: A record of the inputs passed to the workflow.
      • output: The result of the workflow execution, or null if the workflow failed.

Leap AI is a powerful tool for automating business processes and crafting sophisticated no-code AI workflows. Its straightforward, no-code interface, combined with a rich set of features and robust integration options, positions Leap AI as a key resource in the democratization of AI. It caters to both seasoned developers and newcomers to AI, providing the tools and community support needed to bring innovative ideas to life. As AI continues to evolve, platforms like Leap AI are essential in enabling a broader audience to harness the potential of this cutting-edge technology.

Filed Under: Guides, Top News


Latest timeswonderful Deals

Disclosure: Some of our articles include affiliate links. If you buy something through one of these links, timeswonderful may earn an affiliate commission. Learn about our Disclosure Policy.