Categories
News

How to download iPhone maps for offline use

How to download iPhone maps for offline use

With the introduction of iOS 17, Apple has made it possible for iPhone users to download maps for offline use. This feature provides a practical solution for users who may be traveling to areas with unreliable or non-existent internet connections. By downloading maps onto their devices, users can ensure that they will always have access to their desired routes, even if they lose a cellular connection.

Offline maps are more than just a static image of a location. They provide users with a wealth of information, such as hours and ratings for places, turn-by-turn directions, and estimated arrival times. This means that even without a Wi-Fi or cellular connection, users can still navigate and access key information about their surroundings.

Use search in Maps

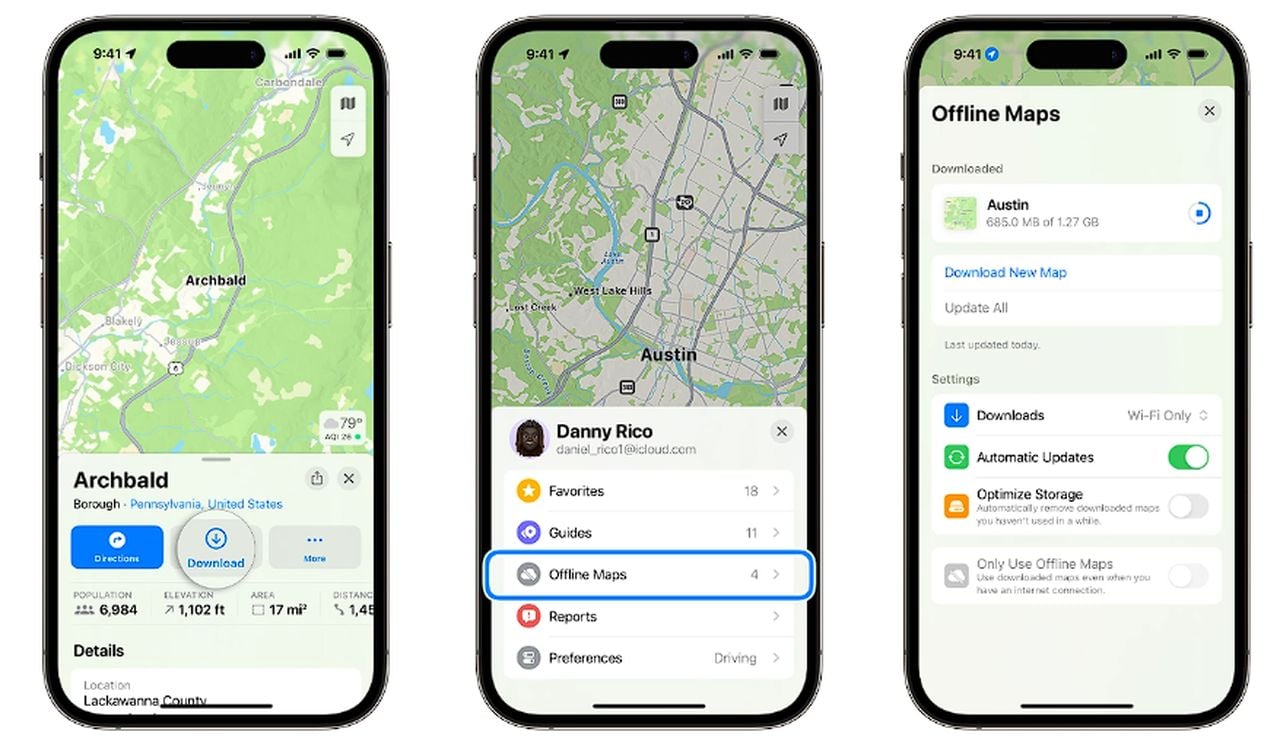
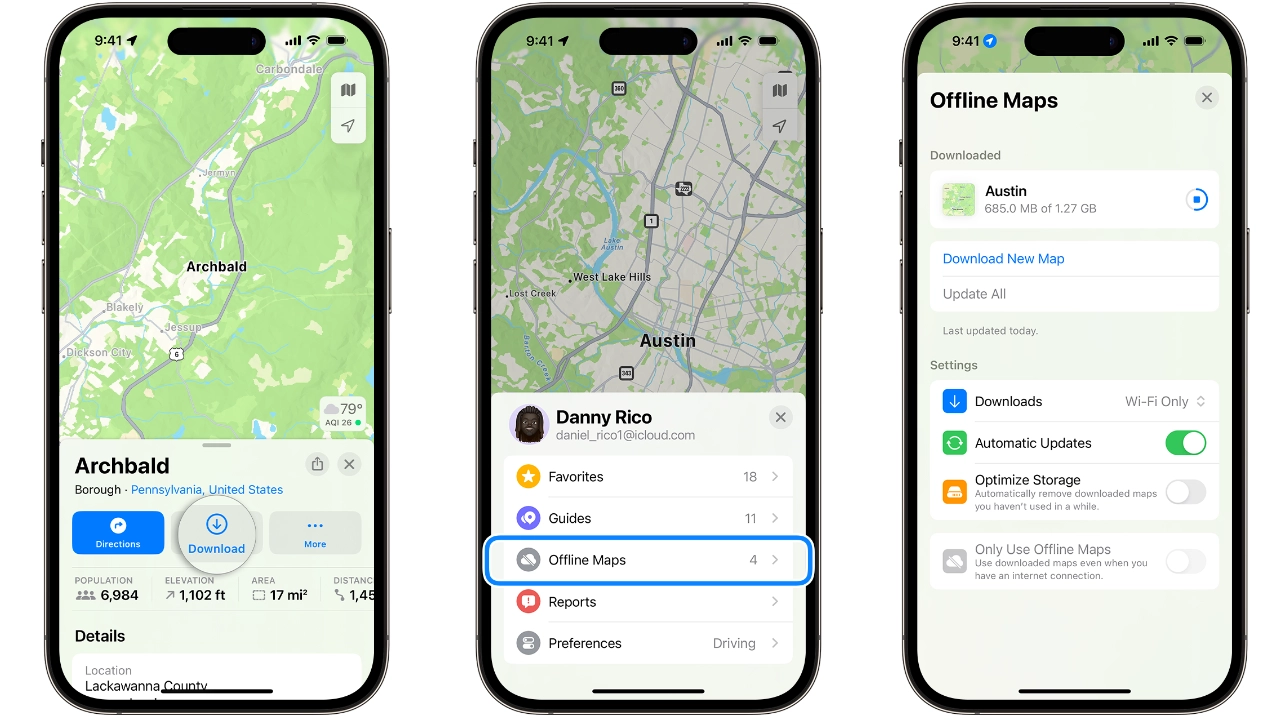
  1. Open the Maps app and search search for a location, then select the place in your search results.
  2. Tap the Download button if it’s available, or tap More then tap Download Map.
  3. You can also adjust the area that you want included in your offline map before you download. To make sure you have the exact area you need.

Drop a pin

  1. Open the Maps app, tap an unmarked area to drop a pin.
  2. Press Download.
  3. Again you can adjust the area that you want included in your offline map before you download. To make sure you have the exact area you need.

Use the offline maps settings

  1. In the Maps app, tap your picture or initials next to the search field.
  2. Select Offline Maps.
  3. Tap Download New Map, or select a map that you previously used or that Maps suggests.
  4. Enter a location or select Current Location.
  5. Adjust the size of the map area, then tap Download.

How to download maps on iPhone

Downloading maps for offline use is a straightforward process. Users can do this by searching for a location in the Maps app, tapping the location in the search results, and then tapping the Download button. Alternatively, they can drop a pin on an unmarked area in Maps, tap Download, and adjust the area to be included in the offline map.

Other articles you may find of interest on the subject of Apple’s latest iPhone 15 :

iPhone storage

However, users should be aware that offline maps consume storage space on their device. To help manage this, the Maps app shows the file size of a potential offline map before it is downloaded. This allows users to make an informed decision about whether they have enough space on their device to accommodate the map.

Once downloaded, offline maps can be viewed on an Apple Watch when the iPhone is on and within Bluetooth range. This provides an additional level of convenience for users who prefer to navigate using their smartwatch.

It’s important to note that offline maps do not sync across devices. They are also only available in select areas and are not intended for use in all regions. Therefore, users may need to plan ahead and download the necessary maps before they travel.

Managing offline maps is also simple. Users can tap their picture or initials next to the search field in the Maps app, tap Offline Maps, and then select the map to edit or delete. This gives users full control over the maps they have downloaded and ensures that they can easily remove any maps they no longer need.

The Maps app also allows users to adjust their offline maps settings. For example, they can choose to download offline maps only when connected to a Wi-Fi network, automatically update offline maps, delete unused offline maps after a certain period, and use downloaded maps even when there is an internet connection.

  1. In the Maps app, tap your picture or initials next to the search field.
  2. Tap Offline Maps.
  3. Under Settings, turn on the setting that you want to use.

The ability to download maps for offline use is a valuable feature for iPhone users. Whether you’re traveling to a remote area with no internet connection or simply want to reduce your data usage, offline maps provide a reliable and convenient solution. With iOS 17 or later, navigating without a Wi-Fi or cellular connection has never been easier.

If you would like to learn more about how to use your iPhone, iPad or MacBook. It might be worth your while jumping over to the official Apple support website. Or booking an appointment with an Apple Genius Bar representative who will be up to provide further advice in person.

Filed Under: Apple iPhone, Top News


Latest timeswonderful Deals

Disclosure: Some of our articles include affiliate links. If you buy something through one of these links, timeswonderful may earn an affiliate commission. Learn about our Disclosure Policy.

Categories
News

iPhone 15 Resident Evil Village gameplay performance tested

iPhone 15 gaming performance tested with Resident Evil Village

The gaming landscape on Apple devices has taken a significant leap forward with the release of Resident Evil Village for the iPhone 15 Pro Max and iPad Pro with M2 Chip. This marks a significant milestone in the evolution of mobile gaming, demonstrating the impressive processing power and graphical capabilities of Apple’s latest iPhone 15 devices.

Resident Evil Village, a port of the PC game, has been released for both the iPhone and iPad. The game’s performance on the iPhone 15 Pro Max and iPad Pro with the M2 Chip highlights the potential for console-quality gaming on Apple’s mobile devices. The game can be played using a USB type-c backbone controller, touch controls, or a Bluetooth controller such as an Xbox or PS4/PS5 controller. This flexibility in control options enhances the gaming experience, catering to different player preferences.

iPhone 15 RE Village gameplay

One of the primary benefits of playing Resident Evil Village on the iPhone 15 Pro Max or iPad Pro with M2 Chip is the extensive settings options available. Players can adjust display options, screen resolution, frame rate, texture quality, and more, allowing for a highly customizable gaming experience. The game also supports connection to a larger display via USB type-c and video out on the iPhone 15 Pro Max, providing an immersive, console-like gaming experience. check out the video created by ETA Prime to learn more about what you can expect from the games performance.

Other articles you may find of interest on the subject of iPhone 15

Performance and gameplay


The game is available for free up to a certain point on the App Store, after which it costs $39.99. This pricing model allows players to try the game before committing to a purchase, offering a taste of the game’s performance on Apple’s mobile devices.

The performance of Resident Evil Village on the iPad Pro with the M2 Chip is particularly noteworthy. The M2 Chip offers more performance than the iPhone 15, providing a smooth and immersive gaming experience. This suggests that the iPad could become a viable platform for high-quality gaming, especially with the recent announcement of the M3 chips for MacBook and iMacs.

Despite the impressive performance of Resident Evil Village on Apple’s mobile devices, there are some areas for improvement. The game is not universally supported on all platforms, with different prices on the App Store for iPhone and iMac. A universal purchase system across Apple devices could be beneficial for users, allowing them to play the game across multiple devices with a single purchase.

The release of Resident Evil Village for the iPhone and iPad is an exciting development in the world of mobile gaming. It not only showcases the impressive capabilities of Apple’s latest devices but also sets the stage for the future of gaming on Apple platforms. With Capcom set to release Resident Evil 4 for iOS and other publishers expected to release games for the platform, the future of mobile gaming on Apple devices looks promising.

Resident Evil Village offers an impressive gaming experience on the iPhone 15 Pro Max and iPad Pro with M2 Chip. With extensive settings options, flexible control options, and impressive performance, it represents a significant step forward for gaming on Apple’s mobile devices. However, a universal purchase system across Apple devices could enhance the gaming experience further, making it more accessible and convenient for players.

Filed Under: Apple iPhone, Top News


Latest timeswonderful Deals

Disclosure: Some of our articles include affiliate links. If you buy something through one of these links, timeswonderful may earn an affiliate commission. Learn about our Disclosure Policy.

Categories
News

How to use iPhone Live Stickers and make your own custom ones

How to make custom iPhone Live Stickers

This quick guide will show you how easy it is to create your very own custom stickers to use on your iOS devices. Making and using personalized Live Stickers on iOS 17 is a fun and interactive way to add a personal touch to your conversations, notes, documents, and more. The new iOS 17 feature allows users to create their own stickers using their personal photos, including live photos for animated stickers. Follow the instructions below to start creating and using Live Stickers on your iPhone and iOS devices. You can also applying effects to them, and sync them across all your Apple devices using iCloud.

Whether you’re sending a message to a friend or family member, or annotating a document for work, Live Stickers can add a layer of personality and fun. The process is simple: select a photo you’d like to turn into a sticker, touch and hold the subject until an outline appears, then tap ‘add sticker’. This will add the created sticker to your sticker drawer, and an options menu will automatically appear.

How to make an iPhone Live Sticker

Converting photos you have taken on your iOS devices into stickers as a simple process just follow the instructions below :

  1. Simply open the Photos app on your iPhone
  2. Open the photo  into full screen by tapping it
  3. Press and hold the item within the photograph you would like to create a sticker from, then tap Add Sticker.
  4. The newly made sticker will now appear in your stickers menu
  5. You can access the sticker from your iPhone onscreen keyboard or Markup tools
  6. To further customize your sticker select the Add Effect menu option to apply a visual effect such as Outline, Comic, or Puffy
  7. When you have finished simply close the stickers menu

How to use iPhone Live Stickers and make your own custom ones

Other articles you may find of interest on the subject of the latest Apple iPhone and iOS 17 :

Convert a Live Photo into an animated sticker

You can also create animated stickers from your iPhone Live Photo. Follow the instructions below to learn how to do so :

  1. Once again open the Photos app on your iPhone
  2. select a Live Photo and open it in full screen
  3. Touch and hold the subject of the Live Photo, slide it up until you see a duplicate image of the subject, then release it
  4. Select the Add Sticker option
  5. Once created the animated sticker will appear in your stickers menu, which you can access when you use the iPhone onscreen keyboard or Markup tools
  6. Select the Add Effect option to apply a visual effect such as Outline, Comic, or Puffy
  7. Once you have finished creating your animated iPhone sticker close the stickers menu

Creating a sticker from a photo is an easy and creative way to personalize your communications. You can use any photo from your library, including live photos for animated stickers. To create a sticker, simply tap on a photo, touch and hold the subject until an outline appears, then tap ‘add sticker’. This will create a live sticker from your selected photo, ready to be used in your messages, notes, documents, and more.

Once you’ve created a sticker, you can further personalize it by applying effects. These effects, such as shiny or puffy, will animate when your iPhone or iPad is rotated, adding an extra layer of interactivity to your stickers. The options menu that appears after creating a sticker will allow you to add these effects.

Creating an animated sticker from a Live Photo is another exciting feature of iOS 17. By selecting a Live Photo as your subject, you can create a sticker that moves, adding a dynamic element to your messages. Just like creating a sticker from a regular photo, touch and hold the subject of the Live Photo until an outline appears, then tap ‘add sticker’.

iOS 17 Live Stickers

One of the most convenient features of the Live Stickers on iOS 17 is their synchronization across devices via iCloud. Once you’ve created a sticker, it will be available across all devices signed into the same Apple ID, thanks to iCloud synchronization. This means you can create a sticker on your iPhone and use it on your iPad, or vice versa, without any extra steps.

Live Stickers can be used in various ways across supported apps and documents. In a conversation, tap the plus button to the left of the text field and choose from your list of stickers in the sticker drawer. You can create a new sticker or tap an existing one to add it to the text field. You can also touch and hold an existing sticker to peel it and then drag it to stick it anywhere on a message bubble. Additionally, Live Stickers can be used on photos, documents, and screenshots using markup, adding a personal touch to your files.

The Live Stickers feature on iOS 17 is a fun, creative, and interactive way to personalize your communications. Whether you’re creating a sticker from a photo, applying effects, or using a live photo for an animated sticker, the process is simple and intuitive. Plus, with iCloud synchronization, your stickers are always available across your devices. So why not add a bit of personality to your messages, notes, documents, and more with personalized Live Stickers?

If you would like to learn more about how to use your iPhone, iPad or MacBook. It might be worth your while jumping over to the official Apple support website. Or booking an appointment with an Apple Genius Bar representative who will be up to provide further advice in person.

Filed Under: Apple, Guides, Top News


Latest timeswonderful Deals

Disclosure: Some of our articles include affiliate links. If you buy something through one of these links, timeswonderful may earn an affiliate commission. Learn about our Disclosure Policy.

Categories
News

How to leave an iPhone video message using FaceTime

How to leave and iPhone video message using FaceTime

With the release of iOS 17 Apple has added a wealth of new functionality, features and enhancements to its mobile operating system. One of which is the ability to now leave FaceTime iPhone video messages and audio if someone misses your call. Once you have left a message your friends and family can even play your message on their Apple Watch, making it even more convenient to stay in touch.

This guide will show you  how to record and send video messages when your FaceTime call is not answered. The first step in leaving a video message on FaceTime is initiating a call. If the person on the other end does not pick up the call, an option appears on the screen to record a video. Upon tapping this option, a countdown begins from 5 to 1, after which you can begin recording your message. The interface is user-friendly, featuring a “Call Again” button and a “Record Video” button for easy navigation.

How to leave and iPhone video message using FaceTime

iPhone recording a video message screen when the person you’re calling is unavailable. With a Call Again button and a Record Video that allows you to record a video message

Once you’ve recorded your message, several options become available. You can choose to send the recorded message immediately by tapping the Up button, or you can opt to rerecord the message if you’re not satisfied with the initial recording. There’s also an option to save the video message to your Photos app for future use. After sending the video message, the recipient is notified of the message.

Other articles we have written that you may find of interest on the subject of Apple’s iOS 17 mobile operating system :


Interestingly, FaceTime’s video message feature is not limited to iPhones and iPads. Recipients can even play these messages on their Apple Watch, making it a versatile tool for communication across various Apple devices. To do this, they simply need to open the notification center, tap on the message, and hit play to watch the video.

Live Voicemail

In the US and Canada, there’s an additional feature for FaceTime audio calls known as Live Voicemail. If the person you’re calling doesn’t answer, and you’re a known contact, you’re prompted to leave a voicemail. If the recipient has Live Voicemail turned on in their settings, your message is transcribed on their screen in real time, giving them an idea of what you’re calling about and the option to pick up your call.

Live Voicemail is available only in English in the U.S. and Canada, excluding Guam, Puerto Rico, and the U.S. Virgin Islands.

It’s important to note that there are some restrictions to these features. For instance, you can only receive video messages from saved contacts, people you’ve called, and people suggested by Siri. Moreover, not all countries or regions have access to FaceTime. Therefore, availability may vary depending on your location.

IOS 17’s FaceTime video message feature offers a unique way to communicate and stay connected with friends and family. Whether you’re leaving a heartfelt message for a loved one or sending a quick update to a colleague, this feature ensures your messages are delivered and received in a personal and engaging way.

If you would like to learn more about how to use your iPhone, iPad or MacBook. It might be worth your while jumping over to the official Apple support website. Or booking an appointment with an Apple Genius Bar representative who will be able to provide further advice in person.

Filed Under: Apple, Guides, Top News


Latest timeswonderful Deals

Disclosure: Some of our articles include affiliate links. If you buy something through one of these links, timeswonderful may earn an affiliate commission. Learn about our Disclosure Policy.

Categories
News

How to customize your iPhone with iOS 17

customize iOS 17

This guide will show you how to customize your iPhone with iOS 17.Apple’s iOS 17 brings a number of new customization features to the iPhone, giving users more control over the look and feel of their devices. Here’s a quick guide on how to customize your iPhone with iOS 17:

Lock screen

  • Change your wallpaper: To change your lock screen wallpaper, go to Settings > Wallpaper > Lock Screen. You can choose from a variety of built-in wallpapers, or use your own photos or videos.
  • Add widgets: iOS 17 allows you to add widgets to your lock screen for the first time. To do this, long-press on the lock screen and tap the + button. You can then choose from a variety of widgets, such as weather, calendar, and fitness.
  • Customize the clock: You can also customize the clock on your lock screen. To do this, long-press on the clock and tap Customize. You can then change the font, color, and size of the clock.

Home screen

  • Arrange your apps: To arrange your apps on the home screen, simply tap and hold on an app and drag it to a new location. You can also create folders to organize your apps.
  • Add widgets to the Home Screen: You can also dd widgets to the Home Screen on your iPhone like you can with the Lock Screen.
  • Hide apps: If you don’t want to see certain apps on your home screen, you can hide them. To do this, long-press on an app and tap Remove App. Then, tap Move to App Library. Apps that you move to the App Library will still be available on your device, but they will be hidden from the home screen.

Other customization options

In addition to the lock screen and home screen, you can also customize a number of other aspects of your iPhone with iOS 17. For example, you can change the font and size of the text on your device, change the accent color, and change the sounds that your iPhone makes.

To change these settings, go to Settings > General. You can then scroll down to find the settings that you want to change.

Here are some additional tips for customizing your iPhone with iOS 17:

  • Use themes: Themes are a great way to quickly change the look and feel of your iPhone. You can find a variety of themes for free and paid in the App Store.
  • Use Shortcuts: Shortcuts is a powerful app that allows you to create custom actions. You can use Shortcuts to create custom widgets, icons, and more.
  • Use third-party apps: There are a number of third-party apps that can help you customize your iPhone. For example, apps like Widgetsmith and Color Widgets allow you to create custom widgets, while apps like MD Blank and Shortcut Maker allow you to create custom icons.

With iOS 17, there are more ways than ever to customize your iPhone. By following the tips above, you can create a device that is truly unique to you. At the time of writing this guide the current version of iOS is 17.0.3, Apple will be releasing iOS 17.1 shortly and it will land on the 24th of October 2023. We hope that you find out guide helpful, if you have any comments, tips you want to share, or any questions, please let us know in the comments section below.

Image Credit: Amanz

Filed Under: Apple, Apple iPhone, Guides


Latest timeswonderful Deals

Disclosure: Some of our articles include affiliate links. If you buy something through one of these links, timeswonderful may earn an affiliate commission. Learn about our Disclosure Policy.

Categories
News

iPhone 15 and 15 Pro 80 percent battery charging explained

iPhone 15

Apple’s iPhone 15 and 15 Pro have come with a range of new features, is includes a new optional 80% charge limit for the battery.. This feature is a departure from traditional charging behavior, and it has left many users wondering what it’s all about. In this article, we’ll delve into the purpose, impact, and potential trade-offs of this intriguing new feature.

Firstly, it’s important to note that the 80% charge limit is currently only available on the iPhone 15 and 15 Pro models. While Apple has not explicitly stated why this feature hasn’t been extended to other iPhones with similar processors, it’s a point of interest that could indicate the company’s future direction in battery management.

Contrary to popular belief, enabling the 80% charge limit doesn’t mean your iPhone will always stop charging at 80%. Instead, Apple’s system will occasionally charge the phone to 100% to maintain accurate battery statistics. This nuanced approach aims to balance the benefits of limiting the charge with the need for precise battery metrics.

Apple has not officially commented on the purpose of the 80% charge limit, but speculation suggests that it’s designed to extend the physical battery’s lifespan. By not consistently charging the battery to its maximum capacity, the feature could reduce wear and tear, thereby prolonging its life. This aligns well with Apple’s sustainability goals, potentially reducing the frequency with which users need to replace their iPhone batteries.

The real-world impact of the 80% charge limit on daily usage is still under evaluation. Initial observations indicate that even with an 80% charge, the iPhone 15 and 15 Pro can last between 6-8 hours of on-screen time. While this may be sufficient for some users, others who require longer battery life may find it limiting.

The feature’s effectiveness in preserving battery health is yet to be conclusively determined. A long-term evaluation is underway, with plans to report back in a year with comprehensive findings. This will provide valuable insights into whether the 80% charge limit is more than just a novel feature and actually contributes to extending battery lifespan.

The 80% charge limit on the iPhone 15 and 15 Pro is a feature that has intrigued many and left some scratching their heads. While its primary aim appears to be prolonging battery lifespan, the real-world impact on daily usage and long-term effectiveness is still under scrutiny. As we await more comprehensive evaluations, this feature remains a fascinating glimpse into Apple’s ongoing efforts to innovate and prioritize sustainability.

Source & Image Credit: iDevicehelp

Filed Under: Apple, Apple iPhone


Latest timeswonderful Deals

Disclosure: Some of our articles include affiliate links. If you buy something through one of these links, timeswonderful may earn an affiliate commission. Learn about our Disclosure Policy.

Categories
News

What’s inside the iPhone 15 (Video)

iPhone 15

We previously saw a teardown video of the iPhone 15 Pro and 15 Pro Max and now we get to find out what is inside the iPhone 15 in a new video from JerryRigEveything.

The video below gives us a look inside the iPhone 15 and it is interesting to see how the handset is put together and designed and also what materials and parts are used in the device.

As a reminder the iPhone 15 6.1-inch screen that boasts a 60Hz refresh rate. Under the hood, it runs on the Apple A16 Bionic chip and offers 6GB of RAM. Notably, this is the same processor found in last year’s iPhone 14 Pro models.

The handset comes with a 48-megapixel primary camera, a 12-megapixel ultrawide lens, and a 12-megapixel front-facing camera for selfies and video conferencing., and this year’s iPhones also feature USB-C, which has been wanted by iPhone users for a considerable amount of time.

Apple’s iPhones are designed to be more repairable than they used to be, and although there is still some way to go for them to be easily repairable by everyone, Apple now offers tools to allow you to repair your own device at home as part of its self repair program.

Source & Image Credit JerryRigEveything

Filed Under: Apple, Apple iPhone


Latest timeswonderful Deals

Disclosure: Some of our articles include affiliate links. If you buy something through one of these links, timeswonderful may earn an affiliate commission. Learn about our Disclosure Policy.

Categories
News

How to use Interactive Widgets in iOS 17 on the iPhone

Interactive Widgets

This guide will show you how to set up Interactive Widgets on the iPhone, you will need to be running the latest iOS 17 to use this feature. Interactive widgets are a new feature in iOS 17 that allows you to interact with your widgets directly from the home screen. This can be a huge time-saver, as it eliminates the need to open the app associated with the widget.

To use interactive widgets:

  • Tap and hold anywhere on the home screen until the icons start to jiggle.
  • Tap the “+” button in the upper-left corner of the screen to add a widget.
  • Browse the list of available widgets and select the one you want to add.\
  • Choose the size of the widget and tap “Add Widget.”
  • Once the widget is added to your home screen, tap on it to interact with it.

Here are some examples of how to use interactive widgets:

  • Music widget: Play, pause, skip, and go back to previous tracks without opening the Music app. You can also use the widget to adjust the volume, create a new playlist, or shuffle your music library.
  • Podcasts widget: Play, pause, skip, and go back to previous episodes without opening the Podcasts app. You can also use the widget to subscribe to new podcasts, mark episodes as played, and delete episodes.
  • Reminders widget: Mark reminders as complete or incomplete, add new reminders and view upcoming reminders without opening the Reminders app. You can also use the widget to snooze or delete reminders.
  • Home widget: Control your smart home devices without opening the Home app. You can turn on and off lights, adjust the thermostat, lock and unlock doors, and more.
  • Calendar widget: Create new events, view upcoming events, and edit existing events without opening the Calendar app. You can also use the widget to switch between different calendar views and search for events.
  • Weather widget: View the current weather conditions, forecast, and air quality index without opening the Weather app. You can also use the widget to add locations to your favorites and view weather alerts.

Here are some additional tips for using interactive widgets:

  • To resize a widget, tap and hold on it until the quick actions menu appears. Then, tap “Edit Widget.”
  • To move a widget, tap and hold on it until it starts to jiggle. Then, drag it to the desired location.
  • To delete a widget, tap and hold on it until the quick actions menu appears. Then, tap “Remove Widget.”

You can also add interactive widgets to the lock screen in iOS 17. To do this, follow these steps:

  • Swipe to the leftmost lock screen page.
  • Tap the “Customize” button.
  • Tap the “+” button in the upper-right corner of the screen to add a widget.
  • Browse the list of available widgets and select the one you want to add.
  • Choose the size of the widget and tap “Add Widget.”

Once the widget is added to your lock screen, you can tap on it to interact with it.

You can use multiple widgets for the same app. For example, you could have a large music widget on your home screen that shows the album artwork and playback controls, and a smaller music widget on your lock screen that shows the song title and artist.

You can stack widgets on top of each other to save space on your home screen. To do this, drag one widget on top of another. You can then swipe up or down to view the different widgets in the stack.

You can customize the appearance of some interactive widgets. For example, you can change the color of the background or the font of the text. To do this, tap and hold on the widget and then tap “Edit Widget.”

Interactive widgets are a powerful new feature in iOS 17 that can help you save time and be more productive. By following the tips above, you can learn how to use interactive widgets to the fullest. We hope that you find this guide on how to use Interactive Widgets in iOS 17 helpful, if you have any comments, tips or questions, please leave a comment below and let us know. You can find out more details about all of the new iOS 17 features over at Apple’s website.

Filed Under: Apple, Apple iPhone, Guides


Latest timeswonderful Deals

Disclosure: Some of our articles include affiliate links. If you buy something through one of these links, timeswonderful may earn an affiliate commission. Learn about our Disclosure Policy.

Categories
News

How to create a Personal Voice on the iPhone or iPad with iOS 17

personal voice ios 17

This guide is designed to show you how to create a personal voice on the iPhone or iPad with iOS 17. This is a new feature that was recently introduced with the release of the iOS 17 and iPadOS 17 software updates.

This feature allows you to create a synthesized voice that sounds eerily similar to your own, offering a more personalized experience when communicating with family and friends. Whether you’re using FaceTime, phone calls, or assistive communication apps, your Personal Voice can be your new digital identity. In this article, we’ll guide you through the step-by-step process of setting up your Personal Voice on iOS 17.

Prerequisites

Before diving into the setup process, make sure you meet the following requirements:

  • Operating System: iOS 17, iPadOS 17, or macOS Sonoma or later
  • Device Compatibility:
    • iPhone 12 or later
    • iPad Air (5th generation)
    • iPad Pro 11-inch (3rd generation) or later
    • iPad Pro 12.9-inch (5th generation) or later
    • Mac with Apple silicon
  • Security: Face ID, Touch ID, or a device passcode or password
  • Language: Currently, Personal Voice is available only in English.

Creating Your Personal Voice

On iPhone or iPad

  1. Open Settings: Navigate to the Settings app on your device. Tap on ‘Accessibility’, then tap on ‘Personal Voice’.
  2. Initiate Setup: Tap on ‘Create a Personal Voice’.
  3. Follow Instructions: The on-screen instructions will guide you through recording your voice. You’ll need to read a series of randomly chosen text prompts to record approximately 15 minutes of audio.

To Pause and Resume

  • Pause: Tap ‘Done’ or close the Settings app. Your progress will be saved.
  • Resume: Go back to Settings > Accessibility > Personal Voice, tap the voice you want to continue creating and tap ‘Continue Recording’.

On Mac

  1. Navigate to System Settings: Click on the Apple menu > System Settings, then click on ‘Accessibility’ in the sidebar and select ‘Personal Voice’.
  2. Initiate Setup: Click on ‘Create a Personal Voice’.
  3. Follow Instructions: Just like on iOS, you’ll be guided through the recording process.

To Pause and Resume

  • Pause: Click ‘Done’. Your progress will be saved.
  • Resume: Go back to System Settings > Accessibility > Personal Voice, click the ‘Show Detail’ button next to the voice you want to continue creating, and click ‘Continue Recording’.

Deleting a Personal Voice

If you wish to delete a Personal Voice, you can do so but be aware that it cannot be recovered.

On iPhone or iPad

  1. Open Settings > Accessibility > Personal Voice.
  2. Tap the voice you want to delete.
  3. Authenticate using Face ID, Touch ID, or enter your passcode.
  4. Tap ‘Delete Voice’ and confirm.

On Mac

  1. Navigate to System Settings > Accessibility > Personal Voice.
  2. Click the ‘Show Detail’ button next to the voice you want to delete.
  3. Enter your password.
  4. Click ‘Delete Voice’ and confirm.

Additional Features

  • Live Speech: Type to speak using your Personal Voice.
  • Share Across Devices: Sync your Personal Voice to other devices signed in to iCloud with your Apple ID.
  • Privacy and Security: Your Personal Voice is encrypted and stored securely on your device.

Summary

Creating a Personal Voice in iOS 17 is a straightforward process that offers a more personalized and secure way to interact with your digital world. With just a few steps, you can have a synthesized voice that sounds just like you, enhancing your communication experiences. You can find out more details about the Personal Voice Feature for the iPhone and iPad over at Apple’s website.

Filed Under: Apple, Apple iPad, Apple iPhone, Guides


Latest timeswonderful Deals

Disclosure: Some of our articles include affiliate links. If you buy something through one of these links, timeswonderful may earn an affiliate commission. Learn about our Disclosure Policy.

Categories
News

The Ultimate Storage Solution: iPhone 14 Plus Offers a Max 1TB Option

In today’s world where smartphones dominate in many areas, Apple continues to excel and push through many boundaries with its latest offering, the iPhone 14 Plus. Packed with innovative features and technology, this device aims to redefine the way we use and store data on our mobile devices. One standout feature of the iPhone 14 Plus is its incredible storage capacity, boasting a maximum option of 1TB.

Unleashing the Power of 1TB

With the iPhone 14 Plus, Apple has taken storage capabilities to a whole new level. The introduction of a max 1TB storage option allows users to store an extensive amount of data conveniently on their mobile device. Whether it’s high-resolution photos, videos, or a vast library of apps, the iPhone 14 Plus ensures that storage limitations become a thing of the past.

Endless Possibilities with Abundant Space

The generous 1TB storage capacity opens up a world of possibilities for iPhone 14 Plus users. Imagine having your entire music collection readily accessible, without the need for additional cloud storage or constant shuffling of files. With 1TB at your disposal, you can capture countless memories with the device’s exceptional camera capabilities, recording videos in stunning 4K resolution without worrying about running out of space.

For content creators, the iPhone 14 Plus becomes an invaluable tool with its expansive storage capacity. The ability to shoot, edit, and store high-quality videos directly on the device allows professionals to streamline their workflow and maintain a seamless creative process. With up to 1TB of storage, filmmakers, photographers, and designers can carry their entire portfolio in their pocket, ready to showcase their work at any moment.

Enhanced Gaming Experience

Gamers will also benefit greatly from the iPhone 14 Plus’ massive storage capacity. With the rise of graphically intensive mobile games, the ability to install and run multiple titles without worrying about storage limitations becomes crucial. The 1TB option ensures that gaming enthusiasts can have a vast library of games readily available, providing endless entertainment on the go.

Seamlessly Sync with Other Apple Devices

Aside from their powerful processors, Apple is renowned for its no-hassle integration across many platforms and devices. The iPhone 14 Plus is no exception. With its extensive storage capacity, users can effortlessly sync their data, including photos, videos, and documents, across their iPhone, iPad, and MacBook. This streamlined experience ensures that you can access your files from any device, eliminating the need for cumbersome transfers or relying solely on cloud storage.

Security and Peace of Mind

With the increasing amount of personal data stored on our smartphones, security is a top concern for many users. The iPhone 14 Plus addresses this concern by incorporating advanced encryption technology to safeguard your data. Additionally, the ample storage capacity allows for regular backups, ensuring that important files and memories are protected and easily restorable.

Final Thoughts

The iPhone 14 Plus sets a new benchmark for smartphone storage capabilities with its maximum 1TB option. Whether you’re an avid content creator, a passionate gamer, or simply someone who wants the freedom to store an extensive library of media, this device offers the ultimate storage solution. With its seamless integration within the Apple ecosystem, enhanced security features, and unparalleled convenience, the iPhone 14 Plus is a game-changer in the world of mobile devices.

As technology continues to advance, Apple’s commitment to innovation ensures that its devices stay ahead of the curve. The iPhone 14 Plus is a testament to this dedication, providing users with a storage option that opens up a world of possibilities. Say goodbye to storage constraints and embrace the freedom of having a 1TB powerhouse in the palm of your hand.