Categories
News

How to build AI apps visually with no coding required

How to build AI apps visually with no coding required

In the rapidly evolving world of artificial intelligence (AI), the ability to quickly and efficiently prototype AI applications is more important than ever. For those who are excited about the potential of AI but are not well-versed in coding, Ironclad’s Rivet offers a compelling solution. This platform allows users to create complex AI prototypes without writing a single line of code, using a graphical interface that simplifies the entire process.

Ironclad’s Rivet is a tool that is changing the way we approach AI application development. It is designed for individuals who may not have a background in programming but still want to participate in creating sophisticated AI systems. The graphical interface of Rivet focuses on the design and functionality of the application, removing the need to understand complex programming languages.

Rivet is a visual programming environment for building AI agents with LLMs. Iterate on your prompt graphs in Rivet, then run them directly in your application. With Rivet, teams can effectively design, debug, and collaborate on complex LLM prompt graphs, and deploy them in their own environment.

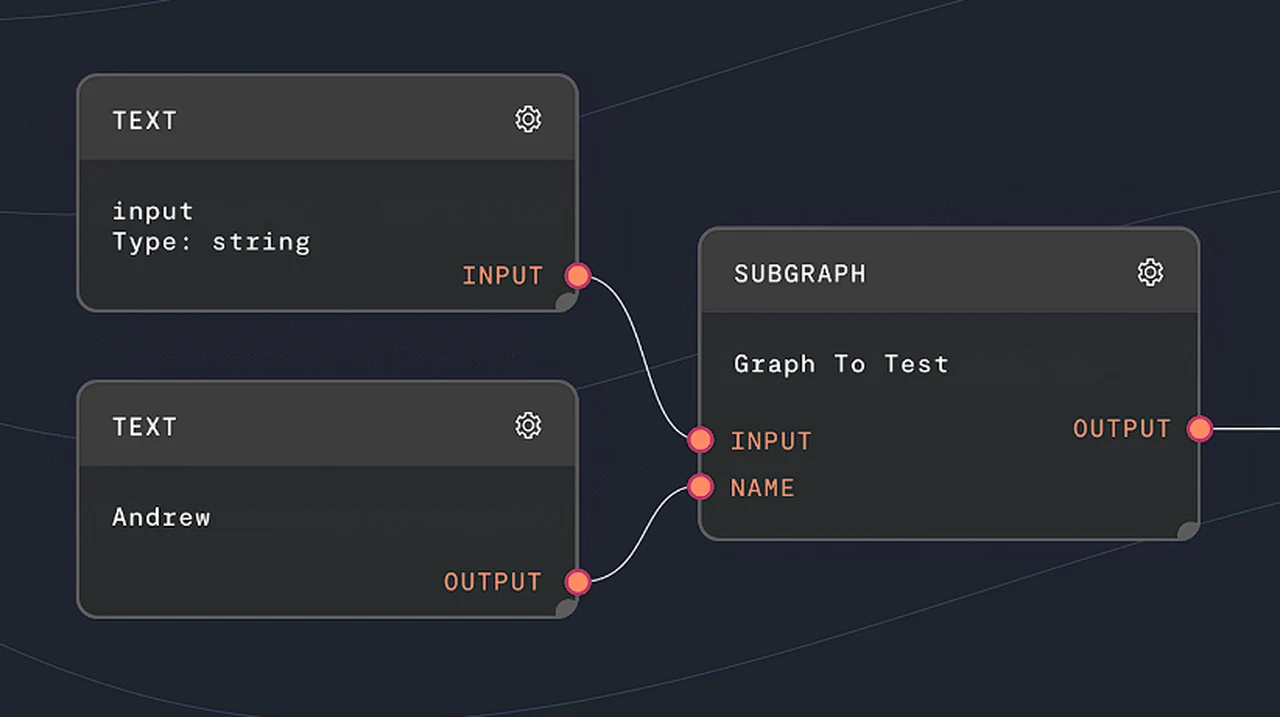
Getting started with Rivet is incredibly simple. The installation process is quick and straightforward, and once installed on your laptop, you’ll be greeted with a user-friendly interface. This interface allows you to begin building your AI application by simply dragging and dropping different components to where they need to be.

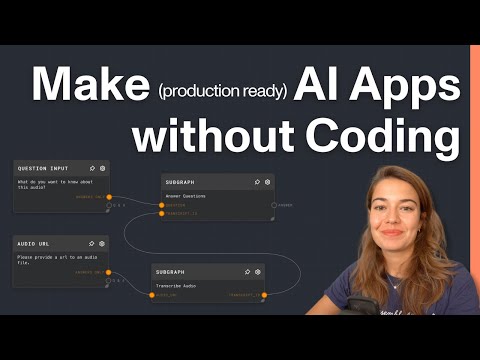
Build AI apps visually with no-code

Here are some other articles you may find of interest on the subject of no code AI tools and projects :

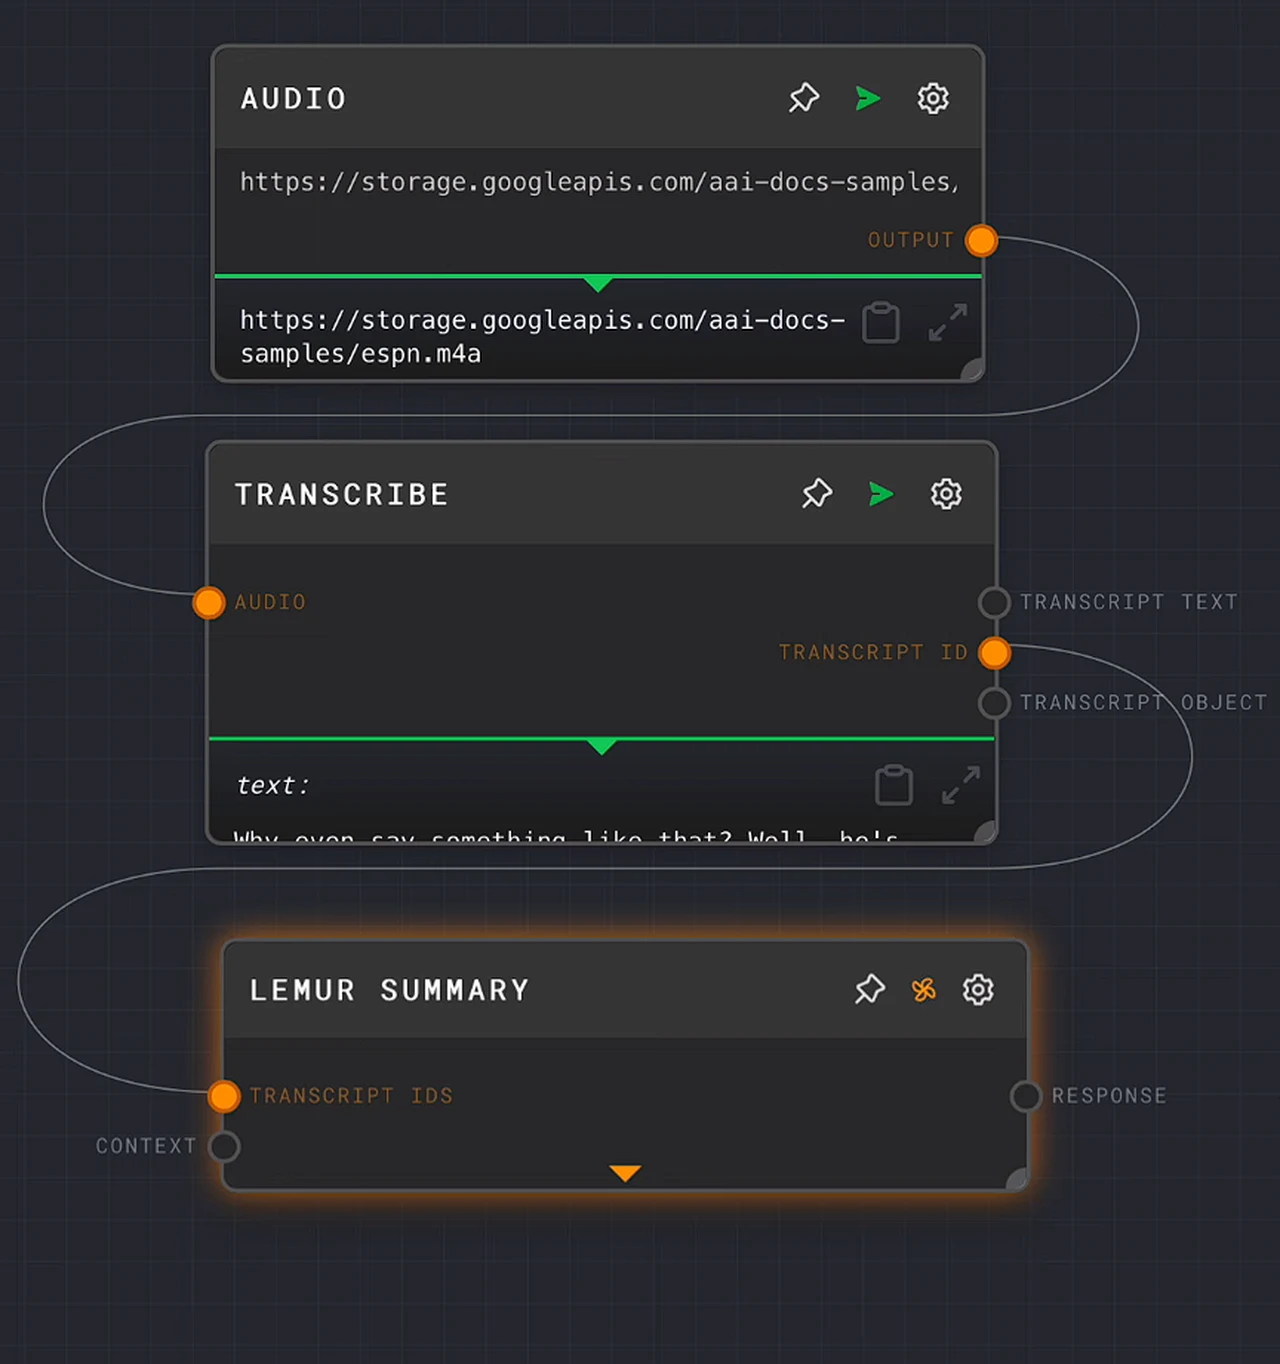
One of the key features of Rivet is its ability to integrate with other services, such as Assembly AI. This integration can significantly enhance your application’s capabilities, such as adding audio transcription and interactive Q&A features. To use these services, you’ll need to obtain an API key from Assembly AI’s website, which ensures a secure connection between Rivet and the services provided by the plugin.

Rivet’s environment is designed to be modular, meaning you can create separate graphs for different functions within your application. For example, you might have one graph for handling audio transcription and another for managing the Q&A functionality. This modular approach not only makes your application more flexible but also allows it to scale more easily as you add more features.

The process of using Rivet is intuitive. You start by inputting an audio URL, which the Assembly AI plugin then transcribes. Following this, you can ask a question, and Rivet will provide an answer in text form. This demonstrates the seamless integration of services like Assembly AI into your application, making it easier to build powerful AI features.

assembly AI plugin for Rivet

An important aspect of creating effective AI responses is prompt engineering. This involves crafting questions in a way that elicits the most accurate and relevant answers from your AI model. Mastering this technique is vital for ensuring that your AI prototypes perform optimally and deliver the results you’re looking for.

For those who want to take their Rivet graphs to the next level, integrating them into larger projects is possible with technologies like Node.js. Node.js is a popular runtime environment that allows you to incorporate the graphs you’ve created in Rivet into web applications or other software projects, significantly expanding the potential uses of your AI prototypes.

Ironclad’s Rivet provides a powerful and accessible platform for those interested in AI prototyping but who may lack coding expertise. By utilizing the steps provided, from the initial installation to becoming proficient in prompt engineering, you can develop and refine AI functionalities such as audio transcription and interactive Q&A.

The combination of Rivet’s graphical development environment with integrations like Assembly AI and Node.js ensures that your entry into AI prototyping is efficient and effective. With tools like Rivet, the barrier to entering the world of AI is lower than ever, opening up opportunities for innovation and creativity in a field that continues to grow and influence our world in countless ways.

Image Credit : Ironclad

Filed Under: Guides, Top News


Latest timeswonderful Deals

Disclosure: Some of our articles include affiliate links. If you buy something through one of these links, timeswonderful may earn an affiliate commission. Learn about our Disclosure Policy.

Categories
News

Using Duet AI to rapidly build web apps

Using Duet AI to rapidly build in-house web apps

If you need to build complex web applications focusing on reliability, scalability and security. You’re navigating through a maze of decisions, from selecting the right computing resources to ensuring your app can handle sudden surges in traffic. Now, picture having a knowledgeable assistant by your side, one that’s powered by artificial intelligence and deeply integrated with Google Cloud’s suite of tools. This is where Gooogle Duet AI comes into play, offering a helping hand to cloud architects and web app developers.

As you dive into the world of multi-tier web applications, you’ll find that Google Duet is not far out of reach. It’s built right into the Cloud Console toolbar, and for those who prefer working in their favorite coding environments, it’s also available through extensions in IDEs such as Visual Studio Code. This seamless integration means you can access Duet AI’s guidance without ever leaving the comfort of your development setup.

One of the first decisions you’ll face is selecting the appropriate compute tier for your application. It’s a balancing act between performance needs and budget constraints. Duet steps in to analyze factors like the level of service management you require and the expected volume of internet traffic. With its deep understanding, it can recommend whether a standard tier is adequate or if a more robust option is necessary to meet your application’s demands.

Building web apps with Duet AI

For web applications, the ability to scale automatically is crucial. Services like Cloud Run are designed to handle varying amounts of requests, but how do you configure them effectively? Duet AI provides insights into the right auto-scaling settings, ensuring your app can respond to user demand without incurring unnecessary costs.

Security is a top priority, and you’ll want to make sure that only authorized users can access your application. Duet AI can guide you through the process of setting up these security measures, helping to protect your app from unwanted intrusions.

When it comes to deploying web apps, especially those built with frameworks like Django, you might be considering containerization or using Docker files. Duet AI is ready to discuss these options with you, and it might even suggest more efficient deployment strategies that you hadn’t considered.

The performance of your web application can be greatly enhanced by a well-thought-out caching strategy. Duet AI points you towards managed services that handle caching and shows you how to establish private communication between Cloud Run and Cloud Memorystore using a serverless VPC access connector.

Selecting the right data storage solution is another critical step in the design process. Google Duet is there to help, often recommending Cloud SQL and tailoring its advice to fit the specific needs of your application and the expertise of your team.

Finally, Duet AI doesn’t just leave you with a list of recommendations; it assists you in integrating services like Cloud Run, Cloud Memorystore, and Cloud SQL to ensure a smooth deployment experience. Duet AI is an invaluable asset for cloud architects. It offers sophisticated analysis and support, enabling you to design and deploy multi-tier web apps on Google Cloud with confidence. To explore Duet’s workflows and features further, you can visit the Google Cloud website and see firsthand how it can enhance your design process.

Here are some other articles you may find of interest on the subject of Google Duet AI :

Filed Under: Guides, Top News


Latest timeswonderful Deals

Disclosure: Some of our articles include affiliate links. If you buy something through one of these links, timeswonderful may earn an affiliate commission. Learn about our Disclosure Policy.

Categories
News

Build generative AI apps quickly using Google MakerSuite

Build generative AI apps quickly using Google MakerSuite

At the core of today’s most innovative AI tools are LLMs, which can understand and generate text that seems remarkably human-like. Google MakerSuite brings these powerful models to your fingertips, offering a space for you to invent and build applications that leverage the strengths of LLMs. Whether you’re aiming to develop a responsive chatbot, an advanced data analysis tool, or a creative writing aid, MakerSuite provides the foundation for your inventive projects.

What distinguishes MakerSuite is its no-code philosophy. You can design and prototype your applications without writing any code. This inclusive approach democratizes AI application development, allowing you to focus on the creative aspects of your projects. With MakerSuite, the technical barriers that once hindered innovation are removed, creating an inviting environment where your AI ideas can take root and grow.

Introduction to Google MakerSuite

Here are some other articles you may find of interest on the subject of Google AI :

A key aspect of MakerSuite is the ability to experiment with different prompts. These prompts are how you communicate with the LLM, guiding it to understand and execute the tasks you have in mind. MakerSuite offers three distinct interfaces for creating these prompts:

Text Prompts: Ideal for creative and unstructured tasks, text prompts let you interact with the LLM in a versatile manner. Your imagination sets the boundaries—ask the model to generate anything from stories to code snippets.

Data Prompts: For applications that require a more structured approach, data prompts are the answer. They are designed for tasks involving structured, tabular few-shot prompts, ensuring the LLM processes data according to your precise needs.

Chat Prompts: If you’re looking to create conversational experiences, chat prompts are your go-to tool. They enable you to prototype applications that can engage with users in a smooth, conversational style, emulating human interaction.

Your experience with MakerSuite doesn’t end with prototyping. Thanks to the PaLM API, you can convert your prototypes into Python code, paving the way for further development and integration into larger systems. This seamless transition from a no-code environment to a coding space means that your initial ideas can evolve into complex, real-world applications.

MakerSuite and Python

At its core, MakerSuite is engineered to simplify the complexities inherent in working with large language models. If you are wondering how it achieves this, the answer lies in its user-friendly interface. MakerSuite empowers you to:

  1. Efficiently Engineer Prompts: Crafting effective prompts for LLMs can be challenging. MakerSuite provides an intuitive environment for prompt engineering, ensuring that your applications are responsive and accurate.
  2. Prototype with Ease: Whether it’s a travel itinerary generator or a passage summarizer, MakerSuite allows you to quickly prototype your ideas. This feature is particularly beneficial if you’re looking to validate and refine your application concept.
  3. Export and Expand: Once you’re satisfied with your prototype, MakerSuite lets you export your code. This means you can take your project beyond the prototyping phase and build a fully-fledged application using Google’s generative language API.

Google MakerSuite Workshop

The user interface of MakerSuite is designed to be intuitive. A tutorial video available with the tool walks you through every step of the process. This guidance is invaluable, especially if you’re new to working with LLMs. You’ll find that navigating the platform and implementing your ideas is a streamlined process, devoid of unnecessary complexities.

Starting with Google MakerSuite is straightforward. You’ll need a Workspace account, and if you’re eager to try out the latest features, you might want to enable Early Access apps. These apps, developed by Google’s own teams, showcase MakerSuite’s potential and can inspire your own projects.

Google MakerSuite is your gateway to the world of LLMs, offering an accessible platform for anyone interested in exploring AI-driven application development. Its no-code foundation and versatile prompt interfaces give you the power to transform your concepts into prototypes and, eventually, into concrete solutions.

Filed Under: Guides, Top News


Latest timeswonderful Deals

Disclosure: Some of our articles include affiliate links. If you buy something through one of these links, timeswonderful may earn an affiliate commission. Learn about our Disclosure Policy.

Categories
News

Build Raspberry Pi audio and video projects using the PicoVision

Raspberry Pi Pico Vision digital video stick

PicoVision, a small Raspberry Pi powered board equipped with two RP2040 chips. These chips, developed by the development team at Raspberry Pi, serve as the central processing unit (CPU) and graphics processing unit (GPU) respectively. The CPU executes code and interacts with other devices, while the GPU is responsible for generating high-resolution animations and digital video (DV) signals.

The unique configuration of the RP2040 chips in the PicoVision uses two Pseudo Static Random Access Memories (PSRAMs) as a front and back buffer. Essentially, while the CPU writes to one PSRAM, the GPU reads from the other, applies effects, and generates the DV signals. This simultaneous operation significantly enhances the device’s performance and capability to handle complex tasks.

PicoVision pins

One of the standout features of the PicoVision is its high-resolution DV output. This is possible thanks to the GPU, which was developed with the assistance of software wizard Mike Bell. The GPU can display high-resolution animations, making it an ideal tool for creating and running homebrew games, drawing digital art, recreating demos, visualising data, emulating CeeFax, and creating signage.

The PicoVision is available to purchase priced at £34.50 p from Pimoroni and is equipped with a variety of connectors and slots to facilitate its use. It features an HDMI connector, allowing it to be plugged into any HDMI display. Additionally, it has line out audio, a microSD card slot, and a Qw/ST connector. The device also includes on-board reset and user buttons, adding to its user-friendly design.

For those interested in programming, the PicoVision offers the flexibility of using either C++ or MicroPython. Furthermore, users have access to PicoGraphics libraries, PicoVector, and PicoSynth, providing a wide range of tools to create and customize their projects.

PicoVision board

The PicoVision leverages the features of the Raspberry Pi Pico W and RP2040. The Raspberry Pi Pico W Aboard, which serves as the CPU, features a Dual Arm Cortex M0+ with 264kB of SRAM, 2MB of QSPI flash supporting XiP, and 2.4GHz wireless / Bluetooth 5.2. The RP2040, functioning as the GPU, mirrors the Dual Arm Cortex M0+ with 264kB of SRAM, connects to the CPU as an I2C peripheral device, and uses 2 x 8MB PSRAM chips for frame double-buffering.

Additional features of the PicoVision include digital video out via the HDMI connector, a PCM5100A DAC for line level audio over I2S, a microSD card slot, three user buttons, a reset button, a status LED, and a Qw/ST connector. Moreover, the PicoVision comes fully-assembled, making it a convenient and accessible tool for users of all levels.

In summary, the PicoVision is a versatile and powerful digital video stick. Its dual RP2040 chips, high-resolution DV output, and range of connectors and programming options make it a valuable tool for a variety of applications. Whether you’re a digital artist, a game developer, or simply a tech enthusiast, the PicoVision opens up a world of possibilities. For a more in-depth review jump over to the Raspberry Pi Foundation website.

Filed Under: Hardware, Top News


Latest timeswonderful Deals

Disclosure: Some of our articles include affiliate links. If you buy something through one of these links, timeswonderful may earn an affiliate commission. Learn about our Disclosure Policy.

Categories
News

Build a custom AI chatbot with JavaScript in just two hours

learn how to use JavaScript to build a ChatGPT AI chatbot trained with custom data

If you would like to build a custom chatbot using JavaScript, you might be interested to know that Ania Kubów an expert in coding has created a new tutorial that takes you through a project to build a full stack ChatGPT AI chatbot trained on your data. Imagine the possibilities when you combine the power of AI with the efficiency of inventory management. You’re about to dive into a project that will not only streamline how businesses handle their stock but also transform the way they interact with data.

This guide will walk you through the steps of creating an AI chatbot that can sift through CSV file data and tap into the wealth of information available on the internet. By using TypeScript for the chatbot’s framework and integrating OpenAI’s natural language processing capabilities, you’ll create a tool that’s both smart and easy to talk to.

Let’s start by setting up your development environment. This is where you’ll lay the groundwork for your project. You’ll need to install some key software, like Node.js, which will support both TypeScript and Python. You’ll also set up your development tools and generate an API key. This key is crucial—it’s like a secret handshake that lets your chatbot access and update your database securely.

Now, let’s talk about TypeScript. It’s a supercharged version of JavaScript that makes your code more reliable and easier to maintain, thanks to its strong typing and object-oriented features. You’ll begin by building the core of your AI chatbot with TypeScript, focusing on how it will interact with users and process their queries.

Building and AI chatbot using JavaScript

Here are some other articles you may find of interest on the subject of coding using the power of AI

Your chatbot needs to be quick and sharp when searching through large datasets. That’s where SingleStore’s vector search comes in. You’ll learn how to integrate vector embeddings into your database, which will allow your chatbot to find similar products quickly by using a similarity score. This is a game-changer for inventory management because it means your chatbot can make fast and accurate product suggestions.

For your chatbot to really understand and respond to users naturally, you’ll harness the power of OpenAI’s natural language processing technologies. By using OpenAI’s GPT models, your chatbot will be able to generate responses that make sense in the context of the conversation, pulling information from your CSV files to do so.

While TypeScript is great for building the chatbot’s structure, you’ll use Python scripting for managing the database. Python is perfect for creating tables, filling them with data, and running complex queries. This strategic use of both TypeScript and Python ensures that you’re using the best tool for each job.

Of course, a chatbot isn’t much without a user interface (UI). You’ll design a UI that’s not only nice to look at but also easy to use. This will make the user’s experience with your chatbot smooth and enjoyable. At the same time, you’ll work on integrating your chatbot with a backend server. This server will handle user inputs and make sure all parts of your chatbot work together flawlessly.

By the end of this guide, you’ll have a sophisticated AI chatbot that’s perfectly tuned for managing inventory. You’ll have hands-on experience with TypeScript, SingleStore vector search, OpenAI’s natural language processing, and Python database scripting. Your chatbot will be a pro at navigating CSV data and using internet resources to become a comprehensive inventory management tool.

This journey will equip you with the skills to build advanced, intelligent systems that can enhance business operations. You’re not just creating a chatbot; you’re crafting a smarter way for businesses to work, and enhancing your skills which you can resell to those in need. Taking advantage of the explosion in AI technologies over the recent 12 months and assisting those businesses looking to integrate AI, ChatGPT and custom AI models into workflows.

Filed Under: Guides, Top News


Latest timeswonderful Deals

Disclosure: Some of our articles include affiliate links. If you buy something through one of these links, timeswonderful may earn an affiliate commission. Learn about our Disclosure Policy.

Categories
News

Easily Build Your Own Custom GPT With ChatGPT

Custom GPT

This guide is designed to show you how to build your own Custom GPT with the help of ChatGPT. Have you ever considered the exciting possibility of crafting a bespoke AI experience tailored specifically to your individual or business requirements? The idea might seem daunting, but rest assured, it’s more accessible than you might think. Enter ChatGPT, a remarkably versatile AI model brought to life by the innovative minds at OpenAI. This article is designed to guide you through the intriguing process of customizing ChatGPT.

To give you a clear understanding, the video below uses the creation of a fitness assistant as an example. This example serves as a practical demonstration of how you can develop a version of ChatGPT that aligns seamlessly with your unique needs, whether for personal wellness guidance or as a tool to enhance your business operations. By the end of this read, you’ll have a comprehensive grasp of how to tailor this advanced AI technology to work wonders for you.

Understanding the Customization of ChatGPT

Customizing ChatGPT goes beyond the basics of AI interaction. It starts with a fundamental understanding of how ChatGPT can be tailored to meet diverse needs, such as customer service and creative writing. The custom model, once created, can function in unique ways specific to your requirements.

The Initial Steps

If you’re wondering how to begin, it all starts at the ChatGPT website. Here, you can explore a wealth of resources and guidelines that are crucial for understanding and modifying ChatGPT. Remember, you’ll need an account and access to certain features, like a GP4 subscription, to proceed.

Exploring the Versatility of ChatGPT

ChatGPT isn’t just about text responses. The platform extends its capabilities to various specialized versions. For instance, there’s Dall-E for image generation, tools for data analysis, and even game explanation tools. This diversity showcases the model’s adaptability and potential.

Creating a Custom ChatGPT – Fitness Bud

Let’s dive into the core of customization using “Fitness Bud” as an example:

  1. Define the Role: You start by setting ChatGPT’s role, in this case, as a personal fitness assistant.
  2. Personalize Interaction: Next is customizing the model’s behavior, tone, and style of interaction to suit your preferences.
  3. Functionality Additions: You can add specific functions, like generating personalized workout plans.
  4. Knowledge Base Enhancement: Uploading additional resources, such as a bodybuilding PDF, refines the model’s knowledge base for more accurate and relevant responses.

Testing and Refinement

After configuring your model, it’s time to test it. In a playground environment, you can see how your “Fitness Bud” generates a workout plan for beginners. Based on this, you can tweak its responses for better accuracy and helpfulness.

The World of Customization

The possibilities for customizing ChatGPT are virtually endless. From educational tools to business analytics, the model can be adapted to suit an array of applications. This flexibility opens up a world of possibilities for AI utilization.

Sharing and Learning

The video concludes with a call to action, encouraging viewers to share their custom ChatGPT models and delve deeper into AI and programming. This collaborative approach fosters a community of learning and innovation.

A Practical Guide for Tailored AI Solutions

This informative video stands as a vital tool for all those who are curious about the prospects of tailoring ChatGPT to suit specific applications. It does more than just showcase the flexibility of this AI model; it delves into the vast potential that ChatGPT holds, unlocking a variety of possibilities for its utilization. Whether you’re looking to enhance your personal hobbies, like crafting or gardening, or seeking innovative solutions for complex business challenges, this video illuminates how ChatGPT can be adapted to meet these diverse needs.

For those eager to embark on a journey into the realm of AI customization, it’s essential to recognize that ChatGPT provides a platform that is both accessible and user-friendly, making it an ideal starting point. This platform invites you to experiment and engage with AI technology in a way that was once thought to be the domain of experts alone. With a few simple clicks, coupled with a dash of creativity and a clear vision of your requirements, you can mold ChatGPT into an AI companion that not only comprehends but also effectively responds to your specific needs. This process of customization opens up a new world where the boundaries of AI are pushed further, allowing you to explore the endless possibilities that this technology has to offer in your personal and professional life.

Source Simplilearn

Filed Under: Guides


Latest timeswonderful Deals

Disclosure: Some of our articles include affiliate links. If you buy something through one of these links, timeswonderful may earn an affiliate commission. Learn about our Disclosure Policy.

Categories
News

Automate your Instagram account using AI to build your brand

how to use AI to Automate your Instagram feed

In the fast-paced world of social media, keeping your Instagram feed lively and engaging is a must for any business owner or content creator. But let’s face it, the demands of running a business can make it tough to post consistently. That’s where the magic of AI and automation tools like Zapier come in. They can help you keep your Instagram account buzzing with activity, without it taking over your life. Let’s dive into how you can make these tools work for you, so your Instagram page stays fresh and your followers stay hooked.

Imagine setting up your Instagram posts to go live at the perfect times for your audience, and all this happening while you’re focusing on other tasks. By planning your content in advance, you can use technology to automate your posting schedule. This approach ensures that your brand remains visible and your followers always have something new to enjoy.

Zapier, in particular, is a fantastic ally when it comes to automation and scheduling. You can set it up to post your content at specific times, which is incredibly helpful if you’re juggling multiple accounts or want to post outside of regular business hours. This method not only automates but also streamlines your process and helps you keep a consistent posting rhythm for followers to enjoy.

How to use AI to automate your Instagram feed

When you’re trying to reach a global audience, you have to think about the different time zones they’re in. It’s important to post when your followers are most likely to be online. Thankfully, Zapier’s scheduling tool can adjust for time zone differences, making sure your content appears at the best possible time.

Here are some other articles you may find of interest on the subject of AI automations using no code system such as Zapier :

On Instagram, visuals are everything. Your posts need to stand out and grab attention. This is where AI can lend a hand. Tools like ChatGPT can help you come up with creative ideas for images, and OpenAI’s DALL-E 3 can turn those ideas into eye-catching visuals. Together, they ensure that your posts are not just regular but also visually stunning.

But it’s not just about the images. The description of your post is your chance to really connect with your followers. ChatGPT can help you craft engaging captions, complete with relevant hashtags and calls to action. A well-written description can elevate a simple post into something that resonates with your audience.

To get started with automation, you’ll need an Instagram Business account that’s linked to a Facebook page. This setup allows you to use tools like Zapier to publish content directly to Instagram, streamlining your social media management.

One of the best things about this kind of automation is that it’s all wireless. You can manage your Instagram account from almost anywhere, without being tied down to a desk. This flexibility is priceless, especially if you’re always on the move or have team members who work remotely.

By embracing AI and Zapier for your Instagram strategy, you can save precious time while keeping your feed engaging. With smart scheduling, time zone adjustments, quality visuals, and meaningful descriptions, you can build an Instagram presence that captures your audience’s attention. The secret to successful automation is a mix of thoughtful planning and savvy tech use. With the tips from this guide, you’re ready to take your Instagram game to the next level for your business or personal brand.

Filed Under: Guides, Top News


Latest timeswonderful Deals

Disclosure: Some of our articles include affiliate links. If you buy something through one of these links, timeswonderful may earn an affiliate commission. Learn about our Disclosure Policy.

Categories
News

How to build a team of automated AI researchers using ChatGPT

How to build a team of automated AI researchers

How you like to build a team of AI researchers that can take a request from yourself and then search Google collecting,  scraping data and knowledge from websites to create the perfect report to answer your question.  If this sounds like something you would like to build you will be pleased to know that AI Jason has created a fantastic overview on how he created his Research Agents 3.0 AI tool  and workflow providing plenty of inspiration on how you can build your very own team of automated AI researchers.

As you can tell from the name of the latest generation of research agent created by AI Jason AI researcher. Its builds on the designs and functionality  of its previous versions. Where it started as a simple model capable of conducting Google searches and executing basic scripts. This was the first step in automating the research process, and although it was a modest start, it set the foundation for some incredible advancements that would follow.

As technology evolved, AI agents became more complex. They were equipped with memory and advanced analytical capabilities, allowing them to break down intricate tasks into smaller, more manageable segments. This was a crucial development, as it brought a new level of detail and sophistication to research outcomes.

Building a team of AI researchers

Here are some other articles you may find of interest on the subject of automation :

Autonomous research

The introduction of multi-agent systems was a game-changer. With innovations like OpenAI’s ChatGPT and Microsoft’s AutoGen, we saw the power of AI agents working together to improve task performance. This collaborative approach was a significant leap forward, paving the way for AI systems that were both more dynamic and more capable.

The Autogen Framework was developed to facilitate the creation of these multi-agent systems. It provided a way for developers to easily construct flexible hierarchies and collaborative structures among agents, enhancing the system’s adaptability and robustness.

AI Researcher 3.0 is the culmination of these technological advancements. It features roles such as a research manager and a research director, both of which are essential for maintaining consistent quality control and distributing tasks efficiently. Achieving this level of consistency and autonomy was previously unthinkable.

A key aspect of AI Researcher 3.0 is the specialized training of its agents. Techniques like fine-tuning and the integration of knowledge bases are employed, with platforms like Grading AI assisting developers in the fine-tuning process. This ensures that each agent performs its tasks with a high degree of expertise.

Benefits of an automated AI research team

Building a sophisticated multi-agent research system like AI Researcher 3.0 requires meticulous planning. However, developing such a system comes with its challenges. For instance, agent memory constraints can limit the depth of research. To address this, it’s important to customize agent workflows to maximize the quality of research.

By using OpenAI’s API in combination with the Autogen Framework, developers can create a system that includes a research director, a research manager, and various research agents, each playing a vital role in the research ecosystem and helping improve your workflows in the number of different areas such as :

  • Speed and Efficiency: AI agents can process and analyze vast amounts of data much faster than humans. This speed enables quicker iteration cycles in research, potentially accelerating discoveries and innovations.
  • Availability and Scalability: Unlike human researchers, AI agents are not constrained by physical needs or time zones. They can work continuously, which means research can progress 24/7. Additionally, the team can be scaled up easily to handle larger projects or more complex problems.
  • Objective Analysis: AI agents can potentially offer more objective analysis as they are not influenced by cognitive biases inherent to humans. This objectivity can lead to more accurate data interpretation and decision-making.
  • Diverse Data Processing Capabilities: AI agents can be designed to process different types of data (textual, visual, numerical, etc.) efficiently. This capability allows for a more comprehensive approach to research, incorporating a wide range of data sources and types.
  • Collaborative Potential: AI agents can be programmed for optimal collaboration, potentially avoiding the communication issues and conflicts that can arise in human teams. They can also be designed to complement each other’s skills and processing abilities.
  • Cost-Effectiveness: In the long run, an AI research team might be more cost-effective. They do not require salaries, benefits, or physical working spaces, leading to reduced operational costs.
  • Customization and Specialization: AI agents can be customized or specialized for specific research tasks or fields, making them highly effective for targeted research areas.
  • Handling Repetitive and Tedious Tasks: AI agents can efficiently handle repetitive and mundane tasks, freeing human researchers to focus on more creative and complex aspects of research.

The potential uses for autonomous AI research teams are vast. In industries like sales, marketing and more, it has the potential to transform processes such as lead qualification and other research-intensive tasks, providing insights that were previously difficult or expensive to access. Cost management is also a critical aspect of running an advanced AI research system. Keeping an eye on OpenAI usage is essential to manage the costs associated with operating the system, ensuring that the benefits outweigh the investment.

The development of AI Research Agents 3.0 reflects the continuous pursuit of innovation in AI research systems and the skills that AI Jason has in creating these automated workflows. With each new version, the system becomes more skilled, more autonomous, and more integral to the field of research. Engaging with this state-of-the-art technology means being part of a movement that is redefining the way we handle complex research tasks.

Filed Under: Guides, Top News


Latest timeswonderful Deals

Disclosure: Some of our articles include affiliate links. If you buy something through one of these links, timeswonderful may earn an affiliate commission. Learn about our Disclosure Policy.

Categories
News

How to build knowledge graphs with large language models (LLMs)

How to build knowledge graphs with large language models (LLMs)

If you are interested in learning how to build knowledge graphs using artificial intelligence and specifically large language models (LLM). Johannes Jolkkonen has created a fantastic tutorial that shows you how to used Python to create an environment with the necessary data and setting up credentials for the OpenAI API and Neo4j database.

Wouldn’t it be fantastic if you could collate your vast amounts of information and interconnect it in a web of knowledge, where every piece of data is linked to another, creating a map that helps you understand complex relationships and extract meaningful insights. This is the power of a knowledge graph, and it’s within your reach by combining the strengths of graph databases and advanced language models. Let’s explore how these two technologies can work together to transform the way we handle and analyze data.

Graph databases, like Neo4j, excel in managing data that’s all about connections. They store information as entities and the links between them, making it easier to see how everything is related. To start building your knowledge graph, set up a Neo4j database. It will be the backbone of your project. You’ll use the Cypher query language to add, change, and find complex network data. Cypher is great for dealing with complicated data structures, making it a perfect match for graph databases.

How to build knowledge graphs with LLMs

Here are some other articles you may find of interest on the subject of large language models :

Building knowledge graphs

Now, let’s talk about the role of advanced language models, such as those developed by OpenAI, including the GPT series. These models have changed the game when it comes to understanding text. They can go through large amounts of unstructured text, like documents and emails, and identify the key entities and their relationships. This step is crucial for adding rich, contextual information to your knowledge graph.

When you’re ready to build your knowledge graph, you’ll need to extract entities and relationships from your data sources. This is where Python comes in handy. Use Python to connect to the OpenAI API, which gives you access to the powerful capabilities of GPT models for pulling out meaningful data. This process is essential for turning plain text into a structured format that fits into your graph database.

The foundation of a knowledge graph is the accurate identification of entities and their connections. Use natural language processing (NLP) techniques to analyze your data. This goes beyond just spotting names and terms; it’s about understanding the context in which they’re used. This understanding is key to accurately mapping out your data network.

Things to consider

When building a knowledge graph it’s important to consider:

  • Data Quality and Consistency: Ensuring accuracy and consistency in the data is crucial for the reliability of a knowledge graph.
  • Scalability: As data volume grows, the knowledge graph must efficiently scale without losing performance.
  • Integration of Diverse Data Sources: Knowledge graphs often combine data from various sources, requiring effective integration techniques.
  • Updating and Maintenance: Regular updates and maintenance are necessary to keep the knowledge graph current and relevant.
  • Privacy and Security: Handling sensitive information securely and in compliance with privacy laws is a significant consideration.

Adding a user interface

A user-friendly chat interface can make your knowledge graph even more accessible. Add a chatbot to let users ask questions in natural language, making it easier for them to find the information they need. This approach opens up your data to users with different levels of technical skill, allowing everyone to gain insights.

Working with APIs, especially the OpenAI API, is a critical part of this process. You’ll need to handle API requests smoothly and deal with rate limits to keep your data flowing without interruption. Python libraries are very helpful here, providing tools to automate these interactions and keep your data pipeline running smoothly.

Begin your data pipeline with data extraction. Write Python scripts to pull data from various sources and pass it through the GPT model to identify entities and relationships. After you’ve extracted the data, turn it into Cypher commands and run them in your Neo4j database. This enriches your knowledge graph with new information.

Benefits of knowledge graphs

  • Enhanced Data Interconnectivity: Knowledge graphs link related data points, revealing relationships and dependencies not immediately apparent in traditional databases.
  • Improved Data Retrieval and Analysis: By structuring data in a more contextual manner, knowledge graphs facilitate more sophisticated queries and analyses.
  • Better Decision Making: The interconnected nature of knowledge graphs provides a comprehensive view, aiding in more informed decision-making.
  • Facilitates AI and Machine Learning Applications: Knowledge graphs provide structured, relational data that can significantly enhance AI and machine learning models.
  • Personalization and Recommendation Systems: They are particularly effective in powering recommendation engines and personalizing user experiences by understanding user preferences and behavior patterns.
  • Semantic Search Enhancement: Knowledge graphs improve search functionalities by understanding the context and relationships between terms and concepts.
  • Data Visualization: They enable more complex and informative data visualizations, illustrating connections between data points.

API rate limits and costs

Handling API rate limits can be tricky. You’ll need strategies to work within these limits to make sure your data extraction and processing stay on track. Your Python skills will come into play as you write code that manages these restrictions effectively.

Don’t forget to consider the costs of using GPT models. Do a cost analysis to understand the financial impact of using these powerful AI tools in your data processing. This will help you make smart choices as you expand your knowledge graph project.

By bringing together graph databases and advanced language models, you’re creating a system that not only organizes and visualizes data but also makes it accessible through a conversational interface. Stay tuned for our next article, where we’ll dive into developing a user interface and improving chat interactions for your graph database. This is just the beginning of your journey into the interconnected world of knowledge graphs.

Filed Under: Guides, Top News


Latest timeswonderful Deals

Disclosure: Some of our articles include affiliate links. If you buy something through one of these links, timeswonderful may earn an affiliate commission. Learn about our Disclosure Policy.

Categories
News

Learn how use Google’s PaLM 2 to build AI apps

Learn how use Google's PaLM 2 to build AI apps

Are you interested in building your very own applications powered by artificial intelligence? If you are you will be pleased to know that the Free Code Camp has created a great tutorial which takes you through everything you need to know to integrate Google’s PaLM 2 AI model into your applications. The tutorial takes you through how to create your very own AI assistant and chatbot using the PaLM 2, Google’s advanced language model.

Palm 2 isn’t your average AI—it’s a large language model that’s really good at understanding and generating text that feels like it was written by a human. This means you can ask it to do things like write code, solve problems, or even translate languages, and it’ll handle it like a champ. Imagine typing out a rough draft of code and having Palm 2 polish it up for you, or quickly adapting your app for users in different countries. That’s the kind of muscle Palm 2 brings to the table.

Now, if you’re going to work with Palm 2, you’ve got to get familiar with API development and cybersecurity. You’ll be setting up the Palm 2 API, making sure your connections are secure with an API key, and protecting your data like a pro. It’s all about sending requests and getting back smart, AI-generated answers that can take your apps to the next level.

Using PaLM 2 to build AI apps

Let’s talk about chatbots. They’re everywhere these days, but with Palm 2, you can build one that’s not just responsive, but truly understands what users want. You start by designing a user-friendly interface, then hook it up to the Palm 2 API to bring your chatbot to life. It’s a great way to get a feel for what users need and how to blend front-end and back-end development smoothly.

Here are some other articles you may find of interest on the subject of Google’s PaLM 2 AI model :

Speaking of the front end, you want your chatbot to look good and work flawlessly. That’s where frontend development and CSS styling come in. You’ll be crafting the visual parts of your chatbot, making sure it’s both functional and easy on the eyes. With CSS, you can style and animate your chatbot to make it look top-notch.

Setting up your development environment

Before you jump into coding, you need the right tools. Setting up your development environment is step one. You’ll pick out the best software and configurations for AI app development, choose an Integrated Development Environment (IDE), set up servers, and organize your project to keep things running smoothly and ready to grow.

Keeping your code neat and tidy is a game-changer. It makes managing and fixing things so much easier. You’ll learn the best ways to keep everything in order and get into server-side programming. That’s where you build the brains of your app, and with Palm 2, you can make your server-side logic even smarter.

An introduction to Google’s PaLM 2

Code generation

One of the coolest things about Palm 2 is its code generation ability. It can help you write code faster and better. And when it comes to debugging, Palm 2 is there to offer suggestions and improvements, making it easier to find and fix any issues that pop up.

Language translation

Palm 2 is also excellent at language translation, which means your software can go global without breaking a sweat. You’ll learn to use the model for accurate, context-aware translations. Plus, Palm 2 can help you predict what users might do or need next, making your apps more intuitive and focused on the user experience.

By getting hands-on experience and diving deep into what Palm 2 can do, you’ll be able to create a wide variety of different applications all powered by Google’s artificial intelligence. Enabling you to add unique functionality to your chatbot.

Filed Under: DIY Projects, Top News


Latest timeswonderful Deals

Disclosure: Some of our articles include affiliate links. If you buy something through one of these links, timeswonderful may earn an affiliate commission. Learn about our Disclosure Policy.