Categories
News

How to use the OpenAI Assistants API to build AI agents & apps

Learn how to use the OpenAI Assistants API

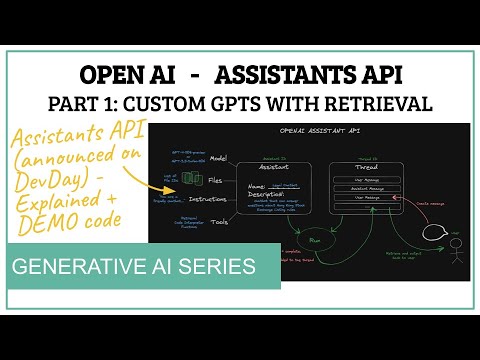
Hubel Labs has created a fantastic introduction to the new OpenAI Assistants API which were recently unveiled at OpenAI’s very first DevDay. The new API tool has been specifically designed to dramatically simplified the process of building custom chatbots, offering more advanced features when compared to the ChatGPT custom GPT Builder which is integrated into the ChatGPT online service.

The API’s advanced features have the potential to significantly streamline the process of retrieving and using information. This quick overview guide and instructional videos created by Hubel Labs will provide more insight into the features of OpenAI’s Assistance API, the new GPTs product, and how developers can use the API to create and manage chatbots.

What is an Assistance API

The Assistants API allows you to build AI assistants within your own applications. An Assistant has instructions and can leverage models, tools, and knowledge to respond to user queries. The Assistants API currently supports three types of tools: Code Interpreter, Retrieval, and Function calling. In the future, we plan to release more OpenAI-built tools, and allow you to provide your own tools on our platform.

diagram of what is an Assistance API

Using Assistants API to build ChatGPT apps

The Assistants API is a powerful tool built on the same capabilities that enable the new GPTs product, custom instructions, and tools such as the code interpreter, retriever, and function calling. Essentially, it allows developers to build custom chatbots on top of the GPT large language model. It eliminates the need for developers to separate files into chunks, use an embedding API to turn chunks into embeddings, and put embeddings into a vector database for a cosine similarity search.

Other articles we have written that you may find of interest on the subject of GPT’s  and building custom AI models

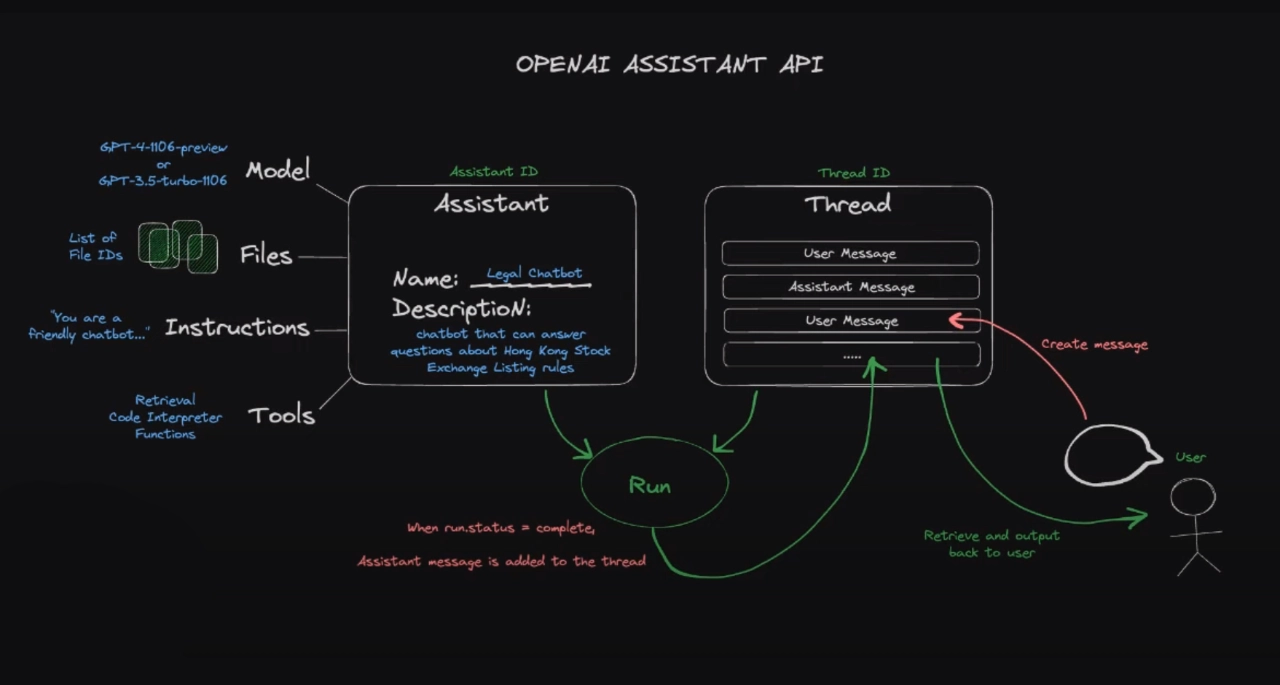
The API operates on two key concepts: an assistant and a thread. The assistant defines how the custom chatbot works and what resources it has access to, while the thread stores user messages and assistant responses. This structure allows for efficient communication and data retrieval, enhancing the functionality and usability of the chatbot.

Creating an assistant and a thread is a straightforward process. Developers can authenticate with an organization ID and an API key, upload files to give the assistant access to, and create the assistant with specific instructions, model, tools, and file IDs. They can also update the assistant’s configuration, retrieve an existing assistant, create an empty thread, run the assistant to get a response, retrieve the full list of messages from the thread, and delete the assistant. Notably, OpenAI’s platform allows developers to perform all these tasks without any code, making it accessible for people who don’t code.

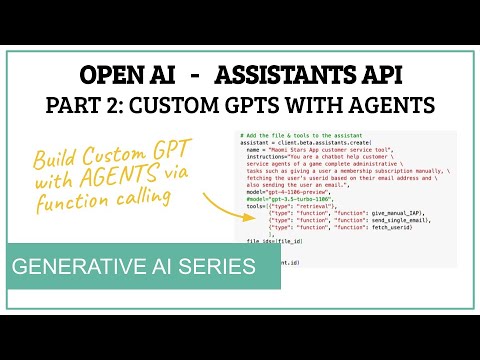
Creating custom GPT’s with agents

Further articles on the subject of OpenAI’s API :

One of the standout features of the Assistance API is its function calling capability. This feature allows the chatbot to call agents and execute backend tasks, such as fetching user IDs, sending emails, and manually adding game subscriptions to user accounts. The setup for function calling is similar to the retrieval mode, with an assistant that has a name, description, and an underlying model. The assistant can be given up to 128 different tools, which can be proprietary to a company.

OpenAI Assistants API

The assistant can be given files, such as FAQs, that it can refer to. It can also be given functions, such as fetching user IDs, sending emails, and manually adding game subscriptions. The assistant can be given a thread with a user message, which it will run and then pause if it requires action. The assistant will indicate which functions need to be called and what parameters need to be passed in. The assistant will then wait for the output from the called functions before completing the run process and adding a message to the thread.

The Assistance API’s thread management feature helps truncate long threads to fit into the context window. This ensures that the chatbot can effectively handle queries that require information from files, as well as those that require function calls, even if they require multiple function calls.

However, it should be noted that the Assistance API currently does not allow developers to create a chatbot that only answers questions about their knowledge base and nothing else. Despite this limitation, the Assistance API is a groundbreaking tool that has the potential to revolutionize the way developers build and manage chatbots. Its advanced features and user-friendly interface make it a promising addition to OpenAI’s suite of AI tools.

Image Credit : Hubel Labs

Filed Under: Guides, Top News


Latest timeswonderful Deals

Disclosure: Some of our articles include affiliate links. If you buy something through one of these links, timeswonderful may earn an affiliate commission. Learn about our Disclosure Policy.

Categories
News

Leonardo Ai API now available for individuals and businesses

Leonardo AI production API now live

The development team at Leonardo Ai have recently announced the launch of its new Production API. This cutting-edge development now allows both individuals and businesses to integrate the companies AI art generator into their systems and applications. This is a significant step forward in the integration of AI into business workflows and is also availability for personal use. Marking a new era in the fusion of technology and creativity with AI art generators. Whether you’re making a personal project or a service that serves millions of end-users, the Leonardo Ai Production API has you covered, say it’s development team.

Leonardo Ai API Quick Start Guide

Creating an API key for Leonardo.Ai’s platform is a straightforward yet crucial step for anyone looking to harness the power of its Production API

1. Getting Started with Your Leonardo Account

First things first, you need to have a Leonardo account. If you haven’t already, it’s easy to sign up. Just head over to the Leonardo web application. It’s important to note that a subscription to the web app is not necessary for API use. Leonardo offers distinct subscription plans for the API, which we will explore shortly.

2. Choosing Your API Plan

Once you’re logged in, your next step is to navigate to the API Access menu in the Leonardo web app. Here, you will find an option to subscribe to an API plan. Leonardo.Ai presents a range of plans to suit different needs, including API Basic, API Standard, and API Pro. Additionally, for unique requirements, you can contact the team to set up a Custom Plan. Remember, an API plan is different from a web-app plan and is focused on providing access to the Production API.

3. Provisioning Your API Key

After selecting your API plan, you will be directed to the API Access Page. Here’s where the magic begins. You can generate your first API key by clicking the ‘Create New Key’ button. When creating your API key, you’ll need to input a name for the key and, if desired, set up optional webhook callback details. This feature is particularly useful as Leonardo notifies you when image generation is complete, saving you the hassle of constantly checking back.

4. API Best Practices

To ensure optimal management and security:

  • Limit the number of API keys you create.
  • Develop a naming system for your API keys that reflects the application name, environment, or team, like mywebapp-dev or myiosapp-prod.
  • Utilize the webhook callback feature for efficient notification on completed generations.

5. Testing Your API Key

Before diving into development, it’s wise to test your API key. Leonardo.Ai makes this easy. Simply visit the Get User Information page in their API documentation. Here, you can input your key under ‘Bearer’ and click ‘Try It’ to ensure everything is functioning as expected. Setting up and using an API key for Leonardo.Ai’s Production API is a user-friendly process that opens doors to a world of creative possibilities. Whether you’re a seasoned developer or just starting out, Leonardo.Ai’s API offers a versatile and powerful tool for your projects.

Leonardo AI production API now available for businesses 2023

Other articles you may find of interest on the subject of Leonardo Ai :

Image Guidance

Another exciting features of Leonardo.Ai’s AI-powered creative process tool is the Image Guidance feature. The company recently introduced an alpha version of this feature, which offers users the option to upload multiple reference images. Users can then select from various options such as depth-to-image and pattern-to-image. This feature is expected to be fully released in the coming days, further enhancing the tool’s capabilities.

Alchemy V2 and Alchemy Refiner

In addition to the Image Guidance feature, Leonardo.Ai has also launched Alchemy V2 and Alchemy Refiner. These tools are designed to transform prompts into complex, high-quality images and refine every detail of the artwork. Alchemy V2 includes three additional SDXL models: Leonardo Diffusion XL, Leonardo Vision XL, and Albedo Base XL. These additional models significantly enhance the tool’s ability to produce stunning, detailed images.

I’m Feeling Lucky

Injecting a dose of creative randomness into the process is the “I’m Feeling Lucky” prompt button. This feature generates new prompt ideas and adds unexpected twists to the creative process. It’s a testament to Leonardo.Ai’s commitment to fostering creativity and innovation in its users.

iOS app

Recognizing the need for mobile accessibility, Leonardo.Ai has released an iOS app. This allows users to use Alchemy V2 and the new XL models on the go, ensuring that creativity is never hampered by location or device constraints.

Canvas Persistent Mode

Finally, the company has introduced the Canvas Persistent Mode. This feature allows users to pick up where they left off in their creative process, as the browser remembers every stroke. This ensures a continuous creative process, allowing users to maintain their flow and momentum.

The launch of Leonardo.Ai’s new Production API and the introduction of these innovative features represent a significant leap forward in the integration of AI into business systems. These developments will undoubtedly revolutionize the creative process, offering businesses a more streamlined, efficient, and innovative way to harness the power of AI. With its commitment to continuous improvement and innovation, Leonardo.Ai is set to remain at the forefront of AI-powered creativity.

Filed Under: Technology News, Top News


Latest timeswonderful Deals

Disclosure: Some of our articles include affiliate links. If you buy something through one of these links, timeswonderful may earn an affiliate commission. Learn about our Disclosure Policy.

Categories
News

How to use OpenAI Assistants API

a team of developers building AI applications using OpenAI Assistants API

During the recent OpenAI developer conference Sam Altman introduced the company’s new Assistants API, offering a robust toolset for developers aiming to integrate intelligent assistants into their own creations. If you’ve ever envisioned crafting an application that benefits from AI’s responsiveness and adaptability, OpenAI’s new Assistants API might just be the missing piece you’ve been searching for.

At the core of the Assistants API are three key functionalities that it supports: Code Interpreter, Retrieval, and Function calling. These tools are instrumental in equipping your AI assistant with the capability to comprehend and execute code, fetch information effectively, and perform specific functions upon request. What’s more, the horizon is broadening, with OpenAI planning to introduce a wider range of tools, including the exciting possibility for developers to contribute their own.

Three key functionalities

Let’s go through the fundamental features that the OpenAI Assistants API offers in more detail. These are important parts of the customization and functionality of AI assistants within the various applications you might building or have wanted to build but didn’t have the expertise or skill to create the AI structure yourself.

Code Interpreter

First up, the Code Interpreter is essentially the brain that allows the AI to understand and run code. This is quite the game-changer for developers who aim to integrate computational problem-solving within their applications. Imagine an assistant that not only grasps mathematical queries but can also churn out executable code to solve complex equations on the fly. This tool bridges the gap between conversational input and technical output, bringing a level of interactivity and functionality that’s quite unique.

Retrieval

Moving on to Retrieval, this is the AI’s adept librarian. It can sift through vast amounts of data to retrieve the exact piece of information needed to respond to user queries. Whether it’s a historical fact, a code snippet, or a statistical figure, the Retrieval tool ensures that the assistant has a wealth of knowledge at its disposal and can provide responses that are informed and accurate. This isn’t just about pulling data; it’s about pulling the right data at the right time, which is critical for creating an assistant that’s both reliable and resourceful.

Function calling

The third pillar, Function calling, grants the assistant the power to perform predefined actions in response to user requests. This could range from scheduling a meeting to processing a payment. It’s akin to giving your AI the ability to not just converse but also to take actions based on that conversation, providing a tangible utility that can automate tasks and streamline user interactions.

Moreover, OpenAI isn’t just stopping there. The vision includes expanding these tools even further, opening up the floor for developers to potentially introduce their own custom tools. This means that in the future, the Assistants API could become a sandbox of sorts, where developers can experiment with and deploy bespoke functionalities tailored to their application’s specific needs. This level of customization is poised to push the boundaries of what AI assistants can do, turning them into truly versatile and adaptable components of the software ecosystem.

How to use OpenAI Assistants API

In essence, these three functionalities form the backbone of the Assistants API, and their significance cannot be overstated. They are what make the platform not just a static interface but a dynamic environment where interaction, information retrieval, and task execution all come together to create AI assistants that are as responsive as they are intelligent.

Other articles you may find of interest on the subject of OpenAI and its recent developer conference

To get a feel for what the Assistants API can do, you have two avenues: the Assistants playground for a quick hands-on experience, or a more in-depth step-by-step guide. Let’s walk through a typical integration flow of the API:

  1. Create an Assistant: This is where you define the essence of your AI assistant. You’ll decide on its instructions and choose a model that best fits your needs. The models at your disposal range from GPT-3.5 to the latest GPT-4, and you can even opt for fine-tuned variants. If you’re looking to enable functionalities like Code Interpreter or Retrieval, this is the stage where you’ll set those wheels in motion.
  2. Initiate a Thread: Think of a Thread as the birthplace of a conversation with a user. It’s recommended to create a unique Thread for each user, right when they start interacting with your application. This is also the stage where you can infuse user-specific context or pass along any files needed for the conversation.
  3. Inject a Message into the Thread: Every user interaction, be it a question or a command, is encapsulated in a Message. Currently, you can pass along text and soon, images will join the party, broadening the spectrum of interactions.
  4. Engage the Assistant: Now, for the Assistant to spring into action, you’ll trigger a Run. This process involves the Assistant assessing the Thread, deciding if it needs to leverage any of the enabled tools, and then generating a response. The Assistant’s responses are also posted back into the Thread as Messages.
  5. Showcase the Assistant’s Response: After a Run has been completed, the Assistant’s responses are ready for you to display back to the user. This is where the conversation truly comes to life, with the Assistant now fully engaging in the dialogue.

Threads are crucial for preserving the context of a conversation with the AI. They enable the AI to remember past interactions and respond in a relevant and appropriate manner. The polling mechanism, on the other hand, is used to monitor the status of a task. It sends a request to the server and waits for a response, allowing you to track your tasks’ progress.

To interact with the Assistants API, you’ll need the OpenAI API key. This access credential authenticates your requests, ensuring they’re valid. This key can be securely stored in a .env file, an environment variable handler designed to protect your credentials.

If you’re curious about the specifics, let’s say you want to create an Assistant that’s a personal math tutor. This Assistant would not only understand math queries but also execute code to provide solutions. The user could, for instance, ask for help with an equation, and the Assistant would respond with the correct solution.

In this beta phase, the Assistants API is a canvas of possibilities, and OpenAI invites developers to provide their valuable feedback via the Developer Forum. OpenAI has also created documentation for its new API system which is deftly with reading before you start your journey in creating your next AI powered application or service.

OpenAI Assistants API is a bridge between your application and the intelligent, responsive world of AI. It’s a platform that not only answers the ‘how’ but also expands the ‘what can be done’ in AI-assisted applications. As you navigate this journey of integration, you will be pleased to know that the process is designed to be as seamless as possible and OpenAI provides plenty of help and insight, ensuring that even those new to AI can find their footing quickly and build powerful AI applications.

Filed Under: Guides, Top News


Latest timeswonderful Deals

Disclosure: Some of our articles include affiliate links. If you buy something through one of these links, timeswonderful may earn an affiliate commission. Learn about our Disclosure Policy.

Categories
News

Deals: 2024 ChatGPT API, Marketing & Prompt bundle

ChatGPT API

Are you ready to dive into the world of artificial intelligence? The course offered by Magine Solutions is your golden ticket to understanding and mastering chatGPT, an AI developed by OpenAI. This beginner-level training is designed to equip you with the knowledge and skills to harness the power of AI in your everyday tasks and professional endeavors.

The course includes 13 lectures and 2 hours of content, accessible 24/7 for a lifetime. This means you can learn at your own pace, whenever and wherever you want. The curriculum covers the basics of chatGPT, its user interface, and the art of writing effective prompts. It offers hands-on experience with the OpenAI Playground and teaches prompt engineering. The course also covers practical applications of chatGPT in handling and synthesizing data.

Key Features of the Course

  • Comprehensive Curriculum: The course covers everything from the basics of chatGPT to its practical applications in various fields.
  • Hands-on Experience: Get practical experience with the OpenAI Playground and learn the art of prompt engineering.
  • 24/7 Access: The course content is accessible round the clock, allowing you to learn at your own pace.
  • Mobile and Desktop Access: You can access the course on both desktop and mobile, making learning convenient and flexible.
  • Certificate of Completion: Receive a certificate of completion at the end of the course, adding value to your professional profile.

The course also teaches how to use chatGPT for simplifying complex datasets, translating text, summarizing videos, and proofreading written material. You’ll also learn how to use chatGPT as a creative tool and for drafting professional emails, analyzing text, and serving as a personal travel assistant.

The course can be accessed on both desktop and mobile, and needs to be redeemed within 30 days of purchase. A certificate of completion is provided at the end of the course, adding a feather to your professional cap. The course requires any device with basic specifications for access.

Magine Solutions is an online education platform that uses digital technology to offer a wide range of online courses. The platform uses cinematic quality production to create an engaging, visually immersive learning environment.

So, are you ready to unlock the power of AI and take your skills to the next level? Enroll in the 2024 ChatGPT AI Marketing Series Bundle today and step into the future of technology.

Get this deal>

Filed Under: Deals


Latest timeswonderful Deals

Disclosure: Some of our articles include affiliate links. If you buy something through one of these links, timeswonderful may earn an affiliate commission. Learn about our Disclosure Policy.

Categories
News

Build your own ChatGPT Chatbot with the ChatGPT API


ChatGPT ChatBot

This guide is designed to show you how to build your own ChatGPT Chatbot with the ChatGPT API. Chatbots have evolved to become indispensable tools in a variety of sectors, including customer service, data gathering, and even as personal digital assistants. These automated conversational agents are no longer just simple text-based interfaces; they are increasingly sophisticated, thanks to the emergence of robust machine learning algorithms. Among these, ChatGPT by OpenAI stands out as a particularly powerful and versatile model, making the task of building a chatbot not just simpler but also far more effective than ever before.

For those who are keen on crafting their own chatbot, leveraging Python, OpenAI’s ChatGPT, Typer, and a host of other development tools, you’ve come to the perfect resource. This article aims to serve as an all-encompassing guide, meticulously walking you through each step of the process—from the initial setup of your development environment all the way to fine-tuning and optimizing your chatbot for peak performance.

Setting Up the Environment

Before you even start writing a single line of code, it’s absolutely essential to establish a development environment that is both conducive to your workflow and compatible with the tools you’ll be using. The tutorial video strongly advocates for the use of pyenv as a tool to manage multiple Python installations seamlessly. This is particularly useful if you have other Python projects running on different versions, as it allows you to switch between them effortlessly.

In addition to pyenv, the video also recommends using pyenv virtualenv for creating isolated virtual environments. Virtual environments are like self-contained boxes where you can install the Python packages and dependencies your project needs, without affecting the global Python environment on your machine. This is a best practice that ensures there are no conflicts between the packages used in different projects.

By taking the time to set up these tools, you’re not just making it easier to get your project off the ground; you’re also setting yourself up for easier debugging and less hassle in the future. Ensuring that you have the correct version of Python and all the necessary dependencies isolated within a virtual environment makes your project more manageable, scalable, and less prone to errors in the long run.

Initializing the Project

After you’ve successfully set up your development environment, the subsequent crucial step is to formally initialize your chatbot project. To do this, you’ll need to create an empty directory that will serve as the central repository for all the files, scripts, and resources related to your chatbot. This organizational step is more than just a formality; it’s a best practice that helps keep your project structured and manageable as it grows in complexity. Once this directory is in place, the next action item is to establish a virtual environment within it using pyenv virtualenv.

By doing so, you create an isolated space where you can install Python packages and dependencies that are exclusive to your chatbot project. This isolation is invaluable because it eliminates the risk of version conflicts or other compatibility issues with Python packages that might be installed globally or are being used in other projects. In summary, setting up a virtual environment within your project directory streamlines the management of dependencies, making the development process more efficient and less prone to errors.

Coding the Chatbot

Now comes the exciting part—coding your chatbot. The video explains how to import essential packages like Typer for command-line interactions and OpenAI for leveraging the ChatGPT model. The video also explains how to set up an API key and create an application object, which are crucial steps for interacting with OpenAI’s API.

Basic Functionality

With the foundational elements in place, you can start building the chatbot’s basic functionality. The tutorial employs Typer to facilitate command-line interactions, making it easy for users to interact with your chatbot. An infinite loop is introduced to continuously prompt the user for input and call the OpenAI chat completion model, thereby enabling real-time conversations.

Adding Memory to the Chatbot

One of the limitations of many basic chatbots is their inability to understand context. The tutorial addresses this by showing how to give your chatbot a “memory.” By maintaining a list of messages, your chatbot can better understand the context of a conversation, making interactions more coherent and engaging.

Parameter Customization

To make your chatbot more flexible and user-friendly, the video introduces parameter customization. Users can specify parameters like maximum tokens, temperature, and even the model to use. This allows for a more personalized chat experience, catering to different user needs and preferences.

Optimizations and Advanced Options

Finally, the video covers some nifty optimizations. For instance, it allows users to input their first question immediately upon running the command, streamlining the user experience. It also briefly mentions Warp API, a more polished version of the chatbot, which is free to use and offers advanced features.

Conclusion

Building a chatbot using Python, OpenAI, Typer, and other tools is a rewarding experience, offering a blend of coding, machine learning, and user experience design. By following this comprehensive tutorial, you’ll not only create a functional chatbot but also gain valuable insights into optimizing its performance and capabilities.

So why wait? Dive into the world of chatbots and create your own ChatGPT-powered assistant today! We hope that you find this guide on how to build your own ChatGPT Chatbot helpful and informative, if you have any comments, questions, or suggestions, leave a comment below and let us know.

Video Credit: warpdotdev

Filed Under: Guides, Technology News


Latest timeswonderful Deals

Disclosure: Some of our articles include affiliate links. If you buy something through one of these links, timeswonderful may earn an affiliate commission. Learn about our Disclosure Policy.

Categories
News

OpenAI ChatGPT API rate limits explained

Understanding ChatGPT API rate limits from OpenAI

If you are creating programs and applications linked to OpenAI’s services such as ChatGPT it is important that you understand the rate limits which have been set for your particular AI model and how you can increase them if needed as well as the costs involved. Understanding the intricacies of an API’s rate limits is crucial for developers, businesses, and organizations that rely on that service for their operations. One such API is the ChatGPT API, which has its own set of rate limits that users must adhere to. This article will delve into the specifics of the ChatGPT API rate limits and explain why they are in place.

What are API rate limits?

Rate limits, in essence, are restrictions that an API imposes on the number of times a user or client can access the server within a specific period. They are common practice in the world of APIs and are implemented for several reasons. Firstly, rate limits help protect against abuse or misuse of the API. They act as a safeguard against malicious actors who might flood the API with requests in an attempt to overload it or disrupt its service. By setting rate limits, OpenAI can prevent such activities.

Secondly, rate limits ensure that everyone has fair access to the API. If one user or organization makes an excessive number of requests, it can slow down the API for everyone else. By controlling the number of requests a single user can make, OpenAI ensures that the maximum number of people can use the API without experiencing slowdowns.

Understanding OpenAI ChatGPT API rate limits

Rate limits help OpenAI manage the aggregate load on its infrastructure. A sudden surge in API requests could stress the servers and cause performance issues. By setting rate limits, OpenAI can maintain a smooth and consistent experience for all users.

Other articles we have written that you may find of interest on the subject of OpenAI and APIs :

The ChatGPT API rate limits are enforced at the organization level, not the user level, and they depend on the specific endpoint used and the type of account. They are measured in three ways: RPM (requests per minute), RPD (requests per day), and TPM (tokens per minute). A user can hit the rate limit by any of these three options depending on what occurs first.

For instance, if a user sends 20 requests with only 100 tokens to the Completions endpoint and their RPM limit is 20, they will hit the limit, even if they did not send 150k tokens within those 20 requests. OpenAI automatically adjusts the rate limit and spending limit (quota) based on several factors. As a user’s usage of the OpenAI API increases and they successfully pay the bill, their usage tier is automatically increased.

For example, the first three usage tiers are as follows:

  • Free Tier: The user must be in an allowed geography. They have a maximum credit of $100 and request limits of 3 RPM and 200 RPD. The token limit is 20K TPM for GPT-3.5 and 4K TPM for GPT-4.
  • Tier 1: The user must have paid $5. They have a maximum credit of $100 and request limits of 500 RPM and 10K RPD. The token limit is 40K TPM for GPT-3.5 and 10K TPM for GPT-4.
  • Tier 2: The user must have paid $50 and it must be 7+ days since their first successful payment. They have a maximum credit of $250 and a request limit of 5000 RPM. The token limit is 80K TPM for GPT-3.5 and 20K TPM for GPT-4.

In practice, if a user’s rate limit is 60 requests per minute and 150k tokens per minute, they’ll be limited either by reaching the requests/min cap or running out of tokens—whichever happens first. For instance, if their max requests/min is 60, they should be able to send 1 request per second. If they send 1 request every 800ms, once they hit the rate limit, they’d only need to make their program sleep 200ms in order to send one more request. Otherwise, subsequent requests would fail.

Understanding and adhering to the ChatGPT API rate limits is crucial for the smooth operation of any application or service that relies on it. The limits are in place to prevent misuse, ensure fair access, and manage the load on the infrastructure, thus ensuring a consistent and efficient experience for all users.

OpenAI enforces rate limits on the requests you can make to the API. These are applied over tokens-per-minute, requests-per-minute (in some cases requests-per-day), or in the case of image models, images-per-minute.

Increasing rate limits

OpenAI explains a little more about its API rate limits and when you should consider applying for an increase if needed:

“Our default rate limits help us maximize stability and prevent abuse of our API. We increase limits to enable high-traffic applications, so the best time to apply for a rate limit increase is when you feel that you have the necessary traffic data to support a strong case for increasing the rate limit. Large rate limit increase requests without supporting data are not likely to be approved. If you’re gearing up for a product launch, please obtain the relevant data through a phased release over 10 days.”

For more information on the OpenAI rate limits for its services such as ChatGPT jump over to the official guide documents website for more information and figures.

How to manage API rate limits :

  • Understanding the Limits – Firstly, you need to understand the specifics of the rate limits imposed by the ChatGPT API. Usually, there are different types of limits such as per-minute, per-hour, and per-day limits, as well as concurrency limits.
  • Caching Results – For frequently repeated queries, consider caching the results locally. This will reduce the number of API calls you need to make and can improve the responsiveness of your application.
  • Rate-Limiting Libraries – There are rate-limiting libraries and modules available in various programming languages that can help you manage API rate limits. They can automatically throttle your requests to ensure you stay within the limit.
  • Queuing Mechanism – Implementing a queuing mechanism can help you handle bursts of traffic efficiently. This ensures that excess requests are put in a queue and processed when the rate limit allows for it.
  • Monitoring and Alerts – Keep an eye on your API usage statistics, and set up alerts for when you are nearing the limit. This can help you take timely action, either by upgrading your plan or optimizing your usage.
  • Graceful Degradation – Design your system to degrade gracefully in case you hit the API rate limit. This could mean showing a user-friendly error message or falling back to a less optimal operation mode.
  • Load Balancing – If you have multiple API keys or accounts, you can distribute the load among them to maximize your allowed requests.
  • Business Considerations – Sometimes, it might be more cost-effective to upgrade to a higher tier of the API that allows for more requests, rather than spending engineering resources to micro-optimize API usage.

Filed Under: Guides, Top News


Latest timeswonderful Deals

Disclosure: Some of our articles include affiliate links. If you buy something through one of these links, timeswonderful may earn an affiliate commission. Learn about our Disclosure Policy.

Categories
News

Perplexity Lab pplx-api API for open-source LLMs

Perplexity API for open-source LLMs

Perplexity Labs has recently introduced a new, fast, and efficient API for open-source Large Language Models (LLMs) known as pplx-api. This innovative tool is designed to provide quick access to various open-source LLMs, including Mistral 7B, Llama2 13B, Code Llama 34B, and Llama2 70B. The introduction of pplx-api marks a significant milestone in the field of AI, offering a one-stop-shop for open-source LLMs.

One of the key features of pplx-api is its ease of use for developers. The API is user-friendly, allowing developers to integrate these models into their projects with ease using a familiar REST API. This ease of use eliminates the need for deep knowledge of C++/CUDA or access to GPUs, making it accessible to a wider range of developers.

Perplexity Lab pplx-api

The pplx-api also boasts a fast inference system. The efficiency of the inference system is remarkable, offering up to 2.9x lower latency than Replicate and 3.1x lower latency than Anyscale. In tests, pplx-api achieved up to 2.03x faster overall latency compared to Text Generation Inference (TGI), and up to 2.62x faster initial response latency. The API is also capable of processing tokens up to 2x faster compared to TGI. This speed and efficiency make pplx-api a powerful tool for developers working with LLMs.

Benefits of the pplx-api

  • Ease of use: developers can use state-of-the-art open-source models off-the-shelf and get started within minutes with a familiar REST API.

  • Blazing fast inference:  thoughtfully designed inference system is efficient and achieves up to 2.9x lower latency than Replicate and 3.1x lower latency than Anyscale.

  • Battle tested infrastructure: pplx-api is proven to be reliable, serving production-level traffic in both Perplexity answer engine and  Labs playground.

  • One-stop shop for open-source LLMs: Perplexity Labs is dedicated to adding new open-source models as they arrive. For example, we added Llama and Mistral m

The infrastructure of pplx-api is reliable and battle-tested. It has been proven reliable in serving production-level traffic in both Perplexity’s answer engine and Labs playground. The infrastructure combines state-of-the-art software and hardware, including AWS p4d instances powered by NVIDIA A100 GPUs and NVIDIA’s TensorRT-LLM. This robust infrastructure makes pplx-api one of the fastest Llama and Mistral APIs commercially available.

API for open-source LLMs

The pplx-api is currently in public beta and is free for users with a Perplexity Pro subscription. This availability allows a wider range of users to test and provide feedback on the API, helping Perplexity Labs to continually improve and refine the tool. The API is also cost-efficient for LLM deployment and inference. It has already resulted in significant cost savings for Perplexity, reducing costs by approximately $0.62M/year for a single feature. This cost efficiency makes pplx-api a valuable tool for both casual and commercial use.

The team at Perplexity is committed to adding new open-source models as they become available, ensuring that pplx-api remains a comprehensive resource for open-source LLMs. The API is also used to power Perplexity Labs, a model playground serving various open-source models. The introduction of pplx-api by Perplexity Labs represents a significant advancement in the field of AI. Its ease of use, fast inference system, reliable infrastructure, and cost efficiency make it a powerful tool for developers working with open-source LLMs. As the API continues to evolve and improve, it is expected to become an even more valuable resource for the AI community.

In the near future, pplx-api will support:

  • Custom Perplexity LLMs and other open-source LLMs.

  • Custom Perplexity embeddings and open-source embeddings.

  • Dedicated API pricing structure with general access after public beta is phased out.

  • Perplexity RAG-LLM API with grounding for facts and citations.

How to access pplx-api

You can access the pplx-api REST API using HTTPS requests. Authenticating into pplx-api involves the following steps:

1. Generate an API key through the Perplexity Account Settings Page. The API key is a long-lived access token that can be used until it is manually refreshed or deleted.
2. Send the API key as a bearer token in the Authorization header with each pplx-api request.
3. It currently support Mistral 7B, Llama 13B, Code Llama 34B, Llama 70B, and the API is conveniently OpenAI client-compatible for easy integration with existing applications.

For more information, visit the official Perplexity Labs API documentation and Quickstart Guide.

Filed Under: Technology News, Top News


Latest timeswonderful Deals

Disclosure: Some of our articles include affiliate links. If you buy something through one of these links, timeswonderful may earn an affiliate commission. Learn about our Disclosure Policy.

Categories
News

OpenAI may slash API prices for ChatGPT next month

ChatGPT API prices and memory storage

Speculation is circulating that OpenAI may unveil some amazing new price cuts for developers next month during its first OpenAI Developer Conference 2023. Sources close to the action who would rather not be named have contacted Reuters explaining that potential major updates for developers to build software applications based on OpenAI’s ChatGPT large language model will be announced next month.

OpenAI, a leading artificial intelligence research lab, is set to introduce significant updates aimed at making AI-based software development cheaper and faster. These updates, which include the introduction of memory storage to developer tools and the addition of vision capabilities for image analysis.

ChatGPT Memory Storage

The introduction of memory storage to its developer tools is a significant step forward for OpenAI. This feature could potentially reduce costs for application makers by up to 20 times, making it more affordable for developers to build software applications based on OpenAI’s AI models. This is a crucial move, especially considering the high revenue expectations of the company. OpenAI executives expect to close this year with $200 million in revenue and aim to reach $1 billion by 2024.

API price cuts

Other articles you may find of interest on OpenAI’s ChatGPT and AI models.

The addition of vision capabilities is another significant update. This feature will enable developers to build applications that can analyze and describe images, expanding the range of possible applications for OpenAI’s technology. This is part of OpenAI’s broader strategy to transition from a consumer sensation to a developer platform. The company launched ChatGPT last November, which quickly became one of the world’s fastest-growing consumer applications. Now, OpenAI is looking to encourage companies to use its technology to build AI-powered chatbots and autonomous agents.

OpenAI developers conference 2023

However, OpenAI’s journey has not been without challenges. The company has faced difficulties in encouraging outsiders to build businesses using its technology. Despite these challenges, OpenAI is planning to release the stateful API, which will make it cheaper for companies to create applications by remembering the conversation history of inquiries. This release, along with the vision API, is part of OpenAI’s efforts to attract more developers to pay to access its model to build their own AI software.

The AI industry has seen significant investment, with investors pouring over $20 billion this year into AI startups, many of which rely on OpenAI’s technology. However, there are concerns over startups’ reliance on OpenAI or Google. OpenAI is working to distinguish itself from competitors like Google and to keep developers happy. However, its ambition to win over other companies has been less smooth, with plugins not gaining market traction.

OpenAI’s upcoming updates are a significant step towards making AI-based software development cheaper and faster. The introduction of memory storage to developer tools and the addition of vision capabilities for image analysis are expected to reduce costs and expand the range of possible applications for OpenAI’s technology. However, the company faces challenges in attracting businesses to use its technology and in distinguishing itself from competitors. Despite these challenges, OpenAI’s efforts to keep developers happy and its high revenue expectations suggest a promising future for the company. As always we will keep you up to speed on all the new announcements made in the run-up to OpenAI’s first highly anticipated developer conference taking place in San Francisco on November 6th 2023.

Source : Reuters

Filed Under: Technology News, Top News


Latest timeswonderful Deals

Disclosure: Some of our articles include affiliate links. If you buy something through one of these links, timeswonderful may earn an affiliate commission. Learn about our Disclosure Policy.

Categories
News

How to deploy a Llama 2 70B API in just 5 clicks

How to deploy a Llama 2 70B API in just 5 clicks

Trelis Research has recently released a comprehensive guide on how to set up an API for the Llama 70B using RunPod, a cloud computing platform primarily designed for AI and machine learning applications. This guide provides a step-by-step process on how to optimize the performance of the Llama 70B API using RunPod’s key offerings, including GPU Instances, Serverless GPUs, and AI Endpoints.

RunPod’s GPU Instances allow users to deploy container-based GPU instances that spin up in seconds using both public and private repositories. These instances are available in two different types: Secure Cloud and Community Cloud. The Secure Cloud operates in T3/T4 data centers, ensuring high reliability and security, while the Community Cloud connects individual compute providers to consumers through a vetted, secure peer-to-peer system.

The Serverless GPU service, part of RunPod’s Secure Cloud offering, provides pay-per-second serverless GPU computing, bringing autoscaling to your production environment. This service guarantees low cold-start times and stringent security measures. AI Endpoints, on the other hand, are fully managed and scaled to handle any workload. They are designed for a variety of applications including Dreambooth, Stable Diffusion, Whisper, and more.

Deploying a Llama 2 70B API on RunPod

To automate workflows and manage compute jobs effectively, RunPod provides a CLI / GraphQL API. Users can access multiple points for coding, optimizing, and running AI/ML jobs, including SSH, TCP Ports, and HTTP Ports. RunPod also offers OnDemand and Spot GPUs to suit different compute needs, and Persistent Volumes to ensure the safety of your data even when your pods are stopped. The Cloud Sync feature allows seamless data transfer to any cloud storage.

Other articles you may find of interest on the subject of Meta’s Llama 2 large language model.

Setting up RunPod


To set up an API for Llama 70B, users first need to create an account on RunPod. After logging in, users should navigate to the Secure Cloud section and choose a pricing structure that suits their needs. Users can then deploy a template and find a Trellis Research Lab Llama 2 70B. Once the model is loaded, the API endpoint will be ready for use.

To increase the inference speed, users can run multiple GPUs in parallel. Users can also run a long context model by searching for a different template by trellis research. The inference software allows users to make multiple requests to the API at the same time. Sending in large batches can make the approach as economic as using the open AIA API. Larger GPUs are needed for more batches or longer context length.

One of the key use cases for doing inference on a GPU is for data preparation. Users can also run their own model by swapping out the model name on hugging face. Access to the Llama 2 Enterprise Installation and Inference Guide server setup repo can be purchased for €49.99 for more detailed information on setting up a server and maximizing throughput for models.

Deploying a Meta’s Llama 2 70B API using RunPod is a straightforward process that can be accomplished in just a few steps. With the right tools and guidance, users can optimize the performance of their API and achieve their AI and machine learning objectives.

Filed Under: Guides, Top News


Latest timeswonderful Deals

Disclosure: Some of our articles include affiliate links. If you buy something through one of these links, timeswonderful may earn an affiliate commission. Learn about our Disclosure Policy.