Recent evidence suggests Chrome on Android may receive a new Tab Declutter tool to help people manage so many open tabs. Hints of this feature were discovered in lines of code on Google’s Chromium platform by 9To5Google. It’s unknown exactly how Tab Declutter will work, although there is enough information to paint a picture.
According to the report, tabs that have been unused for a long period of time “will automatically” be put away in an archive. You can then go over to the archive editor, look at what’s there, and decide for yourself whether you want to delete a tab or restore it.
Not only could Tab Declutter help people manage a messy browser, but it might also boost Chrome’s performance. All those open tabs can eat away at a device’s RAM, slowing things down to a crawl.
This isn’t the first time Google has worked on improving tab management for its browser. Back in January, the company implemented an organizer tool harnessing the power of AI to instantly group tabs together based on a certain topic.
These efforts even go as far back as 2020, when the tech giant began developing a feature that would recommend closing certain tabs if they’ve been left alone for an extended period of time. It was similar to the new Declutter tool, though much less aggressive, since it wouldn’t archive anything. Ultimately, nothing came of it, however it seems Google is looking back at this old idea.
Speculating on all the open tabs
As 9To5Google points out, this has the potential to “become one of the most annoying features” the company has ever made. Imagine Chrome disappearing tabs you wanted to look at without letting you know. It could get frustrating pretty fast.
Additionally, would it be possible to set a time limit for when an unused page is allowed to be put away? Will there be an exception list telling Chrome to leave certain websites alone? We’ll have the answer if and when this feature eventually goes live.
Get the hottest deals available in your inbox plus news, reviews, opinion, analysis and more from the TechRadar team.
We have no word on when Tab Declutter will launch. It’s unknown if Chrome on iOS is scheduled to receive a similar upgrade as the Chromium edition. It’s possible Android devices will get first dibs, then iPhones, or the iPhone may be left out in some regions that don’t get a Chromium-based browser.
9To5Google speculates the update will launch in early May as part of Chrome 125. This seems a little early if it’s still in the middle of development. Late summer to early autumn is more plausible, but we could be totally wrong. We’ll just have to wait.
If you’ve owned your iPhone or iPad for a long time, there’s a good chance it has files, photos, apps and other digital clutter on it that’s taking up more space than necessary. Maybe you’ve even gotten to the point where you’re getting warnings about the scant bit of free space you have left on your device. Thankfully, there are plenty of things you can do to declutter your iPhone or iPad, free up some space and otherwise make your gear feel a bit more like new again. This guide will take you through how to reclaim your notifications and your device’s storage.
Delete your unused apps
Igor Bonifacic / Engadget
You don’t need me to tell you to delete apps you don’t use to free up space on your iPhone, but you might not know that iOS has a dedicated tool to help you do this. You can access it by opening the Settings app on your iPhone or iPad, then tapping “General,” followed by “iPhone Storage” or “iPad Storage.” It may take a few moments for the interface to populate, but once it does, you’ll see a handy visual representation of how much of your device’s storage you’ve given over to apps, photos and other types of files. You will also see a list of every app installed on your device, as well as how much space it takes up and when you last used it – all helpful information you can use to decide what to delete.
Depending on the app, iOS will present you with at least two options when you tap on it. You can delete the app and all its related data or “offload” it. In the latter case, iOS will delete the app from your iPhone or iPad but leave your data untouched. As such, when you reinstall the app, you can pick up right where you left off. It will also remain in your App Library for easy access. From the iPhone Storage menu, you can also set your device to automatically offload unused apps when you’re running low on storage, which is useful for all, but especially those with older, low-storage devices.
Igor Bonifacic / Engadget
If you use Apple Music and Messages frequently, tap on them since they offer a few additional options for managing their footprint. The interface for Apple Music includes a list of every download on your iPhone or iPad sorted by artist and album, offering a much better way of culling your library than from within the app itself.
Messages, meanwhile, has a few handy options for serial texters. At the bottom of the interface, you will see a breakdown of all the different attachments you may have received in messaging with your friends and family. Seeing how much storage those old photos, videos and GIFs take up may be eye opening; in fact, iOS will prompt you to review large attachments. That’s a good place to start since the interface does a good job of highlighting the biggest space hogs right at the top. You can also set iOS to automatically delete messages and attachments that are more than a year old. Unless space is at an absolute premium on your device, I would recommend against turning on this option, if only because it might delete a photo or video that has sentimental value to you.
Trim your contacts list
If you’ve had an iPhone for a while, there’s a good chance your contacts list could use an edit. Unless you plan to one day call everyone on that list, why not delete contacts you don’t speak to anymore? Your iPhone will give you a head start by identifying suspected duplicate contacts. Outside of that, there’s not much to this process other than going through each contact and ensuring the information you have is up to date.
Review your notification settings
Igor Bonifacic / Engadget
Something everyone should do every so often is review their notification settings since alerts can be a drain on your device’s battery (not to mention frequently take your attention away from more important things, too). To get started, open your device’s Settings app and tap on “Notifications.” If you haven’t already, I would recommend taking advantage of iOS 15’s scheduled summary feature. Let’s be honest, most notifications don’t require your immediate attention, and you’re better off addressing them all at once instead piecemeal. The schedule feature will help you do that by allowing you to set a few times per day when your device displays some notifications all at once.
For most people, that should make their notifications more manageable, but if you want to take things a step further, you can adjust individual settings for each app. For some of the worst offenders (Instagram and Twitter come to mind), it’s worthwhile to jump into their in-app settings to limit or disable the notifications they send you.
Focus Modes
Igor Bonifacic / Engadget
Another tool you can use to get a handle on your notification is Apple’s Focus feature, which allows you to configure custom do not disturb settings for different activities. By default, your device will come with a few preconfigured ones, and it’s worth reviewing the settings for each to optimize them for your needs.
To create a new custom Focus Mode, open the Settings app on your iPhone or iPad and tap “Focus,” which is located in the same subcategory as notifications. You can also create a new Focus mode directly from your device’s Control Center by long pressing on the “Do Not Disturb” icon and tapping “New Focus.”
Once you create a new Focus, customizing it is straightforward. You can specify contacts you want iOS to either silence or allow notifications from. You can do the same for apps as well. After you customize those lists to your liking, tap the “Options” prompt below your contacts and apps lists to see a few additional settings. Specifically, there’s an option to allow silenced notifications to display on your lock screen that you might find helpful.
The last thing I want to draw your attention to are the options around customizing your Home Screen for different Focus modes. By limiting the apps I can easily access, I find I’m less likely to get distracted. For instance, I’ve set my Reading Focus to limit my Home Screen to apps like Libby, Pocket and Apple Music.
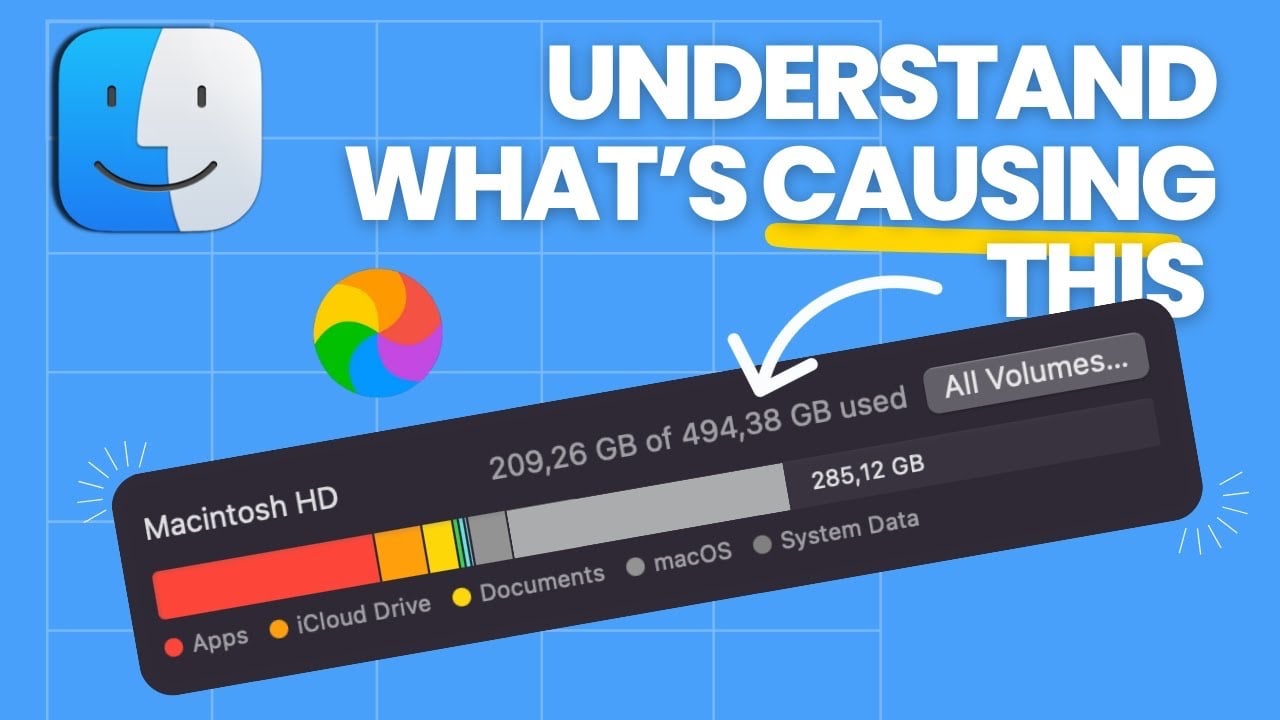
In this article we will look at how you can declutter your Mac and manage your System Data. Are you struggling with a Mac that’s sluggish and low on space? You’re not alone. Many Mac users find themselves grappling with large system data storage. Fortunately, there’s a solution. This video below from Amir Bendabi delves into effective strategies for managing system data and freeing up space on your Mac.
Addressing System Data Storage:
Firstly, let’s talk about system data. It’s a common culprit for taking up significant space on your Mac. If you’ve noticed your computer slowing down, it’s time to take a closer look at what’s hogging your storage. A previous video on this topic garnered much attention, highlighting its relevance among Mac users.
Spotting the Storage Hogs:
So, where to begin? Identifying large files and folders is key. For instance, Adobe applications and their caches can be substantial storage consumers. But remember, what’s sizable in one case may differ in another. It’s about finding what’s large in your specific situation.
Navigating with Ease:
Navigating these storage-heavy folders doesn’t have to be a maze. With simple commands in Finder, such as Command + Shift + G, you can effortlessly access system libraries and caches. A step-by-step guide through these processes can make it a breeze.
Delete with Care:
Now, before you start deleting files, a word of caution: not all files are expendable. Some might look unimportant but are crucial for your system’s functionality. It’s essential to understand what you’re deleting to avoid unintended consequences.
A Practical Approach:
Practical demonstrations, like removing outdated Adobe files, can be incredibly helpful. Watching someone navigate this process provides clarity and confidence when you decide to do it yourself.
Know Your System Inside Out:
Understanding your system folders and applications is crucial. There are certain areas and pre-installed applications that are best left untouched to ensure the smooth running of your Mac.
Learning from Examples – Final Cut Pro:
Take, for example, Final Cut Pro. Improper settings in such applications can lead to excessive storage usage. Adjusting these settings can prevent unnecessary space consumption.
Engaging with the Audience:
Addressing viewer comments and questions is an integral part of learning. It shows a commitment to resolving common issues and enhancing user experience.
Wrapping It Up:
Finally, wrapping up with a clear summary of the key points helps reinforce what you’ve learned and ensures you’re ready to tackle your Mac’s storage issues.
By following these steps, you can effectively manage your Mac’s system data and clear up space. This not only improves your Mac’s performance but also enhances your overall user experience. Remember, the key is understanding what consumes space and tackling it with knowledge and caution.
You will be pleased to know that managing your Mac’s storage doesn’t have to be a daunting task. With the right approach and understanding, you can keep your system running smoothly and efficiently. We hope that you find this article on how to declutter your Mac and manage your System Data useful.
Source & Image Credit: Amir Bendabi
Filed Under: Apple, Guides, Laptops
Latest timeswonderful Deals
Disclosure: Some of our articles include affiliate links. If you buy something through one of these links, timeswonderful may earn an affiliate commission. Learn about our Disclosure Policy.