Categories
News

How to build custom AI chatbots using Google Gemini

How to build custom AI chatbots using Google Gemini

if you are interested in learning how to create chatbot trained on custom information and capable of answering requests on certain topics with ease. You might be interested in knowing that Google Gemini can be used to achieve this easily thanks to Google making available an API late last year.

Imagine a world where your customer service is not just efficient but also uniquely tailored to your business’s every need. This is the promise of Google Gemini AI, a new AI platform that empowers you to create a chatbot that’s not just smart, but also a perfect fit for your company’s operations and customer interactions. In the competitive landscape of today’s market, a custom AI chatbot can be the key to standing out and providing exceptional service and millions of businesses are already adopting AI into their customer service workflows.

Custom AI chatbots are transforming customer service by offering responses that are specifically designed for your business context. They can handle specialized queries, track orders, and even make personalized recommendations. Google Gemini AI is the tool that allows you to develop a chatbot that understands the nuances of your business, providing a more personalized touch to your customers.

Create custom AI chatbots using Gemini

To begin building your custom chatbot, you’ll need to familiarize yourself with Google Gemini API and AI Studio. These platforms are essential for creating and managing your AI assistant. Before diving in, ensure you have Node.js and a suitable code editor installed, as they will be crucial throughout the development process.

Other articles you may find of interest on the subject of Google Gemini :

AI Studio is where you’ll craft the chat prompts that will guide your chatbot’s interactions. These prompts are the script your chatbot will follow, shaping how it responds to various inquiries and commands. By carefully creating these prompts, you’re teaching your chatbot how to effectively communicate with users.

Fine tuning your chatbot

The real benefit of a custom chatbot lies in its ability to reflect your business’s expertise, voice, and ethos. You’ll train your chatbot to understand industry-specific terminology and to adopt a conversational tone that matches your brand’s personality. This personalization is achieved by providing examples and prompts that align with your business objectives.

Once your chatbot is set up, it’s important to test and refine its functionality. Engage with your chatbot, challenge it with complex questions, and evaluate its responses. This process of continuous improvement is crucial to identifying areas that need work, ensuring that your chatbot becomes more accurate and reliable over time.

As your chatbot starts to take shape, you’ll write sample code for integration into your business’s systems. An API key is essential at this stage, acting as a secure gateway for your chatbot to interact with users through your website or app. The final step is to create an intuitive web interface for your chatbot and share your code on platforms like GitHub. This not only promotes community learning but also encourages collaborative improvements.

Continual improvement

With your custom AI chatbot up and running, it’s vital to keep a loop of feedback and user interaction. This dedication to continuous enhancement will ensure that your chatbot develops into an increasingly sophisticated and effective tool for your business.

Crafting a custom AI chatbot with Google Gemini AI is a strategic move to improve your customer service and operational efficiency. By following this guide, you’ll create a chatbot that is not only in tune with your business but also enhances the customer experience. Embark on the journey of AI chatbot development and discover the benefits it can bring to your enterprise.

Filed Under: Guides, Top News


Latest timeswonderful Deals

Disclosure: Some of our articles include affiliate links. If you buy something through one of these links, timeswonderful may earn an affiliate commission. Learn about our Disclosure Policy.

Categories
News

How to build an AI home security system using a Raspberry Pi mini PC

AI home security system using a Raspberry Pi mini PC

If you are looking for a project to keep you busy this weekend you might be interested in learning how to create your very own personal AI assistant by installing artificial intelligence onto a Raspberry Pi mini PC. The latest addition to the line of mini PC hardware is the Raspberry Pi 5, a small yet mighty computer, can now be the brains behind your home security and home automation system, thanks to advancements in artificial intelligence (AI). By combining the Raspberry Pi with the Coral AI Edge TPU, you can create a surveillance system that not only watches but understands what it sees.

AI home security system

To start, you’ll need to connect the Coral AI Edge TPU to your Raspberry Pi. This is done through a special accessory called the Pineberry AI hat, which fits onto the Raspberry Pi and uses the PCIe express bus for fast data transfer. This setup is crucial for handling the demands of AI applications. Once the hardware is in place, you’ll install the Raspberry Pi OS, setting the stage for your AI-powered security system.

The next step is to get the software ready. Docker is a tool that will help you run your AI models without any hiccups. It creates separate environments for each application, so they don’t interfere with each other. You’ll also need to set up MQTT, a messaging protocol that lets different parts of your AI system talk to each other seamlessly.

Running AI on a Pi

Here are some other articles you may find of interest on the subject of Raspberry Pi 5 :

For remote access, you’ll want to connect your Raspberry Pi to your Wi-Fi network and configure SSH. SSH allows you to securely log into your Raspberry Pi from another computer, which is incredibly handy for making updates or changes to your AI applications from anywhere.

When it comes to cameras, you have options. Webcams are a simple, cost-effective choice, while IP cameras offer higher quality and more features. Depending on your needs and budget, you can choose the best fit for your system. These cameras will work with Frigate, an open-source software that’s the heart of your AI surveillance system.

Frigate uses machine learning to analyze video footage in real-time. After installing Frigate on your Raspberry Pi, you’ll set it up with a configuration file written in YAML. This will kickstart your AI surveillance, allowing you to monitor your home with a smart, responsive system.

For those who want even more power, you can add more Edge TPUs to your Raspberry Pi. This means you can process several video streams at once, giving you a more comprehensive view of your home’s security. The Raspberry Pi’s PCIe slot isn’t just for AI, though. It can also be used for other upgrades, like adding NVMe storage, which can speed up your device for a range of projects.

By following these steps, you can transform your Raspberry Pi 5 into a cutting-edge tool for home surveillance. The combination of the Coral AI Edge TPU and the Pineberry AI hat opens up a world of possibilities for tech enthusiasts. This setup allows you to run complex AI models efficiently, making it a powerful and affordable choice for not just home security, but for any AI project you can dream up.

Filed Under: DIY Projects, Top News


Latest timeswonderful Deals

Disclosure: Some of our articles include affiliate links. If you buy something through one of these links, timeswonderful may earn an affiliate commission. Learn about our Disclosure Policy.

Categories
News

How to Build a Website with the Help of Google Bard

website google bard

This guide is designed to show you how to build a website with the help of Google Bard. Building a website can seem daunting, especially for those with little technical experience. But fear not! Google Bard is here to lend a helping hand, guiding you through the process from conception to launch with its impressive AI capabilities. This guide will demystify the steps involved, showing you how to leverage Bard’s strengths to create a beautiful and functional website, even if you haven’t written a line of code.

1. Brainstorm and Plan:

Before diving into the technicalities, take some time to brainstorm your website’s purpose and target audience. Ask yourself:

  • What is the goal of your website? (e.g., personal portfolio, online store, blog)
  • Who are you trying to reach? (e.g., potential employers, customers, like-minded individuals)
  • What key features do you need? (e.g., contact form, gallery, shopping cart)

Once you have a clear vision, use Bard to brainstorm page layouts, content ideas, and website names. Tell Google Bard the purpose and target audience, and ask for creative suggestions for titles, taglines, and even logo designs. This will give you a strong foundation to build upon.

2. Choose Your Tools:

Now it’s time to pick the platform that will power your website. Here are two popular options, each with its own Bard-friendly features:

  • WordPress: This content management system (CMS) is beginner-friendly and offers countless plugins and themes. Bard can help you find the perfect theme that aligns with your vision, and even generate custom content for different sections of your website.
  • Website Builders: Platforms like Wix or Squarespace offer drag-and-drop interfaces, making them ideal for visual learners. While these platforms don’t offer as much customization as WordPress, Bard can still assist with writing engaging website copy and crafting compelling calls to action.

3. Secure Your Domain and Hosting:

Your domain name is your website’s address on the internet, and hosting is where your website’s files reside. Google Bard can help you brainstorm memorable domain names and suggest reputable hosting providers based on your needs and budget.

4. Design and Build Your Website:

This is where the magic of Bard truly shines! Whether you choose WordPress or a website builder, Bard can guide you through the design and development process. Here’s how:

  • Content Creation: Let Google Bard write captivating website copy for your homepage, about page, and other sections. Ask for specific tones and styles, and Bard will tailor the content to your audience.
  • Image Selection and Optimization: Describe the visuals you need, and Bard can suggest relevant images and even adjust their size and format for optimal website performance.
  • Layout and Design: Share your vision for the website layout, and Bard can provide feedback and suggest design elements like fonts and color palettes.
  • Coding Assistance: While Bard can’t write complex code for you, it can help you understand existing code snippets and troubleshoot basic issues.

5. Launch and Optimize:

Congratulations! Your website is ready to go live. Google Bard can help you write clear launch announcements and promote your website on social media. Use analytics tools to track website traffic and engagement, and ask Bard for insights and suggestions on how to improve your website based on visitor behavior.

Remember:

  • Bard is a tool, not a replacement for your creativity. Use its suggestions as a starting point and personalize them to reflect your unique voice and brand.
  • Don’t be afraid to experiment! Bard is happy to answer your questions and adapt to your preferences as you build your website.
  • Be patient and persistent. Building a website takes time and effort. But with Bard by your side, the process will be more enjoyable and rewarding.

Bonus Tip: Check out existing websites built with Bard’s help for inspiration and to see the platform’s capabilities in action.

By following these steps and leveraging the power of Google Bard, you can create a stunning and functional website that reflects your vision and meets your needs. So, go forth and build your digital haven!

This guide is a general overview of how to build a website with the help of Google Bard and specific tools and features may vary depending on your chosen platform and Bard’s development progress. Always feel free to ask Bard for assistance if you encounter any challenges or have specific questions.

Here are some more helpful Google Bard articles:

Filed Under: Guides


Latest timeswonderful Deals

Disclosure: Some of our articles include affiliate links. If you buy something through one of these links, timeswonderful may earn an affiliate commission. Learn about our Disclosure Policy.

Categories
News

Easily build custom AI automations using new drag-and-drop user interface n8n

create AI assistants using drag-and-drop user interface n8n

If you are constantly seeking ways to improve efficiency and streamline operations to improve your productivity and workflows. You might be interested in n8n, a platform that simplifies the creation of automated workflows powered, making it easier for both individuals and organizations to integrate artificial intelligence (AI) into their daily tasks. n8n is designed with the user in mind, offering a straightforward drag-and-drop user interface enabling users to automate complex processes without the need for extensive technical knowledge.

n8n is an extendable workflow automation tool. With a fair-code distribution model, n8n will always have visible source code, be available to self-host, and allow you to add your own custom functions, logic and apps. n8n’s node-based approach makes it highly versatile, enabling you to connect anything to everything.

Features of n8n

– Extensibility: Users can automate workflows and add custom functions, logic, and applications.
– Self-hosting: The platform allows for self-hosting, enabling users to maintain control over their creations.
– Node-based approach: Users can create AI agents by connecting nodes in a workflow.
– Integration: n8n supports integration with over 400 applications, facilitating data management and automation.
– Autonomy: Created AI agents can function autonomously without human intervention.

n8n’s platform stands out for its user-friendly design and allows users to build AI agents by connecting “nodes,” each representing a different function or application. The result is a visual, intuitive system that enables the construction of intricate workflows, making it possible to automate multi-step tasks with relative ease. This approach is particularly beneficial for those who may not have a deep background in coding, as it removes the barriers to developing autonomous AI agents.

One of the key advantages of n8n is its compatibility with a wide range of applications. The platform boasts integration with over 400 apps, which means users can connect various logic and tools to manage data and automate tasks across different platforms. Whether it’s sorting through emails, organizing calendars, or deploying AI models, n8n’s extensive integration options offer robust automation capabilities.

Building AI automations with n8n

Workflow automation is a way to make your daily tasks easier. Imagine you have a series of steps you do every day, like sorting emails or entering data into a spreadsheet. Instead of doing these steps manually, workflow automation uses technology to do them for you. This means you can save time and reduce mistakes.

Here are some other articles you may find of interest on the subject of automation and AI assistants :

For companies that prioritize data security and want to maintain control over their workflows, n8n provides self-hosting solutions. This means that AI agents and automated processes can be managed on the organization’s own servers, allowing for greater data privacy and independence from third-party cloud services.

Autonomous AI assistants

Supporting the platform’s capabilities is a strong community and a host of resources. Users can join n8n’s private Discord community to collaborate with others, access AI tools, and utilize a comprehensive library of learning materials. This community is a valuable asset for both beginners and seasoned users, helping them to make the most of n8n’s features and enhance their automation expertise.

A practical application of n8n’s power is seen in the automation of appointment scheduling. Imagine an AI agent that can independently manage incoming emails, extract the necessary information, and schedule appointments by connecting with calendar apps. This is just one example of how n8n can automate time-consuming tasks, showcasing the platform’s ability to simplify and enhance business operations.

n8n is not only versatile in its functionality but also in its installation options. Users can choose to install the platform using npm, Docker, or as a cloud service. Additionally, n8n offers a flexible pricing structure that accommodates businesses of all sizes, making its benefits widely accessible.

The platform’s interface is clean and effective, equipped with workflow management tools, pre-built templates, and customizable settings to address various automation needs. For those who require more specialized customization, n8n also offers coding features that allow users to tailor workflows to their specific requirements.

Education and user growth are central to n8n’s mission. The platform provides a wealth of documentation and maintains a dedicated YouTube channel filled with tutorials, tips, and best practices. These resources are designed to help users maximize the potential of their AI agents and automated workflows.

n8n is a versatile tool that caters to anyone looking to enhance their workflow automation. Its blend of an easy-to-use interface, broad integration capabilities, and strong community support makes it an attractive option for improving work processes. The platform empowers users, regardless of their technical background, to create powerful AI agents that can significantly boost efficiency and productivity. With n8n, businesses can take a significant step toward optimizing their operations and staying competitive in a world where automation is increasingly essential.

Filed Under: Guides, Top News


Latest timeswonderful Deals

Disclosure: Some of our articles include affiliate links. If you buy something through one of these links, timeswonderful may earn an affiliate commission. Learn about our Disclosure Policy.

Categories
News

Build a real-time speech-to-image AI using Stable Diffusion

Build a real-time speech-to-image AI using Stable Diffusion

Imagine speaking into a microphone and watching as your words are transformed into images on your screen almost instantly. This isn’t a scene from a science fiction movie; it’s a reality made possible by an application demonstration created by All About AI that combines the power of artificial intelligence with the art of visual representation. This innovative tool is reshaping our interaction with technology by allowing us to convert spoken language into pictures in real time. Not only can you ask it to create individual images but you can also run audio into the script for it to create multiple images depending on what is said.

At the heart of this application is a complex process that begins with the sound of your voice. When you speak, your words are captured by a microphone and then swiftly and accurately interpreted by an advanced speech recognition system known as Faster Whisper. Once your speech is converted into text, the baton is passed to a sophisticated image generation model from CIT AI’s suite, aptly named Stable Fusion. This model takes the recognized speech and crafts it into visual art.

The application’s user interface is designed to be smooth and engaging, thanks to a Python extension that powers it. As you speak, you can witness the transformation from audio to visual in real time. A Flask app is employed to display the generated images dynamically, adding to the immediacy of the experience.

Real-time AI speech-to -image

Customization is a key aspect of this speech-to-image AI tool. The Python code behind the application is tailored to allow users to modify the image generation process. Whether you want to change the style, adjust the color palette, or fine-tune the details of the image, the application gives you the control to personalize your visual output.

Here are some other articles you may find of interest on the subject of automations using artificial intelligence (AI) :

The versatility of this application is impressive. It has been tested with various types of audio inputs, proving its capability to handle a wide range of spoken content. From the clear enunciation found in podcasts to the whimsical narratives of bedtime stories, and even the complex layers of music videos, this tool adeptly converts different audio experiences into visual stories.

As the technology continues to evolve, users can anticipate more advanced image generation capabilities, increased customization options, and smoother integration with other digital platforms.  Speech-to-image applications are systems that convert spoken language into visual representations, typically images or sequences of images. This process involves several key steps and technologies.

How does speech-to-image AI work?

First, speech recognition is employed to convert spoken words into text. This involves complex algorithms that handle variations in speech, such as accents, intonation, and background noise. The accuracy of this step is crucial, as it forms the basis for the subsequent image generation.

Once the speech is transcribed, natural language processing (NLP) techniques interpret the text. This involves understanding the context, semantics, and intent behind the spoken words. For instance, if someone describes a “sunny beach with palm trees,” the system needs to recognize this as a description of a scene.

The next step is the actual image generation. Here, the interpreted text is used to create visual content. This is typically achieved through advanced machine learning models, particularly generative models like Generative Adversarial Networks (GANs) or Variational Autoencoders (VAEs). These models are trained on large datasets of images and their descriptions to learn how to generate accurate and realistic images from textual descriptions.

An example of a practical application of speech-to-image technology is in aiding creative processes, like in graphic design or filmmaking, where a designer or director can describe a scene and have a preliminary visual representation generated automatically. Another application is in assistive technologies, where speech-to-image systems can help individuals with disabilities by converting their spoken words into visual forms of communication.

The technology, while promising, faces challenges. Ensuring the accuracy of the generated images, particularly in capturing the nuances of the described scenes, is a significant hurdle. Additionally, ethical considerations arise, especially concerning the potential misuse of the technology for creating misleading or harmful content.

This breakthrough in real-time AI speech-to-image technology represents a significant step forward in the field of artificial intelligence. It creates a bridge between verbal communication and visual creativity, offering a glimpse into a future where our spoken words can be instantly visualized. This enriches our ability to express and interpret ideas, opening up new possibilities for how we communicate and interact with the world around us.

Filed Under: Guides, Top News


Latest timeswonderful Deals

Disclosure: Some of our articles include affiliate links. If you buy something through one of these links, timeswonderful may earn an affiliate commission. Learn about our Disclosure Policy.

Categories
News

Build your own AI assistant like Perplexity

Build your own AI assistant like Perplexity using LangGraph GPT-4 and Tavily

Imagine the power of having your own AI assistant, one that can swiftly find information and engage in conversation just like the sophisticated Perplexity. This is not a distant dream but a tangible project you can embark on today. With the right tools and guidance, you can create an assistant that not only understands and generates nuanced language but also searches with incredible accuracy. This article will guide you through the steps to build such an assistant, which we’ll call “Perplexity Light,” using cutting-edge technologies.

The secret behind the original Perplexity’s impressive capabilities lies in its interaction with advanced language models. To replicate this, you’ll be using the latest LangChain library and LangGraph. These tools simplify the complex process of building language agents by organizing them into graphs, making the execution of AI tasks more straightforward than traditional programming approaches.

At the heart of your AI assistant will be GPT-4, the latest language model from OpenAI. It’s celebrated for its deep understanding of language and its ability to generate responses that feel incredibly human. When you combine GPT-4 with the robust search functionalities of Tavily AI, your assistant will not only hold natural conversations but will also be able to retrieve information with exceptional accuracy.

Build your own AI assistant

In the tutorial below kindly created by AI Anytime explore how to utilize LangGraph, a library designed for building stateful, multi-actor applications. LangGraph, built on LangChain, to enable the coordination of multiple ‘actors’ and how this is particularly useful for adding cycles to your LLM applications, extending beyond the capabilities of a traditional DAG framework.

“LangGraph is a library for building stateful, multi-actor applications with LLMs, built on top of (and intended to be used with) LangChain. It extends the LangChain Expression Language with the ability to coordinate multiple chains (or actors) across multiple steps of computation in a cyclic manner. It is inspired by Pregel and Apache Beam. The current interface exposed is one inspired by NetworkX.”

Here are some other articles you may find of interest on the subject of  Perplexity AI

Your AI assistant will run on a Fast API microservice, which is perfect for handling the asynchronous nature of AI interactions. This framework is known for its speed and efficiency, making it an excellent choice for your project. If you’re thinking about adding a user interface, consider using Bootstrap for its responsive design capabilities and its wide range of components.

The journey to develop your AI assistant begins with Google Colab, a collaborative and user-friendly coding platform that operates in the cloud. Starting in this flexible environment, you’ll eventually transition to the more structured world of a Fast API application.

The core functionality of Perplexity Light is what makes it truly special. It will allow users to ask questions and receive AI-generated responses, mimicking a natural conversation. This feature is not just a technical marvel; it represents a step forward in making information access and management seamless for users.

Perplexity Light also opens doors for those looking to create minimum viable products (MVPs) or proofs of concept. With Tavily AI’s free tier for initial requests, you can start experimenting and refining your application without a significant financial investment, encouraging innovation in the realm of AI assistants.

Building an AI assistant akin to Perplexity means weaving together sophisticated technologies. By harnessing the capabilities of LangGraph, GPT-4, and Tavily AI within a Fast API framework, you’re not just crafting an application; you’re shaping the future of AI-powered search and interaction tools. This guide is your first step towards creating an assistant that not only performs tasks but also transforms the way we interact with technology. For more information on LangGraph jump over to the official documentation.

Filed Under: Guides, Top News


Latest timeswonderful Deals

Disclosure: Some of our articles include affiliate links. If you buy something through one of these links, timeswonderful may earn an affiliate commission. Learn about our Disclosure Policy.

Categories
News

How to build a PlayStation 5 tablet

building a PlayStation 5 tablet games console

Imagine being able to take your PlayStation 5 gaming sessions anywhere you go. This is now a reality thanks to DIY Perks  who have created a custom-built device PlayStation 5 tablet transforming the the PS5 into a portable gaming tablet. This innovative creation is the first of its kind, allowing players to enjoy their favorite games without the need for a traditional console setup.

As you can imagine the transformation of a PlayStation 5 into a tablet requires a complete redesign, especially with the cooling system, All all the PlayStation components had to be reconfigured to fit within a smaller, tablet-sized frame. To prevent overheating, DIY Perks designed a custom heat sink and placed heat pipes in strategic locations. This ensures that the device stays cool, even during the most demanding gaming sessions. The original cooling fans were replaced with smaller, more efficient ones to maintain proper airflow within the compact space.

PlayStation 5 tablet

One of the key advancements in this device is the use of liquid metal as a thermal interface material. This greatly improves the efficiency of heat transfer from the CPU to the heat sink. To protect the cooling system and ensure its longevity, a nickel plating process was applied. Check out the video kindly created by DIY Perks to learn more about creating your very own PlayStation 5 tablet.

Here are some other articles you may find of interest on the subject of games consoles :

The exterior of the PlayStation 5 Tablet Edition is just as impressive as its internal features. It boasts a 3D printed shell that not only looks like something Sony would design but also provides strong protection for the device. The sound system, which includes a mini subwoofer and stereo speakers, offers an audio experience that competes with the visual performance.

Selecting the right display for the PS5 tablet

Choosing the right display technology was crucial, and an OLED screen was selected for its outstanding image quality and motion performance, both of which are vital for an engaging gaming experience. The screen is reinforced with a custom-cut carbon fiber back panel, which adds durability without making the device too heavy. To meet the power requirements of this portable device, the original PS5 power supply was replaced with a smaller, more efficient gallium nitride power supply. A specially designed, flexible power cable connects this new power supply to the motherboard, contributing to the tablet’s sleek design.

The end product is a quiet, high-performance gaming tablet that pushes the boundaries of what portable gaming can be. The PlayStation 5 Tablet Edition is a testament to what can be accomplished with creativity and technical know-how, and it sets a new standard for portable gaming devices.

This project raises questions about why such innovations have not been officially pursued in the industry. The success of the PlayStation 5 Tablet Edition suggests there is a market for high-performance, portable gaming solutions and could encourage future custom projects or even prompt major companies to explore new console designs.

The PlayStation 5 Tablet Edition represents more than just a technical feat; it offers a glimpse into the potential future of gaming. As technology continues to advance, we can only guess at the exciting developments that will transform our gaming experiences. The gaming world is full of potential, and the PlayStation 5 Tablet Edition gives us a tantalizing look at what might be on the horizon.

Filed Under: Hardware, Top News


Latest timeswonderful Deals

Disclosure: Some of our articles include affiliate links. If you buy something through one of these links, timeswonderful may earn an affiliate commission. Learn about our Disclosure Policy.

Categories
News

Build a team of AI workers for your business using CrewAI

Build a team of AI workers for your business using CrewAI

Having access to a single AI assistant is fantastic but what if you could create  an entire workforce of AI assistants that can communicate together to solve problems, code and help you with those mundane tasks of daily life. A new platform is making waves among developers and tech enthusiasts called CrewAI and has been specifically designed to build AI workersfor a wide variety of different applications.

Offering a powerful AI tool that simplifies the orchestration of autonomous AI agents, enabling them to work together to accomplish complex tasks. This open-source platform is not only easy to use but also highly efficient, quickly garnering attention and a growing community on platforms such as GitHub. Providing users with a “cutting-edge framework for orchestrating role-playing, autonomous AI agents. By fostering collaborative intelligence, CrewAI empowers agents to work together seamlessly, tackling complex tasks.”

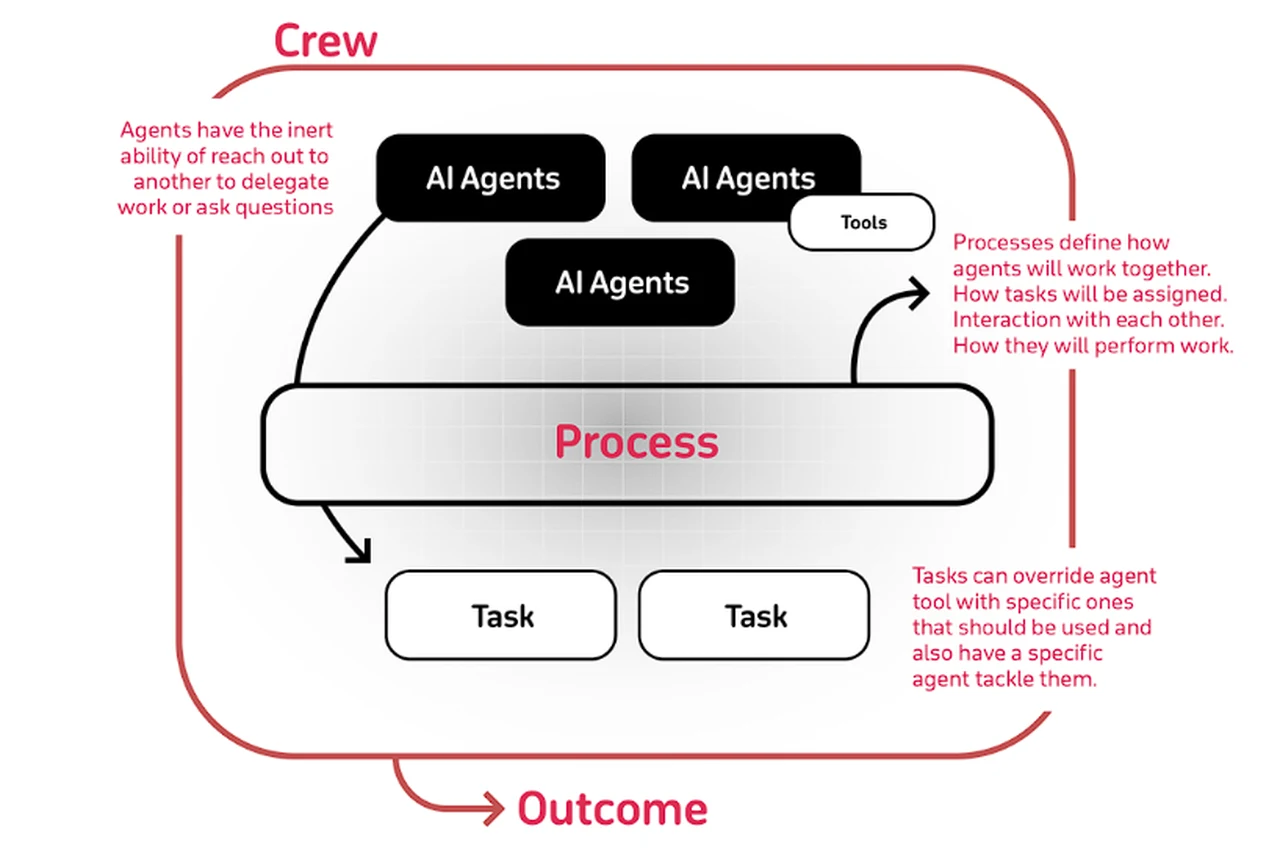
CrewAI workflow

At the heart of CrewAI is a role-based agent design, which allows users to assign specific roles and tasks to each AI workers. This structured approach ensures that each agent operates within its area of expertise, contributing to the team’s overall performance and the achievement of a shared objective. The platform’s collaborative nature is particularly beneficial for projects that require a combination of diverse skills and knowledge.

One of the standout features of CrewAI is its compatibility with a range of language learning models, both open-source and proprietary. This versatility makes it an ideal tool for developers looking to integrate different AI capabilities into their projects. Additionally, CrewAI’s custom GPT (Generative Pre-trained Transformer) facilitates interactive queries about the platform’s features, providing an intuitive experience for users.

Building autonomous AI workers

Matthew Berman explains more about the CrewAI framework that has been specifically designed to help you build autonomous AI agent teams with a focus on giving them tools, delegation powers, and more.

Learn more about CrewAI  and how you can build an army of AI workers to improve productivity and efficiency in your business or personal life. Prompt Engineering has created an overview video low showing how you can build your own team of autonomous AI agents.

“CrewAI is designed to enable AI agents to assume roles, share goals, and operate in a cohesive unit – much like a well-oiled crew. Whether you’re building a smart assistant platform, an automated customer service ensemble, or a multi-agent research team, CrewAI provides the backbone for sophisticated multi-agent interactions.”

Here are some other articles you may find of interest on the subject of building workforces using artificial intelligence :

CrewAI is not exclusively for seasoned experts; it also caters to beginners by offering a comprehensive guide for building applications such as chatbots. This step-by-step guide walks users through the entire development process, from conceptualization to deployment, making it accessible to a wide range of developers.

One of the platform’s key advantages is its accessibility. Available through a Google Colab notebook, CrewAI is free and straightforward to use. Users can easily set up their projects by importing the necessary packages and defining their agents, complete with designated roles, goals, and tools.

The platform’s dynamic task assignment feature allows for the creation of a crew of agents that can execute tasks in a sequential or planned manner, providing the flexibility needed to tackle various project requirements. This adaptability is crucial for developers who need to tailor their AI systems to specific tasks.

Features of CrewAI

  • Role-Based Agent Design: Customize agents with specific roles, goals, and tools.
  • Autonomous Inter-Agent Delegation: Agents can autonomously delegate tasks and inquire amongst themselves, enhancing problem-solving efficiency.
  • Flexible Task Management: Define tasks with customizable tools and assign them to agents dynamically.
  • Processes Driven: Currently only supports sequential task execution but more complex processes like consensual and hierarchical being worked on.

Transparency is another core value of CrewAI. The platform enables users to observe the thought processes and actions of the agents, offering insights into their decision-making and problem-solving strategies. This level of transparency is essential for building trust and understanding in the system.

CrewAI is continuously evolving, with ongoing development efforts focused on enhancing its capabilities and optimizing its performance. The platform is at the forefront of autonomous AI agent orchestration, and its future looks promising as it pushes the boundaries of what is possible in this field.

For developers interested in the potential of autonomous AI agents, CrewAI stands out as a top choice. Its open-source nature, user-friendly interface, and robust set of features make it a prime candidate for driving innovation in AI. Whether the goal is to create a simple chatbot or a complex system of collaborative agents, CrewAI provides the foundation necessary for a successful project. As the platform continues to grow and improve, it is poised to play a significant role in the evolution of AI technology, offering developers the tools they need to bring their creative visions to life.

Filed Under: Guides, Top News


Latest timeswonderful Deals

Disclosure: Some of our articles include affiliate links. If you buy something through one of these links, timeswonderful may earn an affiliate commission. Learn about our Disclosure Policy.

Categories
News

How to Build a Website with AI and No Code

Build a Website

This guide will show you how to build a website with a range of AI tools. The world of website development has undergone a profound transformation, ushering in a new era that redefines the traditional approaches to creating digital spaces. The once-standard model, which saw the building of a website as an arduous endeavor, typically requiring the expertise of a team well-versed in programming languages, has been revolutionized. This change is largely attributed to the advent of no-code platforms and the integration of artificial intelligence in web design. These innovations have effectively democratized the process, making it more user-friendly and significantly less time-consuming.

In this rapidly evolving landscape, the tools at the disposal of aspiring website creators are more powerful and intuitive than ever. For individuals who harbor ambitions of launching a professional-grade website but are hesitant to wade through the complex world of coding, the emergence of platforms like Reloom offers a refreshing alternative. These tools are not just simplifying the process; they are reimagining what it means to build a website. With such advancements, the act of website creation becomes not just about technical execution but also about unleashing creativity, empowering even those with minimal coding knowledge to construct and design websites that stand out.

This shift towards more accessible web development tools is indicative of a broader technological revolution. It reflects a growing recognition that the power to create and innovate online should not be confined to those with technical backgrounds. With the likes of Reloom leading the charge, the journey from concept to a fully-functional website is now more streamlined and less daunting. The promise of these tools is not just in their ability to simplify the technical aspects of website creation but also in their potential to unlock the creative capacities of a wider audience, ultimately enriching the digital landscape with a diversity of perspectives and ideas.  The video below from WeAreNoCode shows us a range of AI tools that can be used to build a website with no code.

The Dawn of No-Code Website Building

Embarking on this journey, let’s first understand the evolution of website development. Traditionally, it was a domain exclusive to coders and designers, but now, thanks to AI and no-code platforms, this process has become simpler and faster. The integration of artificial intelligence in these tools means that they can assist in numerous tasks, from layout design to content generation.

Reloom: Your AI-Assisted Companion

At the heart of this new wave is Reloom, an innovative AI website builder. Originating from a component library for Webflow, Reloom stands out for its ability to swiftly generate a website’s sitemap and structure. This tool is more than just a builder; it’s a creative partner that assists in sculpting the very backbone of your website.

Crafting the Sitemap with Ease

The process begins with inputting a brief description of your website into Reloom. Miraculously, within seconds, it conjures a comprehensive sitemap. This isn’t just a skeletal outline; it’s a fully-realized blueprint comprising various pages and sections. What’s more, each element of this sitemap can be tailored to suit your unique needs and vision.

From Wireframes to Engaging Content

Next, we transform this sitemap into a wireframe, laying down the basic structure of your website. Here, Reloom steps in again, not only creating the wireframe but also suggesting copy for each section. You have the freedom to edit this content, ensuring it aligns with your tone and brand message.

Design Customization: A User-Friendly Experience

Reloom shines in its ability to offer design flexibility. Whether it’s tweaking the layout or refining the content, the tool ensures that each step is user-friendly and efficient. This part of the process is particularly empowering, allowing you to infuse your personal touch into every corner of your website.

Seamless Exporting to Design and Building Tools

Once you’re satisfied with the design, Reloom facilitates the export of your project to platforms like Figma for advanced design work or directly to Webflow for website construction. This stage is crucial, as it involves importing the project into these platforms and making the final adjustments to bring your vision to life.

Incorporating Advanced Features

For those seeking to add an extra layer of sophistication to their website, tools like Spline for 3D designs and animations are recommended. These features can significantly elevate the aesthetic appeal and overall value of your website, making it stand out in the digital realm.

Empowering Your Website Building Journey

As we wrap up this exploration, it’s evident that the journey of building a high-quality website has been tremendously simplified by no-code tools and AI. The efficiency and ease offered by these innovations are not just a boon for budding entrepreneurs and creatives but also a testament to the ever-evolving landscape of technology.

Guiding You Through Every Step

If you are wondering how to begin this exciting journey, rest assured that the tools and resources mentioned here will guide you every step of the way. Building a website has never been more approachable, and with the right tools at your disposal, the possibilities are endless.

Embrace the Future of Website Building

This is the era of AI and no-code solutions, a time when your vision for a digital presence can be realized with greater ease and creativity than ever before. Embrace these advancements and embark on your journey to create a stunning, professional website that reflects your unique brand and vision.

Source & Image Credit: WeAreNoCode

Filed Under: Guides


Latest timeswonderful Deals

Disclosure: Some of our articles include affiliate links. If you buy something through one of these links, timeswonderful may earn an affiliate commission. Learn about our Disclosure Policy.

Categories
News

How to build a flying umbrella using drone technology

How to build a flying umbrella drone style

In a world where technology constantly reshapes our daily lives, the concept of a drone-powered umbrella that hovers above you, providing shelter from the rain without the need to hold it, is not as far-fetched as it once seemed. This idea of a flying umbrella is being brought closer to reality by creative individuals who are combining the convenience of modern drone technology with the age-old need for rain protection. This new type of flying umbrella could soon redefine the way we shield ourselves from the elements.

The challenge in creating such a device lies in the integration of propellers into an object that has never needed them before. Designers have cleverly come up with a frame that has propellers mounted on the sides to prevent any interference with the airflow, which is crucial for the umbrella to work effectively.

The process of developing this innovative umbrella begins with abandoning the traditional handle and constructing an internal frame that can house all the necessary electronic components. This requires expertise in 3D modeling, leading to the creation of parts that are then produced through 3D printing. It’s a trial-and-error process, with issues like misaligned parts often necessitating multiple redesigns and reprints.

Making a flying umbrella using drone technology

Innovation, however, is never straightforward. For example, an electronic speed controller, which is vital for the operation of the propellers, might fail without warning. These setbacks, while frustrating, are invaluable learning experiences that contribute to the improvement of the design and the replacement of faulty parts, bringing the project closer to achieving a working flying umbrella.

Here are some other articles you may find of interest on the subject of drones :

At the heart of this umbrella is its electronic system, which includes a microcontroller and GPS for autonomous navigation. Putting these components together requires proficiency in soldering and wiring. These electronics are what allow the umbrella to stabilize in the air and move where it needs to go without any manual guidance.

But creating a prototype is just the beginning. The true test comes when the umbrella is subjected to real-world conditions. It’s during these tests that issues, particularly those related to stability, are identified and addressed. This ongoing refinement is crucial in developing a reliable product that can be trusted to perform when needed.

Since the umbrella is designed to protect against the weather, it must be able to withstand those very conditions. Weatherproofing the electronic components is a critical step in the development process. The umbrella must prove its worth by functioning in various weather scenarios, which is the ultimate test of its effectiveness.

Areas to consider if you are building your own flying umbrella

When building a flying umbrella, several key areas need to be considered and potentially expanded upon. These areas encompass both the design and functionality aspects, ensuring that the final product is not only innovative but also practical and safe. Here’s an expansion on the mentioned areas and additional considerations:

  • Aerodynamic Design: Beyond traditional design challenges, focus on the aerodynamics of the umbrella. This involves studying airflow patterns and resistance to ensure that the umbrella can achieve and maintain lift without compromising its primary function as a rain shield.
  • Propeller Placement and Dynamics: Expanding on the idea of side-mounted propellers, consider the dynamics of propeller rotation and how it affects umbrella stability. Explore different configurations, such as quadcopter-style designs, for optimal balance and lift.
  • Material Selection: In the construction process, the choice of materials is crucial. Lightweight yet sturdy materials are needed to withstand the forces during flight while remaining portable. Composite materials or advanced polymers might be suitable choices.
  • Advanced Electronics Integration: Delve deeper into the integration of sophisticated electronics. This includes not only basic controls but also advanced features like altitude sensors, accelerometers, and even AI algorithms for stability and pathfinding in windy conditions.
  • Battery and Power Management: Address the challenges of powering the device. This involves selecting the right battery type, ensuring it’s lightweight yet capable of providing sufficient power, and integrating efficient power management systems to extend operational time.
  • Safety Mechanisms: Implement safety features to prevent accidents. This includes automatic shut-off systems in case of malfunction, propeller guards to prevent injury, and emergency descent protocols.
  • Weatherproofing and Durability: Beyond basic weatherproofing, consider the durability of the umbrella under various environmental conditions. This includes resistance to wind, UV protection for the materials used, and corrosion resistance for metal parts.
  • User Interface and Control: Develop an intuitive user interface, possibly integrating smartphone control for ease of use. This could include features like one-touch takeoff and landing, programmable routes, and real-time weather updates.
  • Regulatory Compliance: Investigate and comply with any aviation and safety regulations that might apply to a flying device, even one as unconventional as a flying umbrella.
  • Environmental Impact: Consider the environmental impact of the device, from the manufacturing process to its end-of-life disposal. Focus on sustainability in material choice and energy consumption.
  • Market Research and User Feedback: Conduct thorough market research to understand potential user needs and preferences. Post-development, gather user feedback for continuous improvement and adaptation to consumer needs.
  • Scalability and Manufacturing: If considering mass production, explore scalable manufacturing processes and the potential challenges in scaling up from a prototype to a commercially viable product.

By addressing these areas, you can develop a flying umbrella that is not only a novel concept but also a functional, safe, and user-friendly product.

The flying umbrella is a bold reimagining of a simple tool that has been with us for centuries. By merging drone technology with innovative design and a commitment to solving problems, this project is on the verge of altering the landscape of personal weather protection. As the development continues, the flying umbrella stands on the cusp of changing how we interact with devices that protect us from the weather, making our lives a little easier and a lot more interesting.

Filed Under: DIY Projects, Top News


Latest timeswonderful Deals

Disclosure: Some of our articles include affiliate links. If you buy something through one of these links, timeswonderful may earn an affiliate commission. Learn about our Disclosure Policy.