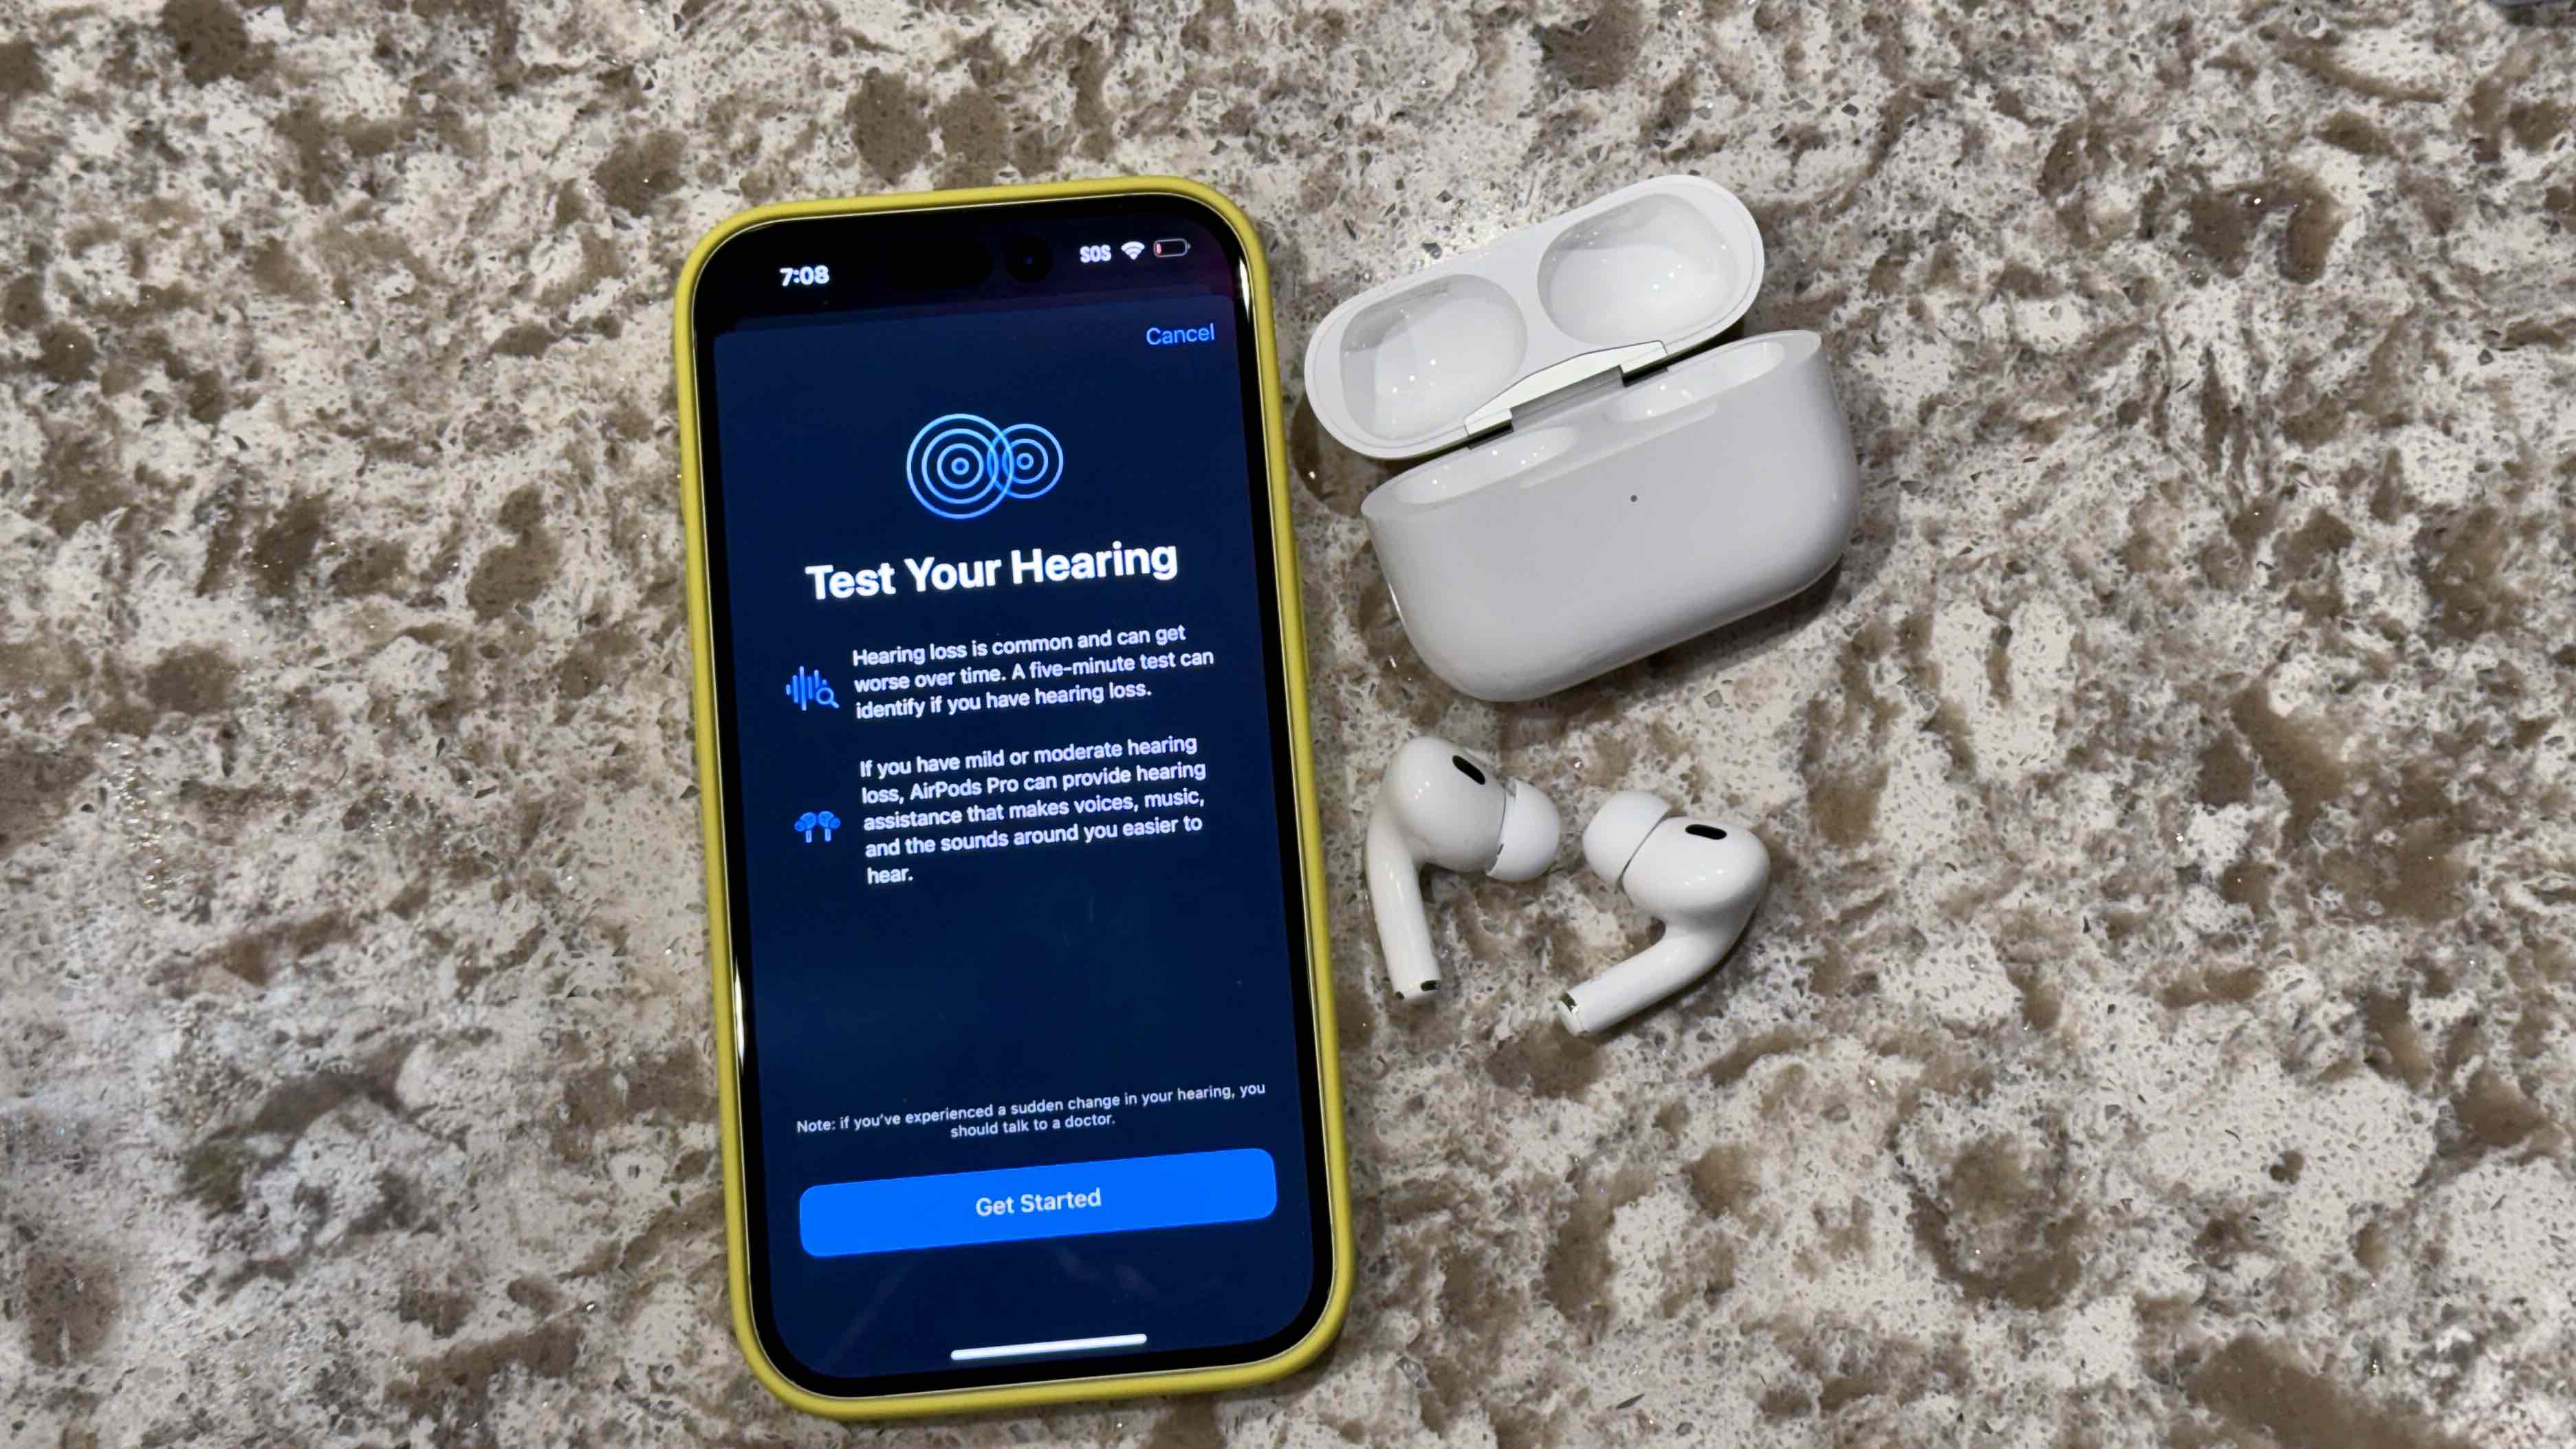
Se espera que iOS 18.2 se lance por completo la próxima semana, 9 de diciembre
La función de prueba de audición llegará al Reino Unido y otros países
Parece que el modo audífono llegará a los Emiratos Árabes Unidos solo por esta vez
manzana Ha lanzado la versión final candidata para iOS 18.2, lo que significa que la tan esperada actualización de iPhone está a punto de lanzarse para todos y no solo para los probadores beta. La buena noticia es que la práctica función de prueba de audición, que le ayuda a detectar cualquier sospecha de pérdida auditiva, llegará a más países, incluido el Reino Unido. Sin embargo, la mala noticia es que esto no incluye la colocación real de audífonos en la mayoría de estos países, sólo las pruebas.
Según las notas de la versión de Apple, de hecho está por llegar un nuevo modo de audífono, pero solo para usuarios de los Emiratos Árabes Unidos. Si bien la actualización brinda “compatibilidad con la función de prueba de audición en AirPods Pro 2 en Chipre, República Checa, Francia, Italia, Luxemburgo, Rumania, España, Emiratos Árabes Unidos y Reino Unido”, solo trae el modo de audífono a los Emiratos Árabes Unidos. .
Probamos el modo audífono de los AirPods Pro 2que está disponible para los usuarios en los Estados Unidos gracias a la aprobación de la Administración de Alimentos y Medicamentos (FDA), que es una actualización muy impresionante. Esperamos que llegue a más países después de las aprobaciones regulatorias pertinentes, pero no hay un cronograma claro para eso, por lo que tenemos que mantener la “esperanza” por ahora.
Qué esperar de iOS 18.2
He estado usando las distintas versiones beta de iOS 18.2 desde hace un tiempo y las características principales giran en torno a la inteligencia de Apple. O al menos lo son si los tienes. iPhone 16 o iPhone 16 Pro modelos, o iPhone 15 Pro Modelos. Ningún otro iPhone fue invitado a la fiesta de Apple Intelligence.
Lo que eso significa en la práctica es una combinación de funciones útiles y, para mí, no tan útiles, incluido el creador de imágenes Image Playground con tecnología de inteligencia artificial, la generación de emojis personalizados y una opción de limpieza ocasionalmente útil en la aplicación Fotos.
Allí también ChatGPT Soporte, resumen de notificaciones de correo y mensajes, inteligencia visual para realizar búsquedas de imágenes según lo que apunta la cámara y un modo de obturador de dos etapas para el nuevo botón de la cámara del iPhone 16. Las aplicaciones de música y TV obtienen búsqueda en lenguaje natural, y las hay. mejoras en la aplicación Find My también.
La versión candidata ya está disponible y, a menos que se descubran errores críticos, esperamos ver la versión completa la próxima semana, probablemente el lunes. Se lanzará junto con nuevas actualizaciones del software iPadOS, macOS, tvOS, watchOS, visionOS y HomePod.
Regístrese para ser el primero en enterarse de las ofertas imperdibles del Black Friday en la mejor tecnología y obtenga todo su contenido favorito de TechRadar.
Han pasado cuarenta años o más desde que hice una prueba de audio real, pero todavía recuerdo cuando era niño, usaba auriculares enormes y levantaba la mano cuando escuchaba una nota. En ese momento tenía una audición perfecta. Me preguntaba que manzanaLa nueva prueba de audición será de grado clínico y de venta libre, especialmente cuando se active a través del pequeño dispositivo de Apple. AirPods Pro 2 Auriculares Bluetooth.
No fue sin miedo cuando hice esta prueba. Los estudios muestran Más de un tercio de las personas de mi grupo de edad suelen tener una pérdida auditiva de 25 decibeles o más. Mi familia lleva años quejándose de mi pérdida auditiva. Pienso en esto como una “escucha de túnel”, lo que significa que escucho aquello en lo que me concentro y tiendo a excluir todo lo demás. Mi preocupación era que la prueba de audición de Apple demostrara que podría tener una pérdida auditiva significativa.
Si hay un lado positivo en esta posible noticia, es que el mismo AirPods Pro 2 que estaba usando para mis pruebas ahora puede servir como un audífono de venta libre. En otras palabras, puedo ocultar mi posible pérdida auditiva detrás de un par de AirPods muy útiles y dejar que la gente suponga que estoy escuchando mi podcast favorito.
La prueba de audición real para los AirPods Pro 2 de Apple es algo más complicada y más larga. Si planeas probarlo, necesitarás al menos un iPhone que funcione iOS 18.1 Y un par de AirPods Pro 2 con el firmware más reciente. aunque nuevo Airpods 4 Al proporcionar cierta cancelación activa de ruido, no tienen el sello necesario para realizar esta prueba.
(Crédito de la imagen: Future/Lance Ulanov)
Resulta que el sellado es una parte importante del proceso, y la prueba de audición de Apple, que puedes encontrar en la aplicación Salud en Navegación/Oída, comienza asegurándote de que tienes el mejor ajuste para tu AirPods Pro 2. Las guías del sistema Debe colocar los auriculares, asegurarse de que estén bien colocados y luego escuchar un poco de música.
En mi caso, el sellado era bueno, pero si no, tendrás que cambiar las puntas de silicona por un tamaño diferente para asegurarte de que encajen perfectamente en tus oídos y sellen cualquier fuga de sonido externo. También hay algunas preguntas que responder, como si tienes 18 años o más (muchas, muchas gracias), o sufres actualmente de alguna alergia, resfriado o infección de los senos nasales (milagrosamente, no), y si He asistido a un concierto ruidoso o a una obra en construcción ruidosa en las últimas 24 horas (¿parezco alguien que va a conciertos ruidosos a mitad de semana… o alguna vez?).
Regístrese para recibir noticias de última hora, reseñas, opiniones, las mejores ofertas tecnológicas y más.
El siguiente paso es la prueba, que lo guía para encontrar un lugar tranquilo sin mucho ruido exterior (es más fácil decirlo que hacerlo en una oficina ocupada, pero usé nuestro estudio de video) y automáticamente configura el teléfono en el modo No molestar para minimizar las perturbaciones.
Ahora escucha esto
Al igual que las pruebas de audición que hice cuando era niño, la prueba de audición de Apple utiliza una serie de tonos que se reproducen en un oído y luego en el otro. En lugar de levantar la mano, toqué la pantalla, que reconocía los toques con un gráfico circular vibrante.
Cada prueba de oído dura al menos tres minutos. Esos, amigos míos, fueron uno de los seis minutos más difíciles que puedo recordar en mucho tiempo. Los tonos varían desde claros y fuertes hasta fuertes y muy suaves. Con cada prueba que pasaba, se ponía más y más nerviosa. ¿Escuchaste un tono? Oh, espera, no hubo tono e hice clic. ¡No escucho nada!
Estaba convencido de que yo, o al menos mis tímpanos, estaban fallando estrepitosamente. Si miras mi cuestionario de TikTok, podrás ver la expresión abatida en mi rostro. Estaba preocupado.
(Crédito de la imagen: Future/Lance Ulanov)
Una vez completada la prueba, los resultados son casi inmediatos. Vi un par de números (11dBHL y 10dBHL), uno para mi oído derecho y otro para mi oído izquierdo. Al principio no pude entender lo que querían decir. Pero luego noté que las calificaciones promedio para cada oído también estaban escritas, “Poca o ninguna pérdida”, y debajo, “No se necesitan cambios” en la sintonización de mis AirPods. Sí, perdí algo de audición, pero nada tangible. No estaba sordo.
Casi salté de alegría. Entonces me detuve y me di cuenta de una verdad difícil. Podía oír bien. Estaba haciendo un trabajo terrible al preocuparme. Creo que esto podría frustrar a mi familia más que simplemente confirmar mi pérdida auditiva. Al menos si mis oídos fallan, no es mi culpa que no te escuché cuando dijiste mi nombre seis veces o que tuviste una conversación de 30 segundos conmigo que no escuché en absoluto. No tengo excusa porque se ha demostrado clínicamente que mi audición es básicamente sólida.
Entonces, gracias a Apple, por poner a prueba mi audición, hacerme sentir bien con la relativa juventud de mis tímpanos y darme una llamada de atención sobre mi aparente déficit de atención. Escucho este mensaje alto y claro: tengo trabajo que hacer.
cuando A principios de esta semana, Apple presentó la tan esperada colección de Que fue anunciado en el evento del iPhone. . Esto incluye audífonos y protección auditiva, así como una prueba de audición “clínicamente aprobada” en su bolsillo. Al combinar su iPhone con un par de AirPods Pro de segunda generación, puede realizar una prueba de audición similar a la que se realiza en el consultorio de un audiólogo sin salir de casa. Lo más importante es que todo esto dura unos cinco minutos y le brinda resultados detallados al instante. Aquí hay una guía paso a paso sobre cómo usarlo.
Actualiza tu iPhone y AirPods Pro 2
Billy Steele para Engadget
Antes de poder acceder a la prueba de audición de Apple, deberá asegurarse de que su iPhone esté actualizado a iOS 18.1 y que sus AirPods Pro 2 tengan el firmware más reciente (7B19). Ninguna de las nuevas funciones de salud auditiva aparecerá en la configuración de tus AirPods o en la aplicación Apple Health si no tienes ambas actualizaciones. Además, no podrá realizar una prueba de audición ni utilizar ninguna de las otras herramientas nuevas en los AirPods Pro de primera generación (modelo 2019).
Puede comprobar su versión actual de iOS desde el menú de configuración del iPhone. Desplácese hacia abajo hasta General y luego haga clic en Actualización de software. Desde aquí, puedes ver qué versión de iOS estás usando y si tienes una actualización pendiente lista para descargar e instalar. Nuevamente, aquí estás viendo iOS 18.1, ya que esa es la versión del software que ofrece una gran cantidad de funciones de salud auditiva.
Para verificar el firmware de sus AirPods Pro 2, conecte los auriculares a su iPhone y vaya al menú Configuración. Aquí, su AirPods Pro 2 debería aparecer cerca de la parte superior de la lista y, al tocar esta opción, accederá a Configuración. También puedes acceder a los detalles de AirPods Pro 2 desde el menú de Bluetooth tocando el ícono “i” al lado del nombre del dispositivo.
Una vez que llegue al menú de configuración de AirPods, desplácese hasta la parte inferior de la pantalla de inicio. Una de las últimas cosas que verá es un montón de información de firmware, incluida la versión actual de sus AirPods Pro 2. Si ve 7B19, está listo para comenzar. De lo contrario, significa que sus auriculares aún no se han actualizado, pero puede intentar forzarlos a hacerlo en lugar de esperar a que el proceso se complete por sí solo.
Para hacer esto, conecta tus AirPods Pro 2 a tu iPhone durante al menos 30 segundos y reproduce música para asegurarte de que la conexión sea estable. Luego, vuelva a colocar los auriculares en el estuche de carga y cierre la tapa, manteniendo los AirPods Pro 2 dentro del alcance del iPhone. Ahora verifique su configuración de Bluetooth, y si ve que su AirPods Pro 2 permanece conectado durante más de 10 segundos mientras está en el estuche de carga con la tapa cerrada, eso debería indicar que hay una actualización en progreso.
¿Dónde puedo encontrar la prueba de audición de Apple?
Billy Steele para Xataka
Apple le permite acceder a su prueba de audición desde dos lugares y ambos son fáciles de encontrar. El primero está en el menú de los AirPods, al que puedes acceder desde el menú de configuración principal o desde el menú de Bluetooth. La sección Salud auditiva se muestra de forma destacada en la pantalla de inicio, justo debajo de las opciones de control de ruido. En esta sección, “Realizar una prueba de audición” será el tercer elemento después de la protección auditiva y el audífono, y aparecerá en azul.
En la aplicación Salud, la forma más rápida de realizar una prueba de audición es tocar Explorar en el menú en la parte inferior de la pantalla de resumen principal. Desde allí, seleccione “Audición” con el ícono de oreja azul y desplácese hacia abajo hasta “Obtener más salud”. Aquí verá la opción para realizar una prueba de audición con su AirPods Pro 2.
Cómo realizar el test de audición de Apple
Billy Steele para Xataka
Una vez que haya actualizado sus dispositivos y haya encontrado una prueba de audición, la parte difícil habrá terminado. Las pruebas basadas en software lo guían a lo largo de todo el proceso, con información detallada sobre qué esperar y qué significan los resultados para usted. Después de seleccionar “Realizar una prueba de audición”, hará clic en “Comenzar” para comenzar el proceso. Primero, el programa le preguntará si tiene 18 años o más, si tiene alergias o síntomas de resfriado y si ha estado en un ambiente ruidoso (como un concierto) en las últimas 24 horas. Los dos segundos ítems pueden afectar la precisión de la prueba si la respuesta es afirmativa a cualquiera de ellos.
En la siguiente pantalla, sus AirPods y su iPhone, uno al lado del otro, se asegurarán de que su entorno sea lo suficientemente silencioso para su prueba de audición. Demasiado ruido de fondo hará que le resulte difícil escuchar los tonos más sutiles durante una exploración. A continuación, el ajuste garantizará que los AirPods Pro 2 se ajusten correctamente a sus oídos y que proporcionen un sellado adecuado para las pruebas. Se le notificará que No molestar estará activo durante la prueba para evitar distracciones y que el modo de cancelación activa de ruido (ANC) se habilitará en este punto. Luego, la prueba presentará algunos tonos de muestra y le indicará que cada tono durante la prueba se reproducirá tres veces.
Cuando comience la prueba, simplemente toque la pantalla de su iPhone cuando escuche un tono (solo toque una vez para cada tono). La prueba comienza en la oreja izquierda antes de pasar a la derecha. No se preocupe si se pierde un sonido: la prueba repetirá cualquier sonido que crea que se perdió en el camino. Cuando finalice la prueba, obtendrá instantáneamente los resultados en su iPhone para cada oído, incluido un audiograma detallado que muestra qué frecuencias tiene dificultades para escuchar (si corresponde). Los resultados también se pueden ver en la aplicación Salud en cualquier momento y puede exportar un PDF para compartirlo con su médico o para otros fines según sea necesario.
Qué hacer con los resultados de las pruebas de audición
Si tiene poca o ninguna pérdida auditiva, la herramienta de Apple le dará sugerencias sobre cómo mantener su audición saludable y le informará que no son necesarios cambios de ajuste para sus AirPods Pro 2. Si tiene una pérdida auditiva de leve a moderada, el programa lo hará. Pregunte si desea configurar las funciones de los audífonos de Apple, que incluyen audífonos, asistente multimedia y mejora de la conversación. Finalmente, si la prueba muestra que tienes una pérdida auditiva severa o profunda, Apple te recomendará que consultes a un especialista para una evaluación adicional.
Las funciones de audífono de AirPods Pro 2 están diseñadas solo para usuarios con pérdida auditiva de leve a moderada, y la prueba de audición solo puede medir una pérdida auditiva inferior a 85 dB. Así se dividen las categorías de pérdida auditiva, según la Organización Mundial de la Salud:
Physical: 100 has developed something of a cult following, and it’s easy to see why. Netflix’s South Korean fitness bonanza marries bizarre concepts (pulling a boat up a slope, anyone?) with genuinely grueling physical tests to deliver compelling entertainment.
For those who haven’t seen it, the show starts with 100 contestants of all different shapes, sizes and genders before periodically whittling this number down to one “ultimate physique” through a series of tasks, or “quests”.
It’s the uniqueness of these quests that, in my eyes, makes Physical: 100 one of the best Netflix shows. Season one included a series of tests inspired by Greek myth, including the Sisyphean task of repeatedly rolling a boulder up a hill until you drop, and the first task was deceptively simple: seeing how long each contestant can hang on a bar over a tank of water until they drop. However, the recently released second season kicks off with a more straightforward mission: running.
Contestants were met with a room containing 100 curved treadmills. These machines sap more of your energy than a standard treadmill because the user is responsible for powering the belt – check out our curved treadmills vs motorized treadmills comparison for all the differences. The athletes’ challenge was to run as far as they could in three timed intervals.
And, as a fitness fan watching 100 people suffer from the comfort of my couch, I immediately knew I wanted to give the test a go for myself.
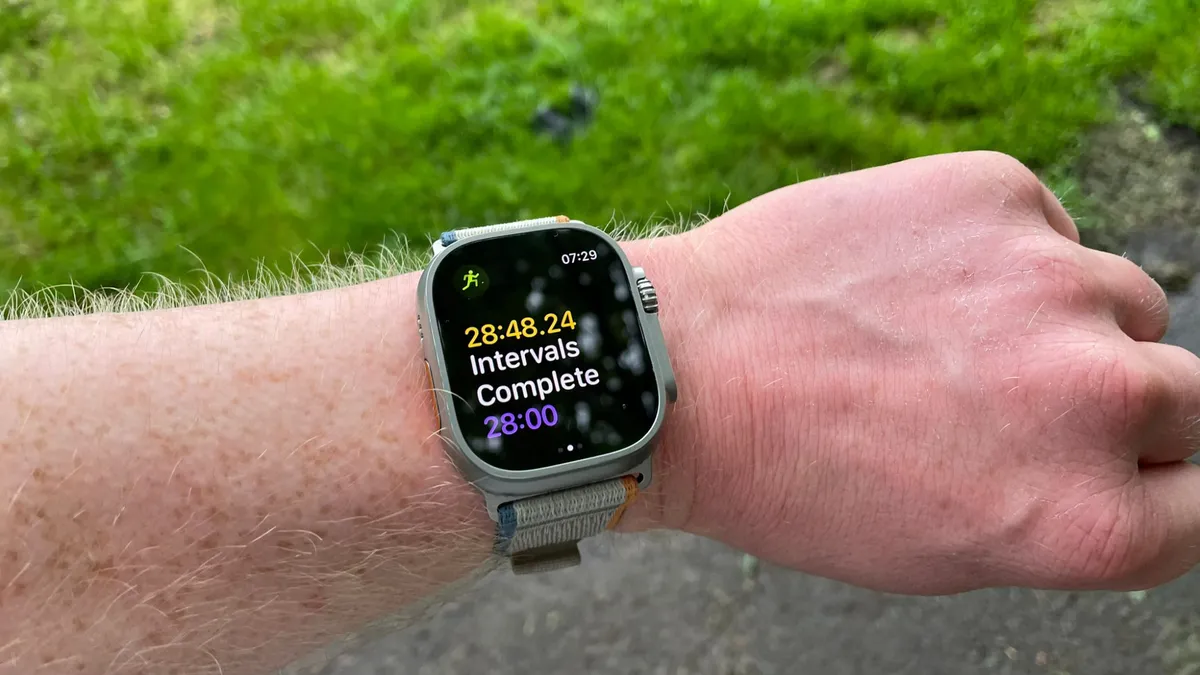
How to try Netflix’s Physical: 100’s endurance test for yourself using an Apple Watch
Contestants had to run as far as they could in 10 minutes, then seven minutes, and finally five minutes, with short rests in between. After the first round, the bottom 50 athletes were eliminated, after the second 40 more were given their marching orders, and the final interval decided the order of top 10. This ranking gave top-performers preferential treatment in future quests.
I don’t have a curve runner. Neither does the gym I train at. But I do have a park nearby, so I set up a custom outdoor run on my Apple Watch Ultra 2, laced up my best running shoes and set off.
Set a custom workout on the “outdoor run” multisport tracking option of your Apple Watch (or equivalent if you’re using another fitness tracker). Read our guide to find out how to set up a custom workout on your Apple Watch.
This custom workout should have three timed interval runs of 10 minutes, seven minutes and five minutes respectively, each separated by a three-minute recovery period.
Warm up and get to work.
The aim is to run as far as possible over the course of those three rounds.
What happened when I tried Netflix’s Physical: 100 endurance test
I like doing difficult things. I lift weights most days, run twice a week and never say no to sports in any form. But there was a point during the second interval of this Physical: 100 test where I questioned why I was so keen to try it.
You’re running for 22 minutes in total so I figured, with a couple of three-minute breaks along the way, I should make it to five kilometers fairly easily.
Get the hottest deals available in your inbox plus news, reviews, opinion, analysis and more from the TechRadar team.
I was wrong. The first 10 minutes went surprisingly well, and I benefited from a slight downhill to ease me into my “quest”, as Physical: 100 refers to it. By the end of the first set I was breathing hard but feeling good, having covered 2.3km. This would have been enough to make the top 50 in Physical: 100. The top performer on the show recorded a distance of 2,416m, and the elimination cut-off was 1,841m.
Having used curve runners in the past, I should say that I find them significantly slower and more taxing than simply running outside – but it was still fun to have scores to compete against.
Following my first interval I stopped to take the prescribed three-minute breather. But after what felt like 20 seconds, my vibrating watch told me it was time to get moving again. I did as I was told, only to find that someone had surreptitiously swapped my legs for lead columns while I had been “recovering”.
(Image credit: Future / Harry Bullmore)
Legendary endurance coach Chris Hinshaw once described the 5,000m as a “true test of overall athletic fitness”, requiring both physical and mental capacity. I was definitely fighting a battle on both fronts by this point, with my body in constant discomfort and my mind trying to distract me from this pain by counting steps.
I finished the second interval and leant aggressively against a nearby railing, having accumulated 2,800 meters according to my Apple Watch. This would have been on the edge of being disqualified, with the tenth-placed Physical:100 contestant recording 3,803m. The winner was flying ahead on 4,160m, while the highest-placed female contestant (handball player Park Ha-Yan) finished 36th with 3,375m.
Once more, the three minutes of rest went by in the blink of an eye, but this time I knew what to expect and adjusted accordingly. As a result, I was able to pick up my speed from the previous round, averaging 4’04”/km (with a sprint finish) rather than 4’41”/km. As the final second ticked over, I reached 5.02km and promptly collapsed onto a park bench.
“Never again,” I muttered to myself, knowing full well I’d be returning to this test at a later date to try and better my score, as well as those of the Physical: 100 contestants.
My distance would have seen me finish in 10th place, with the winner (former firefighter Hong Beom-seok) reaching a lofty 5,472m. Roll on season three.
I’ve spent a good chunk of time these last few evenings playing through the Hades 2 Technical Test, which I was lucky enough to receive an invite for after registering my interest on the game’s Steam page. Despite only featuring the first major level and some elements of the hub area, I’ve already found myself completely unable to put the game down.
This brief opening snippet of gameplay was so thoroughly compelling that it began to eclipse all the tasks I’d planned to do this week. Not least of all was a certain multilingual bird getting particularly irate with me. All of this is to say, when Hades 2 releases in Steam Early Access in the near future, be sure to make ample time for it, because as the game’s intro succinctly stresses: time cannot be stopped.
Family matters
(Image credit: Supergiant Games)
Hades 2 is a direct sequel to Supergiant Games’ smash-hit 2020 roguelite. This time around you’re playing as Melinoë, immortal princess of the underworld and sister to Zagreus – the first game’s protagonist. Her titular father and extended family have been spirited away by Chronos, the Titan of Time.
Chronos now threatens to destroy the underworld and instigate his own rule, which Melinoë, the Gods of Olympus and a small band of allies aren’t all too happy with. Instead of ascending to the mortal realm as Zagreus once did, in a neat twist, Melinoë will have to descend from the surface to the depths of the underworld in order to put an end to Chronos (and thus, time itself) and rescue her family.
It’s a fantastic spin that immediately raises the stakes, offering something much more pressing than the (still extremely compelling) internal familial politics of the first game. And what’s more, Hades 2 is still backed up by a terrific range of well-realized characters.
Melinoë herself is fantastic, offering a more measured, calculated personality than her hot-headed brother. She’s got some truly ice-cold lines, too: “His age doesn’t mean anything to me. The old are seldom wise, and often weak.” Her headmistress, the witch Hecate (who I was pleasantly surprised to learn is voiced by Amelia Tyler, Baldur’s Gate 3’s beloved narrator), is another highlight – her strict-but-caring nature provides a stark contrast to the brutish Hades himself.
(Image credit: Supergiant Games)
Melinoë’s combat abilities appear to be somewhat evolved from what was available to Zagreus in the first game. Regular attack combos, specials, projectiles, and casting abilities are still present here, but the princess of the underworld has some additional tricks up her spectral sleeves.
Get the hottest deals available in your inbox plus news, reviews, opinion, analysis and more from the TechRadar team.
For one, Melinoë can charge up her attacks, converting them into mana-consuming ‘Omega’ abilities. These lend additional properties and utility to her weapon’s move set. For example, using her magic staff that’s unlocked at the start of the level, a charged basic attack now fires beams of light both ahead and behind her for big damage. And by charging her Cast ability (which by default creates a circle that slows enemies caught within it), you’ll cause the area to detonate after a couple of seconds.
Melinoë can also sprint by holding down the Dash button, which as you’d expect, is extremely handy for navigating each room’s arenas and helps you get into more strategic combat positions. This turned out to be incredibly helpful, as I noticed enemy density in Hades 2 was slightly higher compared to the original game – at least in this initial technical test demo.
You’ll still be collecting boons from the various Gods of Olympus which can transform the properties of Melinoë’s move set in various ways, such as spawning a tornado after dashing or causing your projectile to temporarily freeze enemies in place. The foundations of the first game all seem to be here, but some new systems have been added on top to further diversify Melinoë’s abilities in combat.
My favorite new addition comes in the form of Arachne, an adorable spider that can weave special dresses for Melinoë to wear. Beyond some fun aesthetic changes, these dresses also provide an amount of armor to protect your precious health, and powerful buffs to improve your chances against Chronos’ minions. However, you’re incentivized to take very good care of this armor, as taking enough damage will destroy it, alongside any buffs it added to your run.
Time after time
(Image credit: Supergiant Games)
While we’ve only been introduced to its initial level of Erebus and the first boss (which – spoiler warning – turns out to be Hecate, testing Melinoë’s combat prowess before allowing her to progress further and recreating that gorgeously animated reveal trailer), Hades 2 is already shaping up to be a supremely fun and remarkably polished experience. And while I wasn’t going out of my way to hunt for bugs or unintended oddities, I didn’t run into anything remotely game-breaking.
As you may expect from the talented Supergiant team, Hades 2 also looks and sounds phenomenal. Jen Zee’s iconic character artwork only gets better with each Supergiant release and Hades 2 is no different. Environments look equally stunning, and the voice acting is exceptional; there are already what feels like hundreds of unique lines, and across several runs I didn’t once run into instances of repeated dialogue.
We’ve yet to receive a firm release date for Hades 2’s early access, though Supergiant Games has stressed that it’ll be arriving soon. Until then, be sure to play as much of the technical test build as you can. Or if you haven’t received an invite, rest assured that Hades 2 is already looking like it could surpass the developer’s previous efforts.
Picture the scene: Your date has gone well and you and your partner might sleep together. Like any safe adult, you assume there will be a conversation about STI status and the use of protection. Now imagine how you would feel if they asked to take a photo of your penis and upload it to a website you’ve never heard of. That’s the future of intimacy, as imagined by Calmara, a new service launched by “men’s health” startup HeHealth.
HeHealth Website
Its press release suggests users take a picture of their partner’s penis so it can be run through a deep learning model for visual signs of sexually-transmitted infections. And while the website suggests users should wear protection, a banner atop the HeHealth sites describes the app as “Your intimate bestie for unprotected sex.” Mixed messages aside, you may notice some major issues with the pitch: That this only covers infections that present visually, and that it’s only designed to work with penises.
But even if that use case applies, you might not feel you can trust its conclusions once you’ve looked at the data. The Calmara website claims its scans are up to 90 percent accurate, saying its AI has been “battle-tested by over 40,000 users.” That figure doesn’t match up to its press release, which says accuracy reaches 94.4 percent (a figure cited in this NSFW preprint paper submitted a week ago), but its FAQ says the accuracy ranges “from 65 percent to 96 percent across various conditions.” We’ve reached out to the company and want to learn more about the apparent discrepancy.
Calmara
It’s not impossible for models to categorize visual information — I reported on how systems like these look at images of cells to aid drug discovery. But there are plenty of reasons as to why visual information isn’t going to be as reliable for an STI test. After all, plenty of conditions don’t have visual symptoms and carriers can often be asymptomatic long after infection. The company admits to this in its FAQ, saying that the app is a “first line of defense, not a full-on fortress.” Not to mention that other factors, like the “lighting, the particular health quirks you’re scouting for and a rainbow of skin tones might tweak those [accuracy] numbers a bit.” Even more alarming, the unpublished paper (which is riddled with typos) admits that a full 40 percent of its training dataset is comprised of “augmented” images, for instance “extracting specific visually recognizable disease patterns from the existing clinical image dataset and layering those patterns on top of images of health (sic) penises.”
Calmara
The Calmara website’s disclaimer says that its tools are for the purpose of “promoting and supporting general wellness and a healthy lifestyle and are not to be used to diagnose, cure, treat, manage or prevent any disease or condition.” Of course, if it really was intended as a general wellness tool, it probably wouldn’t describe itself as “Your intimate bestie for unprotected sex,” would it.
It doesn’t help that this is a system asking users to send pictures of their, or their partner’s genitalia. Issues around consent and — as writer Ella Dawson raised on Bluesky — age verification, don’t seem to have been considered. The company’s promises that the data is locked in a “digital stronghold” lacks specifics about its security approach or how the data it obtains may be shared. But that hasn’t stopped the company from suggesting that it could, in future, be integrated “directly into dating apps.”
Fundamentally, there are so many red flags and potential vectors for abuse and giving users a false sense of confidence that nobody should try using it.
An important part of how we test TVs at TechRadar is subjective testing. That’s the part of the process where our reviewers run the best TVs through tests looking at picture quality, sound quality, gaming features, smart TV features and more. To test picture quality, we use 4K Blu-ray and streaming, HD Blu-ray and streaming and lower-resolution sources such as DVD.
The specific movies, TV shows, and other media we use are important for our picture quality tests. We’ll use the same scenes for reference across every TV or projector because we know what to look out for when it comes to contrast, black levels, color accuracy, motion, brightness and more using these scenes. And it’s not just picture quality – we’ll also use some of these movie scenes to test the TV’s built-in audio quality.
The movies and scenes we use vary from reviewer to reviewer (apart from one disc that I’ll get into later) but will have been carefully picked as references because they can quickly show a TV’s strengths and weaknesses on the criteria listed above.
Here are the four movies (a mixture of both SDR and HDR across discs and streaming) that I use whenever I’m testing a new TV, along with a bonus disc at the end that no reviewer can live without.
1. The Batman
The Batman (pictured) is excellent for showing black level and shadow detail. (Image credit: Future)
For me, The Batman, the 2022 movie starring Robert Pattinson and Zoë Kravitz, is an excellent resource for testing several aspects of a TV’s picture. An extremely grainy, dark and gritty movie, The Batman used “available natural light” and is “an urban noir film”, according to cinematographer Greg Fraisier ACS ASC (via Cinematography World). The film is also mastered at a very dim 400 nits (most movies are mastered at 1,000 nits).
The Batman is a no-brainer for testing shadow detail and black levels on a TV. If a set can reveal the details and textures in such a dark movie by keeping dark tones accurate, it’s a big positive. Much of the movie takes place at night, so it’s also great for testing black uniformity – the ability to evenly display dark tones across the screen. This is usually no problem for the best OLED TVs but can be a real issue for edge-lit LED TVs such as the Samsung CU8000, for instance, which makes black areas in images appear gray and cloudy instead.
There’s a noticeable amount of grain in The Batman – an intentional choice by the director – but the movie still aims to maintain true-to-life skin tones and textures. That’s why I use it to test a TV’s digital processing to see if it reduces grain too much, giving the image an artificially clean look – something that typically happens in picture modes such as Standard and Vivid.
Along with picture quality, The Batman is excellent for testing audio. The speech is a bit mumbled (again, maybe intentionally?), so it’s a great disc to test dialogue clarity. There’s also the brilliant Batmobile chase scene, which can test the power and weight of a TV’s built-in audio, primarily through the rumble of the Batmobile’s roaring engine.
2. Top Gun: Maverick
Top Gun: Maverick (pictured) is good for showcasing daylight scenes and skin tones. (Image credit: Future)
Top Gun: Maverick, the sequel to 1986’s Top Gun (both starring Tom Cruise), is almost polar opposite to The Batman. Both of these 4K Blu-rays are excellent for evaluating skin tones and a TV’s ability to display true-to-life textures. But a lot of Maverick is shot during the day, so it lets me see how a TV handles those characteristics in a well-lit scene.
The main reason I use Maverick, though, is to test motion. In 2018, Tom Cruise commented on TV motion settings, saying “it takes the cinematic look out of any image and makes it look like a soap opera shot on a cheap video camera” (via BBC News). He made these comments whilst shooting Top Gun Maverick, so clearly natural-looking cinematic fast-paced action was what he was aiming for.
Maverick is filled with plenty of long, panning shots – across landscapes, following cascading, rolling jets and even boats and motorcycles. There are also plenty of intense flight scenes including the first ‘dogfight’ training mission, which I use a lot. This sequence lets me easily see if motion looks smooth or choppy on a TV. When using Filmmaker Mode (generally the most accurate TV picture preset), motion smoothing settings get turned off and that’s a real challenge for TVs. More premium models tend to handle this fine, whereas more budget sets, contrary to what Mr. Cruise says, need a bit of motion help via blur and judder reduction adjustments.
Again, this disc is one I use not just for picture quality tests but audio as well because, you guessed it, jet engines make a fantastic workout for a TV’s built-in speakers. Also, it has many shots of jets flying across the screen, which tests the TV’s soundstage (the wider the better), virtual surround sound, and the positioning of sound effects relative to the on-screen action.
3. Star Wars: The Last Jedi
Star Wars: The Last Jedi demonstrates color, particularly in the scene pictured above. (Image credit: Future)
Despite what many people think of Star Wars: The Last Jedi, it is a wonderfully shot and beautiful-looking movie. Details, motion, contrast – you name it, this movie has it. However, I use it for one test in particular: color.
In the ‘throne room’ fight scene between Rey, Kylo Ren and the red-suited guards late in the movie, so much dynamic and punchy color appears on screen and it really tests a TV’s color rendition. In particular, this scene uses the color red (the guards’ armor, the walls of the room, Kylo Ren’s lightsaber) and it can reveal a TV’s color strengths and weaknesses. Budget models often display a more faded and dull hue whereas more premium sets provide the eye-catching red I’m looking for, though without oversaturation.
The lightsabers are another excellent test for color. Several scenes make these the focal point of the shot and can be very useful for showing a TV’s effectiveness in displaying HDR highlights. TVs I’ve tested that have handled this successfully include OLEDs such as the Panasonic MZ2000, Philips OLED808 and LG G3.
4. The Amazing Spider-Man
The Amazing Spider-Man (pictured) DVD is good for showing a TV’s upscaling. (Image credit: Future)
This choice is less about the movie itself and more about a legacy format: DVD. The Amazing Spider-Man is a superb-looking movie, but not all 4K TVs handle it equally. Textures can appear soft and fuzzy – unsurprising considering the picture needs to be heavily upscaled.
A good 4K TV will provide blur-free upscaling and sharpen textures to give more life and punch to the picture. On larger screens such as the best 65-inch TVs, 4K upscaling of a standard-definition image will never be perfect, but a good TV should be able to make a DVD watchable.
The Amazing Spider-Man is a colorful, fast-paced movie with plenty of alternating day and night sequences, so it covers all the picture quality testing bases. More importantly, the DVD version tests a TV’s upscaling to see if it can bring a vivid visual punch to the movie even from a lower-resolution source.
Bonus disc: Spears & Munsil UHD Benchmark 4K Blu-ray
The Spears & Munsil 4K Blu-ray (demo footage pictured) is a testing essential. (Image credit: Future)
Many readers will be unaware of Spears & Munsil UHD Benchmark 4K Blu-ray, but it is an essential disc for TV reviewers. Spread across three discs, it is designed to test every performance aspect of a TV. The UHD Benchmark features test patterns for color gamut, grayscale, sharpness, motion, skin tones and much more, and for me is a must-have.
A section I regularly use is the demonstration material, a 7-minute reel of footage mastered in all HDR formats – HDR10, HDR10+, Dolby Vision – that highlights every area of a TV’s picture performance mentioned above. Snowy scenes reveal how a TV handles vibrant whites, night landscapes show its ability to reproduce a truly black sky, while animal shots contain intricate textures and details in feathers and scales.
This disc will enable home theater enthusiasts to calibrate their TVs for the absolute best picture and is highly recommended.
I recently attended an LG reviewer workshop and saw its full 2024 TV lineup, which was originally announced in January 2024 ahead of CES 2024. LG’s latest range continues its usual trend, starting from a budget LED screen and leading up to a wireless OLED. At the workshop, we were treated to a preview of the range and given a breakdown of what we can expect from each model.
LG is responsible for making some of the best TVs every year and 2023 was no exception, with the likes of the LG B3, LG C3 and LG G3 all scoring highly in our reviews and featuring in our best OLED TVs, best gaming TVs and other buying guides. Needless to say, its 2024 range has a lot to live up to.
We’d already seen the LG C4 and LG G4 at CES this year and were suitably impressed by both. Although we didn’t get to do full tests on the new sets ahead of release (although we’re hoping to soon) it was great to see them in person. Below, I’ve listed the 3 TVs from LG’s 2024 TV lineup that I’m most looking forward to.
1. LG B4
The LG B4 (pictured) seems to have higher brightness levels than the LG B3 on a first impression. (Image credit: Future)
When we received information about the LG B4, several specs and features immediately stood out. It will come equipped with 4 HDMI 2.1 ports that support 4K 120Hz, and will also be available in a 48-inch screen size- perfect for smaller environments such as bedrooms. It also comes equipped with LG’s latest Alpha 8 AI processor, an upgrade from last year’s Alpha 7 processor. LG claims the Alpha 8 AI matches the performance of the one found in last year’s C3 model, meaning the LG B4 could hit higher peak brightness levels around 800 nits (peak brightness on the B3 was 649 nits).
Seeing the B4 in person, I was pleased to see the rich black levels and contrast I expected. This was showcased through a picture contrast demo that not only highlighted the B4’s impressive shadow detail, but also the fine textures it was capable of.
Another demo was of a soccer (football) game and this showed off the B4’s motion processing and full-screen brightness as it tried to maintain the consistent green of the pitch on screen. There was a further demo of a forest drive and this showed off a perceived increase in brightness, with the greens of the trees and grass taking on a more luscious, dynamic quality, and also the B4’s excellent texture rendition again.
It would have been nice to see more, but the LG B4 remains my most anticipated OLED TV of 2024 and I can’t wait to get in some proper testing time with it.
2. LG G4
LG G4 (pictured) seems to have deeper contrast levels and even higher brightness than the G3. (Image credit: Future)
At the opposite end of the scale to the LG B4, the LG G4 is one of LG’s flagship OLEDs for 2024. It comes equipped with the same micro-lens-array (MLA) tech as its predecessor, the G3, but LG says it’s capable of about 1,600+ nits peak brightness , which is a 20% increase over the G3 and a 150% increase over last year’s B series.
The LG G4 will also feature LG’s latest processor, the Alpha 11 AI. Aside from getting a stack of AI Picture Pro settings and upgrades, the G4 will also be able to transmit wireless, lossless Dolby Atmos audio to compatible LG soundbars, starting the next big home theater race with Samsung, which features similar tech in its TVs. The G4, along with the LG C4 and flagship M4, will also support 144Hz refresh rate for PC gaming for the first time on an LG OLED .
Initially, I was more excited by the prospect of seeing the C4 in action, as at CES 2024 we confirmed the new brightness boost to be very real. However, seeing the C4 and G4 next to one another, it was clear what the upgraded processor in the G4 was doing and after our impressions at CES, the brighter picture of the G4 was just the beginning. Viewing the same footage on both TVs, HDR highlights were significantly brighter and contrast levels seemed much deeper on the G4. This was to be expected, but actually seeing it first-hand was impressive.
3. LG QNED90
LG’s mini-LED, the LG QNED90 (pictured) has a bright, bold color profile that caught our eye. (Image credit: Future)
LG’s QNED TV range is a mix of LED and mini-LED models, with both local and ‘precision’ dimming backlights. Both the QNED80 and QNED85 are LED TVs with local dimming backlights and a QLED panel to increase brightness. The most eye-catching set however was LG’s 4K mini-LED model, the QNED90.
LG faces stiff competition in the mini-LED market from not only Samsung and Sony, but Hisense and TCL, both of which sell budget mini-LED TVs that are catching up with premium rivals in terms of performance and features. Nonetheless, I was intrigued to see how LG’s mini-LED TVs handled several of the pitfalls the technology can suffer from, such as backlight blooming.
Seeing a couple of demos in person, the LG QNED90 had extremely vibrant and bold colors, with eye-popping brightness, particularly in a green-centric woodland demo. In a scene with extreme levels of contrast, where a well-lit ferris wheel is set against a black sky, the picture was rich and detailed, even by mini-LED standards. However, I did notice some backlight blooming in one sequence – a brighter central object that had a halo effect around it.
Nevertheless, the QNED90 was still impressive. Its bold and bright picture was attention-grabbing to say the least, suggesting it could be one of the brightest mini-LEDs we’ve seen. It’s got a very crowded field to navigate, but I’m intrigued to see how it will compare to its fierce rivals.
When you buy one of the best TVs, most of which now have 4K resolution, you want to feed it the best quality possible. I recently tested 4K Blu-ray vs streaming, and although I found the picture with both to be closer than expected, it became clear during my comparison that 4K Blu-ray was superior – especially when it came to audio quality.
If you’re thinking of buying one of the best 4K Blu-ray players, you’ll find that, in terms of price and features, the market can be as diverse as TVs themselves. You can pay as little as $199 / £159 / AU$399 for a basic player, up to over $999 / £999/ AU$1,699 for a premium model.
While there are competitors within the 4K Blu-ray player market, the main manufacturer is Panasonic, which makes consistently high-quality, well-built models that rate highly regardless of whether they are budget, mid-range or premium. Other manufacturers include Sony, Raevon and Magnetar (with the latter two at the premium end of the market).
It should be no problem to opt for a budget model because a 4K Blu-ray player just plays discs, right? Well, a budget player will give you 4K Blu-ray disc playback, but there are a lot of other factors to consider including HDR support, upscaling, audio quality, connectivity and even built-in smart features. The best 4K Blu-ray players do more than just play discs nowadays.
Whilst there are many great 4K Blu-ray players, I’ll primarily discuss three models here: the Panasonic DP-UB154 (and DP-UB150) as the budget entry, the Panasonic DP-UB820 for the mid-range, and the Panasonic DP-UB9000 as the premium option (with a few more at the premium end).
Godzilla vs Kong (pictured) played through the Panasonic DP-UB820 on a Panasonic MZ1500 OLED TV (Image credit: Future)
Picture
While your display, be it a TV, monitor or projector, is extremely important for overall picture quality, the 4K Blu-ray player you use is also important. The player decodes the digital information on the disc and passes it on to the display, applying digital processing such as noise reduction and other image enhancements that can make or break picture quality.
When I tested the UB154 and UB820, the picture quality of both impressed me. I haven’t tested the premium UB9000 in the same way, but it was the 4K Blu-ray player of choice in the demo room at my AV retail job, so I was very familiar with it and impressed. But what makes the two players different?
The 4K picture reproduction is brilliant across the board on these three players, which provide crisp detailed textures and strong contrast. But as you go up the range, there is a noticeable step-up in picture quality, with the UB9000 offering the smoothest visuals. Even the mid-range UB820 provides greater detail than the entry-level UB154.
Upscaling of HD Blu-rays and lower-resolution DVDs is effective across all three players, but once again, the higher up the range you go, the more effective the upscaling gets. We said in our review of the UB9000 that its upscaling provides a “slick, detailed presentation”. There is a difference in upscaling quality between the UB154 and UB820 as well, with the UB820 delivering a picture with finer detail and less noise compared to the UB154.
HDR support is where the UB154 differs from its more premium counterparts. It doesn’t offer Dolby Vision, but does support the less commonly used HDR10+ format. So, if you have one of the best OLED TVs that does support Dolby Vision, sadly you’re out of luck with the UB154. There is a slightly pricier alternative with Dolby Vision, but not HDR10+ support, the Sony UBPX700 ($259 / £229 / AU$399).
The Panasonic DP-UB820 (Image credit: Future)
Audio
Audio decoding and support is a surprisingly even playing field among these models. Each supports Dolby Atmos, DTS:X, DTS-HD Master Audio, Dolby TrueHD and more, so if you have a home theater setup with one of the best Dolby Atmos soundbars or a TV that supports those formats, these players will have you covered.
Hi-res audio and music codecs are also widely supported, though the UB820 and UB-9000 support ALAC up to 7.1 channels. This was the only difference in terms of codec support that I could see.
For audiophiles, it’s worth noting that none of these players support SACD or DVD-A playback. For that, you’ll want the Magnetar UDP800 or Reavon UBRX-200, though with both you’ll be paying at least $500 more than the premium Panasonic UB9000. However, all these named players support CD playback if you want to hold on to your CD collection.
The Panasonic DP-UB820 (pictured) comes with a good amount of connections for a mid-range player (Image credit: Future)
Features
Features are where your budget matters with 4K Blu-ray players. As a budget player, the UB154 comes up short compared to the rest of the range. Primarily, it has no analog audio outputs or Wi-Fi support, whereas the UB820 and UB9000 have 7.1-channel analog and optical digital audio outputs (the UB9000 even has XLR outputs) and Wi-Fi for streaming from apps including Netflix and YouTube.
Among the most noticeable differences between these players are their menus and usability. The UB820 and UB9000 offer more video and audio settings to tweak compared with the UB154 and also more responsive navigation and disc loading times. For example, the time elapsed from first loading a disc to seeing logos on screen can take almost 30 seconds longer with the UB154 than with the UB820.
The build quality of these players suits their prices – the UB154 feels cheap, while the UB9000 has a sturdy, solid metal chassis that makes it feel premium. The UB820 is the real standout here, as it feels suitably tough, and is also a workhorse.
Panasonic Blu-ray players feature settings to tailor picture and audio to your taste (Image credit: Future)
Final thoughts
Unsurprisingly, spending more on a player will get you a more premium 4K Blu-ray experience. The UB9000 has all the bells and whistles (barring SACD) that you need and delivers audio and video at the highest quality level. But then again, none of these 4K Blu-ray players will let you down, and they offer enough positives at their respective prices.
If you can stretch your budget for the UB820 ($425 / £349 / AU$769), you’ll find it absolutely worth it. Panasonic’s mid-range player has many of the premium UB9000’s features at just over a third of that player’s price. From my personal experience, the UB820 is built to last and delivers excellent picture quality. There are good reasons why the Panasonic UB820 sits at the top of our list of the best 4K Blu-ray players.
Are you confident in your cybersecurity knowledge? IBM has created an interactive Cybersecurity Quiz that challenges you to test your understanding of this critical field. This tool is not just a test; it’s a learning experience that caters to everyone, from experts to beginners. As you navigate through the quiz, you’ll encounter a variety of topics that are key to mastering cybersecurity.
At the heart of cybersecurity are three main concepts: prevention, detection, and response. The quiz begins by assessing your knowledge in these areas. Prevention is about stopping cyber threats before they can do any harm. Detection involves recognizing when a security breach has occurred. Response is the action taken to mitigate the damage caused by an attack. These are the foundations of a robust IT security strategy, and grasping them is essential.
Cybersecurity how much do you know?
Imagine the panic of losing a device that holds your digital keys. The quiz walks you through scenarios like this, teaching you how to recover securely and protect your digital identity. It’s a real-world issue that highlights the need for preparedness in the digital age. The quiz also delves into the Zero Trust model, a strict approach to cybersecurity that operates on the principle of not trusting anyone and verifying everything. You’ll be tested on your understanding of this method and how it helps protect systems and data from unauthorized access.
Here are some other articles you may find of interest on the subject of cybersecurity :
Understanding Cybersecurity Fundamentals
Take the IBM Cybersecurity Quiz to evaluate your knowledge and strengthen your defenses against the evolving dangers of the online world. Keeping up-to-date with cybersecurity is the best defense you have.
Question 1: Cybersecurity involves
A. Prevention, detection, and response
B. Protection, obfuscation, and reporting
C. Encryption, encryption, and more encryption
D. Firewalls, antivirus, and hope
Explanation: Cybersecurity focuses on preventing cyber attacks, detecting threats promptly, and responding effectively to mitigate damage.
Question 2: With FIDO passkeys, if you lose your device, there is no way to recover your account.
Explanation: If you lose your device, there are several ways to recover your account, such as using a different device synced to a cloud service or undergoing the usual account recovery process.
Question 3: Zero Trust can be summarized as
A. Trust everything, verify nothing
B. Trust nothing, verify everything
C. The bare minimum
D. A paranoid delusion
Explanation: Zero Trust security model operates on the principle of not trusting any entity inside or outside the network without verification.
Question 4: Which of these should you do first if you’re founding an IT security program?
A. Define policy
B. Encrypt everything
C. Analyze risk
D. Get a good breakfast
Explanation: The first step in establishing an IT security program should be to analyze risks, as this informs the policies and measures to implement.
Question 5: What happens to the strength of a symmetric key when you make it one bit longer?
A. It doubles
B. It stays the same
C. It gets slightly stronger
D. It creates a rip in the space-time continuum
Explanation: The strength of a symmetric key doubles with each additional bit, significantly increasing the difficulty for an attacker to crack it.
Question 6: Hardening is an example of which security principle?
A. Defense in depth
B. Separation of duties
C. The principle of least privilege
D. What happens when you leave bread out too long
Explanation: Hardening a system involves applying the principle of least privilege, eliminating unnecessary access rights or services to minimize vulnerabilities.
Question 7: Absolute security
A. Is ultimately achievable
B. Requires good firewalls
C. Is worth any cost
D. Is a pipe dream
Now that you have completed the cybersecurity quiz check out the answers below to see how you fared. A critical aspect of cybersecurity is risk analysis. The quiz prompts you to identify and evaluate potential threats, which is vital for setting up effective defense strategies. Being able to prioritize risks is a key skill for enhancing your cybersecurity.
Encryption is a powerful tool, but it’s only as strong as the keys that protect it. The quiz examines your knowledge of key strength and the significance of key length in maintaining security. With cybercriminals always looking for new ways to break into systems, it’s important to know how to make encryption as tough as possible.
The quiz also covers system hardening, which involves applying the principle of least privilege to reduce a system’s vulnerability to attacks. By testing your knowledge in this area, the quiz underscores the value of this preventive measure. One of the important lessons the quiz imparts is that absolute security is unattainable. It stresses the importance of constant vigilance and the need to adapt to emerging threats. This serves as a crucial reminder that the fight for cybersecurity is ongoing.
Answers
A. Prevention, detection, and response is the correct answer. Cybersecurity is about preventing attacks, detecting threats, and responding to incidents effectively.
False is the correct answer. There are multiple ways to recover your account, including using another device or through account recovery processes.
B. Trust nothing, verify everything is the correct answer. Zero Trust is a security model that advocates for rigorous verification of every entity, inside or outside the network.
C. Analyze risk is the correct answer. Risk analysis should be the first step in establishing an IT security program, as it informs the development of policies and security measures.
A. It doubles is the correct answer. The strength of a symmetric key increases exponentially with each added bit, doubling with just one additional bit.
C. The principle of least privilege is the correct answer. Hardening a system by applying the principle of least privilege involves removing unnecessary permissions to reduce vulnerabilities.
D. Is a pipe dream is the correct answer. Absolute security is unattainable; the goal is to manage and mitigate risks to acceptable levels.
Filed Under: Guides, Top News
Latest timeswonderful Deals
Disclosure: Some of our articles include affiliate links. If you buy something through one of these links, timeswonderful may earn an affiliate commission. Learn about our Disclosure Policy.