Valve ha agregado una nueva función de grabación de juegos a vapor. La función, actualmente en versión beta, hace lo que dice; Permitir a los jugadores capturar y compartir capturas de pantalla del juego a través del iniciador de Steam sin ningún software externo.
La función de grabación del juego se detalla en Página de destino personalizadaExplica que los jugadores pueden usarlo para capturar imágenes individuales o incluso grabar “campañas completas”, dando a entender que no hay límite para la duración de las imágenes grabadas más allá de lo que permite el espacio de almacenamiento de su computadora.
Luego, el sitio web explica los cuatro pilares principales de la función de grabación de juegos. Primero, el modo de grabación en segundo plano captura los eventos del juego durante su sesión sin exceder los límites de duración o almacenamiento especificados por el usuario. También hay un modo “Grabar bajo demanda”, que permite a los jugadores detener y comenzar a grabar con solo presionar un botón. Luego pueden navegar hasta el metraje y acceder a la línea de tiempo para seleccionar momentos clave o realizar una edición básica.
La segunda opción es Replay, que parece funcionar de manera similar a cómo grabar y guardar eventos de juego que acaban de ocurrir en las consolas PS5 y Xbox. Como dice el propio Steam, esta será una característica útil para saber cómo moriste o si quieres recordar un diálogo importante hablado por un NPC.
La siguiente es la función Clip. Este se explica por sí solo. Prácticamente te permite recortar imágenes en una parte específica del juego; Sin duda es útil para compartir clips específicos con amigos o incluso agruparlos. YouTube Bermudas.
Finalmente, y quizás la más obvia, está la función para compartir. La función de grabación de juegos de Steam permite a los jugadores convertir clips de manera eficiente a formato MP4 para compartirlos en línea y a través de las redes sociales. También puedes enviar clips entre dispositivos, como Steam Deck a PC o viceversa, por ejemplo.
Valve también confirma que Steam Deck verifica la grabación del juego, lo que significa que también podrás grabar imágenes mientras viajas. Parece una característica muy prometedora y estoy seguro de que muchos jugadores apreciarán poder hacer todo esto a través de Steam para facilitar su uso en lugar de depender de software de terceros.
Regístrese para recibir noticias de última hora, reseñas, opiniones, las mejores ofertas tecnológicas y más.
Final Cut Pro has been updated with live multi-camera recording on iPad and powerful new AI color correction on Mac. A free new app for iPad and iPhone, Final Cut Camera, allows for professional video capture in multicam or on its own.
These “amazing updates” will “take creativity to the next level,” said Will Hui, project manager for creative apps at Apple, during its “Let Loose” event today.
Updates to Final Cut Pro for iPad and Mac — and the new Final Cut Camera app — will be available later this spring.
Final Cut Pro 2 for iPad is now a multi-cam recording studio
Live Multicam brings the power of 1960s television three-camera videotape recording into the digital age — all on iPad. Photo: Apple
Last year, Apple released Final Cut Pro for iPad — letting users record, professionally edit and export videos all from its thin-and-light tablet. The entire interface was rebuilt from the ground up around multitouch input. Just a year later, the app is getting powerful new features that push the iPad version of the app forward.
Live Multicam lets directors switch between the live camera feeds of up to four iPhones or iPads, while recording directly into the Final Cut timeline. This “opens up entirely new video workflows,” says Hui.
On an iPhone- and iPad-based production, this significantly reduces the friction between independently recording video on four separate devices, importing footage and editing hours later.
Final Cut Camera can be used for Live Multicam or as a standalone camera app. Image: Apple
Powering Live Multicam is a new app for iPad and iPhone called Final Cut Camera. From the director’s iPad, you can remotely control focus, exposure, white balance and more. It can also be used as a standalone video recording app with more precise manual controls than what Apple can fit in the regular Camera app.
Other improvements to Final Cut Pro 2 for iPad include storing project files on an external drive, thanks to the iPad Pro’s Thunderbolt port. Final rendering is “up to two times faster than M1” on the new iPad Pro with M4, announced at the same event, according to Hui. The M4 also enables “up to four times more streams of ProRes RAW” video footage, a huge increase in bandwidth for editing high-quality video.
Final Cut Pro for Mac gets powerful AI color correction
Color correction is easier with the new update to Final Cut Pro. Image: Apple
Color correction is made easier with a new “Enhance Light and Color” button. Clicking it is a shortcut to getting improved “color, color balance, contrast, and brightness in one simple step, and is optimized for SDR, HDR, RAW and Log-encoded media,” according to the press release. Professional color correction takes years of skill and a great eye — this feature offers an easy starting point for those with less experience.
You can easily drag-and-drop the color correction made to one clip to other clips in the timeline, too. To make edits easily identifiable, you can give each tweak a different name — like Sepia, High Contrast, Desaturated Reds, etc.
AI now fills in the gaps when you slow down a clip from its original speed, too. “With Smooth Slo-Mo, frames of video are intelligently generated and blended together,” according to the press release. That means that slowing down a segment of video to 80% of its original speed will look more natural and less choppy.
These new features require a Mac with Apple silicon. These updates, alongside Final Cut Pro 2 for iPad and Final Cut Camera, will be available this spring.
Final Cut Pro for iPad costs $4.99 per month or $49.99 per year; Final Cut Pro for Mac is available as a one-time purchase for $299.99. Final Cut Camera will be available for free.
Apple is all over the place today on the hardware side of things, having just . However, some of Apple’s most beloved software is also getting some love. There’s a Final Cut Pro for tablets that brings plenty of long-requested features.
The big news for video editors? Final Cut Pro for iPad 2 (actual name) now supports external drives. Video editing projects are typically gigantic when you consider all of that raw footage. It’s easy to fill up all of the available space of an iPad with footage from one or two scenes, let alone an entire project. This fixes a major barrier of entry for those curious about editing on a tablet. It also makes it easier to hand off footage to another editor or import footage to Final Cut Pro for Mac.
The software is even bringing live multicam recording to iPads. This lets creators capture up to four different angles of a single scene spread across multiple devices. Everything connects wirelessly via a new app called Final Cut Camera, which gives a real-time “director’s view” on four iPhones or iPads. Each feed has its own settings that can be adjusted, like focus, zoom and more. Editable preview clips immediately get passed on to Final Cut Pro for editing.
As for customization options, Final Cut Pro for iPad 2 brings 12 new color-grading presets, eight basic text tiles, 20 new soundtracks and more dynamic backgrounds. These will be especially useful when creating title sequences and the like.
Apple
The Mac version of Final Cut Pro is also getting a fairly substantial update, with a focus on AI. The software leverages Apple silicon’s Neural Engine to bring a bit of AI flourish to basic editing tasks. The update allows users to change up colors, color balance, contrast and brightness all at the same time. There’s also something called Smooth Slo-Mo that pairs with AI, in which “frames of video are intelligently generated and blended together, providing the highest-quality movement.” The timeline has also been refreshed and looks a bit more intuitive.
Finally, there’s an update to , with a new session player feature and a stem splitter tool. The updates for Final Cut Pro and Logic Pro for iPad are available for free to current users and cost $5 per month for new users, which is the same pricing model as last year when . Final Cut Pro for Mac costs $300 for new users, but the update is free for pre-existing users. All of these updates drop later this spring.
This article contains affiliate links; if you click such a link and make a purchase, we may earn a commission.
Samsung may have brought some of the best Galaxy S24 software features to older flagship smartphones through the One UI 6.1 update, but the Galaxy S24 series still has some exclusive functionality that isn’t available on any older device.
One feature exclusive to the Galaxy S24 series that not enough people are talking about is the Dual Recording mode in the camera app. Dual Recording is not a new concept in the mobile world, and it certainly isn’t a new concept where Samsung’s Android smartphones are concerned.
But Dual Recording on the Galaxy S24, S24+, and S24 Ultra is not the same as Dual Recording on other Galaxy smartphones, and in the video below and in this article, we take a deeper look at what this feature does and how you can use it.
What is Dual Recording mode on the Galaxy S24 series?
Dual Recording is not a new feature. It used to be available on most Samsung smartphones a few years ago, and it was the inspiration for the Director’s View mode on some recent flagships like the Galaxy S23 and Galaxy Z Fold 5.
On the S24 series, the basic concept is the same: this mode lets you record videos from two of the phone’s cameras at the same time. But Dual Recording on the Galaxy S24 series goes a step further by giving you more control and freedom over which two cameras are used to record the video.
In Director’s View, out of the two camera feeds, one will always come from the front-facing camera, and you can only choose which rear camera is active alongside the front-facing camera.
With the Galaxy S24’s Dual Recording mode, there is no such limitation: you can choose to record video from any two cameras on the phone at the same time. It just doesn’t allow the use of the 5x zoom camera on the S24 Ultra, which was probably a limitation put in place to ensure a consistent experience across every Galaxy S24 model.
The Dual Recording mode makes a lot of sense in different situations. For example, if you’re at a music concert, you can record a video from the regular wide-angle rear camera and the telephoto camera so you can capture the crowd while also being able to focus on what the artists are doing on stage.
It’s also useful in general as you can use it to record videos at different zoom levels simultaneously without missing the moment, something the standard video recording mode does not allow.
Dual Recording has different layouts, can combine or save separate videos
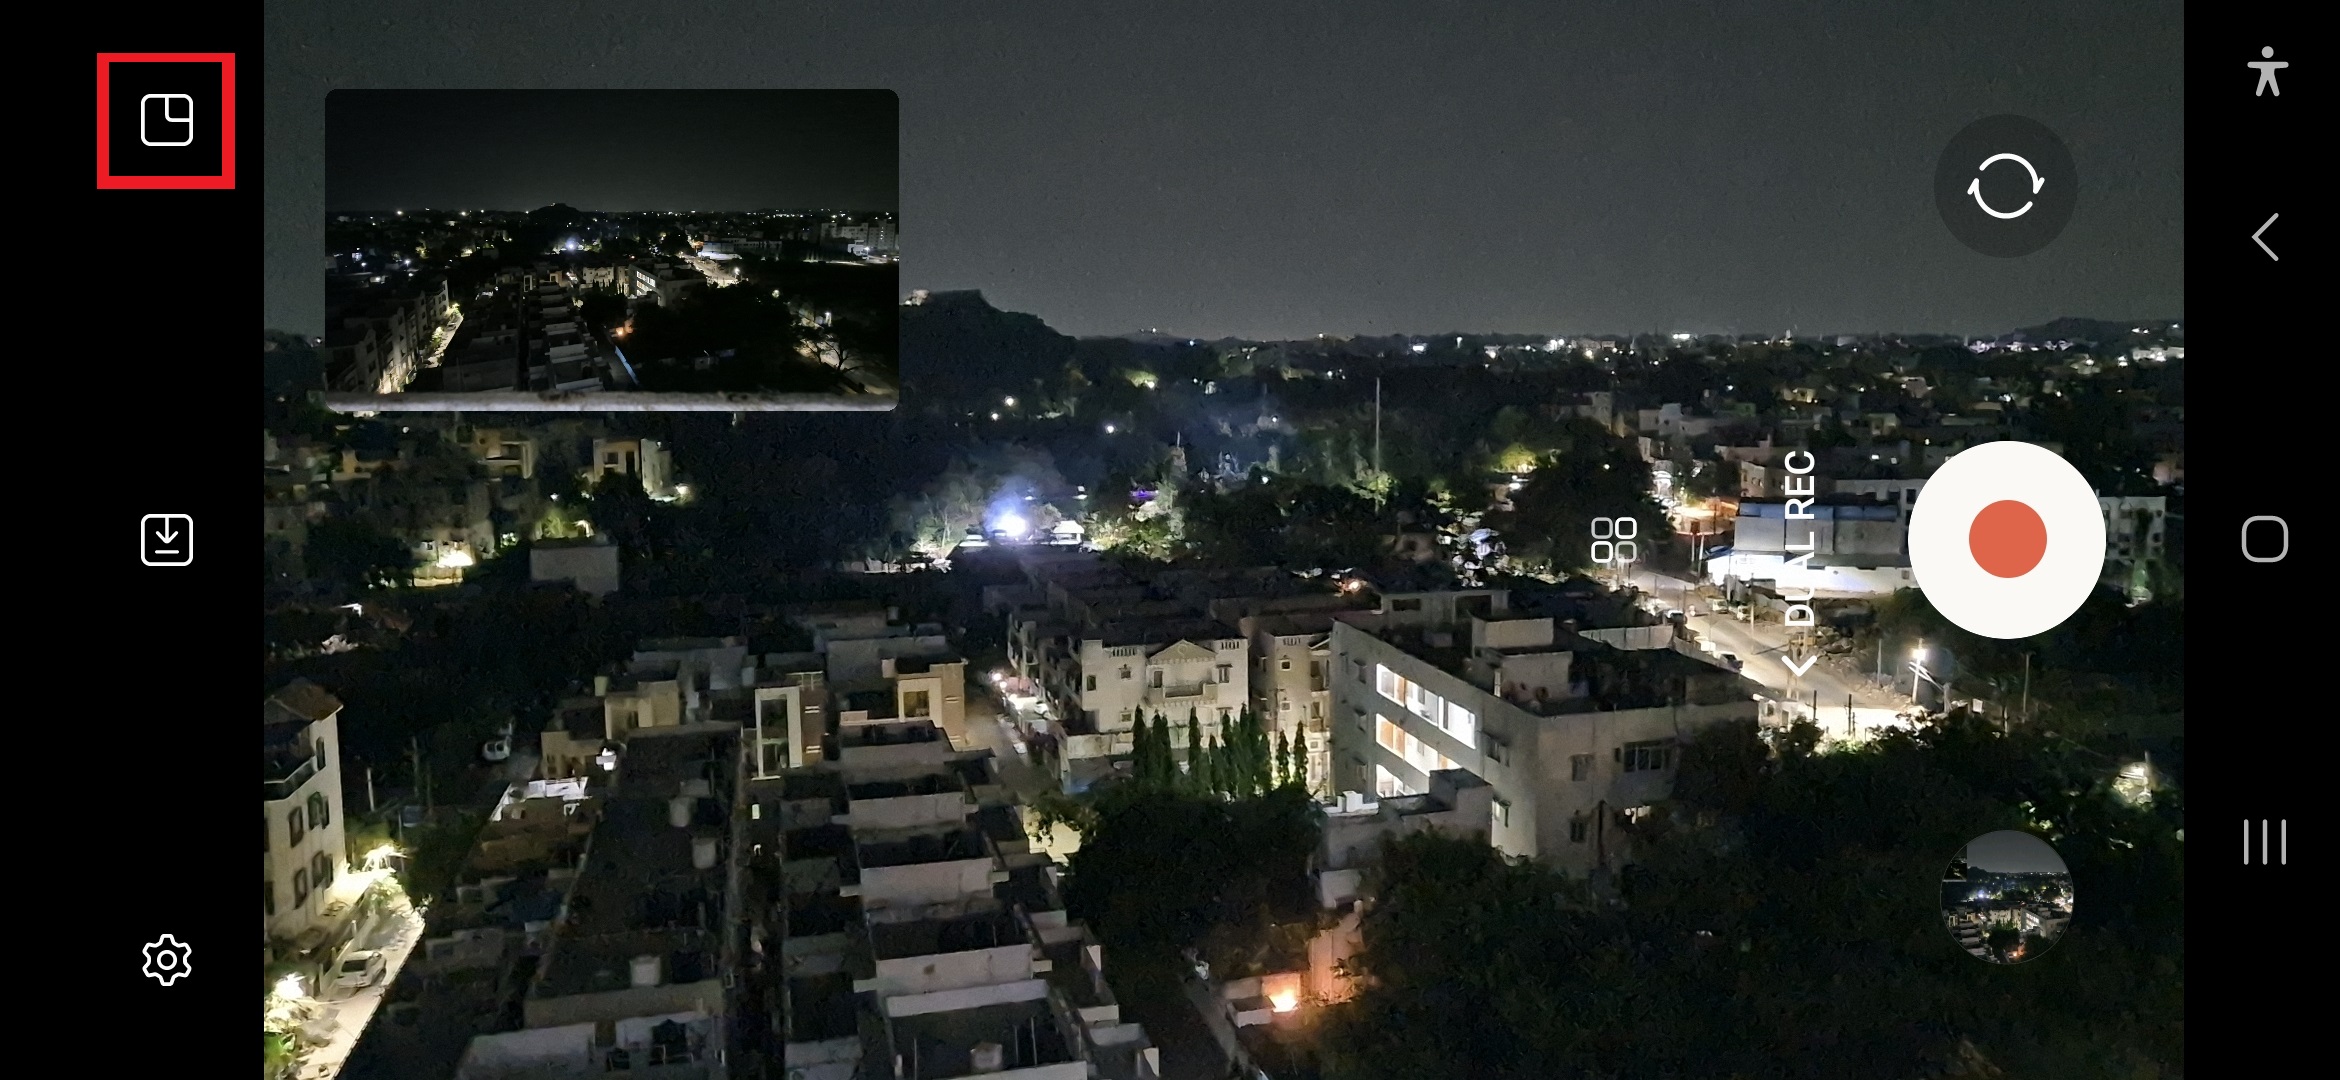
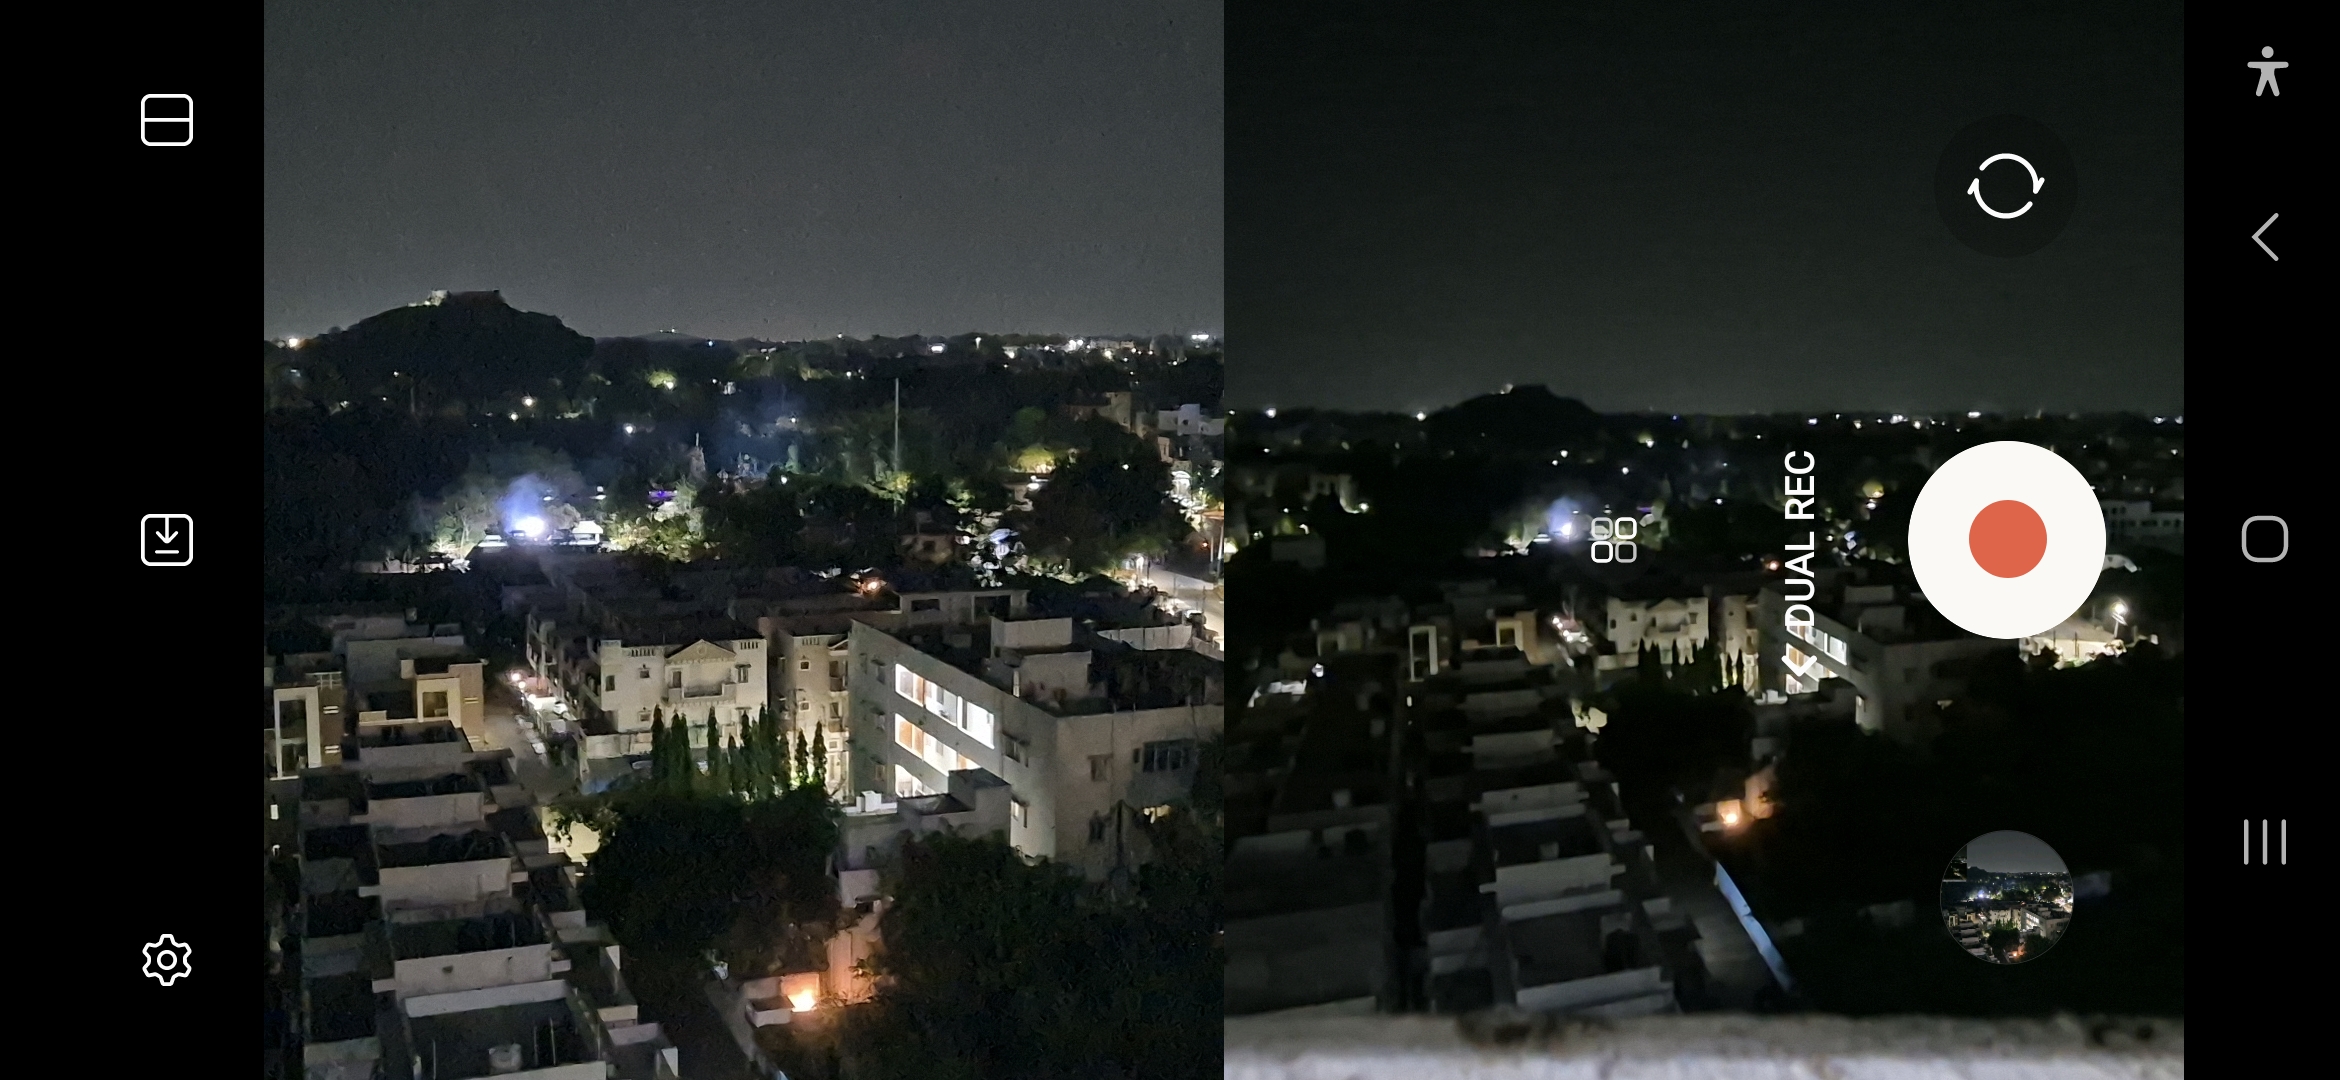
Like Director’s View, Dual Recording mode lets you choose how the feeds from two cameras will be mixed together in the final video. Picture-in-picture mode is the default setting and shows the feed from one camera in a small window superimposed on the feed from the other camera, but you can also have the feeds split down in the middle.
That’s not all: you can also save the recording from the two cameras as separate videos. This is an excellent option for those who are simply looking for the ability to record videos from two cameras at the same time and don’t want them combined into one.
How to use Dual Recording mode on a Galaxy S24, S24+, or S24 Ultra?
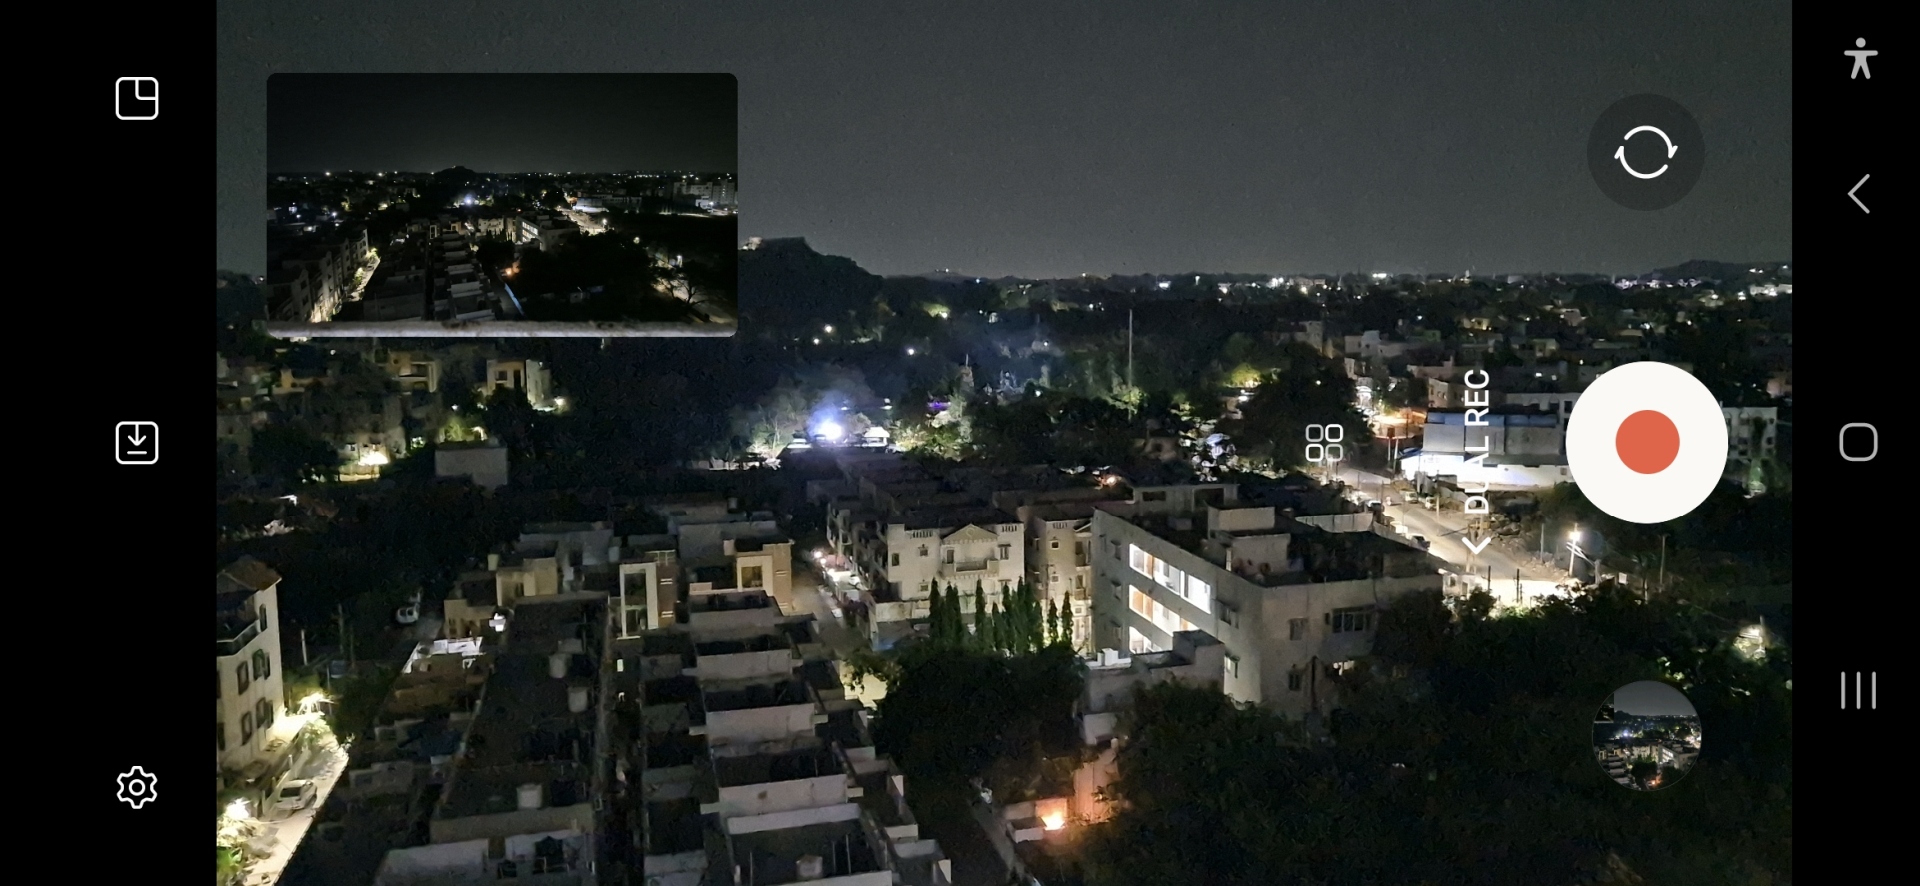
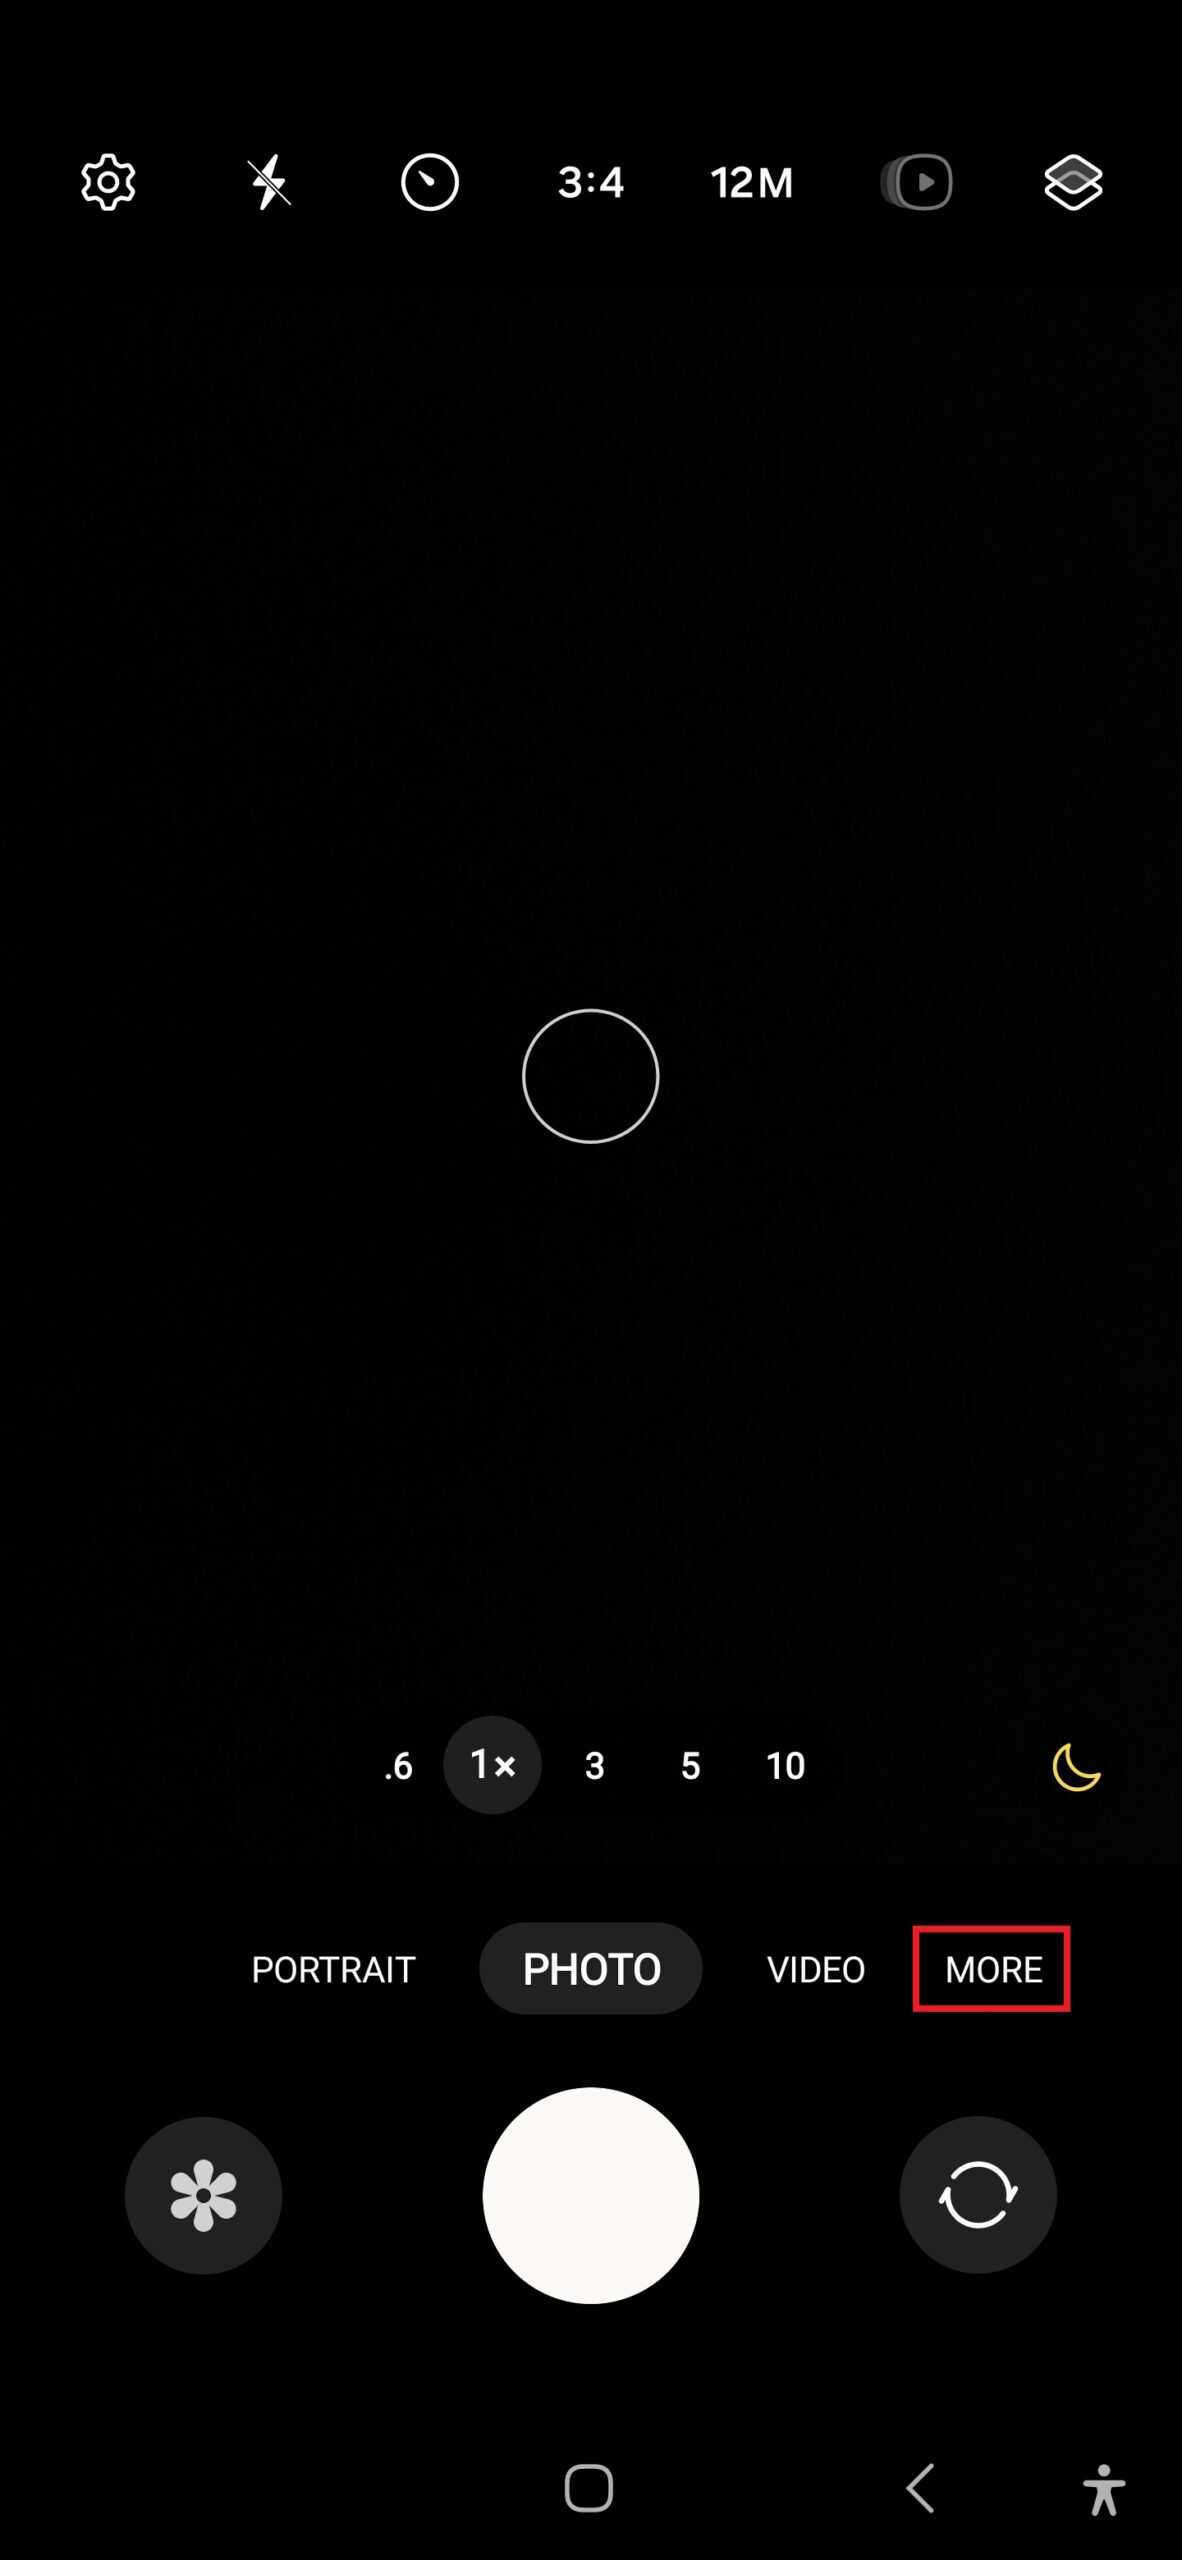
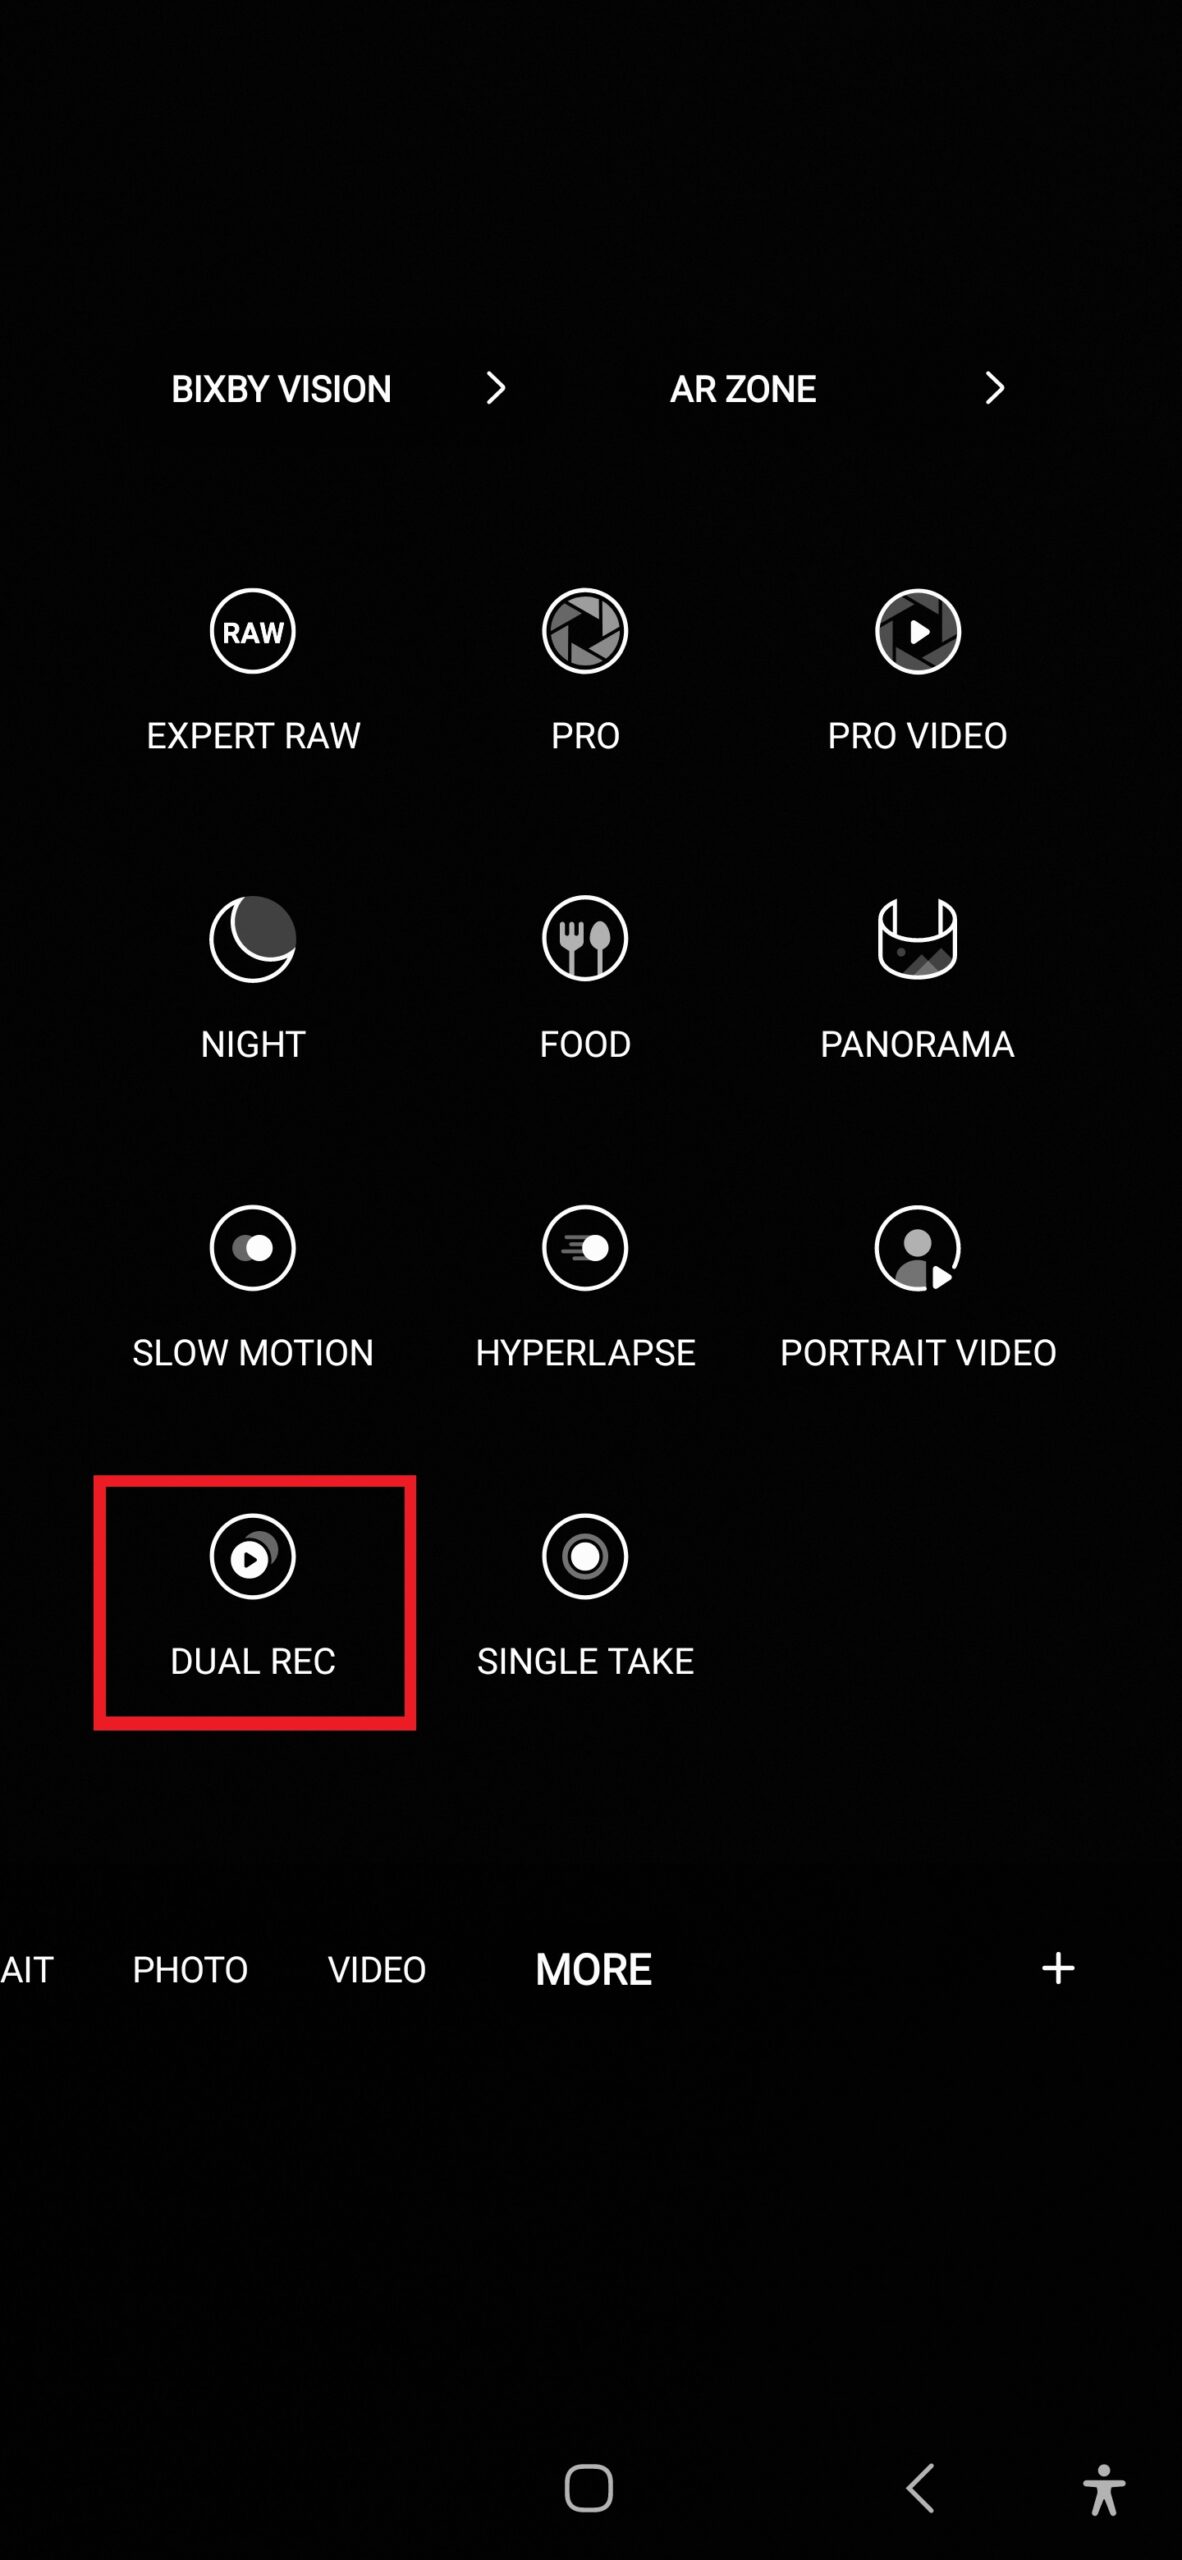
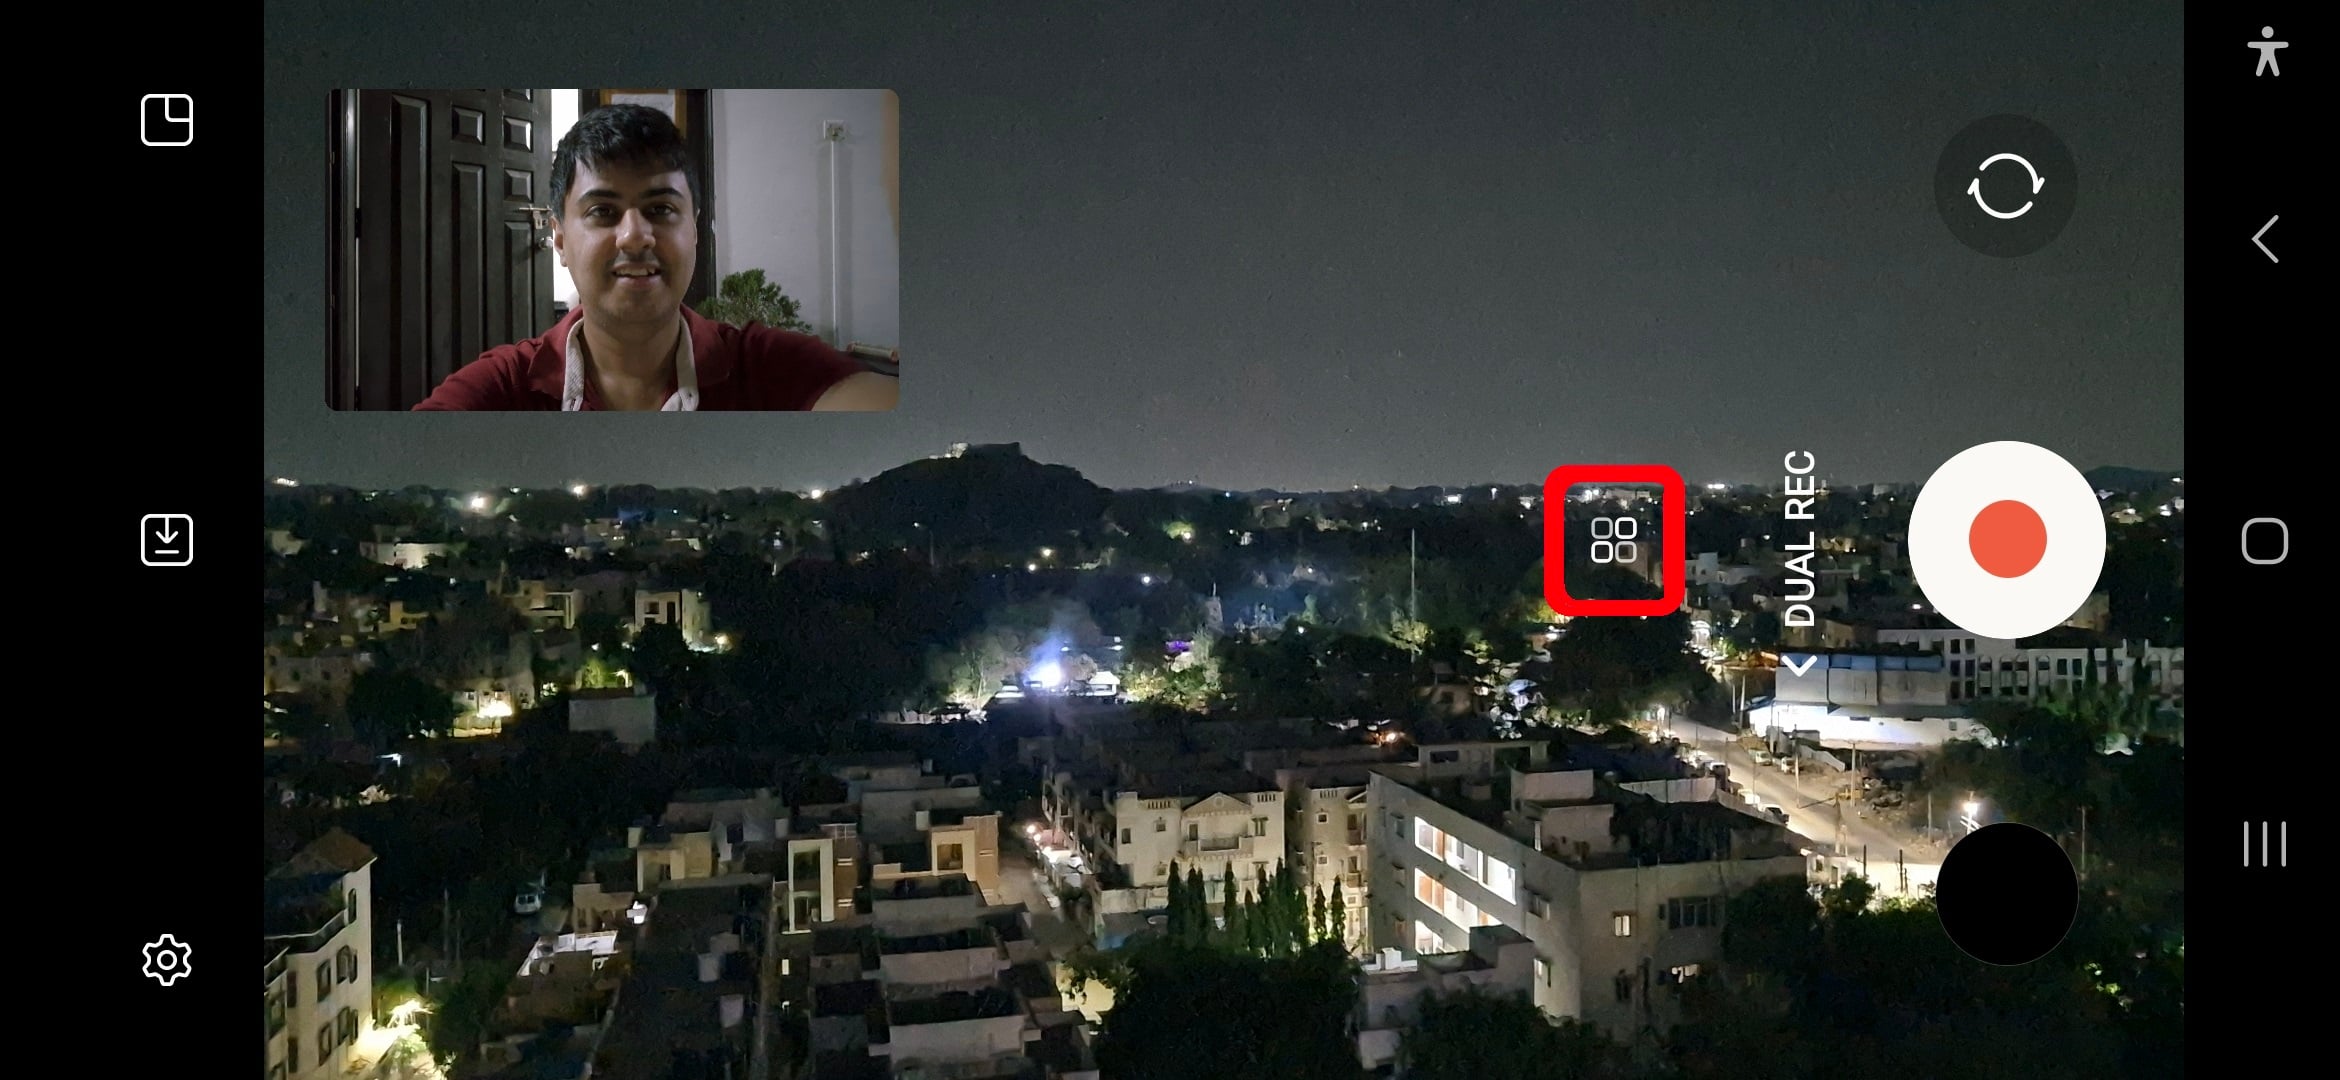
The Dual Recording mode, or Dual Rec, as Samsung calls it, can be found in the Modes section of the camera app. Just open the camera app, tap the Morebutton to the right of the shutter button to see all available modes, and tap Dual Rec.
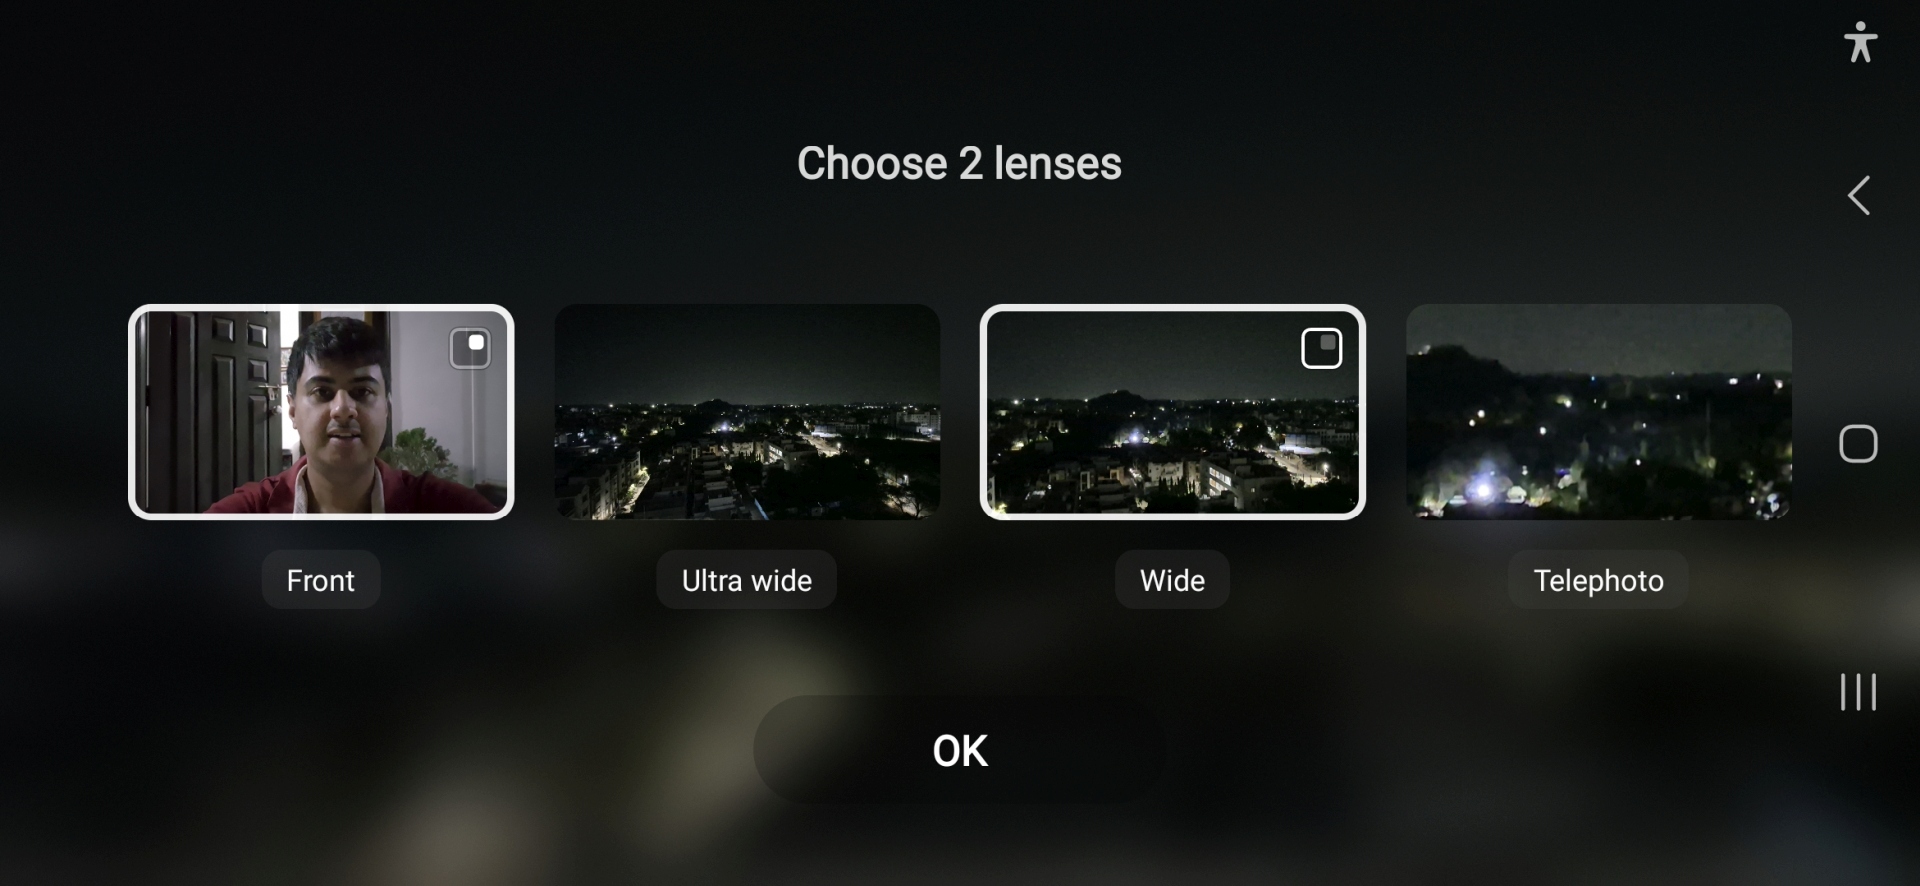
By default, the primary rear camera and the selfie camera will be selected, with the selfie feed showing in a small window that can be moved around. To change which lenses are active, tap the Select lenses button (highlighted in the first screenshot below) next to the shutter button, then tap the two lenses that you wish to use.
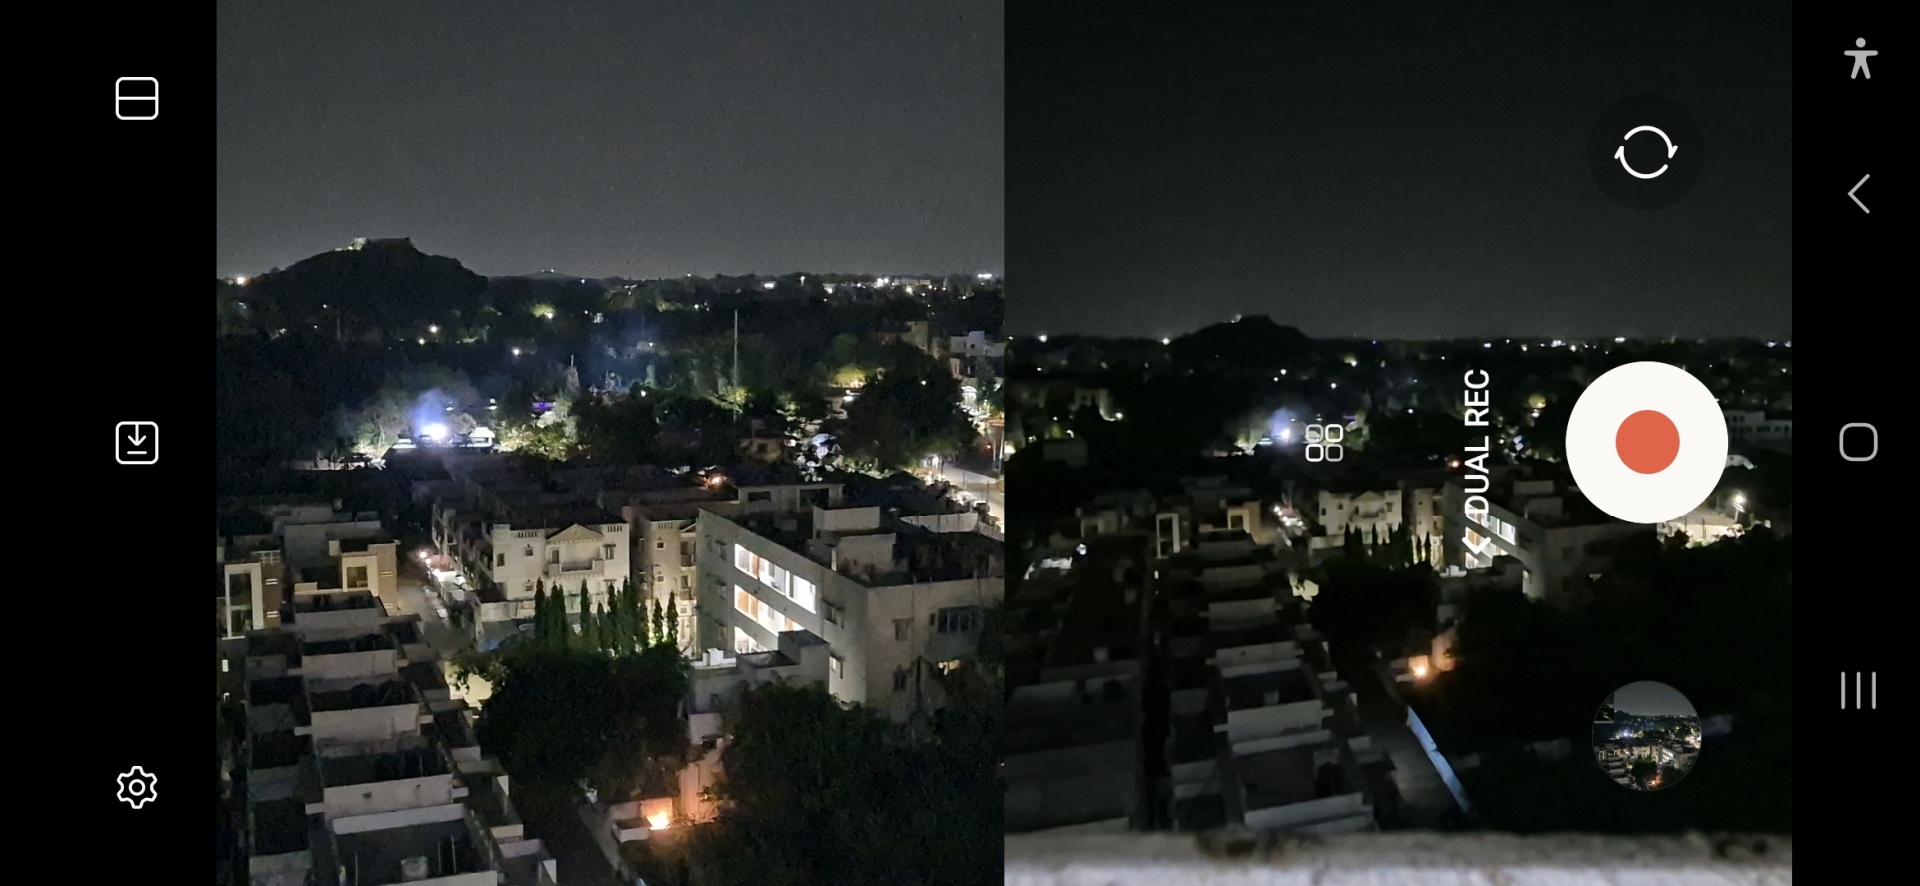
Switch between split-screen view or picture-in-picture view
If you don’t like the picture-in-picture (PiP) view, you can have the feed from the two selected cameras split in the middle. To change between PiP and split-screen view, tap the rightmost icon at the top of the screen if you’re holding the phone in portrait orienation or the icon in the top left corner of the screen if you’re holding the phone in landscape orientation.
You can also change the position of the two camera feeds by tapping the circle icon next to the shutter button (the same button that you use for switching between the front and rear cameras when capturing standard photos and videos).
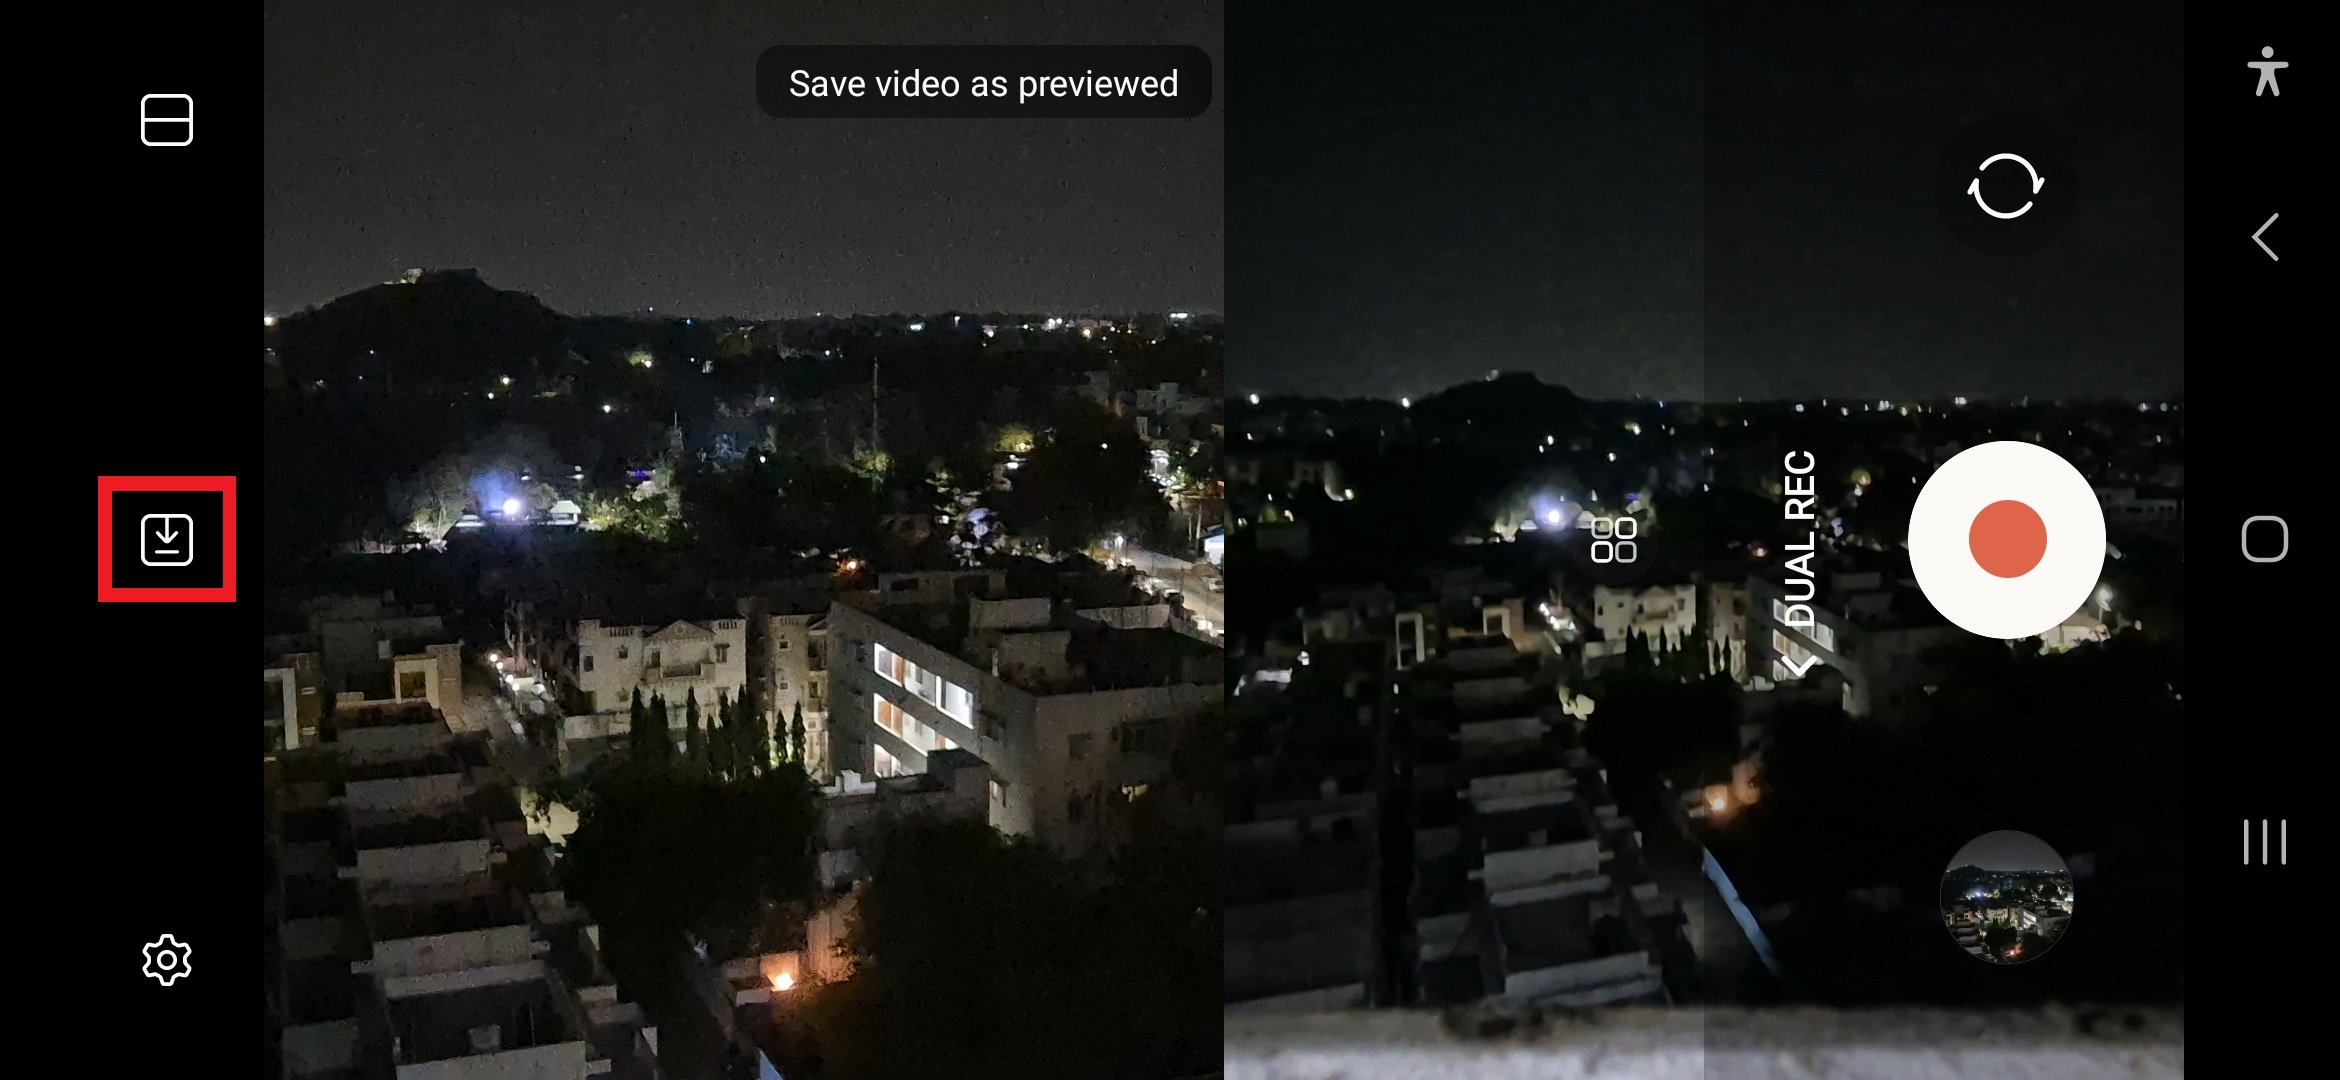
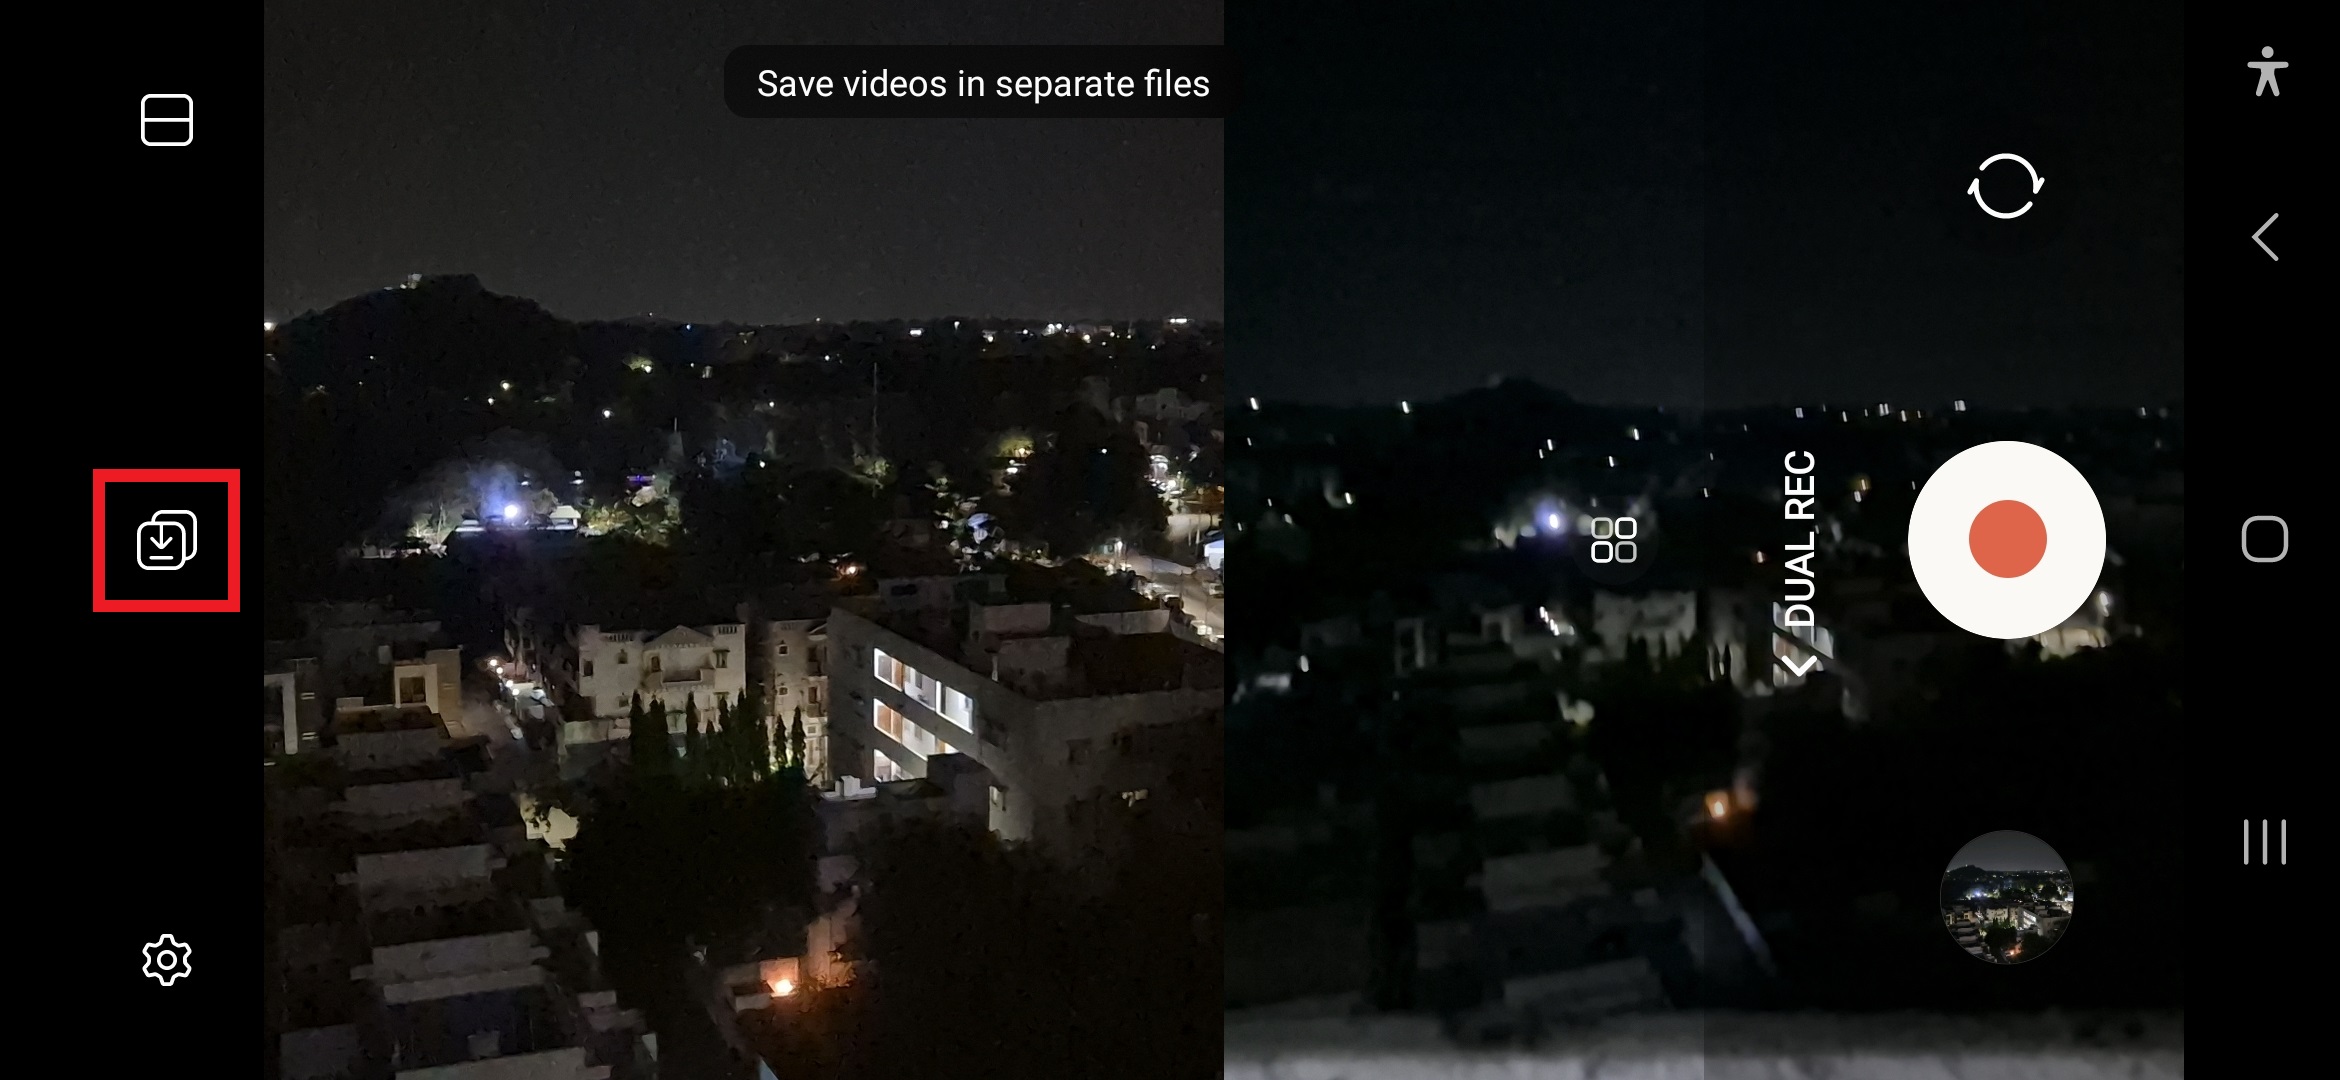
Save videos as previewed or as separate video files
This setting is for those who wish to record separate videos from two different cameras simultaneously instead of having them combined together.
Tap the icon with the downward arrow symbol (highlighted in the screenshot below) to switch between saving a single video with a picture-in-picture/split-screen view or saving the output from the two selected lenses as two separate videos.
Unfortunately, this is an either/or choice. You can either save two separate videos or create a single video that includes the output from each lens. Samsung probably made this decision to ensure the phone’s hardware isn’t taxed too much, but we’ll update this article if the company changes its decision later on.
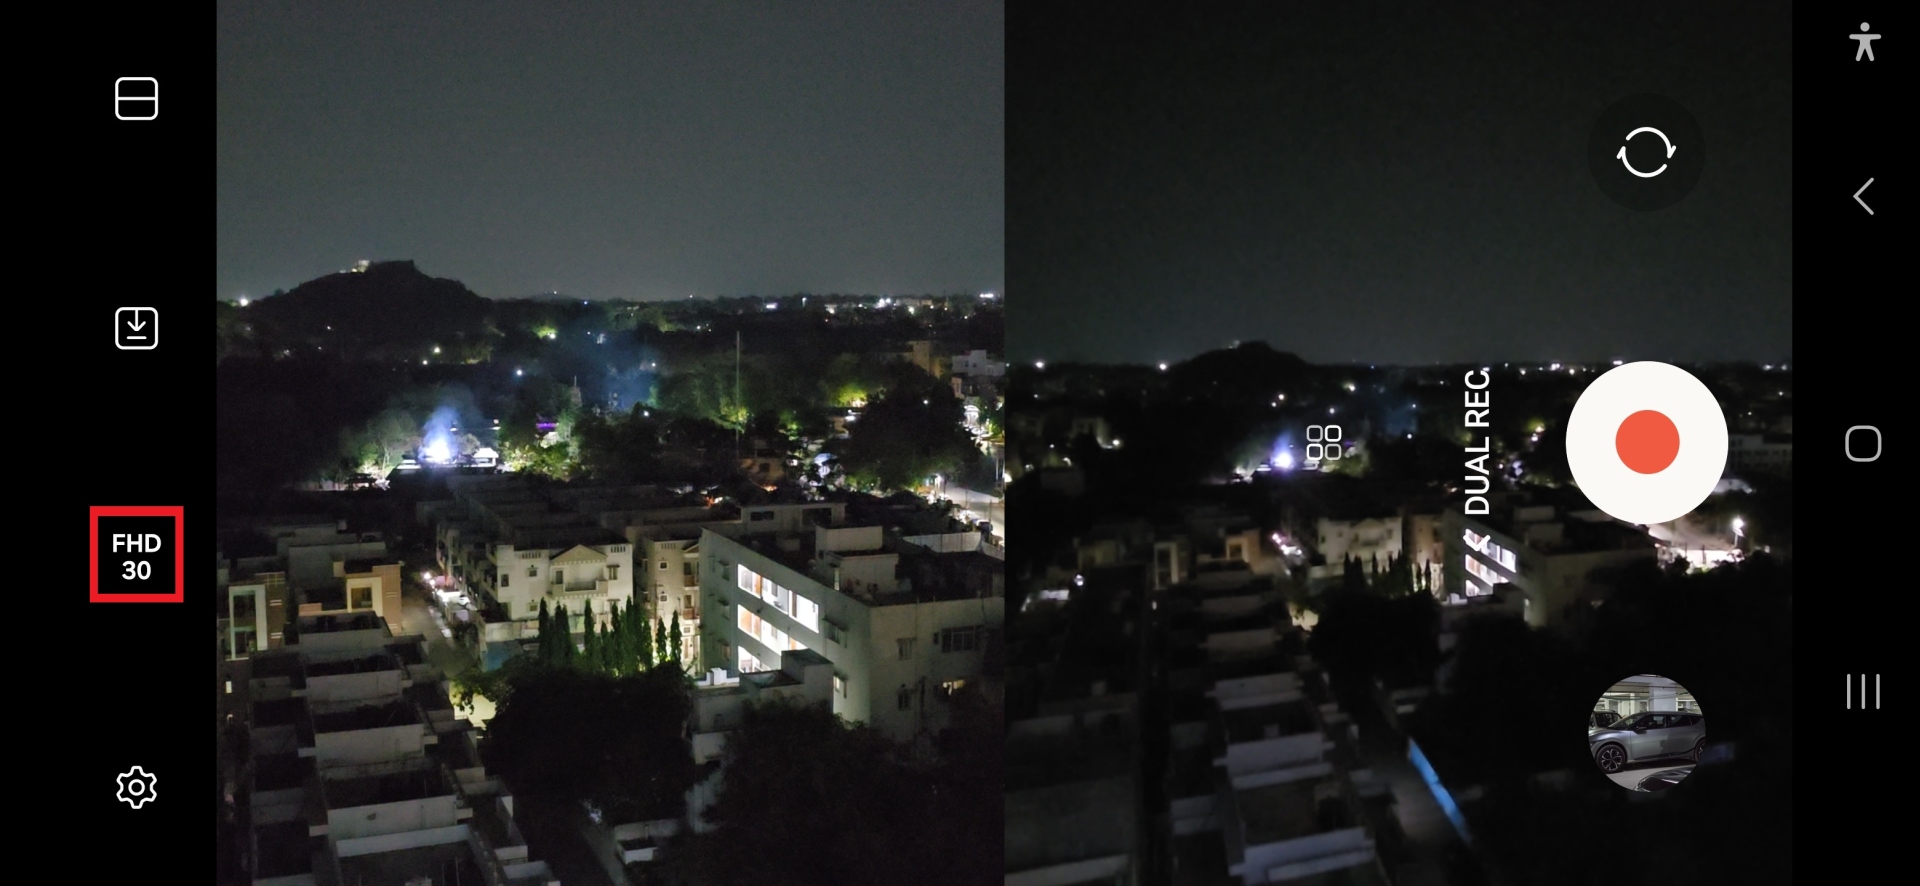
Galaxy S24 Ultra owners can switch between Full HD and 4K resolution
If you own a Galaxy S24 Ultra, you can record videos in the Dual Recording mode in either Full HD or 4K resolution. To switch between the two resolutions, tap the video size icon (highlighted in the screenshot below).
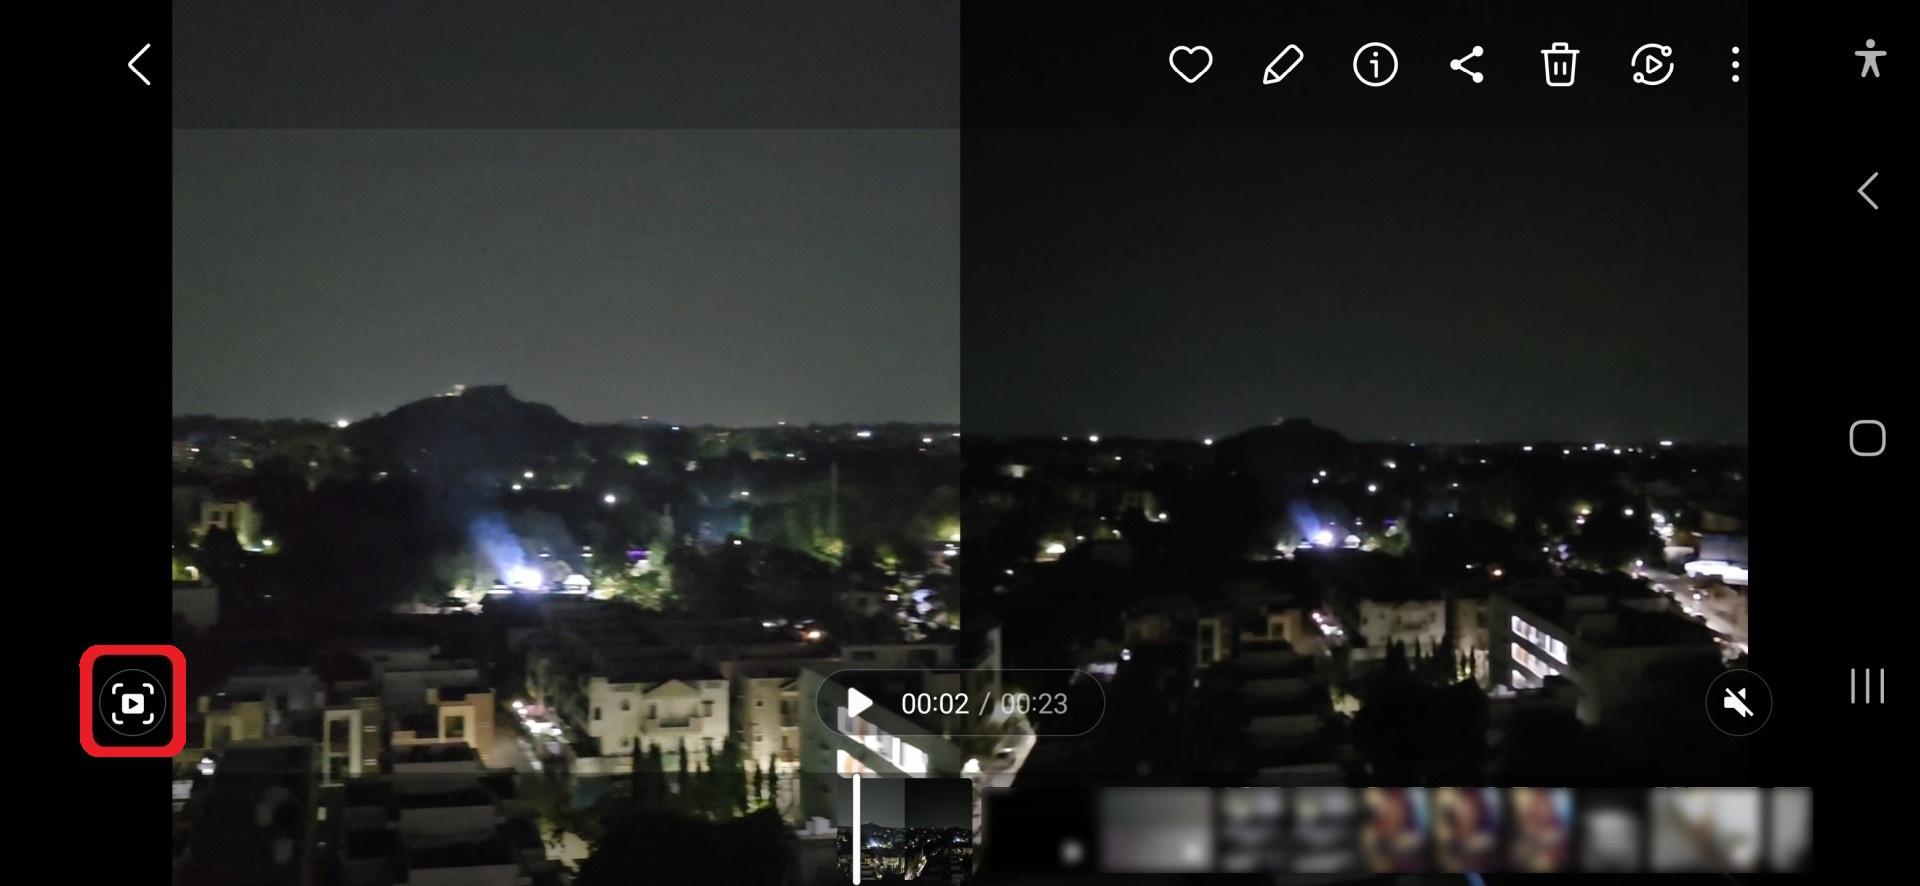
Can you capture photos in Dual Recording mode?
Dual Recording is a video feature and doesn’t have any option to capture still photos. While you can capture stills when you’re using the standard video recording mode, there is no such option in Dual Recording mode.
To get still images from videos you record in Dual Recording mode, play the video in the Gallery app, pause it at the right moment, and tap the Quick cropbutton on the left side of the screen, which will save that frame as an image.
Does the Galaxy S24 series have the old Director’s View mode?
While Dual Recording is an excellent feature, it doesn’t allow you to switch between the rear cameras while recording is active, unlike Director’s View. Unfortunately, Director’s View is not available on the Galaxy S24, Galaxy S24+, and Galaxy S24 Ultra. Samsung could bring Director’s View back as a separate mode with a software update, though the chances of that happening are slim.
Voice Memos is a built-in app on iPhone that allows you to record your voice and store it in your iPhone.This versatile app is particularly useful for recording a wide range of audio content including lectures, interviews, personal notes, and various other sounds and conversations.
Our comprehensive guide will walk you through the process of creating a voice recording on your iPhone utilizing the Voice Memos app. Additionally, we’ll delve into the more sophisticated capabilities of the app. This includes editing your audio recordings to refine the content, sharing these recordings with others, and exploring the various recording options available to customize your audio-capturing experience according to your needs.
Step 1: Open the Voice Memos App
To get started, open the Voice Memos app. You can find it in your App Library or by searching for it in Spotlight Search.
Step 2: Tap the Record Button
Once you have opened the Voice Memos app, you will see a red record button in the middle of the screen. Tap this button to start recording your voice.
Step 3: Adjust Volume
The red record button will also display a level meter that shows the current volume of your recording. You can adjust the volume by moving your iPhone closer to or farther away from the source of the sound.
Step 4: Pause and Resume Recording
To pause your recording, tap the red record button again. To resume recording, tap the button again.
Step 5: Stop Recording
To stop recording, tap the stop button (a white square with a red line through it) in the top-left corner of the screen.
Step 6: Save the Recording
Your recording will be saved automatically to your iPhone. You can view your recordings in the Voice Memos app by tapping the Library tab.
Editing Recordings
You can edit your recordings by tapping on them in the Voice Memos app. You can trim the beginning and end of your recording, adjust the playback speed, and add annotations.
Sharing Recordings
To share your recording, tap on it in the Voice Memos app and then tap the Share button (a square with an arrow pointing upwards). You can share your recording through AirDrop, Messages, Mail, and other apps.
Setting Recording Options
You can set recording options to customize your audio experience. To do this, open the Voice Memos app and tap the Settings button (gear icon) in the bottom-left corner of the screen.
Advanced Features
The Voice Memos app has several advanced features, such as the ability to record in stereo, set a recording timer, and use a Bluetooth microphone. To learn more about these features, open the Voice Memos app and tap the Settings button.
Additional Tips
Use a headset or earbuds to record high-quality audio.
Place your iPhone in a stable position to avoid introducing noise into your recording.
Speak clearly and at a moderate pace.
Review your recordings before sharing them to ensure they are of high quality.
Summary
The Voice Memos app, built into the iPhone, serves as an efficient and powerful tool for recording and managing various types of voice recordings. It is designed to offer users a seamless experience in capturing high-quality audio for different purposes. In this detailed guide, we provide a step-by-step approach that covers the entire spectrum of using this app.
You will gain insights into how to initiate a new recording, ensuring you capture every important detail. Beyond mere recording, this guide also elaborates on the editing process, allowing you to fine-tune your audio files for clarity and precision. Additionally, we explore the sharing functionalities of the Voice Memos app, enabling you to distribute your recordings with colleagues, friends, or for professional purposes. Finally, we delve into effective management techniques for your voice recordings, ensuring you can organize and access them efficiently and without hassle. You can find out more details about this iPhone app over at Apple’s website.
Filed Under: Apple, Apple iPhone, Guides
Latest timeswonderful Deals
Disclosure: Some of our articles include affiliate links. If you buy something through one of these links, timeswonderful may earn an affiliate commission. Learn about our Disclosure Policy.
An Indiana man was sentenced to 85 years in prison for the murder of his mother’s boyfriend in front of his mother, as well as for recording the whole incident on voicemail, which was acquired exclusively by Fox News Digital. The voicemail was played back at the sentencing hearing.
According to court documents obtained by Fox News Digital, Cody Allen Wade, then 33 years old, stabbed Carl Haviland at least seven times in 2020 because he felt that his mother “disrespected him.”
Wade was convicted guilty of murder following the conclusion of his trial in August. On September 6th, his sentence was handed down by Judge Robert A. Pell of the Superior Court in Clay County.
According to court documents obtained from the Clay County Prosecutor’s Office, he had a habitual offender enhancement applied to his sentence because he had at least 12 prior convictions, including a felony for an alleged burglary in 2013 and another for arson in 2018. Both of these felonies were committed in 2018.