Categories
News

How to Take Screenshots and Screen Recordings on Your iPhone

screenshot iPhone

In today’s digital landscape, capturing and sharing screen content has become an indispensable aspect of our smartphone usage. Whether it’s documenting crucial information, creating engaging tutorials, or sharing entertaining social media content, screen capture and recording capabilities have become essential tools for iPhone users. This comprehensive guide delves into the world of capturing and sharing your iPhone’s screen, providing detailed instructions on both screenshots and screen recordings.

Part 1: Capturing Screenshots: A Step-by-Step Guide

Screenshots are an excellent way to preserve the current state of your iPhone’s screen, capturing essential information, conversations, or visual elements. Let’s explore how to take and edit screenshots effectively.

Taking Screenshots with Ease:

  1. Locate the Crucial Buttons: Identify the side button (formerly known as the Sleep/Wake button) and the volume-up button on the right side of your iPhone.
  2. Press Simultaneously: Quickly press and release both the side button and the volume up button simultaneously. A distinct screenshot sound will confirm the successful capture, unless your device is in silent mode.

Taking Screenshots with AssistiveTouch:

  1. Enable the AssistiveTouch Feature: For iPhones with Touch ID or Face ID, navigate to Settings > Accessibility > AssistiveTouch and toggle the switch to enable the feature. For iPhones with home buttons, go to Settings > Accessibility > Home Button > AssistiveTouch and follow the same process.
  2. Access the AssistiveTouch Menu: Double-tap the home button or swipe up from the bottom edge of the screen to open the AssistiveTouch menu.

Capture with AssistiveTouch: Tap the “Devices” icon in the AssistiveTouch menu, then select “Screenshot” from the options.

Editing Screenshots with Precision:

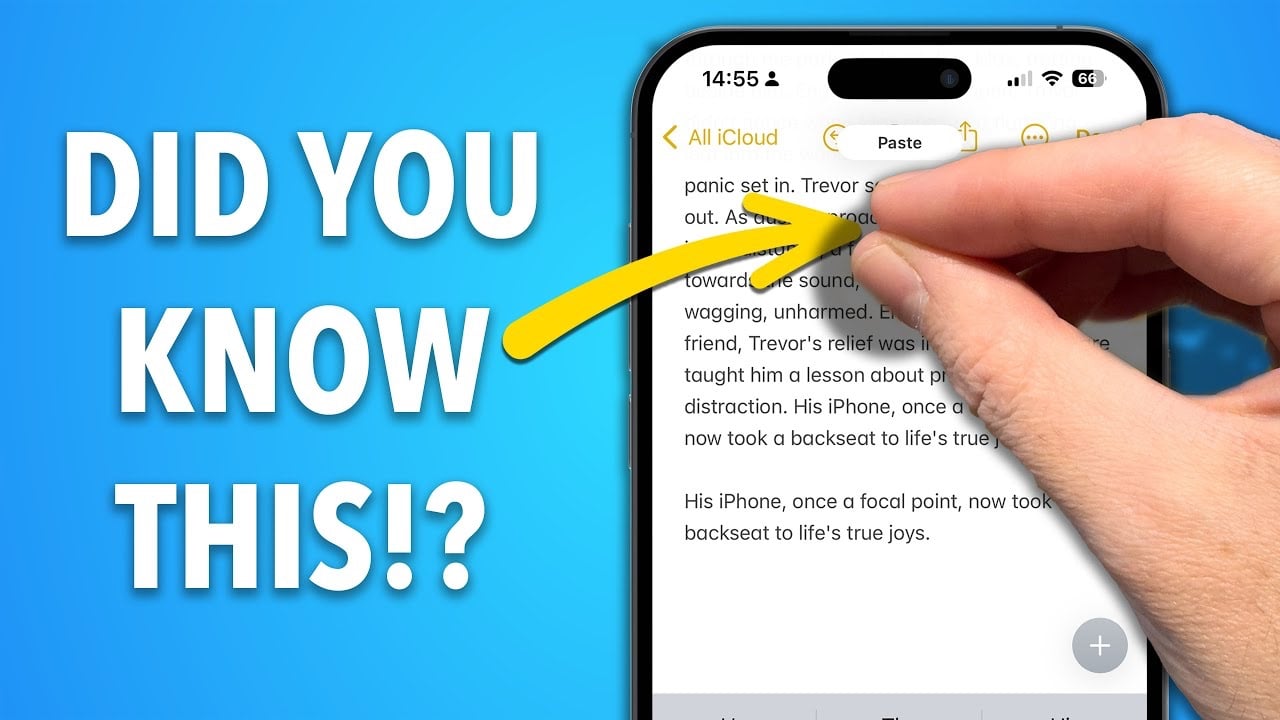
  1. Access the Editing Shortcut: Once you’ve captured a screenshot, a thumbnail will appear in the lower-left corner of the screen. Tap the thumbnail to open the editing window.
  2. Manipulate the Screenshot: Use the editing tools provided, such as drawing tools, text insertion, and cropping options, to customize your screenshot to your liking.
  3. Save or Share Your Creation: Once satisfied with your edits, tap the Done button to save the modified screenshot or tap the Share icon to share it via various apps or services.

Part 2: Recording Screen Activities: Capturing Digital Moments

Screen recordings allow you to capture the entirety of your iPhone’s screen activity, making them ideal for creating tutorials, demonstrating gameplay, or documenting app usage. Here’s how to record screen activities effectively.

Recording Screen Activities with Control Center:

  1. Access the Control Center: Swipe down from the top-right corner of your iPhone’s display to open Control Center.
  2. Find the Screen Recording Button: Locate the Screen Recording button, which may require tapping the “Customize Controls” option to add it if it’s not visible.
  3. Initiate Screen Recording: Tap the Screen Recording button. A brief countdown will appear, followed by the start of the screen recording.
  4. End the Recording: To stop recording, open Control Center again and tap the red Stop Recording button.

Accessing Recorded Screen Recordings:

  1. Locate Your Recordings: All recorded screen recordings are stored in the Photos app. You can find them in the “Screen Recordings” album under the “Media Types” section.

Editing and Sharing Screen Recordings:

  1. Access the Editing Tools: Open a recorded screen recording in the Photos app. Tap Edit to access the editing tools.
  2. Crop and Annotate: Trim the video to your desired length using the crop tool and add annotations, text, or shapes using the Markup tool.

Summary

Mastering screen capture and recording on your iPhone empowers you to effectively document, share, and enhance your digital experiences. With these comprehensive guidelines, you can confidently capture and share your iPhone’s screen content, whether it’s preserving important information, creating engaging tutorials, or showcasing entertaining gameplay moments. You can find out more details on how to take screen recording and screenshots on your iPhone over at Apple’s website.

Image Credit: John Appleseed

Filed Under: Apple, Apple iPad, Guides


Latest timeswonderful Deals

Disclosure: Some of our articles include affiliate links. If you buy something through one of these links, timeswonderful may earn an affiliate commission. Learn about our Disclosure Policy.

Categories
News

How to Make a Voice Recording on the iPhone in Voice Memos

iPhone Voice Memos

Voice Memos is a built-in app on iPhone that allows you to record your voice and store it in your iPhone.This versatile app is particularly useful for recording a wide range of audio content including lectures, interviews, personal notes, and various other sounds and conversations.

Our comprehensive guide will walk you through the process of creating a voice recording on your iPhone utilizing the Voice Memos app. Additionally, we’ll delve into the more sophisticated capabilities of the app. This includes editing your audio recordings to refine the content, sharing these recordings with others, and exploring the various recording options available to customize your audio-capturing experience according to your needs.

Step 1: Open the Voice Memos App

To get started, open the Voice Memos app. You can find it in your App Library or by searching for it in Spotlight Search.

Step 2: Tap the Record Button

Once you have opened the Voice Memos app, you will see a red record button in the middle of the screen. Tap this button to start recording your voice.

Step 3: Adjust Volume

The red record button will also display a level meter that shows the current volume of your recording. You can adjust the volume by moving your iPhone closer to or farther away from the source of the sound.

Step 4: Pause and Resume Recording

To pause your recording, tap the red record button again. To resume recording, tap the button again.

Step 5: Stop Recording

To stop recording, tap the stop button (a white square with a red line through it) in the top-left corner of the screen.

Step 6: Save the Recording

Your recording will be saved automatically to your iPhone. You can view your recordings in the Voice Memos app by tapping the Library tab.

Editing Recordings

You can edit your recordings by tapping on them in the Voice Memos app. You can trim the beginning and end of your recording, adjust the playback speed, and add annotations.

Sharing Recordings

To share your recording, tap on it in the Voice Memos app and then tap the Share button (a square with an arrow pointing upwards). You can share your recording through AirDrop, Messages, Mail, and other apps.

Setting Recording Options

You can set recording options to customize your audio experience. To do this, open the Voice Memos app and tap the Settings button (gear icon) in the bottom-left corner of the screen.

Advanced Features

The Voice Memos app has several advanced features, such as the ability to record in stereo, set a recording timer, and use a Bluetooth microphone. To learn more about these features, open the Voice Memos app and tap the Settings button.

Additional Tips

  • Use a headset or earbuds to record high-quality audio.
  • Place your iPhone in a stable position to avoid introducing noise into your recording.
  • Speak clearly and at a moderate pace.
  • Review your recordings before sharing them to ensure they are of high quality.

Summary

The Voice Memos app, built into the iPhone, serves as an efficient and powerful tool for recording and managing various types of voice recordings. It is designed to offer users a seamless experience in capturing high-quality audio for different purposes. In this detailed guide, we provide a step-by-step approach that covers the entire spectrum of using this app.

You will gain insights into how to initiate a new recording, ensuring you capture every important detail. Beyond mere recording, this guide also elaborates on the editing process, allowing you to fine-tune your audio files for clarity and precision. Additionally, we explore the sharing functionalities of the Voice Memos app, enabling you to distribute your recordings with colleagues, friends, or for professional purposes. Finally, we delve into effective management techniques for your voice recordings, ensuring you can organize and access them efficiently and without hassle. You can find out more details about this iPhone app over at Apple’s website.

Filed Under: Apple, Apple iPhone, Guides


Latest timeswonderful Deals

Disclosure: Some of our articles include affiliate links. If you buy something through one of these links, timeswonderful may earn an affiliate commission. Learn about our Disclosure Policy.

Categories
News

How to Change iPhone Notification Sounds in iOS 17.2

Change iPhone Notification Sounds

Apple recently released its iOS 17.2 software update, which brings a range of new features to the iPhone, one of these is the ability to change your iPhone Notification sounds. his long-awaited feature allows users to choose from a variety of built-in sounds or even import their own custom tones. Whether you want a more subtle or attention-grabbing alert, this new option gives you greater control over your iPhone’s notification experience.

This guide is designed to show you how to easily change the notification sounds on your iPhone. To do this, you will need to update your iPhone to the latest version of iOS, which is iOS 17.2.

Step-by-Step Guide to Changing Your iPhone Notification Sounds

  1. Access the Settings App: Begin by launching the Settings app on your iPhone.
  2. Navigate to Sounds & Haptics: From the Settings menu, locate and tap the option labeled “Sounds & Haptics.” This will open the dedicated settings panel for audio and haptic feedback on your iPhone.
  3. Identify the Default Alerts Option: Scroll down the list of options until you find “Default Alerts.” Tap on this setting to access the customization options for the default notification sound.
  4. Choose Your Preferred Sound: Select the desired notification sound from the available options. You can choose from the built-in sounds like Chime, Glass, or Hero, or explore the Tone Store to find more unique and creative tones.
  5. Preview the Notification Sound: Before finalizing your selection, tap on the preview button to listen to the chosen notification sound. This allows you to ensure that the sound matches your preferences and doesn’t clash with other audio sources.
  6. Set Custom Notification Sounds for Specific Apps: If you prefer to have different notification sounds for different apps, you can still do so by accessing the notification settings for each individual app. Simply navigate to Settings > Notifications and select the desired app. You’ll find the option to customize the sound, vibration pattern, and appearance of notifications for that specific app.

Additional Tips for Customizing Your Notification Experience:

  1. Explore Third-party Tones: While iOS provides a decent selection of built-in notification sounds, you can also import custom tones from third-party apps or websites. Simply download the tone file and transfer it to your iPhone’s appropriate location.
  2. Consider Haptics: Alongside the notification sound, you can also customize the haptic feedback that accompanies notifications. This adds a subtle physical sensation to the notification experience, making it even more engaging.
  3. Create a Consistent Theme: If you’re particularly fond of a particular sound, consider using it for other alerts like the ringtone, new mail notifications, and calendar alerts. This creates a cohesive and personalized notification experience across your iPhone.
  4. Respect Quiet Settings: Remember to adjust your notification settings accordingly when in situations that require focus or silence. You can temporarily disable notifications or set them to vibrate only to avoid distractions.

With iOS 17.2, Apple has given iPhone users greater control over their notification experience. By customizing the default notification sound, you can personalize the way your iPhone alerts you to new messages, calls, and other important events. Take advantage of this feature to create a notification experience that suits your preferences and lifestyle. You will need to download the new iOS 17.2 software update to use this feature. You can find out more details about it over at Apple’s website.

Filed Under: Apple, Apple iPhone, Guides


Latest timeswonderful Deals

Disclosure: Some of our articles include affiliate links. If you buy something through one of these links, timeswonderful may earn an affiliate commission. Learn about our Disclosure Policy.

Categories
News

How to Create a New Apple ID for Your iPhone or iPad

create apple ID

Creating an Apple ID is an essential step for new users of Apple devices, including iPhones and iPads. This ID serves as a unique identifier, seamlessly linking all your Apple devices and services. It’s not just about gaining access to basic features like the App Store, iCloud, iMessage, and FaceTime; an Apple ID also unlocks a world of possibilities within the Apple ecosystem. With this ID, you can download and install apps from the App Store, expanding the functionality of your device.

Additionally, it enables you to rent movies from iTunes, offering a wide range of entertainment options at your fingertips. Importantly, an Apple ID is crucial for utilizing iCloud services, which provide secure and convenient storage for your data, photos, and backups, ensuring that your important information is accessible and protected across all your devices. Thus, setting up an Apple ID is a fundamental step in integrating into the Apple ecosystem and making the most out of your new device.

Prerequisites

Before you begin creating your Apple ID, ensure you have the following items ready:

  • An internet connection: You’ll need an internet connection to create your Apple ID and access Apple services. Make sure you’re connected to a stable Wi-Fi network or have a strong mobile data connection.
  • A valid email address: You’ll need a valid email address to create your Apple ID. Choose an email address that you’ll use regularly and can access easily.
  • A strong password: A strong password is essential for protecting your Apple ID and the data associated with it. Choose a password that is at least 8 characters long and includes a mix of uppercase and lowercase letters, numbers, and special symbols.
  • Payment information (optional): If you plan to purchase apps or content from the App Store, you’ll need to enter your payment information. This can include your credit card number, debit card number, or PayPal account information.

Creating an Apple ID Using Your iPhone or iPad

There are two primary methods to create an Apple ID using your iPhone or iPad: through the App Store or through the Settings app.

Option 1: Through the App Store

  • Launch the App Store on your iPhone or iPad.
  • Tap on your profile icon in the top right corner of the screen.
  • Scroll down and tap on the “Create New Apple ID” option.
  • Follow the on-screen instructions to enter your personal information, including your email address, password, name, and payment details (if applicable).
  • Verify your email address by clicking on the link sent to your inbox.
  • Complete the rest of the setup process, including accepting the terms and conditions.

Option 2: Through the Settings App

  • Open the Settings app on your iPhone or iPad.
  • Tap on your name or profile picture.
  • Scroll down and tap on the “iCloud” tab.
  • Tap on the “Create New Apple ID” option.
  • Follow the on-screen instructions to enter your personal information, including your email address, password, name, and payment details (if applicable).
  • Verify your email address by clicking on the link sent to your inbox.
  • Complete the rest of the setup process, including accepting the terms and conditions.

Important Considerations

When creating your Apple ID, it’s important to follow these key guidelines to ensure your account’s security and protect your personal information:

  • Choose a strong password: Avoid using easily guessable passwords or those associated with your personal information. A strong password should be at least 8 characters long and include a combination of uppercase and lowercase letters, numbers, and symbols.
  • Secure your email address: Use a secure and private email address for your Apple ID. Avoid using personal or work email addresses that may be compromised.
  • Protect your Apple ID credentials: Keep your Apple ID password confidential and don’t share it with anyone. Enable two-factor authentication to add an extra layer of security to your account.
  • Beware of scams: Be cautious of phishing emails or websites that attempt to collect your Apple ID credentials. Never provide your password or personal information to unsolicited requests.

Additional Tips

To further safeguard your Apple ID and the data associated with it, consider these additional tips:

  • Manage your Apple ID: Regularly check your Apple ID settings and ensure that payment information, security options, and family sharing settings are accurate and up-to-date.
  • Enable Find My iPhone or iPad: This feature allows you to locate and remotely erase your device if it’s lost or stolen.
  • Keep your device software up to date: Apple regularly releases software updates to address security vulnerabilities and enhance device performance.

Summary

An Apple ID serves as the gateway to a world of possibilities on your iPhone or iPad. It’s the single identifier that connects you to Apple’s vast ecosystem of services and features, allowing you to browse and download apps from the App Store, store your photos, music, and documents in iCloud, and enjoy seamless connectivity with other Apple devices.

By following the steps outlined in this guide, you can effortlessly create and manage your Apple ID, ensuring that you fully embrace the benefits of this versatile digital tool. Remember, security is paramount when it comes to your Apple ID, so always prioritize safeguarding your information to maintain the integrity of your account. You can find out more details about creating your Apple ID for a new iPhone or iPad over at Apple’s website.

Image Credit: David Švihovec

Filed Under: Apple, Apple iPad, Apple iPhone, Guides


Latest timeswonderful Deals

Disclosure: Some of our articles include affiliate links. If you buy something through one of these links, timeswonderful may earn an affiliate commission. Learn about our Disclosure Policy.

Categories
News

How to Protect the New iPhone Journal App with Face ID (Video)

iPhone Journal App

Apple recently released their new Journal App on the iPhone and iPad, in this guide we will show you how you can easily protect the app with Face ID, Touch ID or by using a passcode. Are you seeking an effective way to safeguard your personal reflections and memories in the Journal App on your iPhone? You will be pleased to know that enhancing your privacy has now become more straightforward and secure, thanks to the integration of Face ID and Touch ID features. This article guides you through the process, ensuring your diary-like entries remain private and accessible only to you. The video below from iPhone Quick Tips shows us what we need to do to secure the app on the iPhone.

Step-by-Step Guide to Securing Your Journal App:

  1. Initiate the Process: Begin by opening the Settings app on your iPhone. This is where your journey to enhanced security starts.
  2. Locate the Journal App Settings: As you scroll through the settings menu, look for the Journal App’s specific settings. This is where you’ll make the crucial changes to bolster your app’s privacy.
  3. Opt for Enhanced Security: Within the Journal App settings, you’ll find an option to lock the app. Selecting this adds a robust layer of security.
  4. Set a Personal PIN Code: For an added layer of security, setting up a PIN code is a wise move. This code acts as a backup in case biometric authentication fails or is unavailable.
  5. Choose Your Preferred Biometric Lock: This is where the magic happens. Choose to secure your Journal with either Face ID or Touch ID. This choice personalizes your security, ensuring only you can access the app.
  6. Customize Auto-Lock Timing: Flexibility is key, and hence, configuring the auto-lock timing according to your preference is crucial. You can set the app to lock immediately after you exit or after a specific duration.

This feature stands as a significant advancement in the realm of digital privacy. It brings peace of mind to users who consider their digital journal as personal and private as a traditional diary. Biometric authentication, through either Face ID or Touch ID, offers a secure and convenient way to keep your reflections and memories private.

The Importance of Biometric Security:

In a world where digital security is paramount, biometric authentication offers a reliable and user-friendly solution. The Journal App’s integration of this technology underscores its commitment to user privacy. With biometric locks, the chances of unauthorized access are drastically reduced, providing a safe haven for your personal entries.

Embracing User-Friendly Security:

If you are wondering how this new feature affects your daily use of the Journal App, rest assured, the integration is seamless. The app remains as user-friendly as ever, with the added benefit of enhanced security. This implementation strikes a balance between robust protection and ease of use, ensuring you enjoy the best of both worlds.

Technical Yet Accessible:

While the technology behind this feature is advanced, its implementation is designed for ease of use. You don’t need to be a tech expert to navigate these settings. The process is intuitive, catering to a wide range of users, from tech-savvy individuals to those who prefer simplicity.

Secure Your Digital Diary:

In an era where digital privacy is a growing concern, securing your personal Journal App with Face ID or Touch ID is a wise decision. It assures that your private thoughts and memories remain just that – private. This feature is more than a security measure; it’s a commitment to safeguarding your digital diary.

Source iPhone Quick Tips

Image Credit: Miguel Tomás

Filed Under: Apple, Apple iPhone, Guides


Latest timeswonderful Deals

Disclosure: Some of our articles include affiliate links. If you buy something through one of these links, timeswonderful may earn an affiliate commission. Learn about our Disclosure Policy.

Categories
News

How to transfer photos and videos from your iPhone to PC or Mac

transfer photos iPhone

This guide is designed to show you how you can easily transfer photos from your iPhone or iPad to your PC or Mac. Transferring photos and videos from an iPhone or iPad to a Mac or PC is a common task that many users need to perform. This process allows for better organization, editing, and backup of your media files. There are several methods to achieve this transfer, each with its own set of steps and considerations.

Method 1: Using iCloud

Background: iCloud is Apple’s cloud storage service, which syncs data across all your Apple devices.

Assumptions: You have an iCloud account and are signed in on your iPhone/iPad and Mac/PC.

Steps:

  1. Enable iCloud Photos on your iPhone/iPad: Go to Settings > [your name] > iCloud > Photos, then turn on iCloud Photos. This will upload all your photos and videos to iCloud.
  2. Access on Mac: On a Mac, open the Photos app and sign in with your Apple ID to view the iCloud Photos.
  3. Access on PC: Install iCloud for Windows and sign in with your Apple ID. Enable Photos. You can then access your photos through the iCloud for Windows application or directly from a folder in File Explorer.

Considerations:

  • iCloud storage is limited to 5GB for free accounts. Additional storage requires a subscription.
  • This method requires a good internet connection for initial upload and subsequent syncing.

Method 2: Using a USB Cable

Background: Direct transfer via a USB cable is a straightforward method that involves physically connecting your device to your computer.

Assumptions: You have a compatible USB cable and the latest version of iTunes installed on your PC (not required for Mac).

Steps:

  1. Connect your iPhone/iPad to your computer using the USB cable.
  2. Trust the Computer: If prompted, tap ‘Trust’ on your iPhone/iPad to allow the computer access to your device.
  3. For Mac users: The Photos app will open automatically. You can then import your photos and videos.
  4. For PC users: Open iTunes, select your device, and choose ‘Photos’. You can then choose to sync all photos and albums or select specific items.

Considerations:

  • This method provides a quick and direct transfer without needing internet access.
  • Syncing via iTunes on PC may sometimes lead to data overwriting or duplication.

Method 3: Using AirDrop (Mac Only)

Background: AirDrop is a feature that allows wireless transfer of files between Apple devices.

Assumptions: Both devices have AirDrop enabled and are within Bluetooth and Wi-Fi range.

Steps:

  1. Enable AirDrop on your Mac: Go to Finder > AirDrop and turn on Bluetooth and Wi-Fi.
  2. Choose Photos/Videos on your iPhone/iPad: Open the Photos app, select the items you want to transfer, tap the share icon, and choose AirDrop.
  3. Accept the Transfer on Mac: When your Mac appears, tap it. The photos/videos will be transferred to the Downloads folder on your Mac.

Considerations:

  • AirDrop requires both devices to be relatively close.
  • Large transfers may take some time.

Method 4: Using Third-Party Cloud Services

Background: Services like Google Photos, Dropbox, and OneDrive offer cross-platform cloud storage.

Assumptions: You have an account with these services and have their apps installed on your devices.

Steps:

  1. Upload from iPhone/iPad: Open the respective app and upload your photos and videos to the cloud.
  2. Access on Mac/PC: Log into the same account on your computer and download the uploaded files.

Considerations:

  • These services usually offer limited free storage, with paid plans for more space.
  • Transfer speed is dependent on your internet connection.

Summary

Each method has its pros and cons, and the best method depends on your specific needs, such as the volume of data to be transferred, the devices you are using, and whether you prefer a wired or wireless solution. Regularly transferring and backing up your photos and videos ensures that your memories are safe and accessible across all your devices. You can find out more information about transferring your videos and photos from your iPhone or iPad to your PC or Mac over at Apple’s website.

Here are some more helpful iPhone articles:

Image Credit: Tomasz Zagórski

Filed Under: Apple, Apple iPad, Apple iPhone, Guides


Latest timeswonderful Deals

Disclosure: Some of our articles include affiliate links. If you buy something through one of these links, timeswonderful may earn an affiliate commission. Learn about our Disclosure Policy.

Categories
News

Clear the history, cache, and cookies from Safari on your iPhone

clear history safari

This guide is designed to show you how to clear the history, cache, and cookies in Apple’s Safari browser on your iPhone. Every time you browse the web on your iPhone using Safari, the browser stores various information, such as the sites you visited (history), website data for quicker loading (cache), and small files from websites (cookies). While this data helps in quicker access and personalized experiences, it can also take up space and potentially compromise privacy. Therefore, periodically clearing this data is a good practice.

Understanding the Terms

  1. History: This is a log of sites you’ve visited. Clearing it can help maintain your privacy, especially if you share your device with others.
  2. Cache: Safari stores parts of websites in the cache to load them faster during your next visit. Over time, this data can accumulate and take up significant storage space.
  3. Cookies: Cookies are small files that websites use to remember your settings and login details. Clearing cookies can log you out of sites and reset website preferences.

If you’re looking to keep your iPhone clean and protect your privacy, it’s important to clear your browsing history, cache, and cookies from Safari from time to time. This will help to free up space on your phone and prevent websites from tracking your online activity.

Here’s how to clear your browsing history, cache, and cookies from Safari on your iPhone:

  1. Open the Settings app.
  2. Tap on Safari.
  3. Scroll down and tap on Clear History and Website Data.
  4. A pop-up will appear asking you to confirm that you want to clear your history and website data. Tap on Clear History and Data.

Your browsing history, cache, and cookies will be cleared.

What is a browsing history?

A browsing history is a record of all the websites that you have visited on your iPhone. This information is stored by Safari so that you can easily go back to the websites that you have visited recently.

What is a cache?

A cache is a temporary storage area on your iPhone that stores copies of web pages. This can help to speed up the loading of web pages.

What are cookies?

Cookies are small text files that are stored on your iPhone by websites. These cookies can be used to track your online activity and to tailor ads to you.

Why should I clear my browsing history, cache, and cookies?

There are several reasons why you should clear your browsing history, cache, and cookies from Safari on your iPhone:

  • To free up space on your phone.
    To protect your privacy. Websites can track your online activity using cookies. By clearing your cookies, you can prevent websites from tracking you.
    To fix problems with websites that are not loading correctly. Sometimes, clearing your cache and cookies can help to fix problems with websites that are not loading correctly.

How often should I clear my browsing history, cache, and cookies?

It is up to you how often you want to clear your browsing history, cache, and cookies. However, it is a good idea to do it at least once a month.

What happens when I clear my browsing history, cache, and cookies?

When you clear your browsing history, cache, and cookies, the following happens:

  • Your browsing history is deleted. This means that you will no longer see a list of the websites that you have visited recently.
  • Your cache is cleared. This means that the copies of web pages that are stored on your iPhone are deleted. This can speed up the loading of web pages, but it can also make some websites look strange.
  • Your cookies are deleted. This means that websites will no longer be able to track your online activity.

What is the difference between clearing browsing history and clearing website data?

Clearing browsing history only deletes the list of websites that you have visited recently. Clearing website data deletes the list of websites that you have visited recently, as well as the copies of web pages that are stored on your iPhone and the cookies that are stored on your iPhone.

What if I want to clear my history for a specific website?

You can’t clear your history for a specific website in Safari. However, you can clear your browsing history completely and then only visit the websites that you want to keep track of.

What if I want to block cookies?

You can block cookies in Safari by going to Settings > Safari > Block All Cookies. However, this will also block some websites from working correctly. If you want to block cookies from specific websites, you can do that by visiting the website’s privacy settings page.

Additional Tips

  • Regular Maintenance: Clear your history, cache, and cookies periodically to keep Safari running smoothly and protect your privacy.
  • Impact on Website Performance: Note that clearing this data might mean some sites take longer to load initially and you may have to re-enter login details.
  • Backup Important Information: Ensure any important information or bookmarks are saved elsewhere, as clearing history will remove them.

Summary

Regularly clearing the history, cache, and cookies in Safari on your iPhone can help maintain the browser’s performance and protect your privacy. By following these steps, you can manage your data effectively while enjoying a seamless browsing experience. You can find out more details about how to clear your history, cookies and cache on your iPhone over at Apple’s website.

Image Credit: Amanz

Filed Under: Apple, Apple iPhone, Guides


Latest timeswonderful Deals

Disclosure: Some of our articles include affiliate links. If you buy something through one of these links, timeswonderful may earn an affiliate commission. Learn about our Disclosure Policy.

Categories
News

20 Handy iPhone Gestures You May Not Know About

iPhone Gestures

Are you looking to streamline your iPhone experience and boost your efficiency, we get to find out about some helpful iPhone gestures. If you’re wondering how you’ll be pleased to know that mastering a few handy gestures can transform the way you navigate and utilize your device. These gestures, ranging from basic to advanced, unlock new interactions with your iPhone, making everyday tasks quicker and more intuitive. The video below from Proper Honest Tech gives us a look at these handy iPhone gestures.

  1. One-Handed Maps Zoom: Ever found yourself needing to zoom in on Maps with just one hand? Simply double-tap and hold in the Maps app, then slide up or down to zoom in or out seamlessly.
  2. Quick Back Swipe in Settings: Navigating the Settings menu is a breeze. Swipe from left to right to go back a page effortlessly, enhancing your navigation experience.
  3. Efficient Text Selection: Selecting text is more intuitive than ever. Double-tap to highlight a word and triple-tap to select an entire passage, making editing and copying text a swift task.
  4. Shake to Undo: Made a mistake? Just shake your iPhone to undo recent actions, such as typing errors or unwanted app movements. It’s like having a magic eraser at your fingertips.
  5. Three-Finger Text Maneuvers: For text editing, swipe with three fingers to undo or redo. This gesture is a game-changer for quick text adjustments.
  6. Smooth App Exits: To return to the home screen, simply swipe up from the bottom. Need to switch apps? Swipe and hold briefly to access the app carousel.
  7. Drag and Drop Simplicity: Easily drag and drop images or files between apps. This feature is particularly handy for multitasking and organizing your content.
  8. Safari’s Hidden History: In Safari, tap and hold the back button to reveal a list of previously visited pages, making it easier to navigate your web history.
  9. Promotion of .bio Domains: An advertisement for .bio domain names is included in the video, highlighting the growing diversity of domain options.
  10. App Arrangement Made Easy: Organize your apps with ease by dragging and swiping to move them across screens, customizing your home screen to your liking.
  11. Reachability for Comfort: Use the Reachability feature for easier one-handed use, especially on larger iPhone models. This feature brings everything within thumb’s reach.
  12. Control Centre Gestures: Adjust settings like brightness and volume with simple swipes in the Control Centre, making these adjustments more intuitive.
  13. Note-Taking Nuances: In the Notes app, swipe on bullet points to adjust their indentation, organizing your notes more effectively.
  14. Quick Message Responses: Double-tap a message to react or reply quickly, a handy feature for staying on top of your conversations.
  15. Pinch to Copy/Paste: Utilize a three-finger pinch gesture to copy and paste text, streamlining your text handling capabilities.
  16. Multiple Selection in Email and Photos: Swipe to select multiple emails or photos, a time-saving feature for organizing your inbox and gallery.
  17. Precise Cursor Control: Hold down the spacebar to move the cursor precisely within text, offering pinpoint accuracy for editing.
  18. Safari Tab Navigation: Effortlessly swipe at the bottom of Safari to switch between tabs, making web browsing smoother and more efficient.
  19. Back Tap Shortcuts: Assign shortcuts to double or triple tapping the back of your iPhone, a hidden gem for accessing features quickly.
  20. Quick Access Options: Tap and hold on apps or settings for quick access to additional options, making it easier to adjust settings or access app-specific features.

By incorporating these 20 gestures into your daily iPhone use, you’ll discover a more streamlined and efficient way to interact with your device. Whether you’re a long-time iPhone user or new to the ecosystem, these gestures are sure to enhance your user experience, making your digital life more manageable and enjoyable.

Source & Image Credit: Proper Honest Tech

Filed Under: Apple, Apple iPhone, Guides


Latest timeswonderful Deals

Disclosure: Some of our articles include affiliate links. If you buy something through one of these links, timeswonderful may earn an affiliate commission. Learn about our Disclosure Policy.

Categories
News

How to Manage Your Notifications on Your iPhone

notifications iPhone

This guide is designed to show you how to manage your notifications on your iPhone. In today’s fast-paced digital world, staying informed is crucial. However, the constant barrage of notifications from various apps can quickly become overwhelming, disrupting your focus and productivity. Fortunately, iPhones offer a comprehensive set of tools to effectively manage notifications, ensuring you receive important alerts without being bombarded by irrelevant ones.

This guide will delve into the intricacies of notification management on your iPhone, empowering you to take control of your digital notifications and achieve a zen-like balance between staying informed and maintaining sanity.

Navigating the Notifications Hub

The journey to notification mastery begins with understanding the Notifications Center, the central repository for all incoming alerts. To access the Notifications Center, simply swipe down from the top-right corner of your iPhone’s screen. Here, you’ll find a chronological list of notifications from various apps, arranged by recency.

Unveiling Notification Styles

Notifications aren’t one-size-fits-all; they come in various styles tailored to different app experiences. Let’s explore the primary notification styles and their implications:

  • Banners: Banners appear momentarily at the top of your screen, providing a brief glimpse of the notification without disrupting your current activity.
  • Alerts: Alerts take center stage, occupying the entire screen with a prominent sound and vibration. Use alerts cautiously for notifications that demand immediate attention.

Customizing Notification Settings

Delving into the Settings app unlocks a world of granular control over your notifications. Navigate to Settings > Notifications to unleash your notification management prowess.

  • App-Specific Notification Controls: Scroll down to find a list of installed apps. Tap on an app to reveal its notification settings.
  • Allow Notifications: Toggle this switch to enable or disable notifications altogether for that app.
  • Sounds: Choose a custom sound or turn off sounds entirely for the selected app.
  • Badges: Decide whether you want app badges, the red numbers on app icons indicating unread notifications, to be displayed.
  • Lock Screen: Determine how notifications appear on your Lock Screen, ranging from detailed previews to minimal banners.
  • Notification Grouping: Organize notifications into categories, such as Social or News, for a cleaner and more manageable experience.

Silencing Notifications Temporarily

Sometimes, you need a temporary respite from the notification influx. iOS offers two convenient options for silencing notifications for a specified period:

  • Silent Mode: Activate Silent Mode by toggling the mute switch on the side of your iPhone. This silences all incoming calls and notifications.
  • Focus Modes: Tap the Control Center (swipe down from the top-right corner of the screen) and long-press the Focus icon (moon symbol). Choose a Focus mode, such as Sleep or Work, to silence notifications temporarily.

Scheduling Notification Summaries

For apps that generate a steady stream of notifications, consider scheduling notification summaries. This consolidates multiple notifications into a single, more manageable digest delivered at specific times.

To enable notification summaries for an app, go to Settings > Notifications > App Name > Notification Grouping. Select “Scheduled Summary” and choose the desired summary interval.

Muting Individual Conversations

In messaging apps like Messages or WhatsApp, silencing specific conversations can bring peace of mind. Open the conversation, tap the name of the contact or group, and select “Mute.” Choose a mute duration or select “Mute Forever.”

Taking a Notification Break

For a more extensive notification hiatus, utilize Do Not Disturb. Activate Do Not Disturb in the Control Center or go to Settings > Focus > Do Not Disturb. Customize the Do Not Disturb settings to determine which notifications and calls are allowed during this break.

Prioritizing Important Notifications

In the midst of notification overload, it’s easy to miss critical alerts. To ensure you don’t miss important notifications, designate them as favorites. Open the notification, tap “App Name,” and select “Add to Favorites.” Favorited notifications will always appear at the top of the Notifications Center.

Managing Notification Dependencies

Some apps’ notifications rely on other apps’ functionalities. For instance, receiving notifications from a weather app may require location services to be enabled. To check notification dependencies, go to Settings > Privacy and review the settings for relevant apps.

Summary

By becoming adept at managing notifications, you can effectively turn your iPhone from a mere source of constant distraction into a tool that enhances your productivity significantly. The key lies in meticulously setting up your device’s notification system. By doing so, you ensure that you are in full control of what alerts you receive and when. This careful customization means that your phone will only interrupt you for notifications that truly matter, filtering out the less important ones. Consequently, this empowers you to channel your attention and energy towards tasks and responsibilities that are of utmost importance, ultimately boosting your focus and efficiency. With these strategic adjustments in place, your iPhone transforms into an ally in your day-to-day life, aiding you in staying on top of your priorities without the constant barrage of irrelevant alerts.

Here are some more helpful iPhone guides:

Image Credit: Jamie Street

Filed Under: Apple, Apple iPhone, Guides


Latest timeswonderful Deals

Disclosure: Some of our articles include affiliate links. If you buy something through one of these links, timeswonderful may earn an affiliate commission. Learn about our Disclosure Policy.

Categories
News

How to Protect Your iPhone From Security Threats

iphone security

This guide is designed to show you how you can protect your iPhone from potential security threats. In today’s digitally driven world, smartphones have become an indispensable part of our lives. We store a wealth of personal information on these devices, making them a prime target for cyberattacks. iPhones, with their widespread popularity and reputation for security, are no exception. However, even the most secure devices can be compromised if not properly protected.

This guide will delve into the intricacies of safeguarding your iPhone from security threats, empowering you to navigate the digital landscape with confidence.
Essential Steps to Fortify Your iPhone’s Security

Secure Your Passcode:

A strong passcode is the cornerstone of iPhone security. Avoid using easily guessable combinations like birthdays or anniversaries. Instead, opt for a long, complex passcode consisting of a mix of upper and lowercase letters, numbers, and symbols. Additionally, consider enabling two-factor authentication (2FA) for an extra layer of protection.

Keep Your iPhone Updated:

Apple regularly releases software updates to address security vulnerabilities and introduce new features. These updates are crucial for maintaining your iPhone’s defense against evolving threats. Ensure you have automatic updates enabled to receive these patches promptly.

Beware of Phishing Attacks:

Phishing scams attempt to trick you into revealing personal information or clicking on malicious links. Be wary of unsolicited emails, text messages, or social media messages that ask for sensitive information or redirect you to unfamiliar websites. Never enter your credentials on suspicious websites.

Download Apps Only from the App Store:

The App Store is a secure platform for downloading apps. Avoid installing apps from unofficial sources, as these may contain malware or viruses. Always verify the app developer and check user reviews before installing.

Enable App Tracking Transparency:

App Tracking Transparency (ATT) allows you to control which apps can track your activity across other apps and websites. This feature helps protect your privacy and minimize targeted advertising. Enable ATT in your iPhone’s Settings to restrict unnecessary tracking.

Use Strong Passwords for Online Accounts:

Use strong, unique passwords for all your online accounts, including those linked to your iPhone. Avoid reusing passwords, as compromising one account could expose all others. Consider using a password manager to generate and store strong passwords.

Be Cautious with Public Wi-Fi:

Public Wi-Fi networks can be vulnerable to eavesdropping, putting your data at risk. Avoid accessing sensitive information, such as online banking or social media, on public Wi-Fi. If necessary, use a VPN (Virtual Private Network) to encrypt your internet traffic.

Secure Your Physical Device:

Protect your iPhone from physical theft or loss by enabling a passcode and using a strong screen lock. Consider using a Find My iPhone app to locate your device in case it’s lost or stolen.

Be Vigilant about Unusual Activity:

Monitor your iPhone’s activity for any unusual signs, such as unknown app installations, unexplained data usage, or changes in settings. If you notice anything suspicious, take immediate action to protect your device.

Seek Professional Help When Needed:

If you suspect your iPhone has been compromised or if you need further assistance with security measures, don’t hesitate to seek professional help from Apple or a reputable IT specialist.

Additional Tips for Enhancing Security

  • Regularly back up your iPhone data: This ensures you have a copy of your important information in case of device loss, theft, or data corruption.
  • Install a reputable antivirus or anti-malware app: These apps can provide additional protection against malicious software.
  • Avoid clicking on suspicious links or opening unknown attachments in emails or text messages.
  • Be cautious about sharing personal information online. Only share sensitive information with trusted websites and individuals.
  • Educate yourself about cybersecurity: Stay updated on the latest security threats and trends to make informed decisions about protecting your iPhone.

Summary

Keep in mind that security is a continuous journey, not just a singular event that you can tick off your checklist and forget. It’s a persistent, evolving process that demands regular attention and proactive measures. Adhering to these guidelines is just the beginning. You must remain vigilant, constantly updating your awareness and understanding of new threats as they emerge. By doing so, you can greatly diminish the likelihood of your iPhone becoming compromised by security breaches. This involves staying informed about the latest security updates from Apple, understanding the common tactics used by cybercriminals, and being cautious about the apps you download and the links you click. Regularly reviewing and updating your security settings also plays a crucial role. It’s about creating a robust defense system that evolves and adapts, just as the threats do, ensuring that your iPhone, and by extension your personal data, remains secure against the ever-changing landscape of digital threats. In summary, a vigilant and dynamic approach to security is essential to safeguard your iPhone effectively.

Image Credit: Amanz

Filed Under: Apple, Apple iPad, Guides


Latest timeswonderful Deals

Disclosure: Some of our articles include affiliate links. If you buy something through one of these links, timeswonderful may earn an affiliate commission. Learn about our Disclosure Policy.