In November 2023, Google released Android 14 QPR2 Beta 1, which brought Private Space, a feature similar to Samsung’s Secure Folder that you find on most smartphones and tablets from the company. Well, Google has now released Android 14 QPR3 Beta 2.1, and it brings a new option to Private Space which Samsung already offers with Secure Folder. Along with that, the new version of the OS brings a new setup flow for Private Space, which gives you more information on how the feature works and what you can do with it, and a new suggestion to make the most out of the new feature. Let’s take a look.
Starting with the new option, which is ‘Lock private space automatically,’ it lets you configure the feature to automatically lock the protected space depending on one of the two sub-options you select in it, which are ‘Every time device locks’ and ‘After 5 minutes of inactivity.’ If you select the first, the feature will lock Private Space immediately after you lock the device, and if you select the second, it will lock Private Space after five minutes of inactivity. Now here’s something very interesting: Secure Folder already offers this feature. So, it looks like Google has taken inspiration from Samsung.
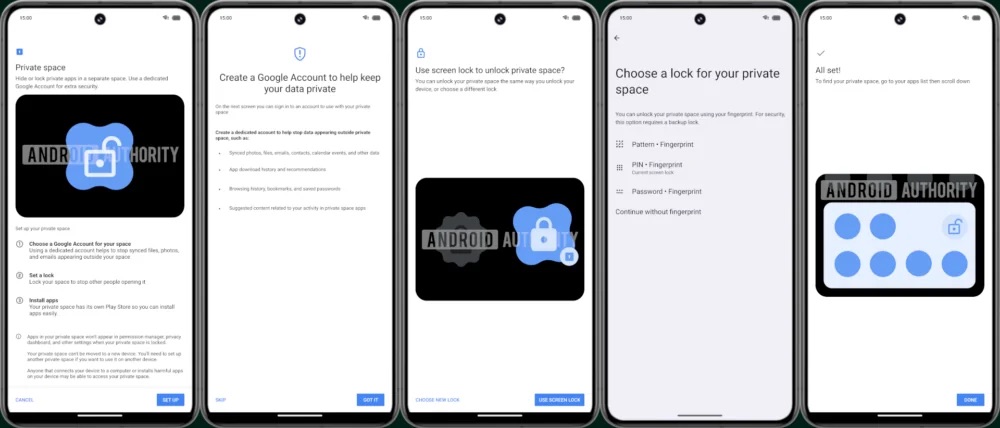
As for the new suggestion, when you are setting up Private Space, the feature now recommends you create a dedicated Google account for using it to “stop data appearing outside private space, such as:” “Synced photos, files, emails, contacts, calendar events, and other data,” “App download history and recommendations,” “Browsing history, bookmarks, and saved passwords,” and “Suggested content related to your activity in private space apps.” This suggestion, as well as the option to automatically lock the protected space further enhances the privacy and security of Private Space.
Lastly, Private Space now offers a revamped setup flow, giving you a better idea of the feature, as you can see in the images above shared by Mishaal Rahman on Android Authority.
Overall, the development of Private Space seems complete, and Google could offer the new feature to the public with Android 15. Fortunately for Samsung users, they don’t have to wait for it as they already have Secure Folder. That being said, it would be interesting to see what Samsung does with Secure Folder once Private Space arrives with Android 15. It could either replace Secure Folder with Private Space or it could disable Private Space and continue offering Secure Folder. We expect Samsung to go with the second option as Secure Folder offers more features than Private Space, at least for now.
You would be forgiven for thinking that password-protecting your Windows account is enough to keep your files from falling into the wrong hands, but it really isn’t. The sad truth is that many people’s passwords can be cracked quite easily, and there is the fact that Windows does not encrypt data by default. This means that someone could simply remove your hard drive, connect it to another computer and access your files.
Thankfully, there is a way to not only password-protect, but also encrypt individual files or folders on your computer, adding a reassuring extra layer of security. And the good news is that this is an option that is built into Windows. There is no need to install additional software to boost your file security – although it is an option if you want. Anyone who is able to access your Windows account will be able to access the data, and this is why we’ve included a second method of protection. If you’ve ever wondered how to password protect a folder on Windows, here is what you need to know.
Quick steps for how to password protect a folder on Windows
Open advanced folder properties
Enable Windows’ built-in encryption
Use third-party software
Tools and Requirements
Step by step guide for how to password protect a folder on Windows
Windows does not shout about the fact that it is possible to encrypt folders, so you will have to delve deep in order to find this option. Start by collecting together a series of files that you would like to protect and place them all in the same folder. You can then right-click the folder and selectProperties, or click the … button in the toolbar and select Properties from the menu that appears.
In the Properties dialog that appears, you will be able to see various attributes of the folder you have selected, such as the number of files it contains, its size, where it is located and so on. To start the process of adding password protect, make sure that you are on the General tab and then click the Advanced button in the Attributes section of the dialog.
In the Advanced Attributes dialog that appears, look to the lower half in the Compress or Encrypt attributes section. Here you will find two options – one about compression and one about encryption – and it is only possible to enable one or the other. Tick the box labeled Encrypt contents to secure data and then click the OK button.
Back at the Properties dialog for your selected folder, click the Apply button and you will see a Confirm Attribute Change dialog. You can choose to apply encryption to just the currently selected folder (Apply changes to this folder only), or to also apply it to all subfolders and files (Apply changes to this folder, subfolders and files). Make the appropriate selection, and then click the OK button.
You should now be able to confirm that your files are protected by the fact that the folder now has a padlock on it. It will only be possible to access the data contained within the folder with the username and password for your Windows account – so when you are logged in, there is no need to enter a password. If you are not able to see this encryption option covered above, it means it is not available in your version of Windows which is why we’ll now look at a third-party option.
The next option is to use a third-party tool, and we’re going to take a look at Free Folder Protector from Gilisoft. You can download this software here, and then run through the installation process in the usual way. This is free software that can be used on as many computers as you want without restrictions. There are other options included, but we’re just looking at password protection here.
The first time you run Free Folder Protector, you’ll be asked to configure a master password –although this is limited in the free version of the software. To secure data, clickLocking File under the Local Disk heading in the left-hand navigation pane and then either drag and drop a folder onto the app interface, or click the Lock Folder button and navigate to the folder you’d like to secure. Without your password, and files stored in this folder will be inaccessible.
Final Thoughts
While it is certainly handy to be able to add a password to folders in Windows using the built-in method described above, there are plenty of third-party tools that can take care of things in a slightly more succinct fashion. If you would like to keep things cost-free, you can stick with Gilisoft’s Free Folder Protection which we’ve also covered. The software is delightfully easy-to-use and includes additional option such as file shredding and disk-wiping to supplement the password protection features.
If you don’t mind parting with a little cash, however, there are many more choices available. Software stalwart IObit, for instance, has the impressive Protected Folder for just $20, while EaseUS offers it own LockMyFiles app for $50. There are free trial versions of both apps available, so you can try them out to see which would serve you better.