If you’ve noticed ‘ghost touches’ on your Apple Watch 9 or Apple Watch Ultra 2 – where something happens on the watch without you touching the screen – installing the latest watchOS 10.4 update should be enough to fix the problem for you.
As per the release notes for the update (via Wccftech), the watchOS 10.4 update fixes an issue “that causes some users to experience false touches on the display”. It’s rolling out now, and as usual can be installed from your iPhone or the watch itself.
We reported on the issue back in February: while it was difficult to ascertain how widespread the problem actually was, Apple received enough complaints about it to issue a memo to authorized Apple repair shops about it.
According to the memo, these false touches could cause calls to be started accidentally, and stop users from entering their passcode – so for those who were affected by the bug, it sounds like it had a substantial impact on the user experience.
Previous and future updates
watchOS 10 launched in September 2023 (Image credit: Apple)
Also included in watchOS 10.4 is the option to use a double-tap to expand notifications on the smartwatch screen. There’s extra security protection for those using Apple Pay with Assistive, and a fix for contact syncing that some people were experiencing.
This is the eighth minor update issued by Apple since watchOS 10 showed up in September 2023, alongside the latest Apple Watch models. Previous bug fixes have covered incorrect elevation readings and watch face syncing problems.
The main watchOS 10 roll out brought with it a major redesign of apps, smart stack widgets, updates for cycling and hiking workouts, and – as usual with watchOS updates – some new watch faces to make use of.
As for watchOS 11, the schedule should be the same this year as it is every year: a preview at Apple’s WWDC event sometime in June, then public betas, before a final release in September (most probably alongside the Apple Watch 10).
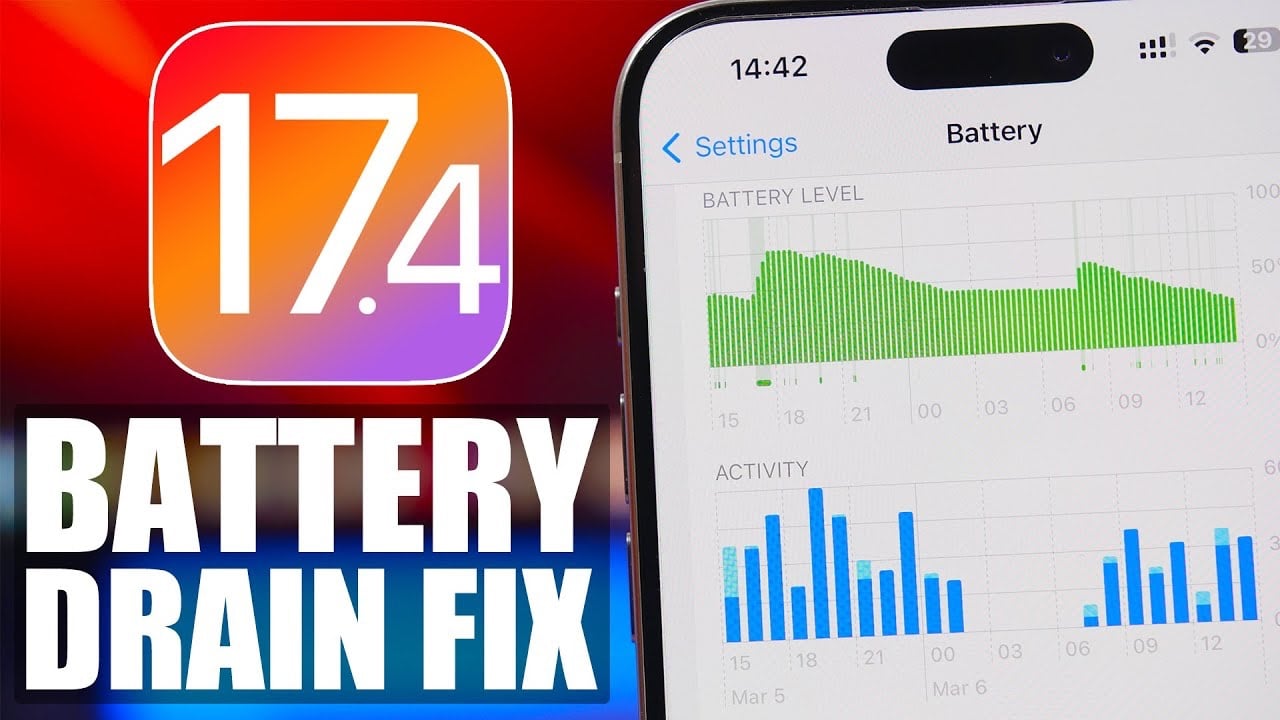
With the release of iOS 17.4, iPhone users have reported improvements in battery life, signaling a step forward in Apple’s ongoing efforts to enhance user experience. However, even with these advancements, certain settings and usage patterns can still lead to unnecessary battery drain. Drawing on expert insights and personal experiences, this video below from iReviews delves into practical strategies to maximize battery efficiency on devices running the latest iOS update.
Understanding iOS 17.4 Battery Performance
Initial observations suggest that iOS 17.4 has made commendable improvements in battery life. This enhancement is a result of both the operating system’s internal optimizations and the potential for users to adopt practices that further extend their device’s battery longevity. Let’s explore how you can leverage these improvements and mitigate battery drain with a few adjustments.
Essential Steps for Optimized Battery Life
Patience After Updating: Post-installation of iOS 17.4, give your device 3-5 days to integrate the update fully. It’s normal to experience a temporary decrease in battery life as the system undergoes indexing and other background processes.
Exiting Beta: For those who participated in the beta testing, updating to the final release version of iOS 17.4 is crucial. This ensures you’re benefiting from the latest battery optimizations that might not have been present in the beta versions.
App Updates: Regularly updating apps is key. Developers often release updates that are specifically designed to improve compatibility and efficiency with new iOS versions, contributing to better battery management.
Advanced Settings for Further Efficiency
Managing Haptic Feedback: While haptic feedback enhances the tactile experience, it can also be a significant drain on battery life. Consider limiting this feature to essential uses only.
Smart Feature Usage: Innovative iOS 17.4 features, like screen distance measurement and augmented reality (AR) enhancements, offer unique functionalities but can deplete battery quickly. Disable these features if they are not in regular use.
Wi-Fi Over Cellular Data: Opting for Wi-Fi, especially over 5G connections, can markedly reduce power consumption, as cellular data usage is more demanding on the battery.
Optimizing Screen Settings: Utilize dark mode to save battery on OLED displays and reconsider the need for the back tap feature, which, while convenient, can lead to inadvertent battery usage.
Siri and App Management: Disabling “Hey Siri” prevents your device from perpetually listening for commands, conserving energy. Additionally, scrutinize apps that are heavy on battery usage and manage their background activity.
Debunking the App Switcher Myth
A common misconception is that frequently closing apps via the app switcher conserves battery life. This practice, however, can lead to higher power consumption as apps require more energy to restart. Understanding the correct way to manage apps can significantly aid in extending your battery’s endurance.
Summary
Adopting these strategies can drastically improve your iOS device’s battery performance under the 17.4 update. Remember, while some tips may offer immediate benefits, others require consistency and changes in usage habits to manifest significant improvements. Subscribe for more insights and tips to keep your iPhone running efficiently and to make the most out of every charge.
Incorporating these suggestions into your daily use can transform the way your device manages power, ensuring that your battery life is optimized and that you’re getting the most out of iOS 17.4’s enhancements.
Source & Image Credit: iReviews
Filed Under: Apple, Apple iPhone, Guides, Top News
Latest timeswonderful Deals
Disclosure: Some of our articles include affiliate links. If you buy something through one of these links, timeswonderful may earn an affiliate commission. Learn about our Disclosure Policy.
I have had many issues with my Apple Watch when the heart rate tracking is not working, this usually happens either at the start of a workout or during a workout, there are several things that you can try to stop this issue from happening on your Apple Watch. This guide was written using the most recent version of Apple’s watchOS software which is watchOS 10.3.1.
The Apple Watch comes equipped with an array of fitness and health-monitoring functionalities, among which the heart rate monitor stands out as a key feature. This innovative tool is designed to provide real-time insights into your cardiovascular health, making it an indispensable companion for both fitness enthusiasts and individuals looking to maintain a healthy lifestyle.
Nevertheless, you might encounter instances where the heart rate monitor does not perform as anticipated. There could be moments when your Apple Watch fails to detect your heart rate accurately, delivers inconsistent readings, or the sensor ceases to function entirely. In such situations, it’s crucial to remain calm and not to let frustration take the upper hand. We have meticulously prepared an exhaustive guide aimed at assisting you through the process of identifying and resolving these issues. This guide is crafted to navigate you through the troubleshooting process systematically, ensuring you can quickly return to making the most of your Apple Watch’s health and fitness tracking capabilities.
Understanding How the Apple Watch Measures Heart Rate
Before we dive into solutions, let’s understand how your Apple Watch measures heart rate. The underside of your Watch uses green LED lights paired with photodiodes to detect blood flow in your wrist. The Watch flashes these lights hundreds of times per second to calculate your heartbeats per minute (BPM).
Troubleshooting Your Heart Rate Sensor
Follow these steps to address problems with your Apple Watch heart rate monitor:
1. Basic Checks
Ensure Proper Fit: Your Apple Watch needs a snug fit on your wrist (without being too tight) for the sensors to work accurately. If it’s loose, try tightening the band a notch.
Placement Matters: Ideally, wear your Apple Watch on the top of your wrist. Avoid wearing it too low on your wrist or on your wrist bone.
Cleanliness is Key: Clean the back of your Apple Watch with a slightly dampened, lint-free cloth to remove sweat, lotion, or other substances that might interfere with the sensor.
2. Check Apple Watch Settings
Heart Rate Tracking: On your iPhone, go to the Watch app > Privacy > Ensure “Heart Rate” and “Fitness Tracking” are toggled on.
Workout Power Saving Mode: In the Watch app, go to Workout > Power Saving Mode should be off.
Wrist Detection: In the Watch app, go to Passcode > Wrist Detection should be on. If you have a passcode, ensure you’re unlocking the Watch after putting it on.
3. Restart Your Devices
Sometimes, a simple restart helps both your Apple Watch and iPhone get back on track.
Restart Apple Watch: Press and hold the side button until the “Power Off” slider appears. Slide it to turn it off. Wait a few moments, then press and hold the side button again until you see the Apple logo.
4. Update Your Devices
Ensure both your Apple Watch and iPhone are running the latest versions of watchOS and iOS respectively. Software updates may contain fixes for known issues.
5. Unpair and Re-Pair Your Apple Watch
If the issue persists, unpairing and re-pairing may reset the connection and clear out any bugs:
Open the Watch app on your iPhone.
Go to the “My Watch” tab.
Tap on your Apple Watch at the top.
Tap on the “i” icon next to your Watch.
Select “Unpair Apple Watch.”
Follow the on-screen instructions to re-pair your watch.
Advanced Considerations
Tattoos: Dark tattoos under the Apple Watch sensors can interfere with heart rate readings. Try another wrist, or temporarily disable “Wrist Detection” (not ideal for security, but it can help isolate the issue).
Medical Conditions: Certain medical conditions or medications can affect heart rate readings. If you suspect this is the case, consult with your doctor.
If Problems Still Persist
If you find that your difficulties persist even after diligently following the troubleshooting steps provided, it is highly advisable to reach out to Apple Support for assistance. Their team of experts is well-equipped to offer a more in-depth diagnostic analysis of your device, potentially identifying issues that are not immediately apparent. They may also suggest a range of repair options or adjustments to ensure your Apple Watch functions optimally. Hopefully these tips should help you get this issue sorted on your Apple Watch, I have used many of these myself in an attempt to cut down on how often this happens with my Apple Watch when working out.
Maintaining a heart-healthy lifestyle is of paramount importance, and the heart rate monitoring capabilities of your Apple Watch serve as an instrumental tool in this endeavor. However, it’s crucial to recognize that while this technology offers valuable insights into your heart health, it does not substitute the professional medical advice and regular checkups provided by your healthcare provider. Regular consultations with your doctor are essential to ensure a comprehensive understanding of your heart health. By adhering to the recommended troubleshooting steps and maintaining an open dialogue with your healthcare professional, you can address common issues effectively and enjoy a more dependable and enriching experience with your cherished wearable device. You can find out more details about the Apple Watch heart tracker over at Apple’s website.
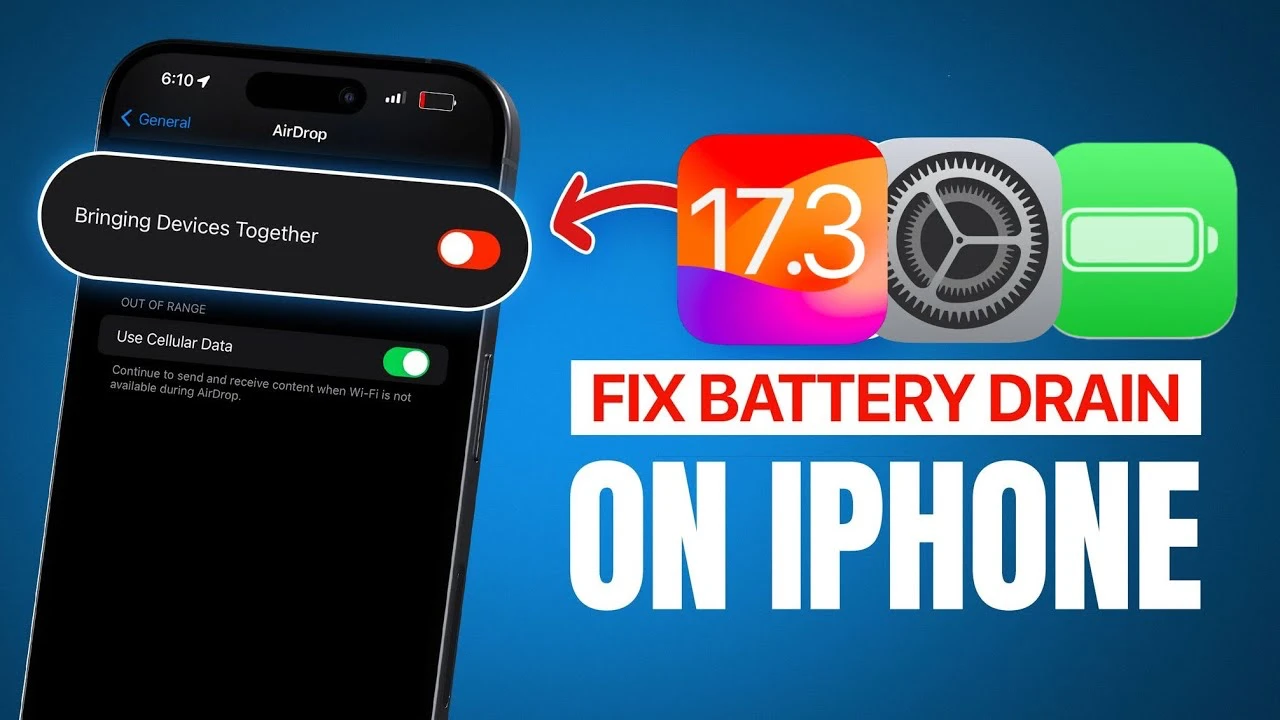
Apple recently released their iOS 17.3 update for the iPhone and now we get to find out how you can fix battery drain on your device. Are you finding your iPhone’s battery life less than satisfactory after updating to iOS 17.3? You’re not alone. Many iPhone users have noticed varying battery performances, especially with the newer models. But fret not – there are effective ways to enhance your device’s battery life, and the video below from iDeviceHelp will walk you through them.
Tweak Your Privacy Settings for Better Battery Performance
App Tracking: One simple yet effective step is to turn off app tracking. When you disable this feature, apps can no longer request to track your activities across other companies’ apps and websites. This not only bolsters your privacy but also conserves battery life.
Location Services: Dive into your System Services settings and consider disabling ‘Significant Locations’ and ‘Product Improvement.’ These features constantly track your location to enhance maps and other services, which can be a significant drain on your battery.
Journal Application Settings: If you’re not using the Journal application, disabling or removing it can be a wise move. By doing so, you reduce battery usage from constant notifications related to activities, media, contacts, and photos.
App Privacy Report: Disabling the App Privacy Report can also save battery life. This feature tracks and reports your iPhone’s activities, which, while useful for transparency, can be a drain on your battery.
Optimize Display and Brightness Settings
Always On Display: For iPhones equipped with this feature, turning off the option to show your wallpaper when the phone is locked can save battery. Opting for a simple black screen displaying only the time and date is far more energy-efficient.
Sound and Haptics Adjustments
Keyboard Haptics: Did you know? Apple itself acknowledges that disabling keyboard haptic feedback can conserve battery life. If you’re not particularly fond of the tactile sensation when typing, turning this feature off could be beneficial for your battery.
General and AirDrop Settings
AirDrop Feature ‘Bring Devices Together’: This feature is handy but can be a drain on your battery if not used regularly. Consider turning it off to enhance your iPhone’s battery performance.
By applying these settings to your iPhone with iOS 17.3 , you might notice a significant improvement in your iPhone’s battery life. Some users have reported an extra 20 to 30 minutes of screen time, which can make a noticeable difference in daily usage.
If you are wondering how these settings impact your specific device, try them out and share your experiences. Often, a combination of these adjustments can lead to the most significant improvements. Remember, managing your iPhone’s battery life is not just about a single setting, but about understanding how different features interact with each other and your usage patterns.
By taking a proactive approach to your iPhone’s settings, you can enjoy a longer battery life and a more efficient device. This is particularly important as we increasingly rely on our smartphones for various daily tasks. The new iOS 17.3 software uddate is now availablew to download, you can install it by going to Settings > General > Software update > Download and Install on your device.
Source & Image Credit: iDeveiceHelp
Filed Under: Apple, Apple iPhone
Latest timeswonderful Deals
Disclosure: Some of our articles include affiliate links. If you buy something through one of these links, timeswonderful may earn an affiliate commission. Learn about our Disclosure Policy.
This guide shows you what to do when your Magic Mouse is not connected to your Mac or Macbook. Are you struggling with your Apple Magic Mouse not connecting seamlessly to your Mac? If so, rest assured that this is a widespread issue that numerous users encounter. There’s no need to fret, as this is a common challenge in the realm of modern technology.
The good news is that there are a variety of simple and practical solutions at your disposal. In this article, we will explore a range of effective troubleshooting techniques that are designed to tackle and resolve this annoying problem. Whether you’re a tech-savvy user or new to the world of Apple, these steps are crafted to guide you through the process smoothly. So, let’s embark on this journey to restore the connection between your Magic Mouse and Mac, ensuring a seamless and efficient working experience.
Reboot Your Magic Mouse
Often, the simplest solution is the most effective. Start by turning your Magic Mouse off and then on again. Locate the power switch on the bottom of the mouse to do this. This basic step can often re-establish a lost connection.
Enable Bluetooth on Your Mac
Your Mac’s Bluetooth needs to be active to communicate with the Magic Mouse. Click on the Bluetooth icon in your Mac’s menu bar to check if it’s enabled. If it’s turned off, just click to turn it on, and then attempt to reconnect your Magic Mouse.
Utilize the Lightning Cable for Pairing
For Magic Mice equipped with a Lightning cable, connecting it to your Mac can initiate the pairing mode. Simply connect one end to your Mac and the other to your Magic Mouse. This direct connection often resolves connectivity issues by forcing the device into pairing mode.
Investigate Wireless Interference
Your Magic Mouse operates using Bluetooth, which other wireless devices can disrupt. If you have wireless gadgets nearby, they could be causing interference. Try moving these devices away from your Mac and Magic Mouse to see if this resolves the issue.
Replace Batteries in Older Models
If you’re using an older model of the Magic Mouse that relies on batteries, weak or dead batteries could be the culprit. Try replacing them with fresh ones to see if this solves your connection problem.
Reset the Magic Mouse
If the above steps don’t work, consider resetting your Magic Mouse. Here’s how:
Turn off the Magic Mouse.
Press and hold the left and right buttons simultaneously.
While holding the buttons, toggle the power switch on and off three times.
Release the buttons.
Your Magic Mouse should now enter pairing mode.
Reach Out to Apple Support: Sometimes, technical issues can be stubborn. If you’ve tried all the above steps and still face connectivity issues, it’s time to seek professional help. Contact Apple Support for further assistance. They are well-equipped to diagnose and solve more complex issues.
Enhancing Your Connectivity Experience
Understanding the technology you use daily can significantly enhance your user experience. The Magic Mouse is a sophisticated piece of technology, and like all tech, it can sometimes require a little troubleshooting. By familiarizing yourself with these steps, you empower yourself to resolve connectivity issues quickly and efficiently, ensuring a seamless interaction with your Mac.
Remember, most connectivity issues with the Magic Mouse can be resolved with simple fixes. However, if the problem persists, don’t hesitate to reach out to Apple’s customer support for a more detailed examination.
Image Credit: Majed Khan
Filed Under: Apple, Guides, Laptops
Latest timeswonderful Deals
Disclosure: Some of our articles include affiliate links. If you buy something through one of these links, timeswonderful may earn an affiliate commission. Learn about our Disclosure Policy.
The current version of Apple’s iPhone software is iOS 17.2.1, and now we have a video that shows you how to fix the battery drain on your iPhone. for those who are experiencing it. Many have noticed a startling decrease in battery life, particularly when the phone is idle. But don’t fret! A new video from iDeviceHelp offers invaluable insights and actionable solutions to this problem. Here’s a breakdown of what you need to know to reclaim your device’s battery longevity.
Identifying the Culprit: The heart of the matter lies in the significant battery depletion observed in iPhones operating on iOS 17.2 or 17.21. This issue is most prominent when the phone is on standby, leaving many users perplexed and frustrated.
Early Remedies: In a quest to tackle this, an earlier video outlined four critical settings adjustments. These included turning off Journal suggestions, disabling the App Privacy Report, halting tracking requests, and modifying location services. While helpful, these solutions were just the tip of the iceberg.
Digging Deeper for Solutions: Persistence in research has uncovered two more settings with a profound impact on battery life. Implementing these changes could be your ticket to better battery performance.
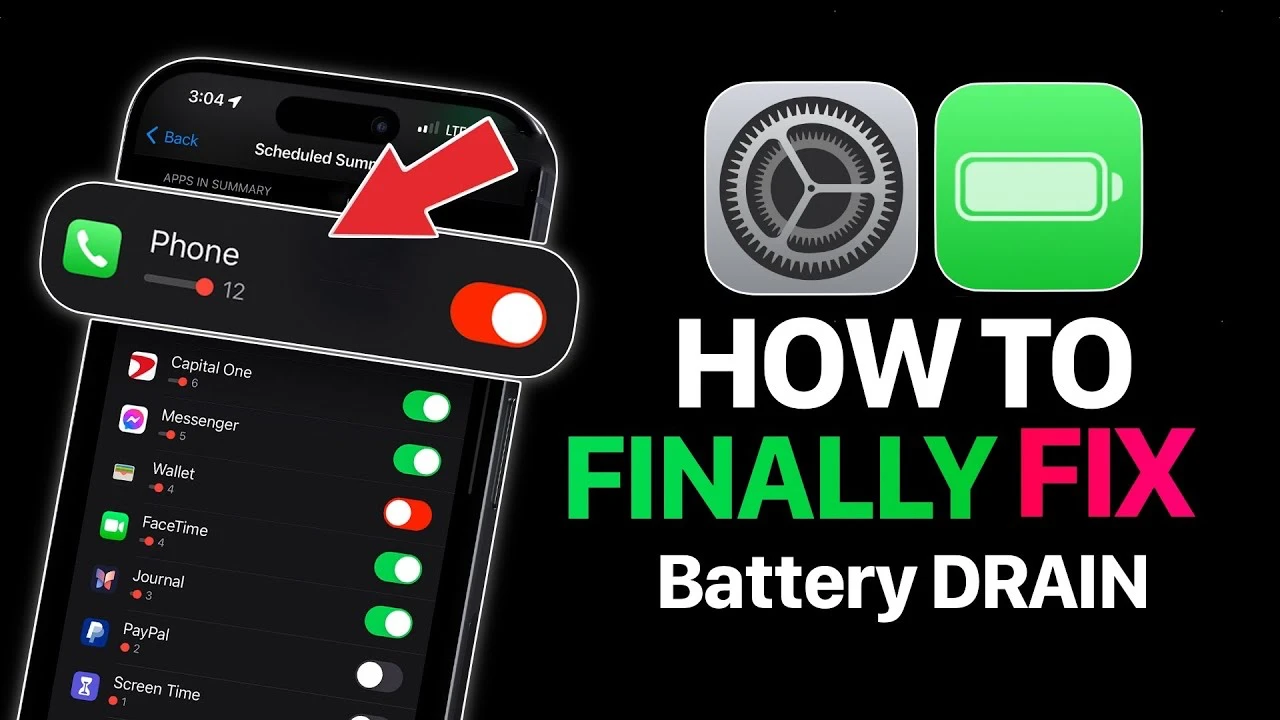
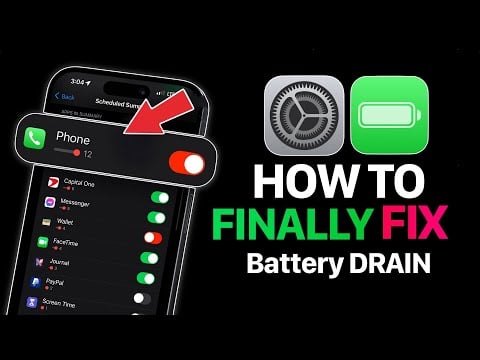
Tweaking Always On Display: The first revelation pertains to the Always On Display feature. You will be pleased to know that a simple adjustment here can yield significant results. By disabling the ‘Show Wallpaper’ option, you limit the display to essential elements like time and date, thereby conservatively using battery resources.
Notification Summary Setting: The second recommendation focuses on the Scheduled Notification Summary. It may surprise you, but this feature, which organizes notifications for a specific delivery time, can be a silent battery drainer. Disabling it could be a game-changer in your battle against battery drain.
If you are wondering how effective these tweaks are, why not try them out for yourself? The video’s creator encourages viewers to experiment with these settings and share their experiences. Additionally, useful resources and links are available in the video description, providing further guidance.
Remember, while these steps are beneficial, your mileage may vary depending on your specific usage patterns and device settings. Nevertheless, these insights offer a solid foundation for mitigating the battery drain issue on your iOS 17.2 or 17.21 iPhone. Apple is working on a new update at the moment which is in beta, iOS 17.3, we are expecting this software to be released later this month.
Source & Image Credit: iDeviceHelp
Filed Under: Apple, Apple iPhone
Latest timeswonderful Deals
Disclosure: Some of our articles include affiliate links. If you buy something through one of these links, timeswonderful may earn an affiliate commission. Learn about our Disclosure Policy.
The dreaded “iPad Unavailable” message can strike fear into the hearts of even the most tech-savvy iPad users. This jarring message appears when you’ve entered an incorrect passcode too many times, rendering your iPad temporarily unusable. While it may seem like a daunting issue, there are several methods you can employ to regain access to your device.
Understanding the iPad Unavailable Mechanism
The iPad Unavailable message is a security feature implemented by Apple to protect your device from unauthorized access. When you repeatedly enter an incorrect passcode, the iPad temporarily locks you out, displaying the message “iPad Unavailable. Try again later.” This lock-out period gradually increases after each failed attempt, discouraging brute-force password-cracking attempts.
Restoring Access with the Correct Passcode
The simplest way to resolve the iPad Unavailable issue is to wait for the lock-out timer to expire. The timer typically starts at one minute and increases with each failed attempt. Once the timer runs out, you can try entering your passcode again. If you enter the correct passcode, your iPad will unlock normally.
Using the Erase iPad Option
If you’re unable to wait for the lock-out timer or have forgotten your passcode entirely, you can use the “Erase iPad” option to unlock your device. This method will erase all data and settings from your iPad, restoring it to factory defaults.
How to Erase iPad Using the Security Lockout Screen
Repeatedly enter the wrong passcode until the “iPad Unavailable” screen appears.
Tap the “Erase iPad” option.
A confirmation prompt will appear. Tap “Start Erase” to proceed.
Enter your Apple ID password to sign out of iCloud.
Your iPad will begin the erase process. This may take several minutes, depending on the device’s storage capacity.
Once the erase is complete, your iPad will reboot and prompt you to set it up as new.
Using iTunes or Finder to Erase iPad
If your iPad is unresponsive or you cannot access the Security Lockout screen, you can use iTunes or Finder on your computer to erase it. This method requires you to have an up-to-date computer and a valid USB cable for your iPad.
How to Erase iPad Using iTunes or Finder
Connect your iPad to your computer using a USB cable.
Open iTunes (for Windows) or Finder (for macOS).
Locate your iPad in the device list.
Click the “Restore” button.
Follow the on-screen instructions to confirm the erase and restore your iPad.
Preserving Data with iCloud Backup
Before attempting to erase your iPad, ensure that you have a recent iCloud backup of your device’s data. This backup will allow you to restore your data after the erase process, minimizing data loss. To create an iCloud backup, go to Settings > [Your Name] > iCloud > iCloud Backup, and tap “Back Up Now.”
Using Third-Party Passcode Removal Tools
In some cases, you may require third-party passcode removal tools to bypass the iPad Unavailable screen and unlock your device. These tools typically require you to put your iPad into recovery mode or DFU mode, which can be risky if not done correctly. It’s advisable to use these tools as a last resort and to exercise caution when selecting and using one.
Seeking Professional Assistance
If you’ve tried all the above methods and are still unable to unlock your iPad, you may need to seek professional assistance from an authorized Apple service provider. They have specialized tools and expertise to handle complex device issues.
Preventing Future iPad Lockouts
To avoid encountering the iPad Unavailable message in the future, consider using a strong and memorable passcode, avoiding repetitive patterns or easily guessable combinations. Additionally, enable two-factor authentication for your Apple ID to further secure your account.
Remember, the iPad Unavailable message is a security feature designed to protect your device. By following the recommended methods and practicing responsible password management, you can minimize the risk of encountering this issue and keep your data secure.
Image Credit: Francois Hoang
Filed Under: Apple, Apple iPad, Guides
Latest timeswonderful Deals
Disclosure: Some of our articles include affiliate links. If you buy something through one of these links, timeswonderful may earn an affiliate commission. Learn about our Disclosure Policy.
Encountering an error message stating “Your PC Did Not Start Correctly” can be a harrowing experience for any computer user. This error typically occurs on computers running the Windows operating system and can be triggered by a range of issues from hardware failures, and system file corruption, to problematic software or drivers. The message is often accompanied by the Windows Automatic Repair screen, offering options to troubleshoot and fix the issue. This article provides a step-by-step guide to resolving this error, ensuring a swift return to a functioning system.
Understanding the Error
Before diving into solutions, it’s vital to comprehend the root causes of the “Your PC Did Not Start Correctly” error. The error typically manifests due to:
Corrupted system files.
Incomplete or damaged software installations or updates.
Malfunctioning or outdated drivers.
Conflicts arising from third-party software.
Hardware failures, such as a bad hard drive or memory issues.
Step-by-Step Troubleshooting
Addressing this error involves a systematic approach, starting from simple solutions to more complex ones.
Restart Your PC Begin with the most straightforward step: restart your computer. Occasionally, a temporary glitch can cause the error, and a simple reboot might resolve the issue.
Use Advanced Repair Options If a restart doesn’t work, Windows offers advanced options through the Automatic Repair screen:
Startup Repair: This is a Windows utility that can fix certain system problems that might prevent Windows from starting.
System Restore: If you have system restore points set up, you can try to revert your system to a previous state where everything worked correctly.
Boot into Safe Mode Booting into Safe Mode loads Windows with a minimal set of drivers and services. If the error doesn’t occur in Safe Mode, it’s likely due to a software or driver issue.
Check Disk Utility Run the Check Disk utility (chkdsk) to find and fix problems with your hard disk, as corrupted sectors can cause startup issues.
System File Checker Utilize the System File Checker (sfc /scannow) to repair missing or corrupted system files.
DISM Tool Deployment Image Service and Management Tool (DISM) can restore the health of your system image, which can subsequently aid in fixing the startup error.
Uninstall Recent Updates If the error started appearing after a recent Windows update, you might need to uninstall the update from Safe Mode.
Update Drivers Outdated or corrupt drivers can cause startup problems. Update drivers through Safe Mode or use a reliable third-party tool.
Uninstall New Software If you’ve recently installed new software, it might be conflicting with your system. Uninstall these from Safe Mode.
Restore Registry Backups The Windows Registry can be restored to a previous state using backup files if the current Registry has been corrupted.
Check Hardware Components Hardware issues, especially with your hard drive or RAM, can cause startup errors. Run diagnostic tools to check the health of your hardware.
Reset Your PC If none of the above steps work, consider resetting your PC. This can be done without losing personal files, but you’ll need to reinstall software.
Clean Installation of Windows As a last resort, a clean installation of Windows can resolve the issue, but this will erase all data on the system drive.
Preventive Measures
Once resolved, take preventive measures to avoid future occurrences:
Regularly update Windows and drivers.
Install reliable antivirus software to prevent malware infections.
Create regular system restore points.
Backup important data consistently.
Summary
Addressing the “Your PC Did Not Start Correctly” error requires a composed and methodical approach, but it is entirely manageable with the right steps and a bit of perseverance. This error message, while intimidating at first glance, typically does not necessitate immediate professional intervention. With careful attention to the detailed guidance provided in the steps above, users are equipped to methodically assess the problem, identify its origins, and apply targeted solutions to rectify the issue.
After successfully navigating through these troubleshooting steps, it’s advisable for users to proactively adopt practices that could deter the recurrence of such disruptive errors. Regular system maintenance is not just recommended; it’s a critical component of ensuring the longevity and robust performance of your PC. This encompasses timely updates to your operating system and drivers, rigorous security measures including the use of reputable antivirus software, and the habitual creation of restore points to capture your system in a state of optimal functioning.
Moreover, the value of consistent data backups cannot be overstated. By frequently securing your data, you create a safety net that protects against not only startup errors but a multitude of potential system failures. With these proactive strategies in place, users can enjoy a more seamless computing experience, minimizing the inconvenience caused by system errors and maintaining their PC in a state of good health for the long term.
Here are some more helpful articles for PC and Windows users:
Image Credit: Windows
Filed Under: Guides
Latest timeswonderful Deals
Disclosure: Some of our articles include affiliate links. If you buy something through one of these links, timeswonderful may earn an affiliate commission. Learn about our Disclosure Policy.
This guide will show you how you can fix common issues in Apple’s iPadOS 17 software. iPadOS 17 is a new software update for iPads, and it brings with it a number of new features and improvements. However, like any new software update, there are also some potential issues that users may encounter. If you’re having problems with your iPadOS 17 device, here are a few things you can try to fix the issue:
1. Restart your iPad.
A simple restart can often fix minor software glitches. To restart your iPad, press and hold the power button until you see the “slide to power off” slider. Then, slide the slider to the right and wait for your iPad to power off. After a few seconds, press and hold the power button again to turn your iPad back on.
2. Check for updates.
Apple is constantly releasing software updates to fix bugs and improve performance. To check for updates, go to Settings > General > Software Update. If there’s an update available, tap Download and Install.
3. Force-quit apps.
If an app is crashing or freezing, you can try force-quitting it. To do this, double-press the home button (or swipe up from the bottom of the screen on iPads without a home button) to open the app switcher. Then, swipe up on the app preview card to force-quit it.
4. Clear app cache and data.
Over time, apps can accumulate cached data and files. This data can sometimes become corrupted and cause problems with the app. To clear an app’s cache and data, go to Settings > General > iPhone Storage. Then, tap on the App you want to clear data for and tap Offload App or Delete App.
5. Reset all settings.
If you’re still having problems, you can try resetting all of your iPad’s settings. This will not erase any of your personal data, but it will reset all of your settings to their factory defaults. To reset all settings, go to Settings > General > Transfer or Reset iPad > Reset > Reset All Settings.
6. Restore your iPad.
If you’ve tried all of the above steps and you’re still having problems, you may need to restore your iPad. This will erase all of your data and reset your iPad to factory settings. To restore your iPad, connect it to your computer and open iTunes or Finder. Then, select your iPad in the left-hand sidebar and click on the Restore button.
If you’re still having problems after following these steps, you can contact Apple Support for further assistance.
Here are some additional tips for fixing common iPadOS 17 issues:
Battery drain: If you’re experiencing excessive battery drain, try checking your battery usage to see which apps are using the most power. You can also try disabling background app refresh and reducing screen brightness.
Wi-Fi problems: If you’re having trouble connecting to Wi-Fi, try restarting your router and modem. You can also try resetting your iPad’s network settings.
Bluetooth problems: If you’re having trouble connecting to Bluetooth devices, try restarting your iPad and the Bluetooth device you’re trying to connect to. You can also try resetting your iPad’s Bluetooth settings.
App problems: If you’re having problems with a specific app, try restarting the app or force-quitting it. You can also try updating the app or clearing its cache and data.
In conclusion, if you’re having problems with your iPadOS 17 device, there are a few things you can try to fix the issue. First, try restarting your iPad and checking for updates. If that doesn’t work, try force-quitting the app that’s causing the problem or clearing its cache and data. If you’re still having problems, you can try resetting all settings or restoring your iPad. If you’ve tried all of the above steps and you’re still having problems, you can contact Apple Support for further assistance. You can find out more details about all of the iPadOS features over at Apple’s website.
Image Credit: Daniel Romero
Filed Under: Apple, Apple iPad, Guides
Latest timeswonderful Deals
Disclosure: Some of our articles include affiliate links. If you buy something through one of these links, timeswonderful may earn an affiliate commission. Learn about our Disclosure Policy.
Released recently, macOS Sonoma has been lauded for its stability and reliability. However, like any software, it’s not without its quirks and issues. Whether you’re struggling with download issues, installation glitches, or performance hiccups, this guide aims to provide you with actionable solutions. Below, we delve into some of the most common macOS Sonoma problems and offer step-by-step fixes to get your Mac running smoothly again.
macOS Sonoma Download Problems
The Issue:
One of the first hurdles you might encounter is downloading macOS Sonoma itself. This could be due to insufficient storage, unstable internet, or server issues on Apple’s end.
The Fix:
Check Storage Space: Ensure you have at least 13 GB of free storage on your Mac.
Stable Internet: A reliable and fast Internet connection is crucial.
Restart Your Mac: Sometimes, a simple restart can resolve the issue.
Try Again: Attempt the download once more.
Safe Mode: If all else fails, download macOS Sonoma in Safe Mode by holding down the Shift key during a restart.
Installation Issues
The Issue:
You’ve managed to download the update, but now it won’t install.
The Fix:
Compatibility Check: Ensure your Mac meets the system requirements listed on Apple’s website.
Restart and Retry: A restart can often clear any temporary glitches.
Safe Mode: As with download issues, installing in Safe Mode may bypass the problem.
Performance Issues
The Issue:
Your Mac is sluggish or unresponsive after the macOS Sonoma update.
The Fix:
Close Unnecessary Apps: Keep only essential apps open.
Free Up Storage: Ensure you have ample free storage space.
Update Apps: Make sure all your apps are updated.
Restart Your Mac: A restart can often resolve minor issues.
Reset SMC and NVRAM: Follow the guidelines on Apple’s website for these advanced steps.
App-Specific Problems
The Issue:
A particular app is not functioning as it should post-update.
The Fix:
Update the App: Always keep your apps up-to-date.
Reinstall: Uninstall and reinstall the problematic app.
New User Account: Create a new user account to isolate the issue.
Contact Developer: If the problem persists, reach out to the app’s support team.
Wi-Fi Connectivity Issues
The Issue:
Wi-Fi is unstable or not connecting.
The Fix:
Restart Devices: Reboot both your Mac and router.
Forget and Reconnect: Remove the Wi-Fi network from your Mac and reconnect.
Router Reset: Reset your router to factory settings.
Firmware Update: Check for router firmware updates.
ISP Support: Contact your internet service provider for assistance.
Other Common Problems
The Issue:
Issues with Bluetooth, printing, or audio.
The Fix:
Restart: A simple restart can often fix minor issues.
Safe Mode: Boot into Safe Mode to isolate third-party app issues.
Reinstall macOS: As a last resort, reinstall macOS Sonoma.
Additional Troubleshooting Tips
Keep macOS Sonoma updated.
Regularly update all your apps.
Uninstall unnecessary apps.
Run malware scans.
Regularly back up your Mac.
If you’ve tried all these steps and are still encountering issues, it’s time to contact Apple Support for further assistance.
macOS Sonoma is Apple’s latest operating system, as with every major new release, there are probably still various bugs in the software, this guide aims to help you troubleshoot and resolve the most common problems you may face. If you have any tips on how to fix any of the bugs that you may have experienced, please leave a comment below and let us know. You can find out more details about the latest version of Apple’s Mac software over at Apple’s website.
Filed Under: Apple, Guides
Latest timeswonderful Deals
Disclosure: Some of our articles include affiliate links. If you buy something through one of these links, timeswonderful may earn an affiliate commission. Learn about our Disclosure Policy.