Categories
News

How to Enable Stolen Device Protection on iPhone

[ad_1]

When Apple released iOS 17.3 in January, it introduced a Stolen Device Protection feature to provide iPhone users with added security. This article explains what it does, why you might want to turn it on, and how to go about doing so.

ios stolen device protection
In 2023, reports began emerging about a new method thieves were using to steal iPhones and access users’ highly sensitive data. Thieves would surreptitiously spy on their victims in public while they entered their passcode, before going on to steal the device. With the passcode known to them, criminals could empty bank accounts, steal passwords, and make the iPhone untraceable.

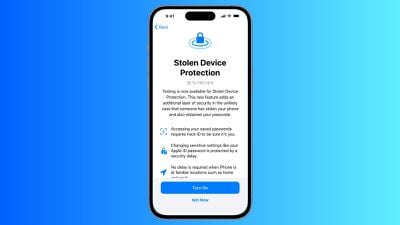
Enter, Stolen Device Protection

To make it harder for a thief to access passcode-protected data on a stolen iPhone, Apple in iOS 17.3 included Stolen Device Protection. With the feature enabled, Face ID or Touch ID is required to access passwords in iCloud Keychain, Lost Mode settings, options for erasing the device, and making purchases in Safari.

In addition to the new biometric requirements, the feature also imposes a one-hour security delay on actions like changing an Apple ID password. In other words, if someone tries to change Apple ID login information, Face ID authentication is required, and then an hour must pass before the password can be changed. The only time this wait period is not imposed is when the device at a trusted location like home or work.

Actions Requiring Face ID/Touch ID With Stolen Device Protection Enabled

  • Viewing/using passwords or passkeys saved in iCloud Keychain
  • Applying for a new Apple Card
  • Viewing an Apple Card virtual card
  • Turning off Lost Mode
  • Erasing all content and settings
  • Taking certain Apple Cash and Savings actions in Wallet
  • Using payment methods saved in Safari
  • Using your iPhone to set up a new device

Note that these actions do not have a passcode backup, so you can’t use a passcode to avoid using Face ID or Touch ID.

Actions Requiring 1-Hour Delay With Stolen Device Protection Enabled

Actions that require biometric authentication and have a one-hour security delay include the following:

  • Changing your Apple ID password
  • Updating select Apple ID account security settings, including adding or removing a trusted device, trusted phone number, Recovery Key, or Recovery Contact
  • Changing your iPhone passcode
  • Adding or removing Face ID or Touch ID
  • Turning off Find My
  • Turning off Stolen Device Protection

How to Enable Stolen Device Protection

Note that Stolen Device Protection is only available on iPhones that are able to run iOS 17, which includes the iPhone XS and newer. Also, make sure your iPhone is up-to-date and running iOS 17.3 or later (Settings ➝ General ➝ Software Update). Here’s how to enable the feature.

  1. Open the Settings app.
  2. Scroll down and tap Face ID & Passcode (or Touch ID & Passcode, depending on iPhone model).
  3. Enter your passcode at the prompt.
  4. Scroll down and tap Stolen Device Protection.
  5. Toggle on the switch next to Stolen Device Protection, then tap Turn On at the prompt.

settingssettings

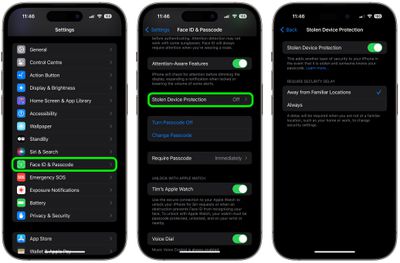
Note that if your iPhone is running iOS 17.4 or later, an additional option on this screen lets you choose to require a security delay when your device is Away from Familiar Locations, or Always. Otherwise, that’s all there is to it. You can just as easily turn off the feature by toggling off the Stolen Device Protection switch, but you’ll need to authenticate to do so.

[ad_2]

Source Article Link

Categories
Business Industry

How to enable 4K display resolution in Samsung DeX

[ad_1]

Samsung DeX was introduced in 2017. Many years later, it continues to be the best way to enjoy a desktop-like experience via a smartphone or tablet. All modern flagship Galaxy phones and tablets support Samsung DeX, and Samsung continually makes improvements to the feature from time to time.

However, there is room for further improvement as DeX has a not-so-small list of limitations. One major limitation is the lack of support for 4K resolution.

Samsung DeX can project its desktop interface to external displays in multiple ways. You can connect wirelessly to any TV or monitor via Miracast screen mirroring (most smart TVs have this) or use a USB-C to HDMI cable. You can also use DeX on a Windows PC by connecting your device to it with a USB cable.

When you connect to a display using a USB-C to HDMI cable, DeX allows you to change the screen resolution. But the maximum supported resolution is WQHD (2560×1440). You can even be limited to 1080p depending on the TV you own, as televisions are generally designed to run at either 1080p or 4K and don’t support WQHD and other intermediate resolutions.

If that’s something that bothers you, don’t worry, Samsung’s Good Lock app can help. Good Lock enables many hacks and experimental functionalities that aren’t officially supported on One UI. One of those lets you enable higher resolutions in DeX.

For those wishing to run DeX at 4K resolution on their monitor or TV, we have prepared the guide below. It applies to both direct HDMI connections between the phone/tablet and display and connections made via a DeX dock, such as the one Samsung used to sell a few years ago.

First, download and install Good Lock and MultiStar

If Good Lock is available in your country, you can install it directly from the Galaxy Store. Once installed, open Good Lock and install MultiStar from the app’s Life up tab. Then, skip to the next section of the guide to find out how you can use MultiStar to enable 4K resolution in DeX.

If Good Lock isn’t available in your country, follow the steps below to manually download and install Good Lock and MultiStar before moving into the next section.

Step 1. First, let’s download and install Good Lock. Click this link in your mobile browser to open the Good Lock APKMirror page. On that page, scroll down to the All Versions section and hit the download button next to the latest version of the app.

Step 2. Scroll down to the Download Good Lock section and tap the download icon (highlighted in the screenshot below) once again.

Step 3. Scroll down once again and hit the DOWNLOAD APK button and the APK file should start downloading in a few seconds.

Step 4. Once the APK file is downloaded, open the My Files app on your device. The downloaded Good Lock file will show in the list of recent files at the top of My Files – tap it and follow the on-screen instructions to install the app.

Note: If you are installing an app manually for the first time, you will get a pop-up notification saying “your phone currently isn’t allowed to install unknown apps from this source.” To fix that, simply tap the Settings button on the pop-up notification, then tap the toggle button next to Allow Permission

Step 5. Now, it’s time to get MultiStar. Click this link to visit the MultiStar APKMirror page and then perform the same steps as you did earlier for Good Lock to download and install the latest version of MultiStar.

Enable and activate 4K resolution in DeX

Once you have Good Lock and MultiStar installed, follow the steps below to enable 4K resolution.

Step 1. Open Good Lock, switch to the Life up section of the app, and tap MultiStar to open it

Step 2. In MultiStar, tap I ♡ Samsung DeX, which is the very first option.

Step 3. In the I ♡ Samsung DeX menu, enable the High resolutions for external display option.

Step 4. Connect your phone or tablet to the display using an HDMI cable to fire up DeX mode, then open the Settings app via the app drawer or the shortcut on the DeX desktop.

Enable 4K display resolution in Samsung DeX

Step 5. Select Samsung DeX to view all DeX settings.

Enable 4K display resolution in Samsung DeX

Step 6. Tap Display resolution.

Enable 4K display resolution in Samsung DeX

Step 7. Select the resolution you wish to use from the list of resolutions.

Enable 4K display resolution in Samsung DeX

[ad_2]

Source Article Link

Categories
Featured

Dragon’s Dogma 2 players can now enable DLSS 3 and Frame Generation thanks to this handy mod

[ad_1]

Some Dragon’s Dogma 2 players with an RTX 40-series graphics card have been experiencing performance issues on PC, but this new mod might offer some improvements.

Before the release of Capcom’s open-world fantasy RPG, it was said that the Dragon’s Dogma 2 would be released with DLSS 3, however, as players come to find out, that wasn’t the case. Strangely enough, the game installation folder does feature the DLSS 3 file for Frame Generation but is currently inaccessible for owners of an RTX 40-series GPU.

[ad_2]

Source Article Link

Categories
Computers

How Apple’s Advanced Data Protection Works, and How to Enable It on Your iPhone

[ad_1]

ADP extends that protection pretty considerably to also cover your iCloud backups, iCloud Drive, and the information in Photos, Notes, and Reminders. Without ADP enabled, this data is still encrypted, which adds a strong layer of protection from third parties or bad actors. But Apple can still access this data and turn it over to the cops.

End-to-end encryption closes that loophole. If an Apple employee decides to go rogue, or Apple gets hacked and your files get leaked—and neither of those scenarios have happened, to our knowledge—ADP will ensure your data is still safe. It also means Apple can’t get your files back if you lose access to them: The passcodes and passwords on your Apple devices are the only route through which end-to-end encrypted data can be unlocked. Apple has a full and comprehensive explanation of iCloud’s security and privacy features.

ADP does make iCloud on the web harder to get into.

Apple via David Nield

So, do you need ADP? If you want the most complete level of security and privacy possible, then yes. Just make sure you have backup methods for recovering your account (more on this in a moment), as Apple won’t be able to help you unlock your encrypted files if your account becomes inaccessible. While the default, standard encryption Apple puts in place is already very strong, ADP covers more of your data, which is reassuring in the slim chance Apple’s data centers suffer a breach or the FBI wants to take a look at your iCloud files.

It’s also worth bearing in mind that all this extra encryption restricts iCloud access in your web browser (the web portal where you can get at your emails, photos, and so on). You can still log in to iCloud on the web, but you’ll need to confirm the connection on a trusted device (like an iPhone or Mac) every single time you log in—and you’ll need to reauthorize the link every hour while you browse your files. If you use iCloud on the web a lot, you might find life more convenient without ADP enabled.

How to Enable Advanced Data Protection

If you’re ready to enable ADP, you can do it right from your iPhone—as long as all the devices associated with your Apple ID are running the latest software, and your Apple ID has two-factor authentication switched on. (If you haven’t yet done this, you’ll find instructions on the Apple website.)

If you’re using an iPhone or an iPad, open Settings, then tap your name at the top. Choose iCloud, then Advanced Data Protection: You’ll see a screen briefly explaining how the feature works, and you can tap Turn On Advanced Data Protection to do just that. At this point you’ll be told if there are any devices connected to your Apple ID that aren’t compatible with ADP, and you’ll be given the option to “remove” them. If you do remove a device, it will no longer be linked to your Apple ID, and it won’t sync to your iCloud account, so it’s not recommended you “remove” any devices you’re still using. A better option would be to update the software on these devices to make them compatible with ADP, or replace the devices with newer versions.

[ad_2]

Source Article Link