Categories
Entertainment

How to watch (and record) the 2024 solar eclipse on April 8

[ad_1]

The great North American solar eclipse will darken the US, Canada and Mexico on April 8th, as you’ve no doubt heard. It’s a significant astronomical event, the first since August 21, 2017 and the last one that will be visible on the continent until 2044.

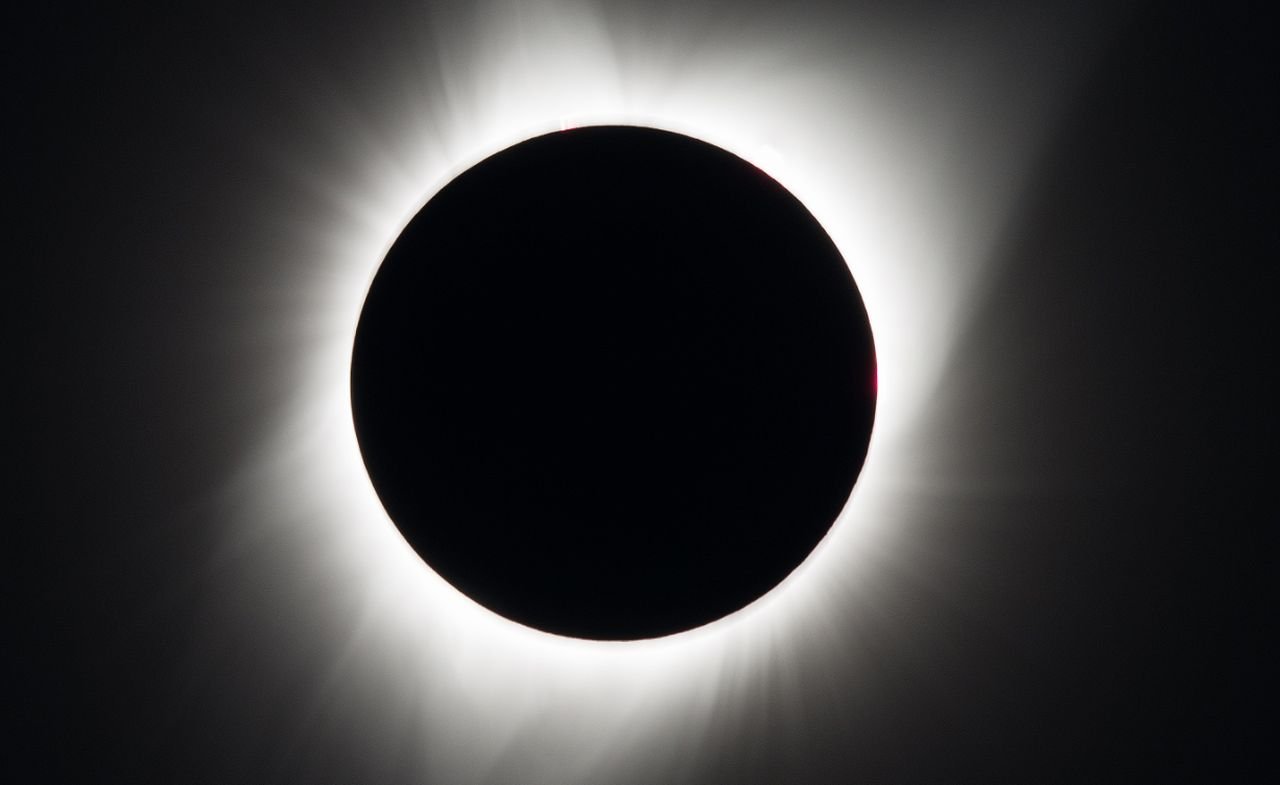
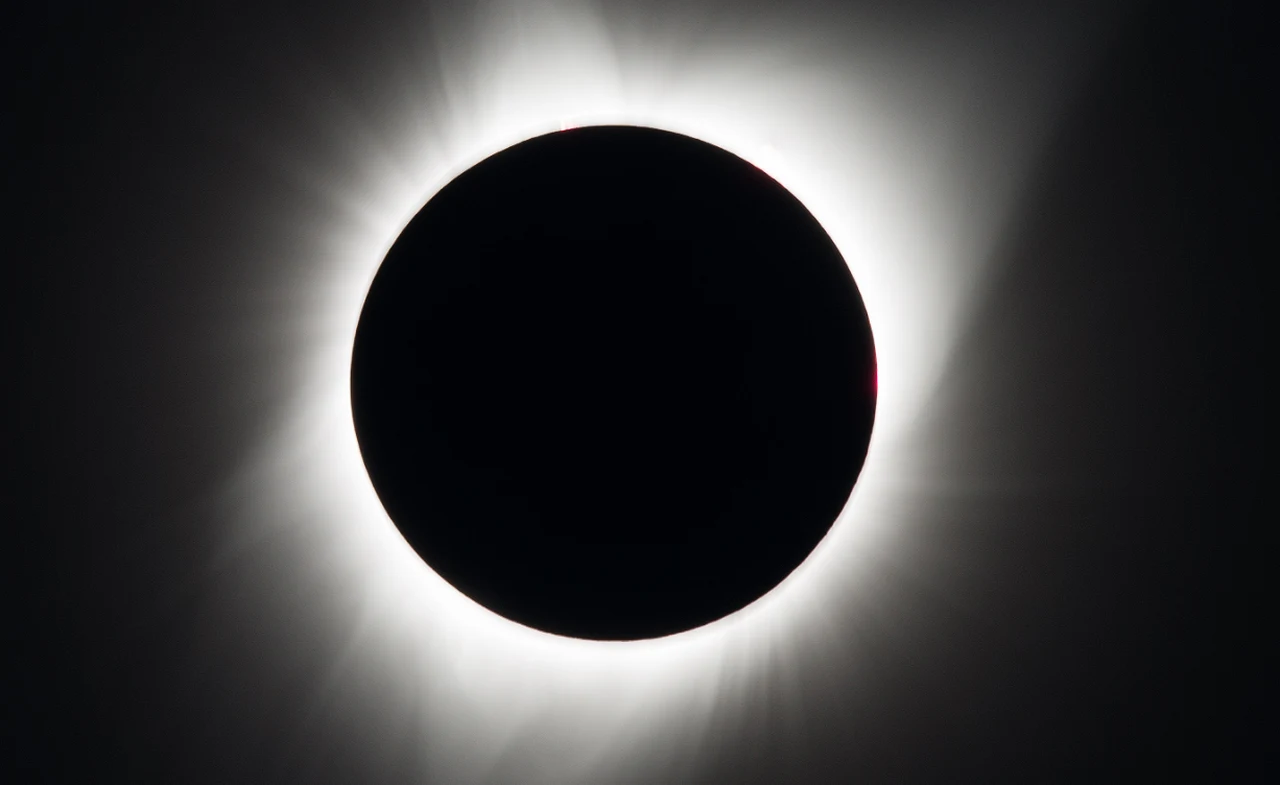
Parts of all three countries will experience “totality” or a full blocking of the sun by the moon. Those lucky folks may even see the sun’s corona and a “diamond ring” — both rare and dramatic sights. Other regions will experience partial eclipses, with the level depending on how close you are to totality. Watching the moon eat into the sun, even a bit, is still a spectacular sight.

So, which cities and regions will experience totality? When will it happen? What’s the weather forecast in those areas? And if you do have a clear view, how can you safely watch and record the event? Read on to find out more.

Where in the US will you experience the solar eclipse totality, and when?

How to watch (and record) the solar eclipseHow to watch (and record) the solar eclipse

The good news is that many major centers are in the 100-mile-wide band of totality, so millions of people will be able to see a full solar eclipse. It follows a northeast path, so Mexico’s Pacific coast will get the first views in Mazatlan starting at around 10:57 AM PDT (total eclipse starting at 12:07 PDT), followed by the city of Torreón (all times local).

The total eclipse moves into the United states at 12:10 PM CDT (Eagle Pass, Texas), then hits Austin, Fort Worth and Dallas — three out of five of the most populous Texas cities. From there, it moves into Little Rock, Arkansas, followed by select parts of Missouri, Illinois and Indiana (including Indianapolis).

How to watch (and record) the solar eclipseHow to watch (and record) the solar eclipse

NASA

Ohio cities Dayton, Toledo and Cleveland get the full show, followed by Erie, Pennsylvania, then Buffalo, Rochester and Syracuse in New York along with Maine. Canada is in on the fun too, with parts of southern Ontario (Hamilton, Niagara Falls) and Quebec (Montreal) getting the totality, along with New Brunswick, PEI and finally, Bonavista, Labrador at 4:03 PM NDT (Newfoundland Time).

If you’re elsewhere on the continent and can’t travel, know that the closer you are to the band of totality, the more the sun will be obscured by the moon (this map shows how much of the eclipse you’ll get depending where you are on the continent).

An impressive list of major centers are within 200 miles of totality, so they’ll get a 90 percent or better eclipse (Houston, St. Louis, Memphis, Nashville, Chicago, Cincinnati, Detroit, Toronto, New York, Boston).

Anyone in the US south, midwest and northeast should get a decent spectacle, as will folks in Canada’s southeast and Atlantic coast. Even if you’re not in those regions, you might still see (and can capture) a mini eclipse.

How long with the 2024 solar eclipse last?

From the beginning when the moon first starts to cover the sun (partial eclipse) until the end when the two bodies part ways is a good long time – up to two hours and forty minutes in Dallas, and 2:18 in Caribou, Maine.

However, totality itself is brief, with the duration dependent on how close you are to the center of the totality band and the time of day. It’s at just under four minutes in Dallas, less than three minutes in Presque Island, Maine and a mere minute and 12 seconds in Montreal. As such, you’ll need to be ready and hope that the skies are clear during that brief window.

What’s the weather forecast in my area?

It’s still early for an accurate forecast, but a week is enough to get a general idea by region. Suffice to say, April isn’t the ideal month for clear skies. That said, an eclipse can still be visible through light cloud cover, and even if it’s thick, the sky will grow dramatically dark.

Unfortunately, the odds of precipitation are indeed above average across most of the band of the eclipse. Forecasts predict that the chances for clear skies are better the farther northeast you live, the opposite of historical trends.

To wit, Dallas has showers forecast throughout the day (58 percent), which would mean continuous cloud cover and no clear view if that holds. That improves a bit when you get to Indianapolis (partly cloudy, 24 percent chance of rain), with things better still in Buffalo, New York (partly cloudy, 11 percent).

Things are looking good right now in Montreal, though, with mostly sunny skies and only a 9 percent chance of rain, and the same goes for Fredericton, New Brunswick.

Niagara Falls also figures to have decent weather during the eclipse (mostly sunny, 18 percent) and is in the path of totality, which has led to the city declaring a state of emergency out of caution. Officials estimate that a million people could pour into the area, creating potentially dangerous crowds.

How can I watch the solar eclipse at home?

Staring at the sun is obviously dangerous for your vision, and doing so during an eclipse can be just as harmful. Even though you may not feel discomfort immediately, you may damage your eyes via an affliction called solar retinopathy. That can lead to serious consequences like eye pain, blind spots, blurred vision and more.

How to watch (and record) the solar eclipseHow to watch (and record) the solar eclipse

American Astronomical Society

To view it safely, you must purchase a pair of approved solar eclipse glasses based on an international safety standard called ISO 12312-2 (regular sunglasses won’t do). That dictates the maximum luminous transmittance, along with the range of permissible wavelength transmittance (UVA, UVB and infrared).

There’s certainly still time to grab a pair if you don’t have them already. The American Astronomical Society (AAS) has many recommendations for manufacturers and vendors, both online and at retail chains.

Warby Parker, for one, is offering free glasses (limit two per person while supplies last). You can also find them at Staples, Lowes and Walmart, or online at B&H and multiple science and astronomy stores.

The AAS advises against searching for the lowest price on Amazon or eBay, however, in case you get a bad knock off. “Before you buy a solar viewer or filter online, we recommend that you make sure that (1) the seller is identified on the site and (2) the seller is listed on this page,” it says on its Solar Eclipse Across America site.

How to watch the solar eclipse safely without glasses

How to watch (and record) the solar eclipseHow to watch (and record) the solar eclipse

Canadian Space Agency

It’s possible to view an eclipse without glasses via indirect means, as well. The simplest way is by punching a small round hole in a piece of thick paper or cardboard, then positioning it so the sun shines through the hole onto the ground or a flat surface (you can also attach a piece of foil with a hole, as NASA shows here). That will project an image of the Sun’s disc, letting you see the eclipse in real time.

The same pinhole principle would let you use anything with perforated holes, like a colander, projecting dozens of tiny eclipses on a surface. Trees can do the same thing, casting weird leaf shadows with little solar eclipse chunks out of them.

How to watch (and record) the solar eclipseHow to watch (and record) the solar eclipse

Benjamin Seigh/Wikimedia

For a bit better experience, you can build a crude box projector. With that, the sun shines through a hole in tin foil onto a white card, and you can look through a larger hole at the card, with the sun behind you. The Canadian Space Agency explains exactly how to make that.

Never, ever view an eclipse directly through a pair of binoculars or a telescope, as that’s a guaranteed way to damage your eyes. That said, you can use a pair of binoculars or a telescope to project the sun onto a piece of paper, as shown in this video.

How to take photos or video of the solar eclipse

Unfortunately, you can’t just point your smartphone or camera at the sun to record the eclipse, as the brightness will overwhelm the sensor and ruin the image (and possibly damage the sensor). Luckily, you can shield your camera just as you do your eyes.

The cheapest way to do that is to buy an extra set of eclipse glasses, then cut out an eyepiece from one and tape it over the smartphone (or other camera) lens. That will reduce the light levels enough to see detail in the sun throughout the partial eclipse and totality.

You can also purchase dedicated smartphone solar filters like the VisiSolar Photo Filter, which are designed for cameras and not direct viewing. Another choice is the Solar Snap Eclipse App Kit, which also offers an app that aids in photographing the eclipsed sun. It’s advisable to also wear solar glasses when setting up your smartphone or camera to protect your eyes.

If you’re shooting the eclipse with a dedicated mirrorless or DSLR camera, you’ll need either a mylar, 16-stop ND (neutral density) or hydrogen alpha solar filter. Again, do not look directly into a DSLR’s optical viewfinder at the sun if the lens doesn’t have one of those filters attached (the electronic viewfinder on a mirrorless camera is safe).

To photograph the eclipse with a smartphone, turn the flash off and put the camera into ultrawide or wide mode so it stays in frame. Do NOT look directly at the sun to line up your camera if you’re not wearing solar eclipse glasses.

Don’t use the digital zoom to try to make the eclipse bigger, as you’ll lose resolution (you can zoom in later in your photo editing app). Once focus is set on the sun, use your smartphone’s focus lock feature so that it doesn’t “hunt” for focus and blur the eclipse.

During totality, the “diamond ring” effect only lasts a split second, so use the burst mode of your camera or you’ll likely miss the shot. And try to capture RAW (rather than JPEG) images to keep the maximum detail possible for later editing. Some iPhone and Android smartphones have RAW capability built-in, if not, you can use a third-party app.

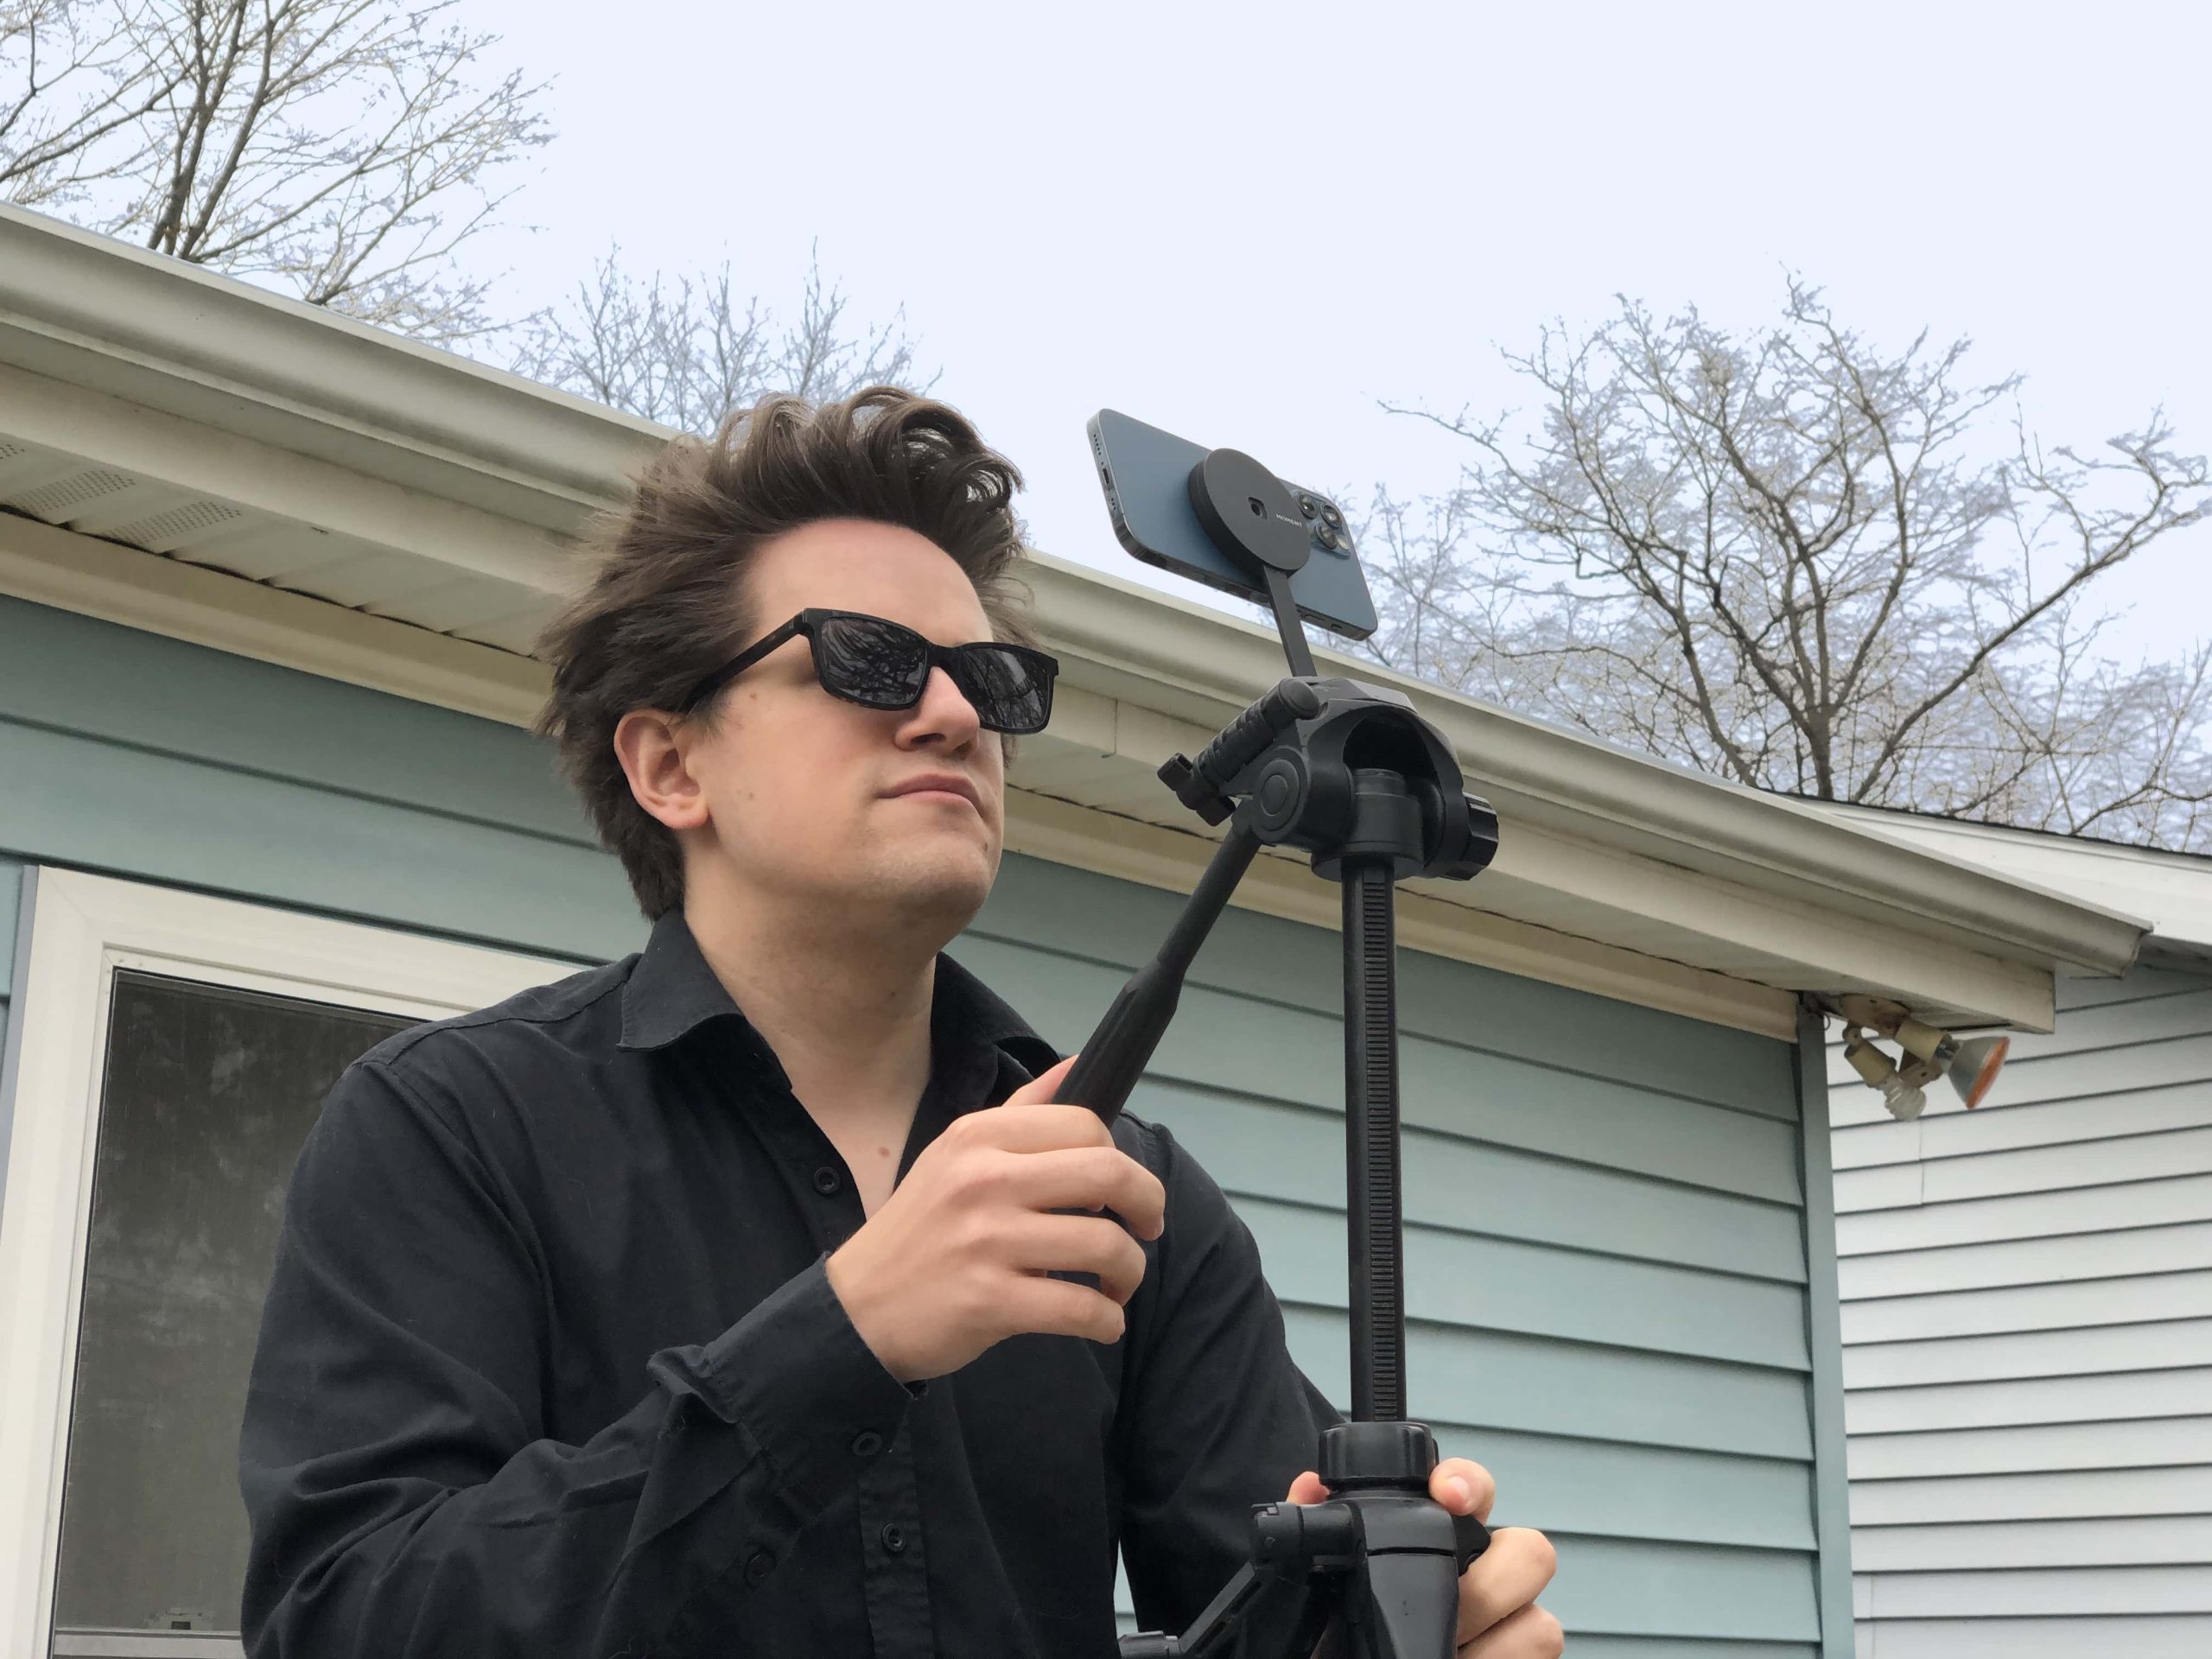
If you decide to capture video, you’ll need a filter as well, of course. But you should also use a tripod, as shooting handheld will induce blur and result in a shaky video. Even a cheap tripod will do the trick, along with a simple smartphone holder. Capture the highest resolution you can (4K or even 8K) at the highest quality possible. You’ll also capture any cheering, shouting, etc. — a precious souvenir you can look back on again and again.

More resources

There are plenty of government and private sites with more information about the eclipse, starting with the AAS’s eclipse site, detailing things like eye safety, imaging, resources and even a totality app — an “interactive map that shows what you’ll see at any location in North America for the total solar eclipse of April 8, 2024.”

NASA also offers a dedicated site for the North American Eclipse, as does the National Weather Service and National Solar Observatory. A private site called Great American Eclipse is largely commercial, but does have a very useful map showing the band of totality and how much of the eclipse you’ll see depending on location, along with a comprehensive list of eclipse times and durations by city.

[ad_2]

Source Article Link

Categories
Bisnis Industri

How to take great solar eclipse photos with iPhone

[ad_1]

There are lots of questions about how to take solar eclipse photos with your iPhone. Firstly, can a solar eclipse harm your iPhone’s camera or lenses? Won’t the sun’s rays damage the camera?

Not according to Apple. Cupertino says it’s safe to photograph a total solar eclipse with your iPhone; but be sure to protect your eyes.

However, photographing the solar eclipse is hard without the right tools. To get a good picture of the solar eclipse with your iPhone, you’re going to need a 12-18x telephoto lens attachment, a solar filter and a tripod. Make sure you have everything you need before the big day next month.

Here’s how you can get prepared. Watch our new video or keep reading below.

This post contains affiliate links. Cult of Mac may earn a commission when you use our links to buy items.

How to take solar eclipse photos on iPhone

A total solar eclipse is one of the most awe-inspiring sights in all of nature. It’s dramatic and beautiful, especially when the moon’s shadow finally blots out the sun. The sudden darkness of the totality is stunning and unlike anything you’ll have ever seen.

To photograph it, preparation is key. The more prepared you are now, the more you can live the moment as the eclipse is happening without worrying about capturing it on your iPhone.

The Great American Eclipse

April 8, 2024 is the Great American Eclipse, so called because the path of totality will cover Mexico, Texas, the Midwest and the border between New England and Canada. There won’t be another total solar eclipse like it until 2044 and 2045. Check  NASA’s website for maps of its path across the United States.

Taking a good picture of a total solar eclipse is a big challenge. Even your best iPhone shot is not going to rival images made by pros. Nonetheless, you can still get good snaps with proper preparation.

Never look at the sun directly

Note: Never look at the solar eclipse through a camera lens, telescope or binoculars: This will fry your eyes instantly. Don’t even look at the sun with your naked eyes. Doing so can damage your eyesight permanently, even when the sun is mostly eclipsed. It’s only safe to look at the eclipse during totality, when the sun is entirely blocked by the moon.

Prepare to photograph the eclipse now

If you want to get good pictures of the total eclipse — especially the spectacular ring of fire — pulling out your iPhone at the last second isn’t going to cut it.

Now is the time to stock up on filters, lenses and tripods — all of which can be acquired pretty inexpensively — and make sure your Apple Watch is set up to act as a remote. It’s also a good idea to practice photographing the sun now, preferably in the same location you’ll be watching the eclipse.

Pro tip: The full moon will give you a good idea of how large the sun will appear during the eclipse. Practice photographing the moon now, and it’ll give you a good idea of how big the sun will appear with your iPhone’s standard lenses or a telephoto attachment.

1. Avoid blur; get a tripod

EasySelfie stick for iPhone
A compact tripod might be all you need.
Photo: SwitchEasy

A tripod will keep your phone steady at the perfect angle. You can pay better attention to everything else going on if you don’t need to worry about holding the phone in your hands.

2. Attach iPhone with a tripod phone mount

If you have a tripod but you don’t have a way to mount your phone, I highly recommend a MagSafe tripod mount.

For getting a good video of the darkness in the middle of the day, a tripod and a phone mount is all you’ll need. But if you want to try to get solar eclipse photos of the sun itself, here are three more things you’ll want to pick up.

3. Make your own iPhone solar filter

Solar eclipse glasses
Just tape one of the lenses over your phone cameras.
Image: Kesseph

Pointing your phone camera at the sun won’t hurt your phone’s camera sensor — it’ll just be really hard to get a picture that isn’t blurry. If you want a good, clear picture of the sun, you’ll need a solar filter.

If you have a spare pair of solar eclipse glasses, you already have one! Just cut it up and tape the filter over the lens of your phone. Don’t use sunglasses — they’re nowhere near strong enough.

If you don’t have any old eclipse glasses, these VisiSolar Smartphone Photo Filters are well suited for use with an iPhone. The large circular filter entirely covers the three-lens camera setup of the latest Pro models. For best results, remove your case first.

Note: You’ll want to remove any filters during totality. You’ll need filters right up to the moment the sun is blotted out, but when the sun is fully eclipsed, you should ditch the filters. The sun’s corona is much fainter than the photosphere, so any pictures taken at this time with a filter will be extremely murky. It’s also safe to look at the eclipsed Sun with your naked eye. In fact, you won’t see much of anything if you’re still looking through your eclipse glasses or a filter.

4. Get way better eclipse shots with a zoom lens

Holding an iPhone with Moment Tele lens
With the Moment case, you can just screw an additional telephoto lens onto your phone.
Photo: D. Griffin Jones/Cult of Mac

If you want a good picture of the solar corona (the white ring of light called the “ring of fire”), you’ll need a bit more zoom than you get out of the box with your iPhone.

If you put a 2× zoom lens over the iPhone 15 Pro Max 5× Telephoto lens, then you’ll get an impressive 10× optical zoom for a great shot of the sun.

The Moment Tele Lens is the easiest way to get more zoom, using their simple screw-on system.

It’s a lot to buy, but when you have the whole system, you’ve effectively doubled the capability of your iPhone camera.

5. Use a camera app with manual controls

Halide in the App Store (left) and Halide camera (right)
Halide gives you the manual controls the iPhone camera app doesn’t.
Screenshot: D. Griffin Jones/Cult of Mac

Sometimes, the stock Camera app on the iPhone doesn’t play nicely with the Moment lenses — much less the weird lighting conditions of a solar eclipse.

If you want fine-tuned manual controls, just like a full-size dedicated camera, I recommend using Halide. This app lets you manually set the lens, the focus, the exposure, the resolution and more.

Tap the 1× button in the bottom corner to manually set the lens; drag your finger up or down on the camera screen to set the exposure. Tap AF to turn off autofocus and set the focus manually. For capturing the sky, you can drag it all the way to 1.0 for maximum distance.

Halide packs in loads of pro features, but thanks to its clever design, it isn’t impossible for novices to figure out like a DSLR camera.

Price: $2.99/month, $11.99/year or $59.99 lifetime
Download from: App Store

6. Mount your iPhone on a telescope

iPhone mounted on a telescope showing the moon in the camera
Mount your iPhone in an actual telescope.
Image: Celestron

Even better than zoom lenses is a telescope. You’ll need an iPhone mount like Celestron’s $80 NexYZ DX Kit, which holds your iPhone next to the eyepiece and includes a Bluetooth shutter release remote. You can even pick up a cheap scope, like the Celestron EclipSmart, for $130, which includes a solar filter.

7. Trigger eclipse pictures with Apple Watch — Siri is even better

Apple Watch Camera Remote
Control your iPhone camera from your Apple Watch.
Photo: D. Griffin Jones/Cult of Mac

Once you’ve got everything set up — tripod, lenses, and filters — you’ll want to make sure your Apple Watch can act as an iPhone camera remote. Luckily, it’s easy. Open the Camera Remote app on your Apple Watch. Twist the Digital Crown to zoom. To adjust exposure, just tap on the key area of the photo on your Apple Watch’s face. To take the shot, tap the Shutter button. By default, there’s a three-second delay.

Even better, use Siri. Just tell your Apple Watch: “Take a picture” and it’ll snap a shot with your iPhone. Make sure this works beforehand and you won’t have to take your eyes off the eclipse as it is happening.

You can also try using your iPhone’s timer setting.

8. To get a great eclipse shot, practice beforehand

For many of us, this upcoming total solar eclipse is literally going to be a once-in-a-lifetime event. Don’t ruin it by futzing about with your iPhone. Best to practice now, before the big day. Luckily, the sun is going to be the same brightness as the sun during an eclipse, so play around with filters and lenses now.

You’ll want to figure out the best composition for your photos, so try to figure out where the sun will be in the sky during the total eclipse.

Can a solar eclipse damage iPhone cameras?

Photographing the sun will not damage your iPhone’s camera or lens. The cameras and lenses are designed to capture light — that’s the sea they swim in — and even direct rays from the sun won’t harm them.

However, leaving your iPhone camera and lens pointed directly at the sun may cause your iPhone to overheat. According to Apple, iPhones are designed to operate at temperatures between 32º to 95º F. Apple explicitly advises against “leaving your device in direct sunlight for an extended period of time.”

If your iPhone overheats, it’ll automatically regulate its behavior to prevent damage, including shutting off the screen, dialing back charging and disabling wireless. If your iPhone overheats, you should see a warning message on the screen.

To avoid overheating, use your iPhone only for short stretches of time, and definitely try shading it when not in use.

Can you look at a solar eclipse with your iPhone?

Theoretically, yes, you could watch the total solar eclipse on your iPhone’s screen instead of looking at it directly. But why would you want to?

Watching the eclipse onscreen is going to be blurry, wobbly and overexposed. Plus, holding your iPhone up to the eclipse, you greatly risk looking directly at the sun instead. Plus, you’re going to need a solar filter for your iPhone, and if you have one, you might as well use it to look at the sun directly. It’s not worth the trouble.

Don’t forget to take pictures around you

To be honest, the best pictures you’ll likely take during the total solar eclipse won’t be of the sun. It’ll be the landscape and people around you. Be sure to get pictures of your friends and family watching the eclipse with you. Take a selfie with the eclipsed sun behind you. Or get a Reservoir Dogs shot of everyone in their eclipse glasses.

Again, it’s a good idea to practice. Before the big day, take some photos of people and your surroundings just before or after sunset. The light level at twilight will be similar to the totality.

Check out more tips on how to take the best pictures.


[ad_2]

Source Article Link

Categories
News

How to photograph the upcoming total solar eclipse 2024

How to photograph the 2024 Total Solar eclipse

As the date of the total solar eclipse on April 8, 2024, approaches, photographers of all levels of experience are presented with the opportunity to document one of nature’s most stunning displays across America. Capturing the eclipse requires preparation and knowledge, and this guide aims to equip you with the necessary information to photograph the event with confidence. Jeff Geerling who has successfully captured fantastic photographs of a previous eclipse explains his method and others on how you can use different methods to photograph the solar eclipse.

On April 8, 2024, a total solar eclipse will cross North America, passing over Mexico, United States, and Canada.

Sun Safety

First and foremost, safety should be your top priority. The intense rays of the sun can cause serious damage to both your eyes and camera if proper precautions are not taken. It is crucial to use solar filters that are specifically designed for cameras to prevent any harm. For those who are mindful of their budget, creating a filter with Baader AstroSolar film is a cost-effective option, though it must be made with great care to ensure it provides sufficient protection.

When it comes to camera settings, manual control is key to obtaining the best images. Using a low ISO setting will help reduce graininess in your photos, and selecting the right aperture is important for keeping your images sharp. The exposure time will need to be adjusted as the eclipse progresses, so staying alert and ready to change settings is important. A reliable tripod is also necessary to prevent any movement that could blur your photos during the longer exposure times needed, especially when capturing the finer details of the sun with a zoom lens.

Photographing a total solar eclipse

Another technique that can be incredibly useful is exposure bracketing. This involves taking multiple shots at different exposure levels. This way, you can capture the wide range of light levels during the eclipse, from the brighter partial phases to the moment of totality when the sun is completely covered and the sky grows dark enough to see stars and planets. Jeff Geerling explains more about his experiences capturing the previous total solar eclipse and how you will be photographing the upcoming 2024 solar eclipse.

Here are some other articles you may find of interest on the subject of photography :

Another technique that can be incredibly useful is exposure bracketing. This involves taking multiple shots at different exposure levels. This way, you can capture the wide range of light levels during the eclipse, from the brighter partial phases to the moment of totality when the sun is completely covered and the sky grows dark enough to see stars and planets.

For those who are more technologically savvy, there are advanced options like using a Raspberry Pi-based system to automate the process of taking high-resolution images of the eclipse. These setups can be complex, but they offer a way to document the eclipse without having to manually control the camera. Even if you can’t make it to the path of totality, there are still ways to be part of the event. Organizations such as NASA will be streaming the eclipse live, which can be an excellent educational resource for anyone interested in learning more about eclipse photography or preparing for future eclipses.

How to capture the total solar eclipse

Photographing a total solar eclipse, such as the one expected in 2024, presents a unique opportunity for both amateur and professional photographers to capture one of nature’s most awe-inspiring phenomena. This guide will walk you through the essential steps, equipment, and considerations to successfully photograph the eclipse, combining technical advice with practical tips to ensure you get the best possible shots.

Understanding the Eclipse Phases

  • Partial Phase: This is when the moon starts moving over the sun, gradually covering it. During this phase, it’s crucial to use a solar filter to protect your camera and eyes.
  • Totality: This occurs when the moon completely covers the sun, revealing the solar corona. It’s safe to remove the solar filter during this brief period to capture the corona’s intricate details.
  • Partial Phase (again): As the moon moves away, the sun begins to reappear, requiring the reattachment of the solar filter until the eclipse ends.

Equipment Checklist

  • Camera: A DSLR or mirrorless camera with manual mode capabilities is ideal for eclipse photography.
  • Lens: A telephoto lens (200mm or greater) is recommended for close-up shots of the eclipse phases. For totality, a wider lens can capture the landscape under the darkened sky.
  • Solar Filter: Essential for photographing the partial phases to protect your camera sensor and eyes.
  • Tripod: A sturdy tripod is crucial for stability, especially for long telephoto lenses.
  • Extra Batteries and Memory Cards: Eclipse photography can be battery and storage intensive.

Preparing Your Camera

  • Focus: Autofocus may struggle with the dim light during totality. Practice manual focusing on distant objects in advance.
  • Exposure Settings: Start with ISO 100, aperture f/8, and a shutter speed of 1/500 for the partial phases with a solar filter. During totality, remove the filter and adjust exposure settings to capture the corona’s detail. Experiment with ISOs between 400 and 1600, shutter speeds from 1/500 to 1 second, depending on the corona’s brightness and desired detail level.
  • Bracketing: Use exposure bracketing to capture a range of exposures, especially during totality, to ensure you get a well-exposed shot of the corona and any surrounding stars.

Practice and Planning

  • Scout Your Location: Choose a location within the path of totality to experience the full eclipse. Ensure your view is unobstructed and consider the sun’s position in the sky during the eclipse.
  • Weather Considerations: Monitor the weather forecast and have a backup plan. Cloud cover can obstruct your view of the eclipse.
  • Practice Shots: Practice taking photos with your solar filter and adjusting settings quickly. Familiarize yourself with switching from filtered to unfiltered shooting for totality.

Safety First

  • Eye Protection: Never look directly at the sun without proper eclipse glasses, except during totality.
  • Camera Protection: Always use a solar filter on your lens when photographing the sun outside of totality to prevent damage to your camera sensor.

Creative Considerations

  • Composition: Consider including interesting foreground elements to add context to your eclipse photos. This can add a unique touch that distinguishes your images.
  • Experiment: Totality is a great time to experiment with different settings, including capturing the “diamond ring” effect just before and after totality.

Post-Processing

  • Editing: Use photo editing software to enhance details, adjust exposure, and combine images for a dynamic range of the eclipse’s phases.
  • Share Your Work: Consider sharing your eclipse photos with online communities or local photography groups to get feedback and learn from others’ experiences.

Photographing the 2024 total solar eclipse is an endeavor that requires careful preparation, the right equipment, and a willingness to face the technical challenges and unpredictable nature of the event. By adhering to these guidelines, you will be well-prepared to capture the breathtaking phenomenon of the eclipse and achieve a remarkable feat in your photography pursuits. Learn more about the 2024 Total Solar Eclipse over on the NASA website.

Filed Under: Guides, Top News


Latest timeswonderful Deals

Disclosure: Some of our articles include affiliate links. If you buy something through one of these links, timeswonderful may earn an affiliate commission. Learn about our Disclosure Policy.

Categories
News

Garmin Descent G1 Solar Ocean Edition unveiled

Garmin Descent G1 Solar Ocean Edition

Garmin has unveiled its latest smartwatch, the Garmin Descent G1 Solar Ocean Edition which is designed to be a dive comp[uter and it can be used for a wide variety of fitness activities, it has also been made of recycled ocean-bound plastics.

The Descent Mk3 series watch-style dive computers and Descent T2 transceiver with enhanced SubWave sonar technology that – through a soon-to-be-released software update – will add diver-to-diver messaging and Diver Assistance1 to tank pressure monitoring. Purpose-built with a dive-first approach to design, the Descent Mk3 series comes in two sizes – 43mm and 51mm – with air integration options on both and feature a vibrant touchscreen AMOLED display, a 200-metre dive-rated case with metal leakproof buttons that are fully operational at that depth, and up to 48 hours of battery life in dive mode2. The 51mm Descent Mk3i also comes with a built-in LED flashlight for greater visibility in low-light conditions—even underwater. With tools like multiple dive modes, DiveView maps and dive readiness score, plus Garmin’s suite of health, fitness and connected features, the Descent Mk3 series helps divers make the most of their adventures above and below the surface.

“From recreational to technical and every dive in between, the Descent Mk3 series and Descent T2 transceiver add innovative new features to help you explore deeper waters. One of those being enhancements to our SubWave sonar technology, which now makes it possible to communicate with other divers and even request assistance from nearby divers when help is needed—right from the wrist. This, coupled with air integration, DiveView maps and dive readiness tools help make these premium dive computers an essential part of your dive kit.” –Dan Bartel, Garmin Vice President of Global Consumer Sales.

You can find out more details about the new Garmin Descent G1 Solar Ocean Edition over at the Garmin website at the link below, it is now available to order in the UK for £569.99.

Source Garmin

Filed Under: Gadgets News


Latest timeswonderful Deals

Disclosure: Some of our articles include affiliate links. If you buy something through one of these links, timeswonderful may earn an affiliate commission. Learn about our Disclosure Policy.