Categories
News

How to print from your Android Phone

print android phone

In today’s digital age, printing from a mobile device has become increasingly common. With the convenience and portability of smartphones, users can easily access and print documents, emails, web pages, and other files directly from their Android phones. Whether you’re a student, a business professional, or simply need to print something on the go, knowing how to print from your Android phone is an essential skill.

This guide will provide you with step-by-step instructions on how to print from your Android phone using various methods, including using a wireless printer, a USB cable, and cloud printing services. You’ll also learn how to troubleshoot common printing issues and optimize your printing experience.

Prerequisites for Printing from Your Android Phone

Before you begin, ensure that you have the following prerequisites:

  • An Android phone or tablet running Android 4.4 or later
  • A compatible printer that is turned on and connected to the same Wi-Fi network as your phone (if using a wireless printer)
  • A USB cable (if using a USB-connected printer)
  • A cloud printing service account (if using cloud printing)

Printing Using a Wireless Printer

Wireless printing is the most common and convenient method for printing from an Android phone. Follow these steps to print using a wireless printer:

  • Verify Printer Compatibility: Check if your printer is compatible with mobile printing. Most modern printers support wireless printing, but it’s always a good idea to double-check. Consult your printer’s manual or manufacturer’s website for compatibility information.
  • Connect Printer to Wi-Fi: Ensure your printer is properly connected to your home or office Wi-Fi network. Refer to your printer’s manual for instructions on connecting it to Wi-Fi.
  • Add Printer to Your Android Phone: On your Android phone, open the Settings app. Navigate to the “Connected devices” or “Printing” section. Tap on “Add printer” or “Add service.” Your phone will search for nearby compatible printers.
  • Select Your Printer: Once your printer is detected, select it from the list of available printers. If your printer requires a password, enter it when prompted.
  • Test Connection: To test the connection, tap the “Print test page” button. If the test page prints successfully, your printer is ready to use.
  • Open Document or File: Open the document, email, web page, or other file you want to print.
  • Initiate Print Function: Tap the “Share” or “Options” button (usually represented by three dots or lines). Select the “Print” option from the menu.
  • Choose Print Destination: Select your wireless printer from the list of available printers.
  • Customize Print Settings (Optional): You can adjust various print settings, such as paper size, page orientation, and number of copies.
  • Start Printing: Once you’ve customized the print settings, tap the “Print” button to start the printing process.

Printing Using a USB Cable

If you don’t have a wireless printer or prefer a wired connection, you can use a USB cable to print from your Android phone. Follow these steps:

  • Connect Printer to USB Cable: Connect the USB cable to the USB port on your printer and the USB port on your Android phone.
  • Verify USB Connection: Your phone should automatically recognize the connected printer. If it doesn’t, try restarting your phone or using a different USB cable.
  • Open Document or File: Open the document, email, web page, or other file you want to print.
  • Initiate Print Function: Tap the “Share” or “Options” button (usually represented by three dots or lines). Select the “Print” option from the menu.
  • Choose Print Destination: Select your USB-connected printer from the list of available printers.
  • Customize Print Settings (Optional): You can adjust various print settings, such as paper size, page orientation, and number of copies.
  • Start Printing: Once you’ve customized the print settings, tap the “Print” button to start the printing process.

Printing Using Cloud Printing Services

Cloud printing services allow you to print documents from anywhere using the internet. Popular cloud printing services include Google Cloud Print, HP Print for Chrome, and Mopria Print Service.

To use cloud printing services, you’ll need to create an account with the chosen service and register your printer with the service. Once registered, you can print documents from your Android phone using the cloud printing service’s app or web interface.

Troubleshooting Common Printing Issues

If you encounter printing issues, try these troubleshooting steps:

  • Check Printer Connection: Ensure your printer is properly connected to the Wi-Fi network or USB cable.
  • Verify Printer Status: Check if the printer has any ink or paper jams. Clear any jams and replace ink cartridges if necessary.
  • Update Printer Drivers: Ensure your printer’s drivers are up to date. Consult your printer’s manufacturer’s website for the latest driver updates.
  • Restart Printer and Android Phone: Sometimes, a simple restart can resolve printing problems. Restart both your printer and Android phone.
  • Check File Compatibility: Some file formats may not be directly compatible with your printer. Try converting the file to a more compatible format, such as PDF.
  • Use a Different Printing Method: If one printing method isn’t working, try a different method, such as using a USB cable or cloud printing service.

Optimizing Your Printing Experience

Here are some tips to optimize your printing experience from your Android phone:

  • Choose the Right Print Quality: Adjust the print quality settings to match your needs. Higher quality settings will produce sharper images but use more ink.
  • Print in Black and White When Possible: Printing in black and white can save ink and produce faster print times.
  • Preview Before Printing: Preview the document before printing to ensure it is formatted correctly and to avoid wasting paper.
  • Consider Using a Mobile Printing App: There are various mobile printing apps available that can enhance your printing experience. These apps may offer additional features, such as cloud printing integration, advanced print settings, and job management.

Summary

Printing from your Android phone is a convenient and versatile way to get hard copies of your digital documents. By following the instructions in this guide, you can easily print from your Android phone using various methods, including wireless printing, USB-connected printing, and cloud printing services. Remember to troubleshoot any printing issues promptly and optimize your printing experience for efficiency and cost-effectiveness.

Image Credit: Daniel Romero

Filed Under: Guides


Latest timeswonderful Deals

Disclosure: Some of our articles include affiliate links. If you buy something through one of these links, timeswonderful may earn an affiliate commission. Learn about our Disclosure Policy.

Categories
News

How to back up and restore your Android Phone

back up and restore your Android Phone

This guide is designed to show you how to back up and restore your Android Phone, we cover everything you need to know. Regularly backing up the data on your Android phone is a critical practice for any smartphone user. This process safeguards your essential information, such as contacts, messages, photos, and app data, against various unforeseen circumstances like loss, theft, or physical damage to your device.

In the event of such incidents, having a backup means you have a safety net, allowing you to restore your phone to its former condition without significant loss. The restoration process is designed to be smooth and efficient, ensuring that all your applications, personal data, and customized settings are reinstated exactly as they were. This not only provides peace of mind but also minimizes the disruption to your digital life, allowing you to resume your activities with minimal delay.

Why Backup Your Android Phone?

There are many reasons why you should back up your Android phone regularly. Here are just a few:

  • To protect against loss or theft: If your phone is lost or stolen, you will be able to restore your data to a new device.
  • To prevent damage from malfunction: If your phone’s hardware or software malfunctions, you can restore your data from a backup and avoid losing everything.
  • To make switching devices easier: When you switch to a new Android phone, you can easily restore your data from a backup.
  • To experiment with new ROMs: If you want to try out a new ROM (custom firmware) on your phone, you can back up your data first in case you need to revert to your previous ROM.

How to Backup Your Android Phone

There are two main ways to back up your Android phone:

Using Google One

Google One is a cloud storage service that includes a built-in backup feature for Android phones. To back up your phone using Google One, follow these steps:

  • Open the Settings app on your phone.
  • Tap Google.
  • Tap Backup.
  • Make sure that Back up by Google One is turned on.
  • Tap Back up now.

Your phone will now back up your data to Google One. The backup will include your apps, data, settings, photos, and videos.

Using a third-party backup app

There are many third-party backup apps available for Android phones. Some popular options include:

  • Helium
  • Titanium Backup
  • G Cloud

These apps typically allow you to back up more data than Google One, including SMS messages, call logs, and app data.

How to Restore Your Android Phone

To restore your Android phone from a backup, follow these steps:

  • Turn on your phone and go through the setup process.
  • When you are prompted to restore your data, select the backup that you want to restore.
  • If you are restoring from a Google One backup, sign in to your Google account.
  • Select the data that you want to restore and tap Restore.

Your phone will now restore your data from the backup. The restoration process may take some time, depending on the size of your backup.

Tips for Backing Up Your Android Phone

Here are a few tips for backing up your Android phone:

  • Back up your phone regularly. A good rule of thumb is to back up your phone once a week.
  • Store your backups in multiple locations. If you are using a cloud storage service, be sure to back up your data to your computer as well.
  • Encrypt your backups. This will protect your data from unauthorized access.
  • Test your backups. Make sure that you can restore your data from your backups before you need to.

Conclusion

The process of backing up your Android phone serves as a crucial measure in safeguarding your personal data. This article provides a comprehensive guide, detailing each step to efficiently back up and restore your phone. By adhering to these instructions, you can create a reliable safety net for your data. This ensures that in any scenario—be it accidental deletion, hardware failure, or other unforeseen events—your information remains secure and retrievable.

The backup process captures everything from your contacts and messages to your apps and personal settings. When you restore your phone from this backup, it’s akin to turning back time on your device, and reinstating all your data as if it were never lost. This peace of mind, knowing your data is always safeguarded, is invaluable in our increasingly digital world. We hope that you find this guide on how to backup and restore your Android Phone helpful, if you have any tips, questions or comments, please leave a comment below and let us know.

Here are some more Android guides you may find useful:

Filed Under: Android News, Guides


Latest timeswonderful Deals

Disclosure: Some of our articles include affiliate links. If you buy something through one of these links, timeswonderful may earn an affiliate commission. Learn about our Disclosure Policy.
Categories
News

How to use a USB Drive with your Android Phone

How to use USB drive  Android Phone

This guide will show you how to use a USB drive with your Android Phone. In today’s technology-driven world, data storage remains a crucial aspect of everyday life. While cloud storage has gained significant popularity, USB drives continue to hold their place as a reliable and portable means of data transfer and backup. Fortunately, Android phones have embraced this technology, allowing seamless integration with USB drives for convenient file management.

Understanding the Need for USB Drives on Android Phones

Android phones, with their ever-increasing storage capacities, have become the go-to devices for storing photos, videos, documents, and other digital assets. However, even the most spacious smartphones can eventually reach their limits, prompting the need for external storage solutions. USB drives, with their compact size and ample storage capacities, provide an ideal solution for expanding Android phone storage.

Prerequisites for Using USB Drives with Android Phones

Before embarking on the journey of utilizing USB drives with Android phones, it’s essential to ensure you have the necessary equipment and compatibility.

USB OTG Adapters: Bridging the Connection Gap

Most Android phones utilize the Micro-USB or USB-C ports for charging and data transfer. However, these ports are not designed to directly connect to USB drives. To bridge this connection gap, a USB On-The-Go (OTG) adapter is required. These adapters have a standard USB female port on one end and a Micro-USB or USB-C male connector on the other end, allowing you to plug in your USB drive seamlessly.

USB Drive Compatibility: Ensuring Smooth Integration

Not all USB drives are compatible with Android phones. To ensure seamless integration, it’s recommended to use USB drives formatted in FAT32 or exFAT file systems. These file systems are widely recognized by Android devices and provide compatibility across various platforms.
Connecting and Using USB Drives with Android Phones

Once you have the necessary equipment and compatibility checked, you’re ready to connect and utilize your USB drive with your Android phone. The process is straightforward and user-friendly.

Connecting the USB Drive

  1. Plug the USB OTG adapter into the charging port of your Android phone.
  2. Connect the USB drive to the USB female port of the OTG adapter.
  3. Your Android phone should automatically detect the connected USB drive.

Accessing and Managing Files on the USB Drive

  1. Open a file manager app on your Android phone. The default file manager should work seamlessly.
  2. Locate the USB drive entry within the file manager. It might appear under “Storage” or “External Storage.
  3. Browse through the contents of the USB drive, just like you would on a computer.
  4. You can copy, move, delete, and rename files on the USB drive using the file manager’s standard functionalities.

Ejecting the USB Drive Safely

To ensure data integrity and prevent potential corruption, it’s crucial to eject the USB drive safely before disconnecting it from your Android phone.

  1. Open the notification panel on your Android phone.
  2. Locate the notification related to the connected USB drive. It might appear as “USB storage is connected” or “USB drive connected.”
  3. Tap on the notification and select “Eject USB storage” or “Eject USB drive.”
  4. Once the ejection process is complete, you can safely disconnect the USB drive from your Android phone.

Advanced Applications of USB Drives with Android Phones

Beyond basic file transfer and storage, USB drives can be utilized for various advanced applications on Android phones.

Expanding App Storage

Many Android apps allow you to store additional data or move existing app data to an external storage device, such as a USB drive. This can be particularly beneficial for apps that consume significant internal storage.

Data Backup and Recovery

USB drives provide a convenient and reliable means of backing up important data from your Android phone. Regularly backing up your data ensures you have a secure copy in case of device loss, damage, or accidental deletion.

Summary

USB drives remain an invaluable tool for Android phone users, offering convenient data transfer, storage expansion, and backup capabilities. With their compact size, ample storage capacities, and ease of use, USB drives seamlessly integrate with Android phones, providing a versatile solution for managing your digital assets. We hope that you find this guide on how to use a USB drive with your Android Phone helpful, if you have any comments, questions, or suggestions, please let us know in the comment section below.

Image Credit: Ian Edokov

Filed Under: Android News, Guides


Latest timeswonderful Deals

Disclosure: Some of our articles include affiliate links. If you buy something through one of these links, timeswonderful may earn an affiliate commission. Learn about our Disclosure Policy.
Categories
News

How to record Audio on your Android Phone

record audio android

This guide is designed to show you how to record audio on your Android Phone. In today’s fast-paced world, the ability to capture audio on the go has become increasingly valuable. Whether you’re a student recording lectures, a musician capturing ideas, or a journalist interviewing sources, your Android phone offers a convenient and versatile tool for audio recording. This comprehensive guide delves into the intricacies of audio recording on Android, equipping you with the knowledge and techniques to produce high-quality recordings.

Unlocking the Built-in Voice Recorder

Most Android devices come pre-installed with a voice recorder app, providing a straightforward solution for capturing audio. To locate the app, simply swipe down from the top of your screen to access the notification panel and search for “Voice Recorder” or “Sound Recorder.” Once launched, the app presents a user-friendly interface with prominent record, pause, and stop buttons.

Initiating Recording and Navigating Controls

To begin recording, tap the large red record button. The app will immediately start capturing audio, and a waveform will appear on the screen, visualizing the sound being recorded. You can pause the recording at any point by tapping the pause button, and resume recording by tapping it again. Once you’re satisfied with your recording, tap the stop button to finalize it.

Saving and Managing Recordings

Upon stopping the recording, the app prompts you to save it. You can then assign a name to the recording and choose the desired storage location. Saved recordings are neatly organized within the app, allowing you to easily access and play them back.

Enhancing Audio Quality for Professional Results

While the built-in voice recorder is sufficient for basic tasks, aspiring audiophiles may seek to elevate their recordings to a professional level. Here are some tips to enhance audio quality:

  • Position and Distance: Position your phone close to the sound source to minimize background noise. Maintain a moderate distance to prevent clipping or distortion.
  • Microphone Placement: Point the phone’s microphone directly towards the sound source for optimal capture. For stereo recording, consider using an external microphone.
  • Environment Control: Choose a quiet recording environment to minimize background noise. Consider using noise-canceling headphones or an external microphone with noise-reduction capabilities.
  • File Format Selection: Opt for lossless file formats like WAV or FLAC to preserve audio quality. These formats retain all the original audio data, ensuring no loss of detail.
  • Editing and Enhancement: Utilize audio editing software to remove unwanted noise, adjust volume levels, and apply filters to enhance the overall sound quality.

Exploring Third-party Audio Recording Apps

The Google Play Store offers a plethora of third-party audio recording apps, each with its unique features and capabilities. Some popular options include:

  • Easy Voice Recorder: A user-friendly app with noise reduction, echo suppression, and widget support.
  • Dolby On: A powerful app with advanced audio processing features, including noise reduction, equalization, and stereo recording.
  • RecForge II: A versatile app with support for various file formats, including MP3, AAC, and WAV.
  • Voice Record Pro: A feature-rich app with options for trimming, adding markers, and transcribing recordings.
  • Audio Evolution Mobile Studio: A professional-grade recording app with support for multi-track recording, MIDI compatibility, and virtual instruments.

Summary

Recording audio on your Android phone offers a convenient and versatile way to capture sounds and ideas on the go. Whether you’re a casual user or an aspiring audiophile, the built-in voice recorder and third-party apps provide ample options to suit your needs. By following the tips and recommendations outlined in this guide, you can elevate your recordings to a professional level, ensuring your audio captures are clear, crisp, and ready to share with the world.

Image Credit: Shiwa ID

Filed Under: Android News, Guides


Latest timeswonderful Deals

Disclosure: Some of our articles include affiliate links. If you buy something through one of these links, timeswonderful may earn an affiliate commission. Learn about our Disclosure Policy.
Categories
News

Lume Cube Ring Light Pro wireless phone lighting system

Lume Cube Ring Light Pro wireless lighting system on a tripod being held by a person

Streamers and vloggers who use their phones to create videos might be interested in a new wireless lighting system, the Lume Cube Ring Light Pro. The professional ring light is now available in white. It has been specifically designed to provide an easy-to-use phone ring light, blending advanced technology with user-friendly features for superior lighting in a variety of environments.

Lume Cube Ring Light Pro in use

The Lume Cube Ring Light Pro features Edge-Lit Technology, wireless remote controls, an adjustable stand, and USB charging ports, making it a versatile tool for your video recording needs. Edge-Lit LED technology ensures balanced and diffused lighting, evenly spreading the light source across the filming area. This is particularly beneficial for long-term workspace lighting, where maintaining consistent and comfortable illumination is crucial.

The phone ring light comes with a built-in lithium-ion battery, a rechargeable power source for cordless operation. This greatly enhances the portability of the ring light, making it a perfect choice for professionals who need a reliable lighting solution on the go. The Lume Cube Ring Light Pro also includes wireless remote controls, giving users the ability to adjust the light settings without physically interacting with the phone ring light. This adds a significant level of convenience, especially when the phone ring light is positioned at a distance or in hard-to-reach areas, allowing for easy control over the lighting conditions.

Lume wireless phone ring light

The Lume Cube Ring Light Pro’s adjustable stand is another key feature. The stand can be adjusted from 18” to 70”, offering flexibility in positioning the light source according to the user’s needs. This is further enhanced by a 360º rotating phone mount and a built-in camera mount, which provide versatile options for placement. The Lume Cube Ring Light Pro also offers customizable color temperatures, ranging from a cool blue to a warm amber. Combined with adjustable brightness controls, users can tailor the lighting conditions to their specific needs, ensuring optimal lighting for every situation.

wireless lighting system for streaming

The phone ring light also includes USB and USB-A charging ports, allowing users to charge their devices directly from the ring light. This is particularly useful in workspace settings, where multiple devices may need to be charged at the same time, adding to the phone ring light’s practicality.

The latest Lume phone ring light is lightweight and portable, an ideal choice for professionals on the move. It comes with a collapsible light stand and a travel case, further enhancing its portability and ease of transport. The Cube Ring Light Pro is a versatile, user-friendly, and technologically advanced lighting solution. Its range of features, including Edge-Lit LED technology, remote controls, an adjustable stand, and USB charging ports, make it a valuable tool for a variety of lighting needs. Whether for long-term workspace use or on-the-go professional needs, the Lume Cube Ring Light Pro delivers powerful, safe, and comfortable lighting, making it a reliable choice for all your lighting needs.

Filed Under: Camera News, Top News


Latest timeswonderful Deals

Disclosure: Some of our articles include affiliate links. If you buy something through one of these links, timeswonderful may earn an affiliate commission. Learn about our Disclosure Policy.
Categories
News

Illuminate your calls with the LumiCard phone light

Illuminate your calls wherever you are with the LumiCard phone light

The Lumicard is a new phone light that takes its power wirelessly from your phone. The compact size, similar to a credit card, enable it to easily fit into a wallet or pocket, making it an ultra-portable light source for any situation. Its unique feature of drawing power wirelessly from mobile devices eliminates the need for cables or external power sources, making Lumicard a trailblazer in the field of portable lighting solutions.

The Lumicard is not just about convenience; it’s about delivering exceptional quality. With a power output of 5W, it provides superior color accuracy, significantly enhancing the quality of your photos and videos. This high-quality lighting can transform your ordinary smartphone into a professional-grade camera, enabling you to capture stunning images and videos, even in low-light conditions. The Lumicard is your pocket-sized solution to achieving cinema-quality lighting, anytime, anywhere.

Time-limited early bird pledges are now available for the originative project from roughly $46 or £39 (depending on current exchange rates), offering a considerable discount of approximately 33% off the average retail price, while the Kickstarter crowd funding is under way.

LumiCard phone light

The Lumicard’s design incorporates a magnetic attachment feature, allowing it to easily attach to magnetic phone cases. This feature, combined with its support for wireless charging, offers a truly cable-free experience. You can simply attach the Lumicard to your phone and let it charge wirelessly, freeing you from the hassle of tangled cables and bulky chargers. This seamless integration of design and functionality makes the Lumicard a user-friendly lighting solution.

LumiCard phone light in use

While the Lumicard is an excellent tool for enhancing your smartphone photography, its uses extend far beyond that. It can light up hard-to-see places, acting as a powerful utility light. Whether you’re looking for something under the bed, working on a project in a dimly lit area, or simply need a light in a power outage, the Lumicard is a versatile lighting solution that you can always have at your fingertips. Its versatility makes it a handy tool for a wide range of situations.

One of the most innovative features of the Lumicard is its ability to harness the power share feature of Android devices. This means that the Lumicard can draw energy directly from your Android device, turning it into a portable power source. This feature not only makes the Lumicard incredibly convenient to use but also reduces the need for additional charging equipment. This innovative use of power share technology sets the Lumicard apart from other portable lighting devices.

If the LumiCard campaign successfully raises its required pledge goal and production progresses smoothly, worldwide shipping is expected to take place sometime around April 2024. To learn more about the LumiCard phone light project look at the promotional video below.

The Lumicard uses USB-C for connectivity, ensuring swift and seamless data transfer. This makes it an ideal choice for on-the-move lighting solutions, allowing you to quickly and easily adjust the lighting settings to suit your needs. The Lumicard’s use of USB-C connectivity ensures that you can adjust your lighting settings swiftly and seamlessly, making it a reliable companion for your on-the-go lighting needs.

The Lumicard is designed to be compatible with a wide range of devices and cases. It works with the new iPhone 15 and for Android users without built-in MagSafe, a magnetic phone case or the included MagSafe sticker can be used for attachment. Peak Design and Moment Cases are recommended for optimal compatibility and style, ensuring that the Lumicard not only enhances your smartphone’s functionality but also its aesthetic appeal. The Lumicard’s broad compatibility ensures that it can be used with a wide range of devices, making it a convenient and stylish addition to your tech accessories.

The Lumicard is a revolutionary mobile lighting device that combines ultra-portability, high-quality lighting, wireless magnetic attachment, versatility, power share technology, USB-C connectivity, and broad compatibility. It is designed to simplify everyday lighting needs and enhance smartphone usage, making it a must-have accessory for anyone who values convenience, quality, and style. The Lumicard is more than just a lighting device; it’s a game-changer in mobile lighting solutions.

For a complete list of all available project pledges, stretch goals, extra media and technical data sheet for the phone light, jump over to the official LumiCard crowd funding campaign page by proceeding to the link below.

Source : Kickstarter

Disclaimer: Participating in Kickstarter campaigns involves inherent risks. While many projects successfully meet their goals, others may fail to deliver due to numerous challenges. Always conduct thorough research and exercise caution when pledging your hard-earned money.

Filed Under: Gadgets News, Top News


Latest timeswonderful Deals

Disclosure: Some of our articles include affiliate links. If you buy something through one of these links, timeswonderful may earn an affiliate commission. Learn about our Disclosure Policy.
Categories
News

How to sideload apps on your Android Phone

sideload apps android

In the realm of Android applications, sideloading refers to the process of installing apps from sources other than the official Google Play Store. While the Play Store remains the primary hub for Android app distribution, sideloading offers several advantages, including access to apps that may not be available on the Play Store, the ability to test unreleased apps, and the freedom to install apps from alternative sources.

However, it’s crucial to exercise caution when sideloading apps, as apps obtained from third-party sources may pose security risks. Before proceeding with sideloading, ensure you only download apps from trusted sources and thoroughly review the app’s permissions and potential security concerns.

Enabling Sideloading on Your Android Device

Before embarking on the sideloading journey, you must enable this feature on your Android device. The process for enabling sideloading may vary slightly depending on your device’s Android version. Here’s a general guide for Android 8 Oreo and newer:

  • Open the Settings app on your Android device.
  • Navigate to Apps & notifications.
  • Expand the Advanced section at the bottom of the menu.
  • Tap on Special app access.
  • Scroll down and select Install unknown apps.
  • A list of apps that can install other apps will appear. Choose the app you want to enable sideloading for, such as your web browser or file manager.
  • Toggle the switch next to Allow from this source to enable sideloading.

Locating and Downloading APK Files

The primary format for sideloading Android apps is the APK (Android Package) file. These files contain all the necessary components to install and run an app on your Android device. To sideload an app, you’ll need to locate and download the corresponding APK file.

  • Trusted Sources: The most reliable sources for APK files are reputable app developers‘ websites or trusted third-party app repositories like APKMirror or APKPure.
  • APK Downloading: Once you’ve found the APK file you want, initiate the download process. Be mindful of the app’s permissions and potential security risks before proceeding.

Sideloading the APK File

  • With the APK file downloaded, you’re ready to sideload the app onto your device. Follow these steps:
  • Locate the APK File: Open the file manager app on your device and navigate to the location where you downloaded the APK file.
  • Initiate Installation: Tap on the APK file to initiate the installation process.
  • Review Permissions: A pop-up window will appear, outlining the permissions requested by the app. Carefully review these permissions to ensure you understand the app’s access level to your device’s data and functionality.
  • Confirm Installation: If you’re satisfied with the permissions, tap the Install button to proceed with the installation.
  • Installation Completion: Once the installation is complete, you’ll receive a notification. You can then launch the app from your app drawer or home screen.

Additional Considerations for Sideloading

  • Security and Privacy: Sideloading apps from untrusted sources poses security and privacy risks. Only sideload apps from reputable sources and thoroughly review their permissions before installing.
  • App Version Compatibility: Ensure you’re downloading the APK file compatible with your device’s Android version. Installing incompatible versions may lead to app malfunctions or device instability.
  • App Updates: Manually sideloaded apps may not receive automatic updates through the Google Play Store. You may need to manually check for and install updates from the developer’s website or alternative app repositories.
  • Troubleshooting: If you encounter issues during or after sideloading an app, try restarting your device or clearing the app’s cache and data. If problems persist, check for updated APK versions or contact the app developer for support.

Conclusion

Sideloading apps on Android offers flexibility and access to apps not available on the Play Store. However, it’s crucial to exercise caution and only sideload apps from trusted sources. By following the guidelines provided, you can safely sideload apps and enjoy the benefits of app exploration and experimentation.

Image Credit: Árpád Czapp

Filed Under: Android News, Guides


Latest timeswonderful Deals

Disclosure: Some of our articles include affiliate links. If you buy something through one of these links, timeswonderful may earn an affiliate commission. Learn about our Disclosure Policy.
Categories
News

How to clear the cache on your Android Phone or Tablet

clear cache Android

This guide is designed to show you how to clear the cache on your Android Phone or tablet. The process of regular use of your Android phone or tablet involves the gradual collection of small bits of data that are stored temporarily. This data, commonly referred to as the cache, serves a useful purpose initially by helping your device to load apps and websites more quickly. However, as time goes on, the cache can become bloated and start to have a counterproductive effect. It not only occupies precious storage space that could be used for other data or applications, but it can also lead to decreased performance of your device. As the cache grows, it can cause apps to load more slowly and may even lead to unexpected crashes or glitches.

To maintain your device’s efficiency and ensure a smooth user experience, it’s advisable to clear the cache periodically. Doing so will remove these temporary files that are no longer needed, thus freeing up storage space and potentially resolving any app-related issues that might have arisen due to outdated cache data. This simple maintenance task is a key step in optimizing the performance of your Android device and can contribute significantly to its longevity and reliability.

What is Cache?

Cache is a type of temporary storage that applications and websites use to store frequently accessed data, such as images, videos, and website pages. This cached data allows for faster loading times and a smoother user experience when you revisit the same content.

Why Clear Cache?

While cache can improve performance, it can also accumulate over time, leading to several issues:

  • Reduced Storage Space: Cache can consume a significant amount of storage space, especially for apps that heavily use multimedia content.
  • Performance Issues: Excess cache can slow down your device’s performance, causing apps to load slowly or crash unexpectedly.
  • App-Related Issues: In some cases, corrupted or outdated cache data can lead to app malfunctions or abnormal behavior.

How to Clear Cache on Android Devices

There are two primary methods for clearing cache on Android devices: clearing individual app caches and clearing all app caches simultaneously.

Clearing Individual App Caches

  • Open Settings: Access the Settings app on your Android device.
  • Navigate to Apps: Locate and select the “Apps” or “Applications” section.
  • Choose an App: Find the app for which you want to clear the cache and tap on it.
  • Access Storage Settings: Tap on “Storage” or “Storage & cache” to access the app’s storage settings.
  • Clear Cache: Locate the “Clear Cache” option and tap on it to remove the app’s cached data.

Clearing All App Caches Simultaneously

  • Open Settings: Access the Settings app on your Android device.
  • Navigate to Storage: Locate and select the “Storage” or “Device storage” section.
  • Manage Storage: Look for the “Free up space” or “Manage storage” option.
  • Review Storage Usage: Analyze the storage usage breakdown to identify apps consuming significant space.
  • Clear App Caches: Tap on “Cached data” or “Temporary files” to view the list of apps with cached data.
  • Select Apps: Choose the apps for which you want to clear the cache.
  • Clear Selected Caches: Tap on the “Free up” or “Clear” button to remove the selected app caches.

Clearing Cache in Web Browsers

In addition to clearing app caches, you should also regularly clear the cache of your web browsers. This can be done within the browser settings:

  • Chrome: Open Chrome, tap the three-dot menu, select “History,” then “Clear browsing data.”
  • Firefox: Open Firefox, tap the three-dot menu, select “Settings,” then “Privacy & Security.” Under “Clear Browsing Data,” choose the desired time range and check the boxes for “Cookies and Site Data” and “Cached Images and Files.”
  • Samsung Internet: Open Samsung Internet, tap the three-dot menu, select “Settings,” then “Privacy and security.” Under “Browsing data,” tap “Delete browsing data” and choose the desired time range and data types to clear.

Additional Tips

  • Clear Cache Regularly: It’s recommended to clear the cache of frequently used apps periodically to maintain optimal performance and storage space.
  • Monitor Cache Usage: Use storage management tools to track which apps are consuming the most cache data.
  • Utilize Third-party Apps: Consider using third-party cache cleaning apps for a more automated approach to cache management.

Summary

The act of clearing the cache from your Android device might seem like a minor and straightforward task, yet its impact on the device’s functionality is anything but negligible. This process can help in enhancing the overall performance of your device. It is akin to spring cleaning for your digital companion; it removes the unnecessary clutter that can bog down your device’s operations, leading to a more responsive and faster performance. Additionally, the space that is freed up in the process can be quite significant, making room for more important data or new applications that you may wish to install.

Moreover, this clearing out of cached data can be a troubleshooting hero—it has the potential to iron out kinks and malfunctions within applications that are often traced back to corrupted or obsolete cache files. By purging these potential problem-makers, you might find that apps that were misbehaving or crashing unexpectedly begin to function smoothly again.

The steps are laid out in a clear and concise manner, enabling even those who may not be tech-savvy to confidently care for their device. By incorporating this practice into your regular device maintenance routine, you can maintain the peak health of your Android device, thereby ensuring an uninterrupted and enjoyable experience with your technology. We hope that you find this guide helpful and informative, if you have any comments, questions or tips, please let us know in the comments section below.

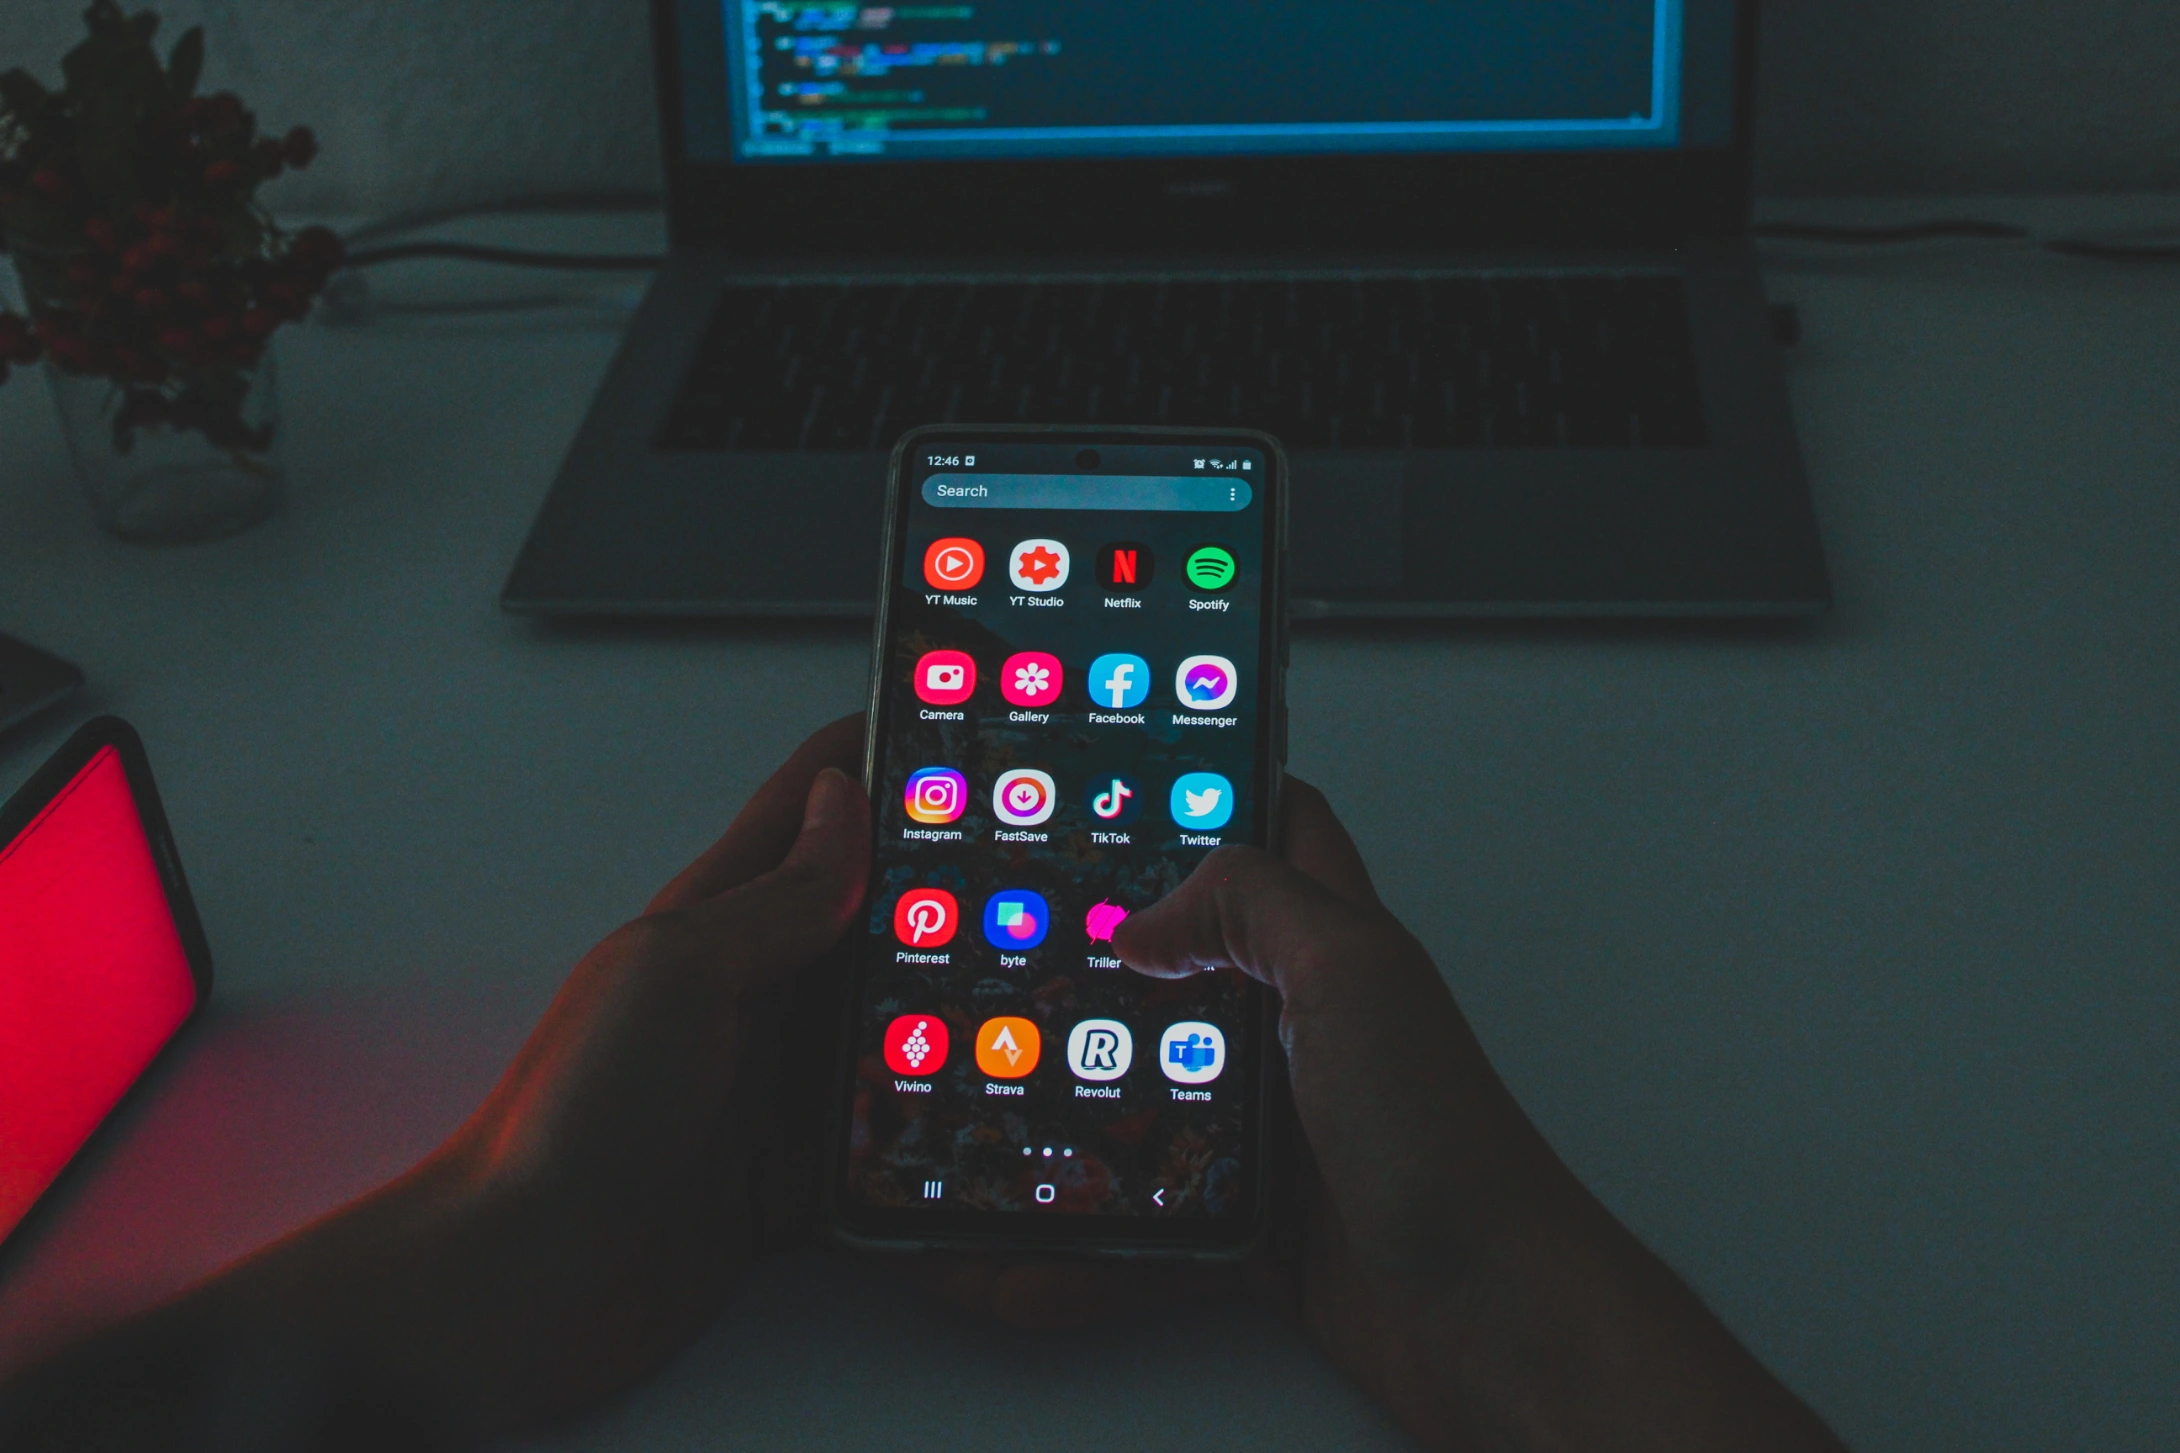
Image Credit: Daniel Romero

Filed Under: Android News, Guides


Latest timeswonderful Deals

Disclosure: Some of our articles include affiliate links. If you buy something through one of these links, timeswonderful may earn an affiliate commission. Learn about our Disclosure Policy.

Categories
News

DIVEROID transforms your phone into a dive computer and more

DIVEROID transforms your phone into a dive computer

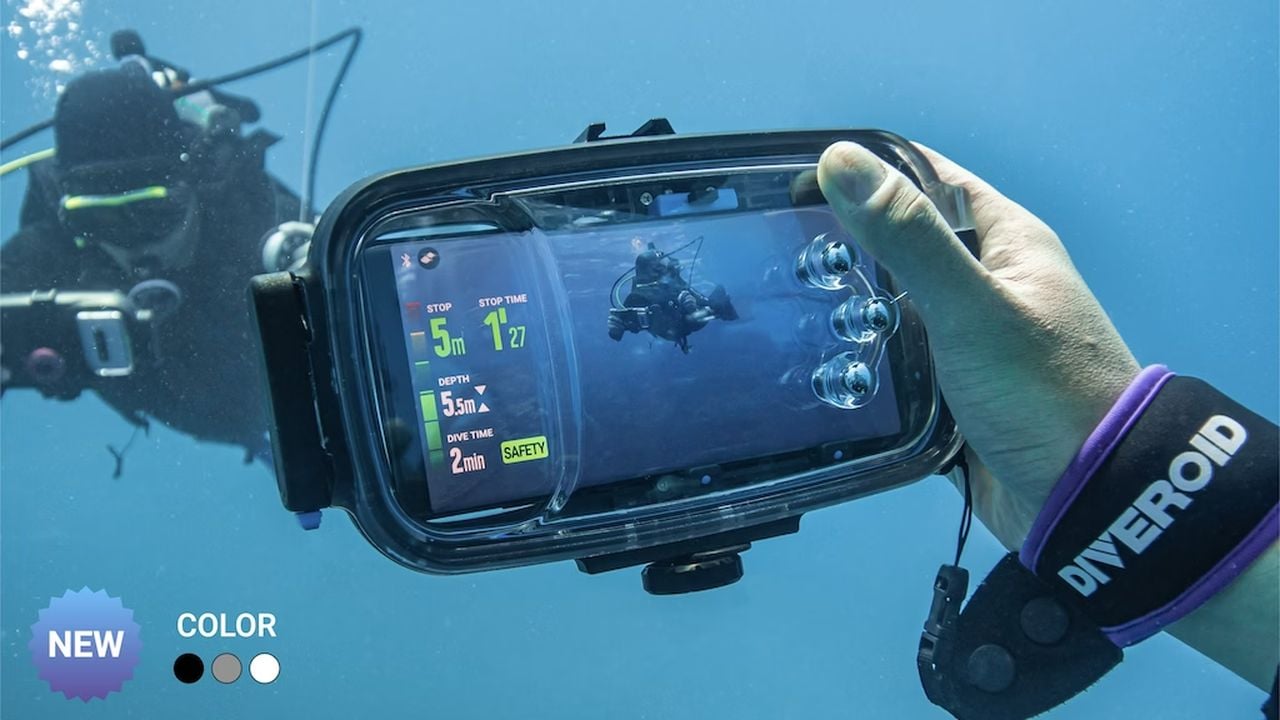
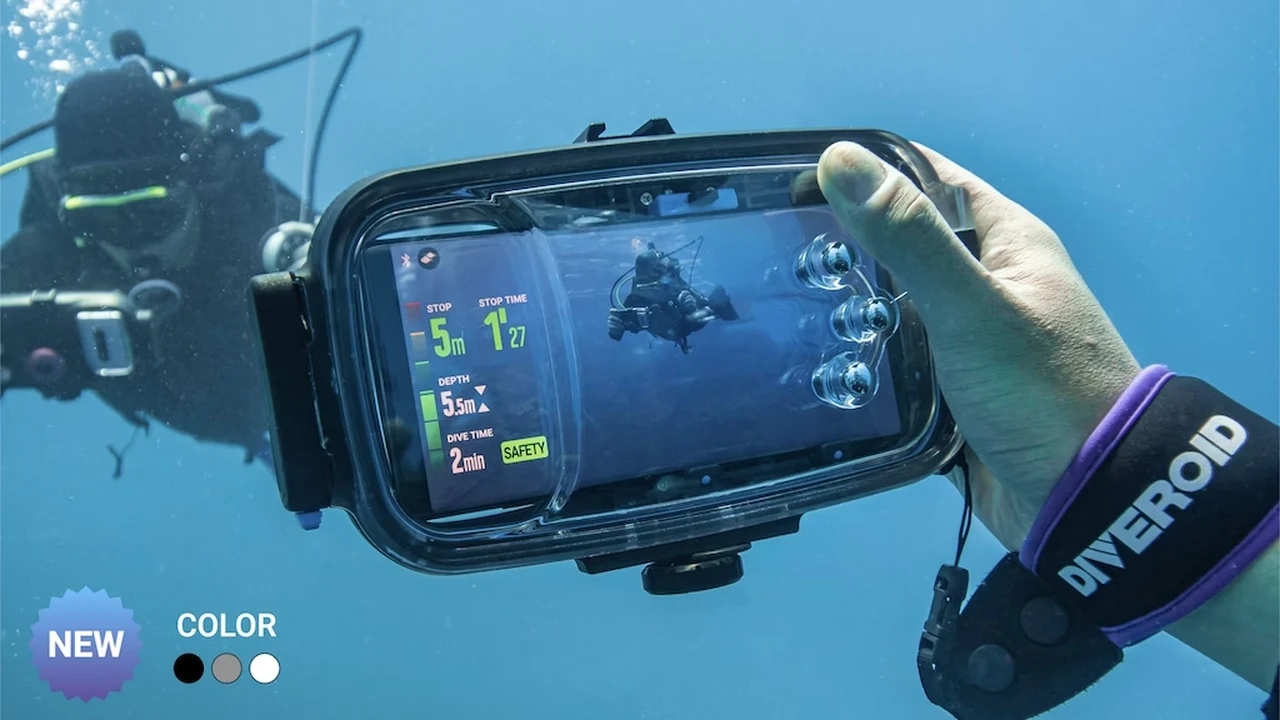
Divers looking for a safe way to take their smart phone under the waves might be interested in DIVEROID. A unique product that transforms your smartphone into a multifunctional dive computer, an underwater camera, and a synchronized photo logbook. This innovative diving accessory is designed to work with a broad range of popular smartphones, although it’s worth noting that it doesn’t support certain brands such as Huawei, Oppo, and Xiaomi.

dive computer features

The DIVEROID system cleverly combines a dive computer, a compass, and a logbook into one compact package. The device is carefully designed with a double O-ring structure, a key waterproofing technology that ensures 60M/200ft waterproof functionality. This impressive feature allows you to take your smartphone to depths previously thought impossible, opening up a new world of underwater exploration and documentation. Early bird opportunities are now available for the imaginative project from roughly $299 or £243 (depending on current exchange rates).

For freediving enthusiasts, DIVEROID provides a wealth of crucial information to ensure a safe and informed dive. This includes important data such as depth, dive time, water temperature, and surface time reach, all of which are essential for effective environmental monitoring. The system also supports a free diving mode with specialized features like a depth alarm and a stopwatch for static apnea. A unique boat calling function is also included, providing a critical communication feature for divers.

Transform your phone into a dive computer

The DIVEROID app displays all the necessary diving information in a bright, high-contrast format, ensuring it remains easy to read even in the most challenging underwater conditions. Safety is a top priority, and the app includes alerts for depth stop and ascending speed, effectively acting as a digital guardian during your dive.

The DIVEROID system also offers additional features such as a tilt compensated 3D compass, a basic navigation tool that ensures you always maintain your orientation underwater. The real-time diving profile feature provides live tracking of your dive, offering a comprehensive overview of your underwater journey.

Assuming that the DIVEROID funding campaign successfully raises its required pledge goal and production progresses smoothly, worldwide shipping is expected to take place sometime around December 2023. To learn more about the DIVEROID phone diving case and computer project check out the promotional video below.

One of the standout features of DIVEROID is its ability to capture high-quality photos and videos of your dive. This underwater imaging capability, combined with a real-time color correction function, allows you to document your dive with an unparalleled level of clarity and vibrancy. The app also meticulously records your entire dive and auto-syncs the photos and videos taken, creating a digital record of your underwater adventures.

Diving phone case

In conclusion, DIVEROID is a pioneering product that leverages mobile computing technology to transform your smartphone into a comprehensive dive monitoring system. With its wide range of features, from underwater imaging to digital record keeping, it offers a new level of convenience and functionality for divers. Whether you’re an experienced professional or a recreational diver, DIVEROID provides the tools you need to explore, document, and navigate the underwater world with confidence and ease. It is a testament to the power of technology and its ability to enhance our experiences and interactions with the natural world.

For a complete list of all available project pledges, stretch goals, extra media and key features for the phone diving case and computer, jump over to the official DIVEROID crowd funding campaign page by proceeding to the link below.

Source : Kickstarter

Disclaimer: Participating in Kickstarter campaigns involves inherent risks. While many projects successfully meet their goals, others may fail to deliver due to numerous challenges. Always conduct thorough research and exercise caution when pledging your hard-earned money.

Filed Under: Gadgets News, Top News


Latest timeswonderful Deals

Disclosure: Some of our articles include affiliate links. If you buy something through one of these links, timeswonderful may earn an affiliate commission. Learn about our Disclosure Policy.

Categories
News

Samsung Galaxy Z Flip5 Retro folding phone

Samsung Galaxy Z Flip5 Retro folding phone

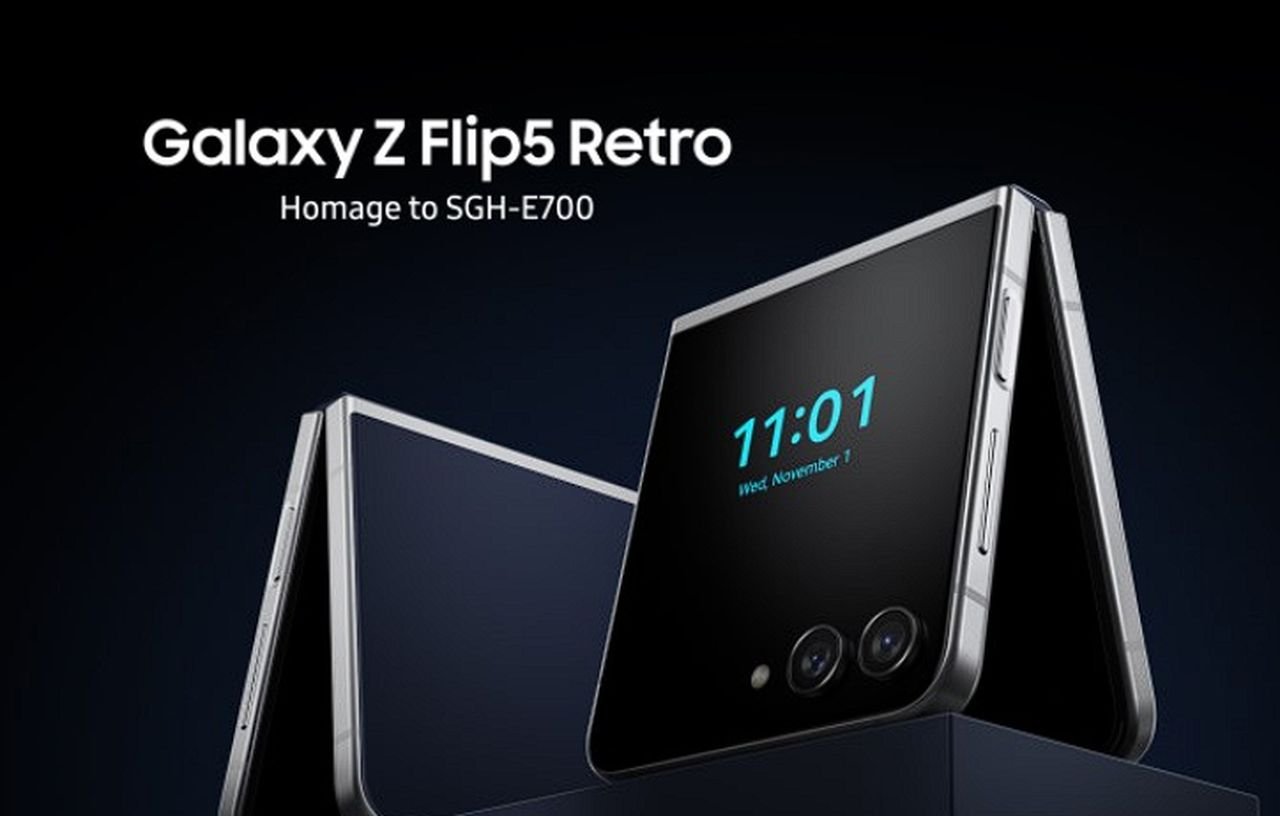
Samsung Electronics has taken a nostalgic trip down memory lane with the release of the Galaxy Z Flip5 Retro folding phone. The limited edition phone created as a tribute to the company’s innovative history, and more specifically to the SGH-E700 model from 2003, marking 20 years of technological advancements in mobile phone design from Samsung . The Galaxy Z Flip5 Retro is scheduled for release on November 1st 2023 in select countries, including Korea, the U.K., Germany, Spain, and Australia, with France following a day later on November 2nd 2023.

The Galaxy Z Flip5 Retro folding phone draws its inspiration from the SGH-E700, a landmark mobile phone that was Samsung’s first to feature a built-in antenna. The SGH-E700 was a breakthrough in mobile technology in 2003, setting the stage for a series of innovative mobile products that followed. These include the MP3 phone SPH-M2500, the watch phone SPH-WP10, the TV phone SCH-M220, and the camera phone SCH-V200.

Samsung Galaxy Z Flip5 Retro

Samsung Galaxy Z Flip5 Retro folding flip phone 2023

Other articles we have written which you may find of interest on Samsung products and folding phones :

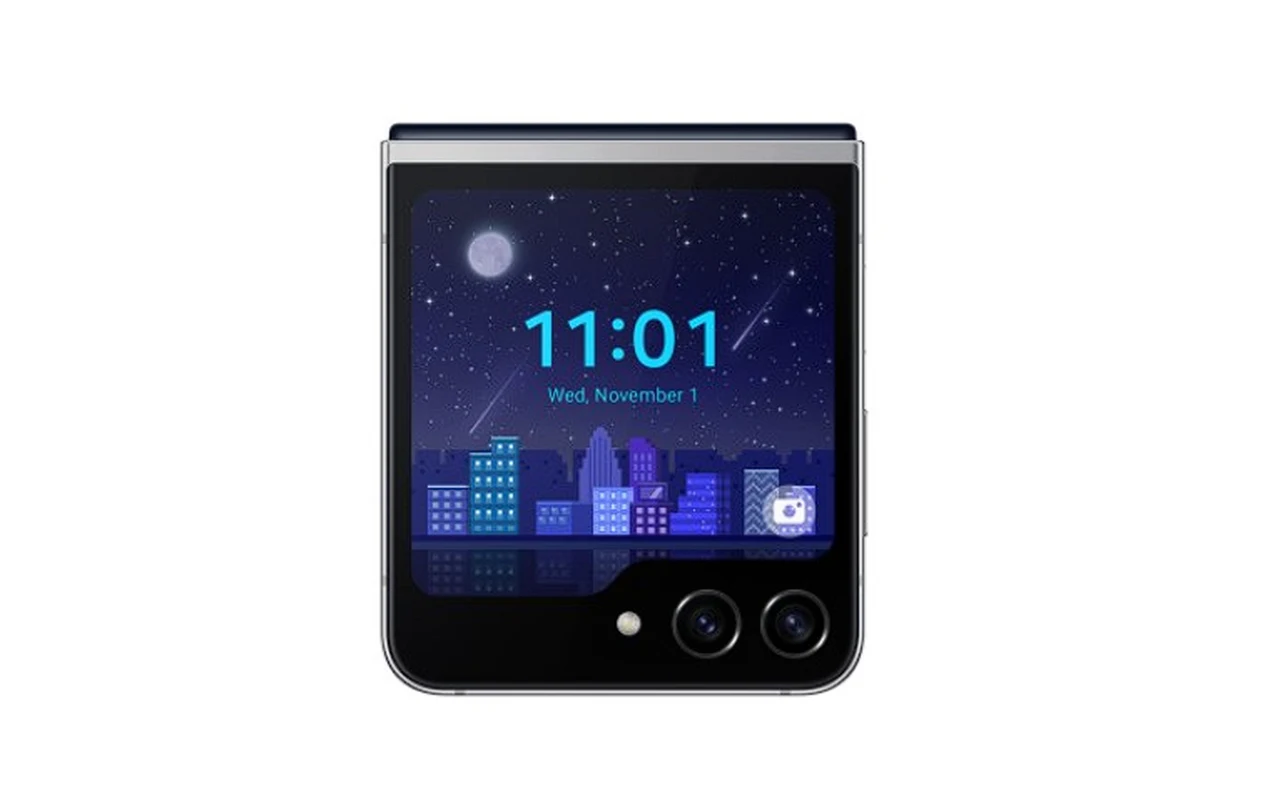
The Galaxy Z Flip5 Retro is not merely a nostalgic nod to the past but a fusion of vintage design aesthetics with modern technology. It incorporates various distinctive features of the SGH-E700, including the combination of indigo blue and silver colors, a UX design reinterpretation of 2000s pixel graphics, and an exclusive animation on the Flex Window. These design elements serve as a reminder of the iconic SGH-E700, while the advanced features of the Galaxy Z Flip5 Retro demonstrate Samsung’s commitment to continual innovation.

Samsung flip phone

In addition to its unique design and features, the Galaxy Z Flip5 Retro folding phone comes with a special package that enhances its collectible value. The package includes three Flipsuit cards featuring logos from different eras of Samsung’s history, a Flipsuit case, and a collector card engraved with a unique serial number. These additions not only add to the nostalgic appeal of the phone but also make it a valuable collector’s item for Samsung enthusiasts.

Samsung Galaxy Z Flip5 Retro limited-edition special packaging

However, the Galaxy Z Flip5 Retro folding phone will not be available to everyone. It will be released in limited quantities in Korea, the U.K., France, Germany, Spain, and Australia. This exclusivity further increases its collectible value and is likely to make it a sought-after item among technology enthusiasts and collectors alike. The release of the Galaxy Z Flip5 Retro is a celebration Samsung’s history of mobile phone design, blending the features and style of the SGH-E700 model with modern technology. Offering a unique product that pays homage to the past while looking towards the future.

Source : Samsung

Filed Under: Android News, Mobile Phone News, Top News


Latest timeswonderful Deals

Disclosure: Some of our articles include affiliate links. If you buy something through one of these links, timeswonderful may earn an affiliate commission. Learn about our Disclosure Policy.