Categories
News

How to use Stable Diffusion and ControlNet to customize AI images

How to use Stable Diffusion and ControlNet to customise AI artwork

AI artists searching for a way to more accurately control AI art creation in Stable Diffusion might be interested in learning how to use ControlNet. A Stable Diffusion model, that has transformed the way AI artists can generate and manipulate images. This model allows users to copy compositions or human poses from a reference image, providing a level of precision that was previously unattainable. This article will delve into the intricacies of using ControlNet, focusing on the image prompt adapter, and how it can be utilized to customize AI images.

ControlNet is a neural network model designed to control Stable Diffusion models. It adds an extra layer of conditioning to the text prompt, which is the most basic form of using SDXL models. This extra conditioning can take various forms, allowing users to manipulate AI-generated images with precision. The image prompt adapter in ControlNet is a powerful tool that can be used to create a person and a background around an AI-generated face, change the age, hair type and color of a person in a photo, or alter elements in digital art.

How to use customise AI art with SDXL and ControlNet

ControlNet and its image prompt adapter provide a powerful tool for manipulating and generating AI images. Whether you’re looking to change elements in digital art, regenerate AI images, or create a whole body and environment from a face image, ControlNet offers a level of precision and control that was previously unattainable. With the right knowledge and tools, the possibilities for image manipulation and generation are virtually limitless.

Other articles you may find of interest on the subject of  Stable Diffusion created by Stability AI :

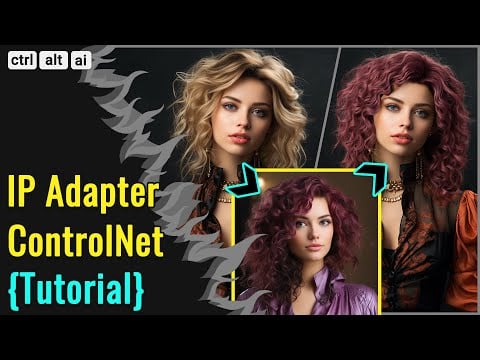
To use ControlNet, users need to download three IP adapter models from Hugging Face, as well as the IP adapter plus face model. The IP adapter model is an image prompt model for text-to-image-based diffusion models like stable diffusion and can be used in combination with other ControlNet models.

The workflow for using the IP adapter model involves regenerating a reference AI image in SDXL and adding elements to the final image using positive prompts. This process allows users to change elements in digital art using ControlNet. For instance, users can use inpainting to change the hair of a base AI image and inpaint the face from another base image. This technique provides a level of control over the subject’s body and face angle, allowing users to change the subject of an image without inpainting.

ControlNet models can also be used in combination with other models. For example, the Rev animated checkpoint can be used to take an AI-generated vector of a house and regenerate it as anime-style art. This technique can be used to manipulate art in various environments and weather conditions.

One of the most powerful features of ControlNet is the ability to create a whole body and environment from a face image. This is achieved by using the plus face model and a second ControlNet image using open pose. This feature provides users with more control over the subject’s body and face angle, allowing them to create more realistic and detailed images. To learn more about ControlNet on how to install it jump over to the Stability AI website.

Filed Under: Guides, Top News


Latest timeswonderful Deals

Disclosure: Some of our articles include affiliate links. If you buy something through one of these links, timeswonderful may earn an affiliate commission. Learn about our Disclosure Policy.

Categories
News

How to use Bing Chat and generate images using DallE 3

How to use Bing Chat


There are a  number of different AI tools available for conversation including ChatGPT, Perplexity, Claude 2.0, Llama 2  and more a few such as Bard and Microsoft’s Bing Chat  have the ability to search the web without any additional plugins. At its core, Microsoft is touting Bing Chat as a free-to-use personal assistant. It combines the computational prowess of OpenAI’s GPT-4 with Microsoft’s Prometheus technology.

“Project Prometheus is building faster, more efficient datacenter systems by co-designing distributed systems with new network primitives. Prometheus takes advantage of new programmable hardware to accelerate applications. We are working across the entire system stack, from applications and distributed algorithms to network design and device architecture.”

The result? A tool that doesn’t just answer your queries but offers complete, sourced, and reliable information. Bing Chat has been designed by Microsoft to provide users with a one-stop-shop for all your informational needs, whether you want to search, chat, or create content. This guide will provide more of an overview of Bing and its new AI features.

Bing Chat modes

Ease of access is one of Bing Chat’s standout features. It’s compatible with any operating system or browser, although using Microsoft Edge will allow for more extended conversations. Whether you are browsing on your phone or your Windows 11 taskbar, Bing Chat is just a click away.

Bing Chat brings versatility to the table with its three distinct conversation styles: creative, balanced, and precise. Depending on your needs, you can toggle between these modes. Creative mode helps you brainstorm ideas, balanced is perfect for everyday chatter, and precise is your go-to for specific queries. The system can handle up to 30 questions in a single conversation thread, maintaining the context throughout.

User-friendly interface

Chatting with Bing Chat is a breeze. The platform accepts questions in various formats—short, long, or something in between. The more specific your query, the more accurate the response. You can also refine your questions in the chat and ask for follow-up information, making the experience interactive and dynamic.

Among its various utilities, Bing Chat can help you generate a grocery list. Just throw in some ideas and watch as Bing drafts a comprehensive list for you. This feature extends to other list-making tasks, such as meal planning or email drafting.

How to use Bing Chat

Other articles you may find of interest on the subject of Microsoft Bing :

For the creatively inclined, Bing Chat’s recent integration with OpenAI’s Dolly 3 has opened new doors. You can now generate images from text prompts, a feature that is revolutionizing the way designers seek inspiration and visualize their ideas.

Bing image analysis

Beyond generating images, Bing Chat can analyze them too. This functionality offers insights into an image’s content and composition. Additionally, the platform can extract text from images, a feature that comes in handy when digitizing printed material.

If you’re looking for a summary or key points from a website, Bing Chat can do that as well. Just direct it to the web content you are interested in, and it will generate a succinct overview for you.

Tracking your conversations

All your chats with Bing Chat are stored in a history log. You can rename these logs for easier reference later, allowing you to revisit past conversations and review the AI’s responses. You can even export these conversations for sharing or future reference.

In summary, Bing Chat AI is more than just a conversational agent; it’s a versatile assistant that caters to a wide range of your digital needs. Whether you are in search of inspiration, information, or interaction, Bing Chat AI is equipped to assist you. While Bing Chat is undeniably powerful, it’s essential to approach its outputs with a critical eye. Always double-check the information and verify the work, as the tool is not infallible.

Filed Under: Guides, Top News


Latest timeswonderful Deals

Disclosure: Some of our articles include affiliate links. If you buy something through one of these links, timeswonderful may earn an affiliate commission. Learn about our Disclosure Policy.

Categories
News

Create amazing animated videos using Midjourney AI images

Create amazing animated videos using Midjourney AI and Adobe Suite

In the realm of digital artistry, the creation of animated scenes is a skill that requires both creativity and technical prowess. This quick guide and tutorial kindly created by freelance video editor and content creator Ryan Collins who is a master at creating animations using AI art. Will provide an overview of how to creating such scenes using two powerful tools: Adobe Suite and Midjourney.

Midjourney is an AI art generator that has been making waves in the digital art community. It’s a platform that allows users to generate unique pieces of art using artificial intelligence, similar to that provided by other AI art generator such as  Stable Diffusion XL and others. On the other hand, Adobe Suite is a collection of software used for graphic design, video editing, web development, and more. It includes programs like Photoshop and After Effects, which are essential tools for creating animated scenes.

Adobe Suite is a versatile tool that can handle a wide range of file formats. This makes it easy to import the images generated by Midjourney. Once the images are imported, they can be manipulated in various ways to create the desired animation effects. This is where Photoshop comes into play.

How to create animated videos using Midjourney

The first step in this process is setting up and using Midjourney. This involves creating an account, familiarizing oneself with the interface, and understanding the different features available. Midjourney offers a variety of options for customization, allowing users to create art that is truly their own. Once the user has generated their desired piece of art, it’s time to move on to the next step: importing the images into Adobe Suite.

Other articles you may find of interest on the subject of Midjourney animation and AI art generator

Photoshop

Photoshop is a powerful image editing software that allows users to cut and layer images. This process involves selecting specific parts of an image and placing them on different layers. By doing this, users can create a sense of depth and dimension in their scenes. This is a crucial step in the creation of animated scenes, as it sets the foundation for the animation process.

After Effects

After the images have been cut and layered in Photoshop, it’s time to bring them to life using After Effects. After Effects is a digital visual effects and motion graphics software that is used in the post-production process of film making, video games, and television production. It allows users to animate their images, adding movement and dynamism to their scenes. Users can animate individual layers, creating a sense of movement and depth that brings their scenes to life.

Final Render

The final step in this process is adding sound effects and rendering the final product. Sound effects can add an extra layer of immersion to the scenes, enhancing the overall experience for the viewer. Once the sound effects have been added, the scene can be rendered. Rendering is the process of generating a high-quality video from the animated scene. This can be done in After Effects, resulting in a final product that is ready to be shared and enjoyed.

Creating animated videos and scenes using Adobe Suite and Midjourney is a process that involves several steps. From setting up and using Midjourney to importing images into Adobe Suite, cutting and layering images in Photoshop, animating images in After Effects, and adding sound effects and rendering the final product. Each step plays a crucial role in the creation of a captivating animated video or scene and shows that with the right tools and a bit of creativity, anyone can create amazing animations using AI generated art and software tools that already available.

Filed Under: Guides, Top News


Latest timeswonderful Deals

Disclosure: Some of our articles include affiliate links. If you buy something through one of these links, timeswonderful may earn an affiliate commission. Learn about our Disclosure Policy.