Categories
News

Building a DIY ARM Network Attached Storage (NAS) solution

how to Build an ARM Network Attached Storage (NAS) solution

Jeff Geerling has published an interesting tutorial revealing how he has built a Network Attached Storage (NAS) system that balances power efficiency with strong performance can be a highly satisfying endeavor. At the heart of such a system, is a ASRock Rack ALTRAD8UD-1L2T Motherboard . This motherboard is energized by an Ampere CPU that boasts 32 cores, similar to those used in AWS Graviton processors. This combination is particularly appealing for those who are somewhat familiar with technology and are eager to construct a dependable NAS setup.

The ASRock Rack motherboard is designed with a “deep microATX” form factor, which provides more room for additional components than a standard microATX board. This extra space is crucial for a NAS that needs to be both expandable and efficient. The motherboard’s 2U cooler is tailor-made to keep the Ampere Ultra Q32 CPU at the ideal temperature, ensuring the system runs smoothly and lasts a long time.

When it comes to a NAS, the variety of ways it can connect to other devices is key to its success. The ASRock Rack motherboard comes with a suite of connectivity options, including PCIe slots for expansion cards, DDR4 RAM slots, SAS and Oculink connectors for different storage devices, M.2 slots for SSDs, and 10 Gigabit Ethernet ports for fast network connections. These features allow you to customize your NAS to meet your specific requirements, making sure it can grow and adapt as needed.

How to build an ARM NAS

The NAS will be equipped with 64GB of DDR4 ECC RAM, which helps maintain data accuracy by correcting errors. For the system’s boot drive, a Kioxia XG8 NVMe SSD has been chosen for its speed and dependability. The storage capacity is impressive, combining six 20TB Seagate Exos drives with four 8TB Samsung SSDs, offering over 150TB of total storage space.

Here are some other articles you may find of interest on the subject of network attached storage :

For the NAS’s housing, the HL5 chassis from 45Drives has been selected for its exceptional quality. Although it comes at a premium, the chassis is expected to provide lasting durability, making it a worthwhile investment. The motherboard, while intended for enterprise use, is a cost-effective option when compared to typical enterprise solutions, offering a good balance between price and performance.

The installation begins with mounting the motherboard inside the HL5 chassis. Next, you’ll connect the power supply, which is essential for providing consistent power to all the components. Then, you install the RAM and the cooling solutions, including the 2U cooler for the CPU.

Once the system is powered on for the first time, it’s crucial to troubleshoot to ensure that the RAM is detected properly and that the system boots without issues. With these steps confirmed, you’ll move on to install Rocky Linux, an operating system compatible with ARM64, which sets the foundation for your NAS.

This guide has provided a walkthrough for creating an ARM-based NAS that is not only power-efficient but also robust and versatile. It offers a wide range of connectivity options and a significant amount of storage capacity. Stay tuned for a follow-up article where the network storage performance of this build will be evaluated in detail.

Filed Under: Guides, Top News


Latest timeswonderful Deals

Disclosure: Some of our articles include affiliate links. If you buy something through one of these links, timeswonderful may earn an affiliate commission. Learn about our Disclosure Policy.

Categories
News

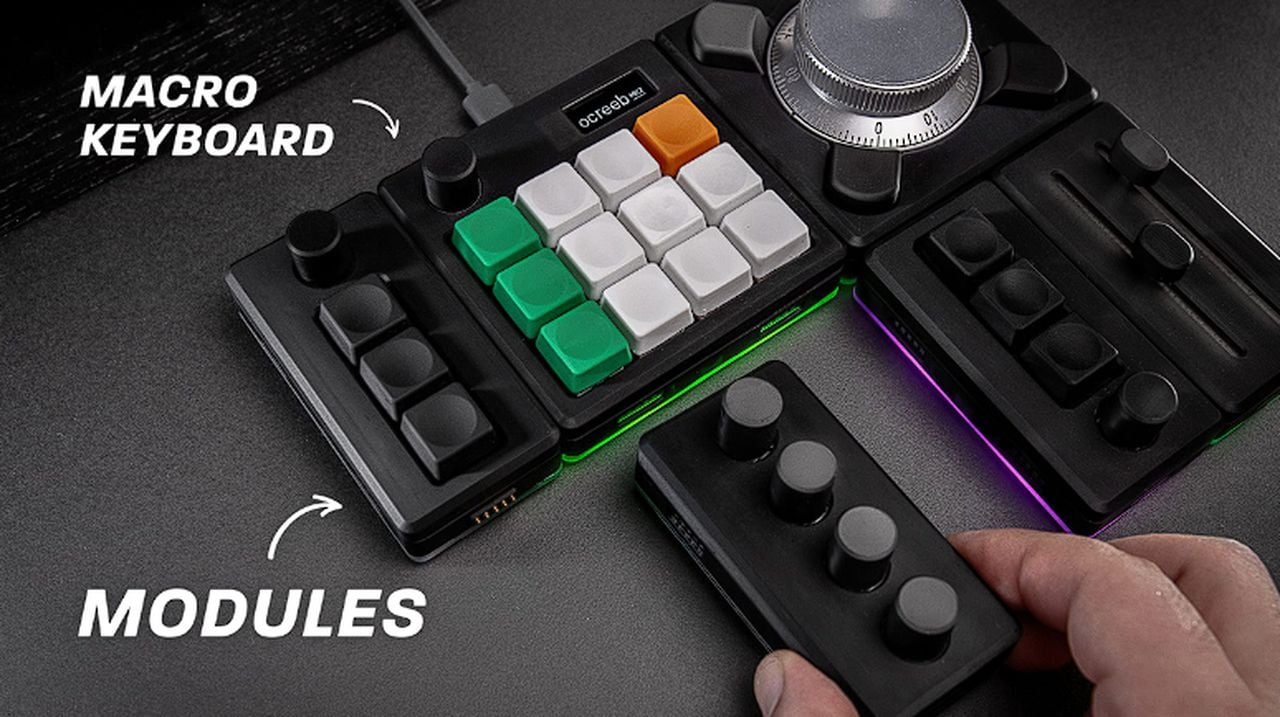
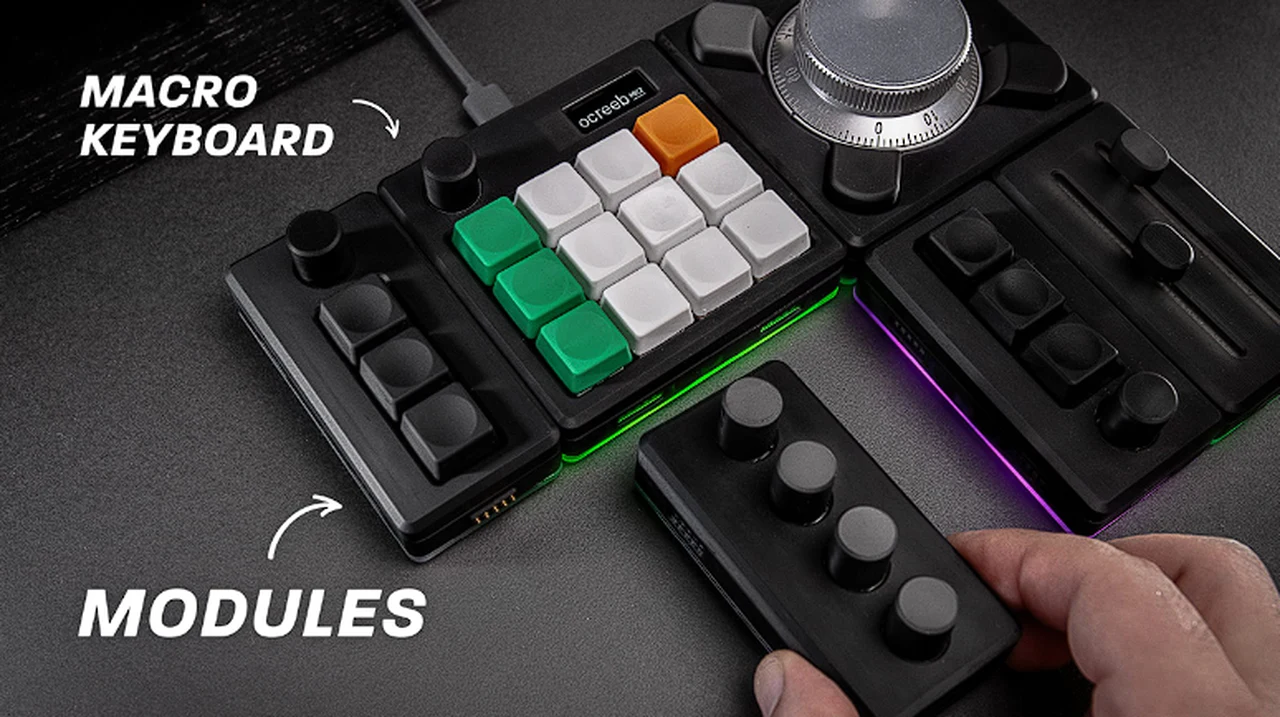
Ocreeb MK2 DIY modular macro keyboard with hot swap sockets

Ocreeb MK2 DIY modular macro keyboard

If you have ever wanted to create your very own modular macro keyboard or can’t quite find the one to specifically suit your needs and would like to design one for specific tasks. You are going to enjoy the fantastic tutorial created by Salim Benbouziyane  showing how you can create a modular macro keyboard similar to the original Ocreeb macro keyboard or it second-generation design..

The Ocreeb MK2 is a 12-key macropad that stands out for its unique modular design, which allows users to easily add and customize various external modules. This innovative keyboard is not just a tool; it’s a canvas for creativity, designed to be tailored to the user’s specific needs and preferences.

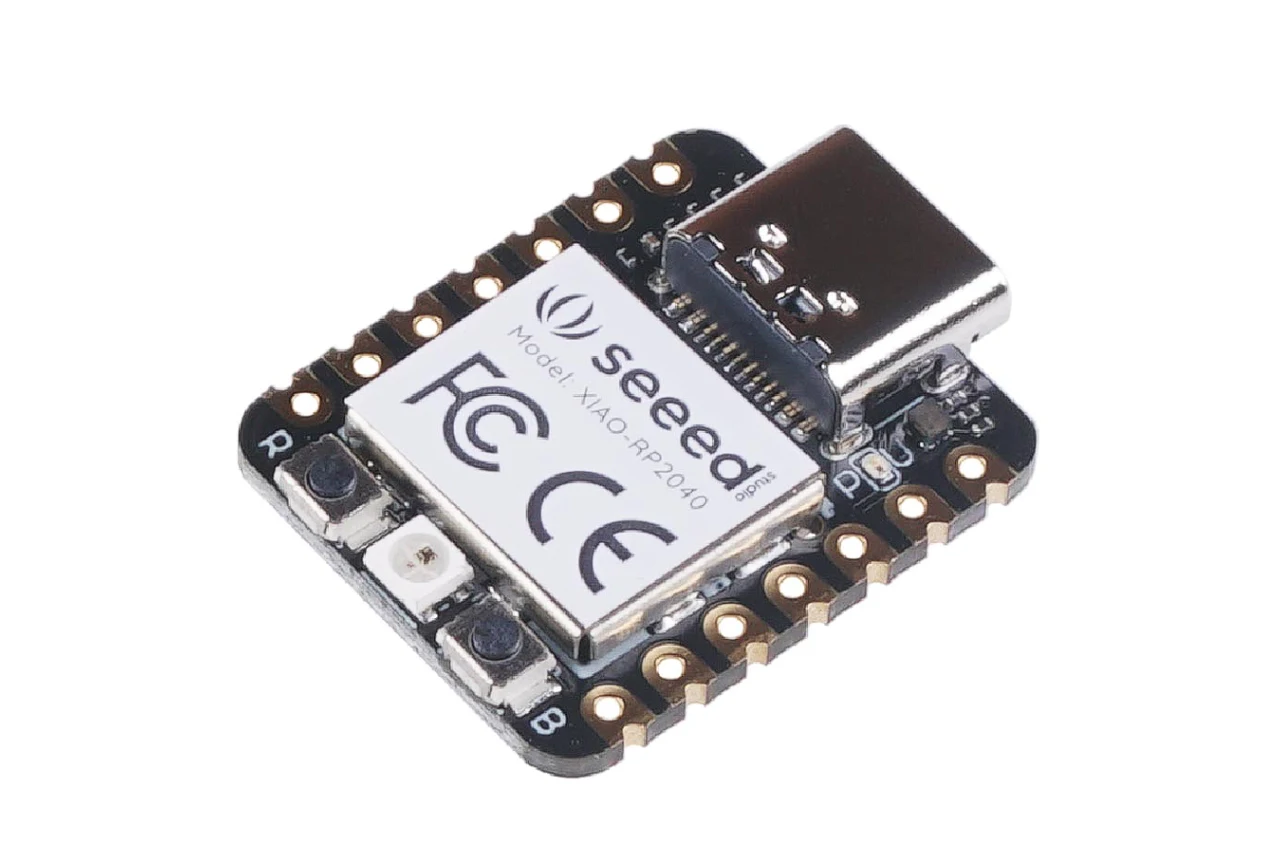
At the heart of the Ocreeb MK2 is the XIAO RP2040 microcontroller from Seed Studio, a choice made for its compatibility and ease of access. This microcontroller is a step up from previous versions, offering users a more powerful and versatile core for their projects. One of the most significant improvements in this model is the introduction of hotswap sockets. These sockets enable users to replace switches quickly and without the need for soldering, making the customization process much more user-friendly.

XIAO RP2040 microcontroller from Seed Studio

XIAO RP2040 features :

  • Powerful MCU: Dual-core ARM Cortex M0+ processor, flexible clock running up to 133 MHz
  • Rich on-chip resources: 264KB of SRAM, and 2MB of on-board Flash memory
  • Flexible compatibility: Support Micropython/Arduino/CircuitPython
  • Easy project operation: Breadboard-friendly & SMD design, no components on the back
  • Small size: As small as a thumb(20×17.5mm) for wearable devices and small projects.
  • Multiple interfaces: 11 digital pins, 4 analog pins, 11 PWM Pins,1 I2C interface, 1 UART interface, 1 SPI interface, 1 SWD Bonding pad interface.

The design of the Ocreeb MK2 has been carefully thought out to enhance the user experience. The switch plate is now separate from the enclosure, which means that accessing the PCB is a breeze. Although the number of encoders has been reduced to one, the addition of an OLED screen more than makes up for it by providing vital information at a glance.

How to build a modular macro keypad

“Ocreeb MK2 is the second iteration of my macropad project. This version features the XIAO RP2040, hotswap sockets support, a detachable switch plate, an OLED screen and I’m exploring a fun new idea inspired by the Monogram Creative Console – a custom magnetic connector that lets me attach all sorts of external modules to make different layouts.”

Here are some other articles you may find of interest on the subject of macro keyboards and customizations :

Taking inspiration from the Creativity Console by Monogram and insights from Zack Freedman’s video, the Ocreeb MK2 has adopted a grid system for attaching peripherals. This universal connection method opens up a world of possibilities, allowing users to add extra encoders, buttons, and potentiometers. With these additions, the macropad transforms into a comprehensive control center that can be customized to suit a wide range of applications.

Ocreeb MK2

The technological advancements of the Ocreeb MK2 are impressive. The magnetic connectors, which are small PCBs themselves, serve a dual purpose. They not only provide mechanical stability but also ensure electrical connectivity. These connectors are both cost-effective and innovative. Additionally, the use of Adafruit’s Seesaw framework through I2C simplifies programming, and shift registers are employed to manage inputs efficiently. This means that multiple inputs can be scanned using only a few pins from the main controller. The KMK firmware is the perfect complement to this efficient design, making it easier for users to program their macropad.

A prototype of the Ocreeb MK2 was developed to test the modular concept. It featured an interrupt system that communicated input events from the modules to the macropad core. The enclosures for both the macropad and its modules were designed with precision and 3D printed to achieve a sleek and professional look.

Macro keypad

Creating the Ocreeb MK2 macro keypad was not without its challenges and issues with PCB rework, interrupt handling, and finding the right balance for the strength of the magnetic connectors all had to be overcome. However, these obstacles were solve with innovative solutions.

The Ocreeb MK2 DIY Modular Macro Keyboard System represents a significant step forward in the customization and flexibility of macro keyboards. While it presents its own set of challenges and limitations, the project files are available to anyone interested in building their own personalized macropad.

The true value of this system lies in its potential for customization. It’s not just about what the macropad can do; it’s about the opportunities it creates for users to make it their own. Whether you’re a programmer, designer, or just someone who loves to tinker with technology, the Ocreeb MK2 offers a new way to interact with your computer and streamline your workflow. jump over to the official GitHub repository for the modules and code you need to create your very own.

Image Credit : Salim Benbouziyane

Filed Under: DIY Projects, Top News


Latest timeswonderful Deals

Disclosure: Some of our articles include affiliate links. If you buy something through one of these links, timeswonderful may earn an affiliate commission. Learn about our Disclosure Policy.
Categories
News

Framework modular PC parts used to make a DIY Cyberdeck

Framework Cyberdeck DIY portable Windows PC

Cyberdeck, a term coined by William Gibson in his 1984 novel Neuromancer is essentially an artisan-crafted computer, a device that is built with a unique blend of creativity, technical prowess, and a deep understanding of hardware components. If you are interested in building your very own cyberdeck or compact portable Windows PC. You are sure to enjoy this video created by the
Ben Makes Everything YouTube channel. Detailing how Framework modular PC components have been used very innovatively to create a unique portable computer.

For those unfamiliar with Framework and it’s modular laptops. The company’s mission is to provide sustainable and customizable computing solutions. The design of their laptops allows for easy upgrades and replacements of individual components like the RAM, storage, keyboard, and even ports via modules. This approach not only makes it easier for consumers to keep their devices up to date, but it also minimizes electronic waste by promoting the reuse of functional components. Their products are often seen as an alternative to more traditional laptops where upgradability and customization are limited.

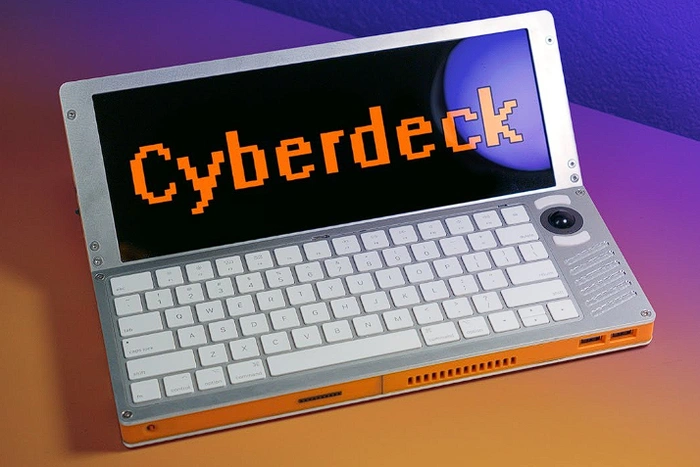
DIY Framework Cyberdeck PC

The choice of hardware for this project was a Framework laptop motherboard. The reasons for this choice were its good performance, modular IO system, thin and small size, and the ability to upgrade parts over time. The creator also used a 500 gig Western Digital black SSD and 16 GB of RAM to ensure the device had ample storage and processing power.

 Previous articles we have written that you might be interested in on the subject of cyberdeck systems :


The design of the cyberdeck was inspired by slab-style computers like the old Tandy TRS-80 Model 100 and its modern counterpart, the Clockwork DevTerm. The creator used a friction hinge mechanism to allow the screen to flip up to 45 degrees for better viewing angles. The device includes a small thumb-controlled trackball for navigation and a Magic 2 keyboard from Apple for input.

Framework modular PC components

The cyberdeck also incorporates swappable expansion port cards, a six-port hub, and a built-in Arduino for testing electronic circuits. The housing for the device was 3D printed and the faceplates were cut from an 8in aluminum sheet. The device also includes a power button, speakers, and a variety of input and output ports. It can also accept additional video inputs, allowing it to be used as a monitor for other devices.

The assembly of the cyberdeck required a deep understanding of the components and a careful approach to ensure that all parts fit together seamlessly. The result is a device that runs an 11th gen i5 processor, an SSD, and 16 GB of RAM. It is capable of running games like DOOM 2016 and Overwatch 2, demonstrating its performance and functionality.

The completed cyberdeck is a testament to the power of modularity and customization. It is described by the creator as “weird, heavy and looks like it came out of a portal to some alternate timeline”, but the creator enjoys using it. It is a device that embodies the spirit of the cyberdeck concept, a blend of old and new, of functionality and aesthetics.

Building a custom cyberdeck using a Framework laptop motherboard is a project that showcases the potential of modular technology. It is a testament to the power of customization and the possibilities that arise when technology is not just consumed, but also created. It is a reminder that technology can be more than just a tool, it can be a canvas for creativity and innovation.

Filed Under: DIY Projects, Top News


Latest timeswonderful Deals

Disclosure: Some of our articles include affiliate links. If you buy something through one of these links, timeswonderful may earn an affiliate commission. Learn about our Disclosure Policy.
Categories
News

DIY Halloween Makeup and Colored Contacts: Tutorials and Ideas

This Halloween, take your costume to the next level with MYEYEBB’s colored contacts. Our comprehensive guide walks you through how these transformative accessories can complete various looks—from fantastical creatures to pop culture icons. With tutorials and creative DIY ideas, we encourage you to let your imagination run wild and make this Halloween unforgettable. Get your MYEYEBB colored contacts now and truly transform!

I. Introduction

Ah, Halloween—a mystical night filled with ghouls, goblins, and glam! But wait, there’s a new player in the game that’s turning heads and capturing the Instagram limelight. That’s right; we’re talking about colored contacts for Halloween. These little gems can transform not only your vision, but your overall look as well. This blog is your one-stop guide to unlocking the immense potential of colored contacts for Halloween. From tutorials to creative ideas, MYEYEBB has got you covered.

What’s the secret sauce that can elevate your Halloween makeup from ‘meh’ to ‘mesmerizing’? Colored contacts for Halloween, without a doubt. When you slip these into your eyes, you’re not just changing your eye color; you’re stepping into a new persona. Eye color can dramatically influence how a character is perceived. From icy blues to fiery reds, the impact is undeniable. So, let’s delve into some tutorials, shall we?

DIY Halloween Makeup and Colored Contacts: Tutorials and Ideas

III. Tutorial 1: Enchanting Fantasy Creature

Ever dreamed of being a mermaid or a fairy for Halloween? Turn that fantasy into reality with this tutorial. Start with a dewy foundation to mimic the ethereal glow of these magical beings. Choose eyeshadows that resonate with your character—think oceanic hues for mermaids and soft pastels for fairies. The game-changer? MYEYEBB’s colored contacts for Halloween. Slipping these on elevates your look from basic to breathtaking, making your eyes the show-stopping feature of your fantastical transformation.

Once your colored contacts for Halloween are in, use a combination of matte and shimmer eyeshadows to create depth. Highlight the inner corners of your eyes and the brow bone for that extra dash of magic. The contacts not only complete but also elevate your look, taking your Halloween makeup from ordinary to extraordinary.

IV. Tutorial 2: Fierce Animal-Inspired Makeup

Detailed Instructions

Foundation:

Begin with a foundation that matches your skin tone to maintain the natural essence of the animal you’re emulating. This will serve as your canvas, ensuring that the rest of your makeup blends seamlessly.

Animal Stripes:

Unleash your inner beast with some bold animal stripes or spots. Use a black eyeliner pencil to sketch out the patterns on your face. Whether you’re going for tiger stripes or leopard spots, make sure they’re evenly spaced and symmetrical for the most authentic look.

Faux Fur:

Give your look some texture by applying a light layer of mascara. Focus on the eyelashes, but you can also lightly brush some on your eyebrows to mimic the texture of animal fur. This will add depth and dimension to your fierce, animal-inspired makeup.

Animal Authenticity

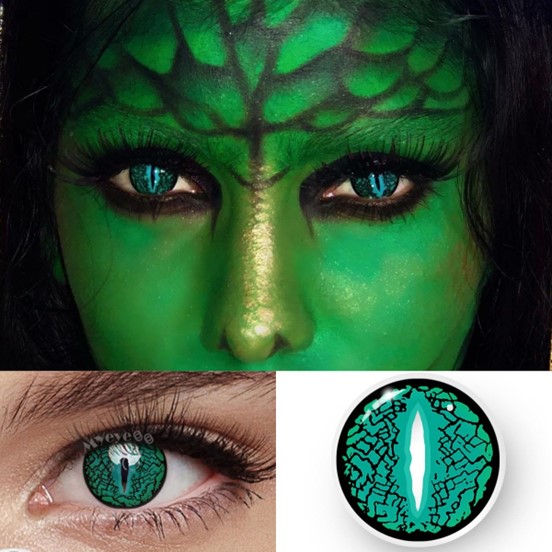
To truly embody your chosen creature, consider adding a pair of colored contacts for Halloween. These will mimic the animal’s eye color, taking your look from simply a costume to a living, breathing embodiment of the wild. With your striking makeup and eye-catching lenses, you’re not just a person in a costume—you’re a fierce predator or a graceful prey, ready to roam the Halloween night!

V. Tutorial 3: Terrifying Zombie or Undead Character

Step-by-step Guide

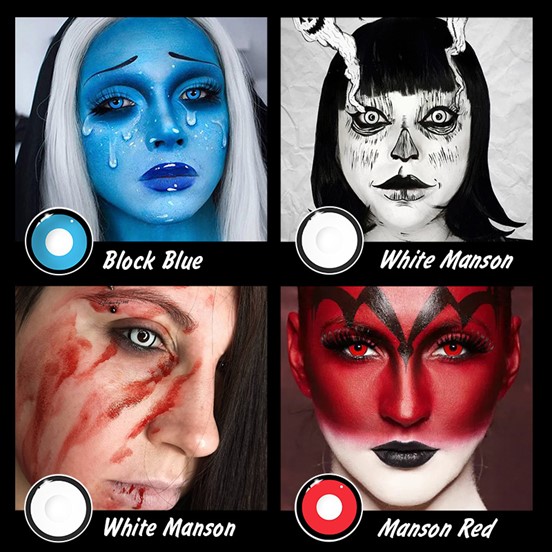
Begin your transformation into the undead by first applying a pale, almost grey, foundation to create a lifeless base. Next, use dark eyeshadows to create hollowed-out eyes and contour the face for a sunken appearance. Adding red and purple tones around the eyes and mouth will give a bruised and decayed look. The final touch to truly bring your zombie character to life (or death) is a pair of white or red colored contacts for Halloween. This will give your eyes a haunting, empty appearance that will chill anyone to the bone.

Frightening Effects

To complement your creepy contacts, use matte black eyeshadow to deepen the hollows of your eyes and cheeks. Apply a dark red or black lipstick, then smudge it slightly for a messy, just-ate-a-brain look. Finish off by adding fake blood and dark veins to your face and neck. This will create a truly terrifying effect that pairs perfectly with your haunting Halloween contacts.

VI. Tutorial 4: Mythical Being or Monster

Halloween is the perfect time to transform yourself into a mythical creature like a vampire or demon. A key element to completing your transformation is using colored contacts for Halloween. These special contacts will not only change the color of your eyes but can also give you a supernatural appearance that contributes to your character’s identity. Whether you want to have the hypnotic eyes of a vampire or the fiery gaze of a demon, colored contacts will enhance your overall look and make your Halloween costume

DIY Halloween Makeup and Colored Contacts: Tutorials and Ideas

VII. Tutorial 5: Pop Culture Icon or Horror Movie Character

Recreating the signature look of a pop culture or horror movie character can be a fun and creative way to show your appreciation for your favorite characters. One crucial element that is often overlooked is the eye color. Accurate eye color is essential for a faithful portrayal of the character. For example, using colored contacts for Halloween can make a big difference in your costume’s authenticity. Whether you are dressing up as a famous pop icon or a terrifying horror movie character, don’t forget to pay attention to the small details like eye color to make your transformation complete.

VIII. Creative DIY Ideas: Beyond the Tutorials

Thinking outside the box this Halloween? Colored contacts aren’t just for recreating specific characters; they can be the creative spark for an entirely unique costume idea. Imagine the arresting visual of neon-green eyes paired with galaxy-inspired makeup, or deep red eyes to complement a steampunk ensemble. Colored contacts for Halloween offer endless possibilities for individual expression.

Don’t be afraid to push the boundaries and combine colored contacts with unconventional makeup styles for unique effects. Consider mixing genres; how about anime eyes with a vintage ’20s look? The sky’s the limit, and the only rule is to let your imagination run wild. Whether you’re a makeup guru or a beginner, colored contacts can elevate your Halloween game to a whole new level.

IX. Conclusion

To wrap it up, colored contacts for Halloween aren’t just accessories; they’re essential elements that breathe life into your character. So, this Halloween, don’t just dress up—transform. MYEYEBB encourages you to explore your creative boundaries and make this Halloween unforgettable.

So, what are you waiting for? Get your MYEYEBB colored contacts for Halloween and let your imagination run wild!