Categories
News

How to Turn your iPhone Into a Producivity Machine (Video)

iPhone Productivity

If you find that your iPhone is a continual distraction when you are trying to work, we have an awesome video from Miles Mochizuki that shows us how to turn your iPhone into a productivity machine.

In a world where our phones often serve as both a gateway to the world and a source of distraction, mastering the art of productivity on your iPhone is not just a skill, it’s a necessity. With the arrival of iOS 17, the potential for enhancing focus and productivity has taken a significant leap forward. Here’s a friendly guide to transforming your iPhone into a tool that not only complements but elevates your daily productivity.

1. Audit Your Apps:

Start by taking stock of your applications. It’s time to be ruthless—delete any app that you rarely use or that tends to be a major distraction. This might mean saying goodbye to social media apps, YouTube, or games. Remember, the goal is to retain only those apps that add positive value to your life.

2. Essential Apps to Keep:

Consider keeping apps that aid in organizing your thoughts and tasks. For instance, a reliable reminders or to-do list app is indispensable for capturing fleeting ideas. A notes app can be your go-to for jotting down quick thoughts or important information on the fly. For your leisure and learning, apps like Audible can be beneficial for listening to audiobooks. Don’t forget about health and fitness apps like Strong or various breathwork apps that promote beneficial activities for your well-being.

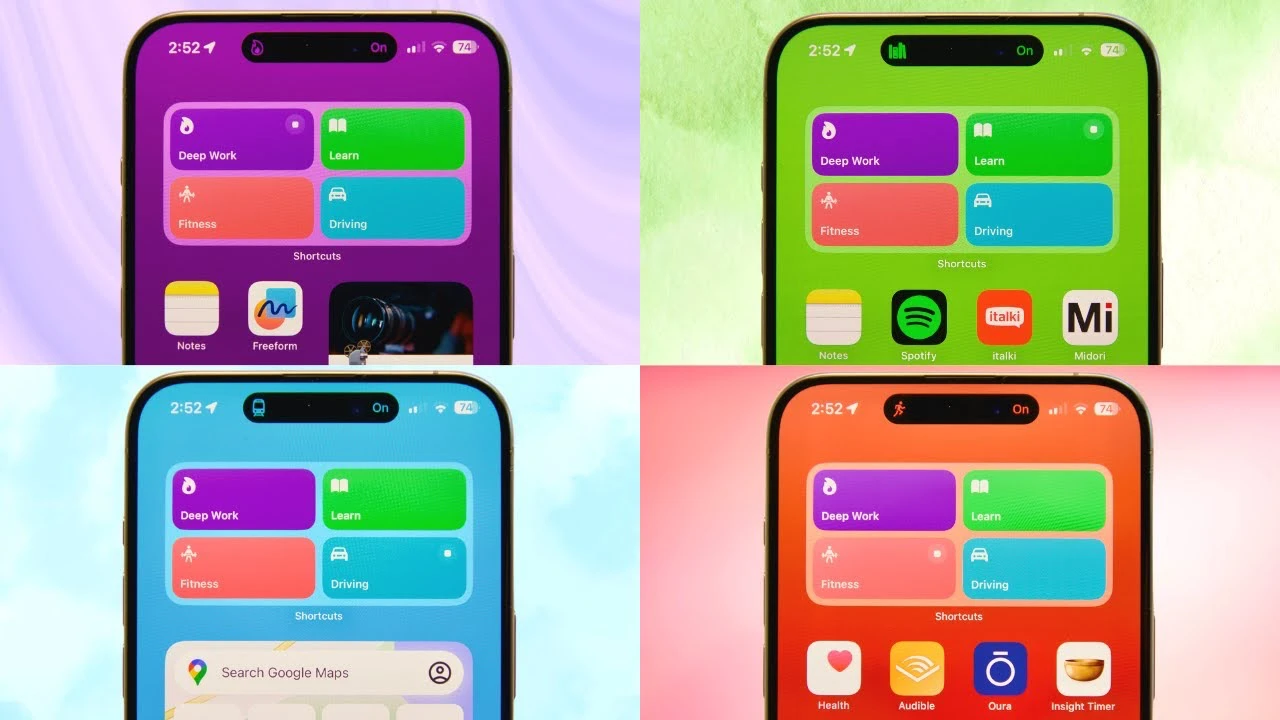
3. Establish Individual Pages for Focus Modes:

iOS 17’s Focus modes are a game-changer. Create different modes for various activities such as Deep Work, Learning, Fitness, or Driving. Then, assign a single page of apps to each Focus mode. This organization helps by minimizing distractions specific to the task at hand.4. Assign Focus Modes to Home Screens:
In the Settings, you can link each Focus mode to a specific home screen. Customize which pages are visible in each Focus mode to further enhance your concentration.

5. Create Shortcut Toggle Widget:

Utilize the Shortcuts app to create toggles for switching between Focus modes. By placing a widget on the home screen, you gain easy access to these modes, seamlessly shifting your phone’s functionality to match your current activity.

6. Aesthetic Customization:

Match the colors of your home screen, lock screen, and shortcut widgets to the theme of your Focus mode. This visual harmony not only looks good but also helps to mentally align with the task or mode you’re in.

7. Automate Focus Modes:

Set specific criteria for Focus modes to activate automatically. This could be based on time, location, or even app usage. Customize your notification settings to filter out the noise, but allow exceptions for emergencies.

8. Focus Filters:

Within each Focus mode, consider filtering specific features of apps. For example, you might only allow messages from certain contacts to come through. This way, your phone tailors its functionality to your current focus.

Summary

Remember, despite these productivity setups, the most effective way to enhance focus is to minimize unnecessary phone usage. Try not to use your phone as a means of distraction, even with a productivity-oriented setup.

By reorganizing your iPhone in this manner, you’re not just decluttering your digital space; you’re actively creating an environment that fosters concentration and productivity. iOS 17’s features, particularly the Focus modes, are there to help you make the most out of every moment. Use these tips to turn your iPhone into a productivity powerhouse.

You will be pleased to know that with these steps, your iPhone can become more than just a device—it becomes a partner in your quest for productivity and focus.

If you are wondering how to integrate these changes into your daily routine, start small. Begin with one Focus mode, and gradually integrate more as you become comfortable. Before you know it, your iPhone will be an integral part of your productivity arsenal. We hope that you find this video and guide on how to turn your iPhone into a productivity machine helpful, leave a comment below and let us know any tips you have to cut down on smartphone distractions.

Source & Image Credit: Miles Mochizuki

Filed Under: Apple, Apple iPhone, Guides


Latest timeswonderful Deals

Disclosure: Some of our articles include affiliate links. If you buy something through one of these links, timeswonderful may earn an affiliate commission. Learn about our Disclosure Policy.

Categories
News

How to turn off Automatic Updates on Android Phones

Automatic Updates on Android Phones

This guide is designed to walk you through the process of disabling automatic updates for both the operating system (OS) and individual apps on your Android phone. It’s a well-known fact that Android devices routinely receive automatic updates. These updates are integral for maintaining the security and stability of both your phone’s operating system and the apps you use daily.

They ensure that you have the latest features and that any known bugs or vulnerabilities are promptly addressed. However, there are instances when having total control over these updates is necessary. You might prefer to manage updates manually to avoid unexpected data usage, to maintain a stable version of an app you rely on, or simply to have a better handle on what changes are being made to your device. Whatever your reason, understanding how to take charge of these updates can be a crucial aspect of managing your Android device effectively.

Disabling Android OS Updates:

  1. Open Settings: Locate and tap the gear icon on your home screen or app drawer.
  2. Navigate to Software Update: The location might vary slightly depending on your phone model. Look for options like “System,” “About Phone,” or “Software Update.”
  3. Access Advanced Settings: Tap the three dots or a cog icon usually located in the top right corner.
  4. Turn Off Auto Downloads: Select “Auto Download & Install” and choose “Do Not Allow.” This prevents automatic downloads and installations of OS updates.
  5. Optional: Disable Wi-Fi Downloading: To further control updates, uncheck “Download over Wi-Fi only” if present. This ensures updates won’t automatically download even when connected to Wi-Fi.

Disabling App Updates in Google Play Store:

  1. Launch Google Play Store: Open the Play Store app.
  2. Tap your Profile Picture: Look for the icon representing your account in the top right corner.
  3. Open Settings: Select “Settings” from the drop-down menu.
  4. Choose Auto-update Apps: Locate and tap this option under “General.”
  5. Select Update Preference: Choose “Don’t auto-update apps” to disable automatic updates for all apps.
  6. Optional: Manage Individual App Updates: For more granular control, tap “Manage apps & device” in Settings. Select “Manage,” then choose the app you want to control. Tap the three dots in the top right corner and uncheck “Enable auto-update.”

Important Considerations:

  • Disabling automatic updates for the OS can leave your phone vulnerable to security exploits and bugs. It’s recommended to update manually at regular intervals.
  • Individual app updates might be crucial for bug fixes and improved functionality. Consider manually updating important apps regularly.
  • Some phone manufacturers or carriers might have slightly different settings menus. Refer to your device manual or manufacturer’s website for specific instructions.

Bonus Tips:

  • You can schedule Wi-Fi updates for the OS by tapping “Advanced Settings” in Software Update and choosing “Schedule system update.
  • Monitoring data usage during app updates can be helpful. Go to Settings > Network & Internet > Mobile data, and track data usage by individual apps.
  • Be cautious when downloading and installing APKs from third-party sources. Stick to the official Google Play Store for secure app updates.

By following this guide and understanding the considerations, by doing so, you are taking a proactive step towards maintaining complete control over your device’s software environment. It’s important to recognize that responsible management of these updates is a balancing act. On one hand, it’s about ensuring the security of your device – keeping it safeguarded against potential threats that are often addressed in these updates. On the other hand, it’s about tailoring your user experience to suit your personal or professional needs, which might mean delaying or selectively choosing when to update.

This process involves more than just flipping a switch. It requires a thoughtful approach where you weigh the benefits of immediate updates against the need for stability or consistency in your device’s performance. It’s about understanding the implications of each update, whether it’s a minor tweak in an app or a significant overhaul of the operating system. By mastering this control, you not only enhance your device’s functionality but also deepen your connection and understanding of the technology in your hands.

So, as you follow through with the steps laid out in this guide, keep in mind that you are not just adjusting settings, but are also crafting a customized, secure, and stable mobile experience that aligns with your individual needs and usage patterns.

Filed Under: Android News, Guides, Mobile Phone News


Latest timeswonderful Deals

Disclosure: Some of our articles include affiliate links. If you buy something through one of these links, timeswonderful may earn an affiliate commission. Learn about our Disclosure Policy.

Categories
News

What to do if Your iPhone Won’t Turn On or is Frozen

iPhone won't turn on

This guide will show you what to do when your iPhone won’t turn on. Dealing with a frozen or unresponsive iPhone can be quite challenging, particularly when you’re in a situation where accessing vital information or making an urgent phone call is essential. Such scenarios can undoubtedly be stressful and inconvenient. However, it’s important to stay calm in these situations. Fortunately, the majority of the time, this issue is not insurmountable. There are a variety of straightforward and effective steps you can follow to troubleshoot and resolve the problem. These methods are designed to help you swiftly restore your iPhone’s functionality, ensuring you can access your important data and make calls as needed. So, even though it may seem daunting at first, rest assured that with a few simple techniques, you can usually get your iPhone back to its normal, responsive state.

Here’s what to do if your iPhone won’t turn on or is frozen:

1. Force Restart

The first thing to try is a force restart. This will restart your iPhone without having to go through the usual shutdown process. The method for force restarting an iPhone varies depending on the model you have:

  • iPhone 8 or later, including iPhone SE (2nd and 3rd generation): Press and quickly release the volume up button, then press and quickly release the volume down button. Finally, press and hold the side button until you see the Apple logo.
  • iPhone 7: Press and hold the Home button and the side button (or the top button) until you see the Apple logo.
  • iPhone 6s or earlier, including iPhone SE (1st generation): Press and hold the Home button and the side button (or the top button) until you see the Apple logo.

2. Charge Your iPhone

If your iPhone is completely dead, it may simply be out of battery. Plug it into a charger and wait for a few minutes. If the battery is very low, it may take a while for the iPhone to respond. You can also try connecting your iPhone to a computer to see if it will charge that way.

3. Check Your Cables and Charger

Make sure that you are using a genuine Apple cable and charger. Damaged or faulty cables can prevent your iPhone from charging properly. Try using a different cable and charger to see if that makes a difference.

4. Update Your iPhone

An outdated iOS version can sometimes cause problems with your iPhone, including freezing and not turning on. Make sure that your iPhone is running the latest version of iOS. You can check for updates by going to Settings > General > Software Update.

5. Restore Your iPhone

If none of the above steps work, you may need to restore your iPhone. This will erase all of your data and settings, so be sure to back up your iPhone before you do this. You can restore your iPhone through iTunes or iCloud.

If you have tried all of these steps and your iPhone is still not working, you may need to take it to an Apple store or authorized service provider for further diagnosis.

Here are some additional tips:

  • If your iPhone is frozen with a specific app open, try closing the app. You can do this by double-pressing the Home button (on iPhone 8 or earlier) or swiping up from the bottom of the screen (on iPhone X and later) and holding your finger until the app previews appear. Then, swipe up on the app preview to close it.
  • If your iPhone is hot, let it cool down for a few minutes before trying to turn it on.
  • If your iPhone has been damaged, such as by being dropped or getting wet, it may be necessary to get it repaired.

I hope this article has helped you get your iPhone back up and running!

Additional Resources:

I would also like to add that if you are not comfortable performing any of these steps yourself, you can always take your iPhone to an Apple store or authorized service provider for help. We hope that you find this article on what to do if your iPhone won’t turn on useful, if you have any questions, comments or suggestions, please leave a comment below and let us know.

Here are some more useful iPhone guides:

Image Credit: Mateusz Dach

Filed Under: Apple, Apple iPhone, Guides


Latest timeswonderful Deals

Disclosure: Some of our articles include affiliate links. If you buy something through one of these links, timeswonderful may earn an affiliate commission. Learn about our Disclosure Policy.

Categories
News

BT Group to turn street cabinets into EV chargers

BT Group

The BT Group has announced a new pilot program in the UK to turn some of its street cabinets into EV chargers, the company plans to repurpose end-of-life green street cabinets in the UK and provide EV chargers for the public for their electric vehicles.

There are around 60,000 of these green street cabinets that could be repurposed as electric vehicle chargers throughout the UK, you can see what the new charger will look like in the photo above.

Etc., the startup and digital incubation arm at BT Group, today announces that it will power up its first EV charging unit built from a street cabinet traditionally used to store broadband and phone cabling. The announcement marks the first step in the rollout of new technical trials, exploring the potential to upgrade up to 60,0002 cabinets to help meet government sustainability targets and decarbonise the transport system in the UK.

Developed to help solve EV charging infrastructure needs by repurposing existing street furniture, the pilots will explore how this solution could be scaled to address the lack of chargers on UK roads. With new BT Group research showing that more than a third (38%)3 would have an EV already if charging were less of an issue, and with only 53,0004 public EV charge points currently on UK roads. the pilot marks an important step in the journey to net-zero.

It will be interesting to see if this new pilot program is successful as it could provide much-needed EV chargers for electric vehicle drivers in the UK, you can find out more information at the link below.

Source BT

Filed Under: Auto News, Technology News, Top News


Latest timeswonderful Deals

Disclosure: Some of our articles include affiliate links. If you buy something through one of these links, timeswonderful may earn an affiliate commission. Learn about our Disclosure Policy.