Categories
Business Industry

How to use navigation gestures with the S Pen on Galaxy devices

[ad_1]

Gesture navigation has been a thing on smartphones for some time now. More and more users are switching from the traditional navigation buttons to gestures on Android smartphones, including those made by Samsung.

However, on Samsung smartphones and tablets that come with an S Pen, navigation gestures can become an issue when the S Pen is used to draw or write near the edges of the display. This is particularly applicable to Android’s stock navigation gestures, which include swiping in from the left and right edge of the screen to go back.

Samsung addressed the problem a few years back by introducing an option to disable the use of navigation gestures with the stylus. That option is useful, but it can come into conflict with some of the new software features that are found on modern Galaxy smartphones and tablets today.

Circle to Search is one example of such software features. The Google-powered AI feature is available on select Galaxy devices running One UI 6.1 and is accessed by long pressing the home button or, in case you are using gesture navigation, by long pressing the bottom edge of the screen.

Out of the box, modern Galaxy smartphones come with the option to use the S Pen for navigation gestures disabled. For most users, this is actually a good thing, but what if you want the gestures to be enabled for both finger/touch and stylus input?

Here’s how to enable navigation gestures with S Pen

To make navigation gestures work with the S Pen, follow the steps below.

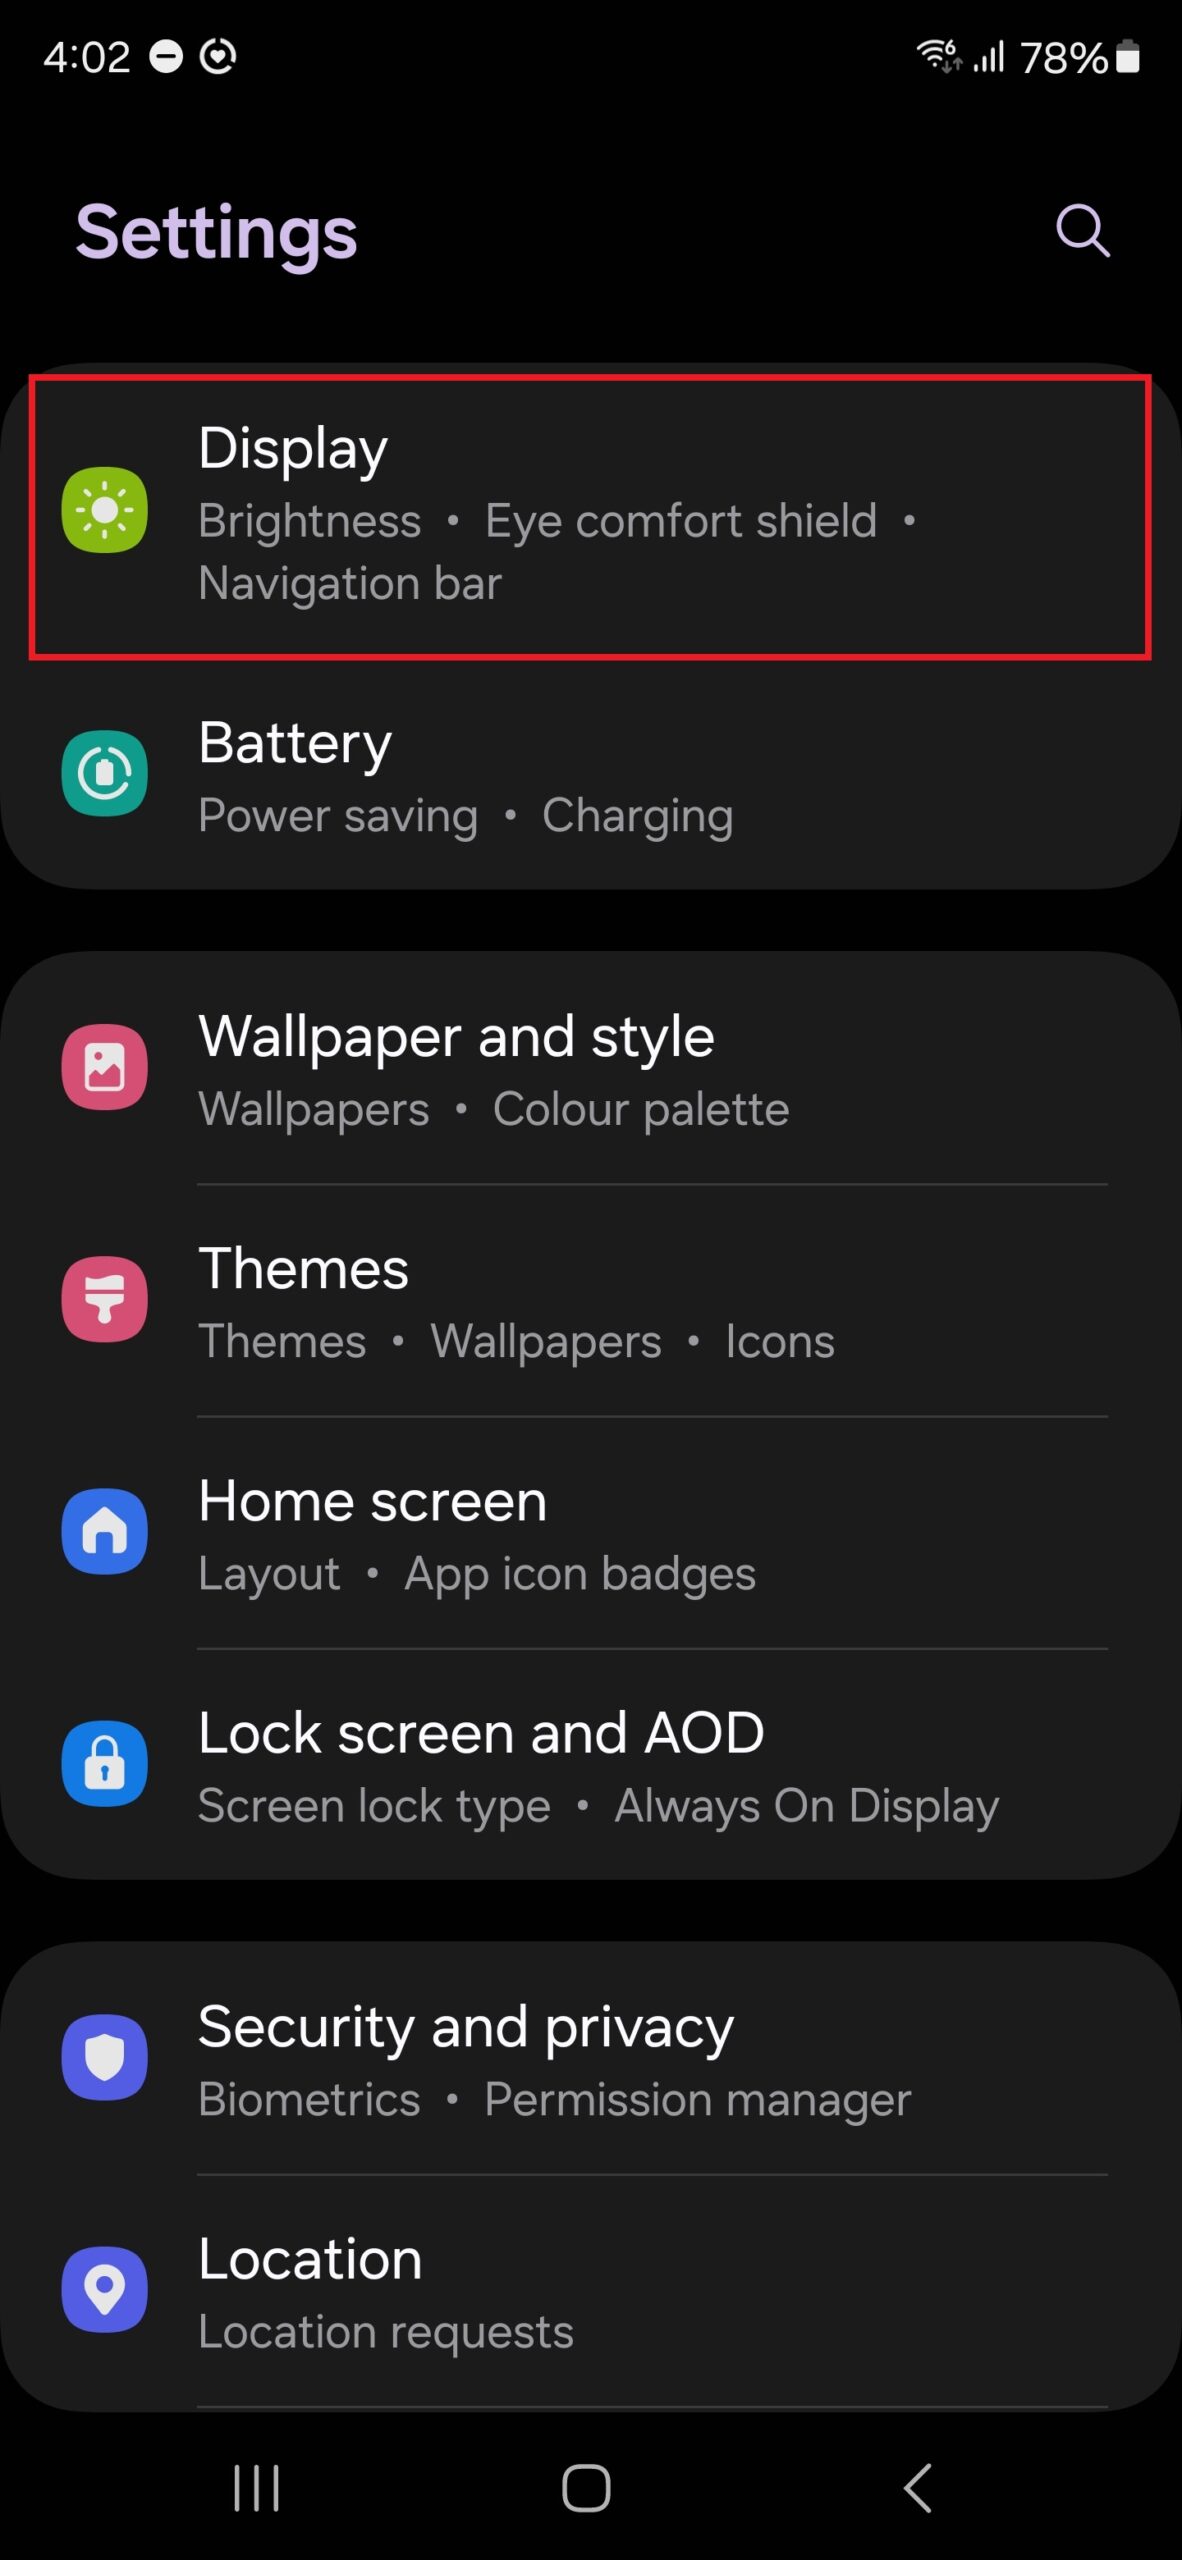
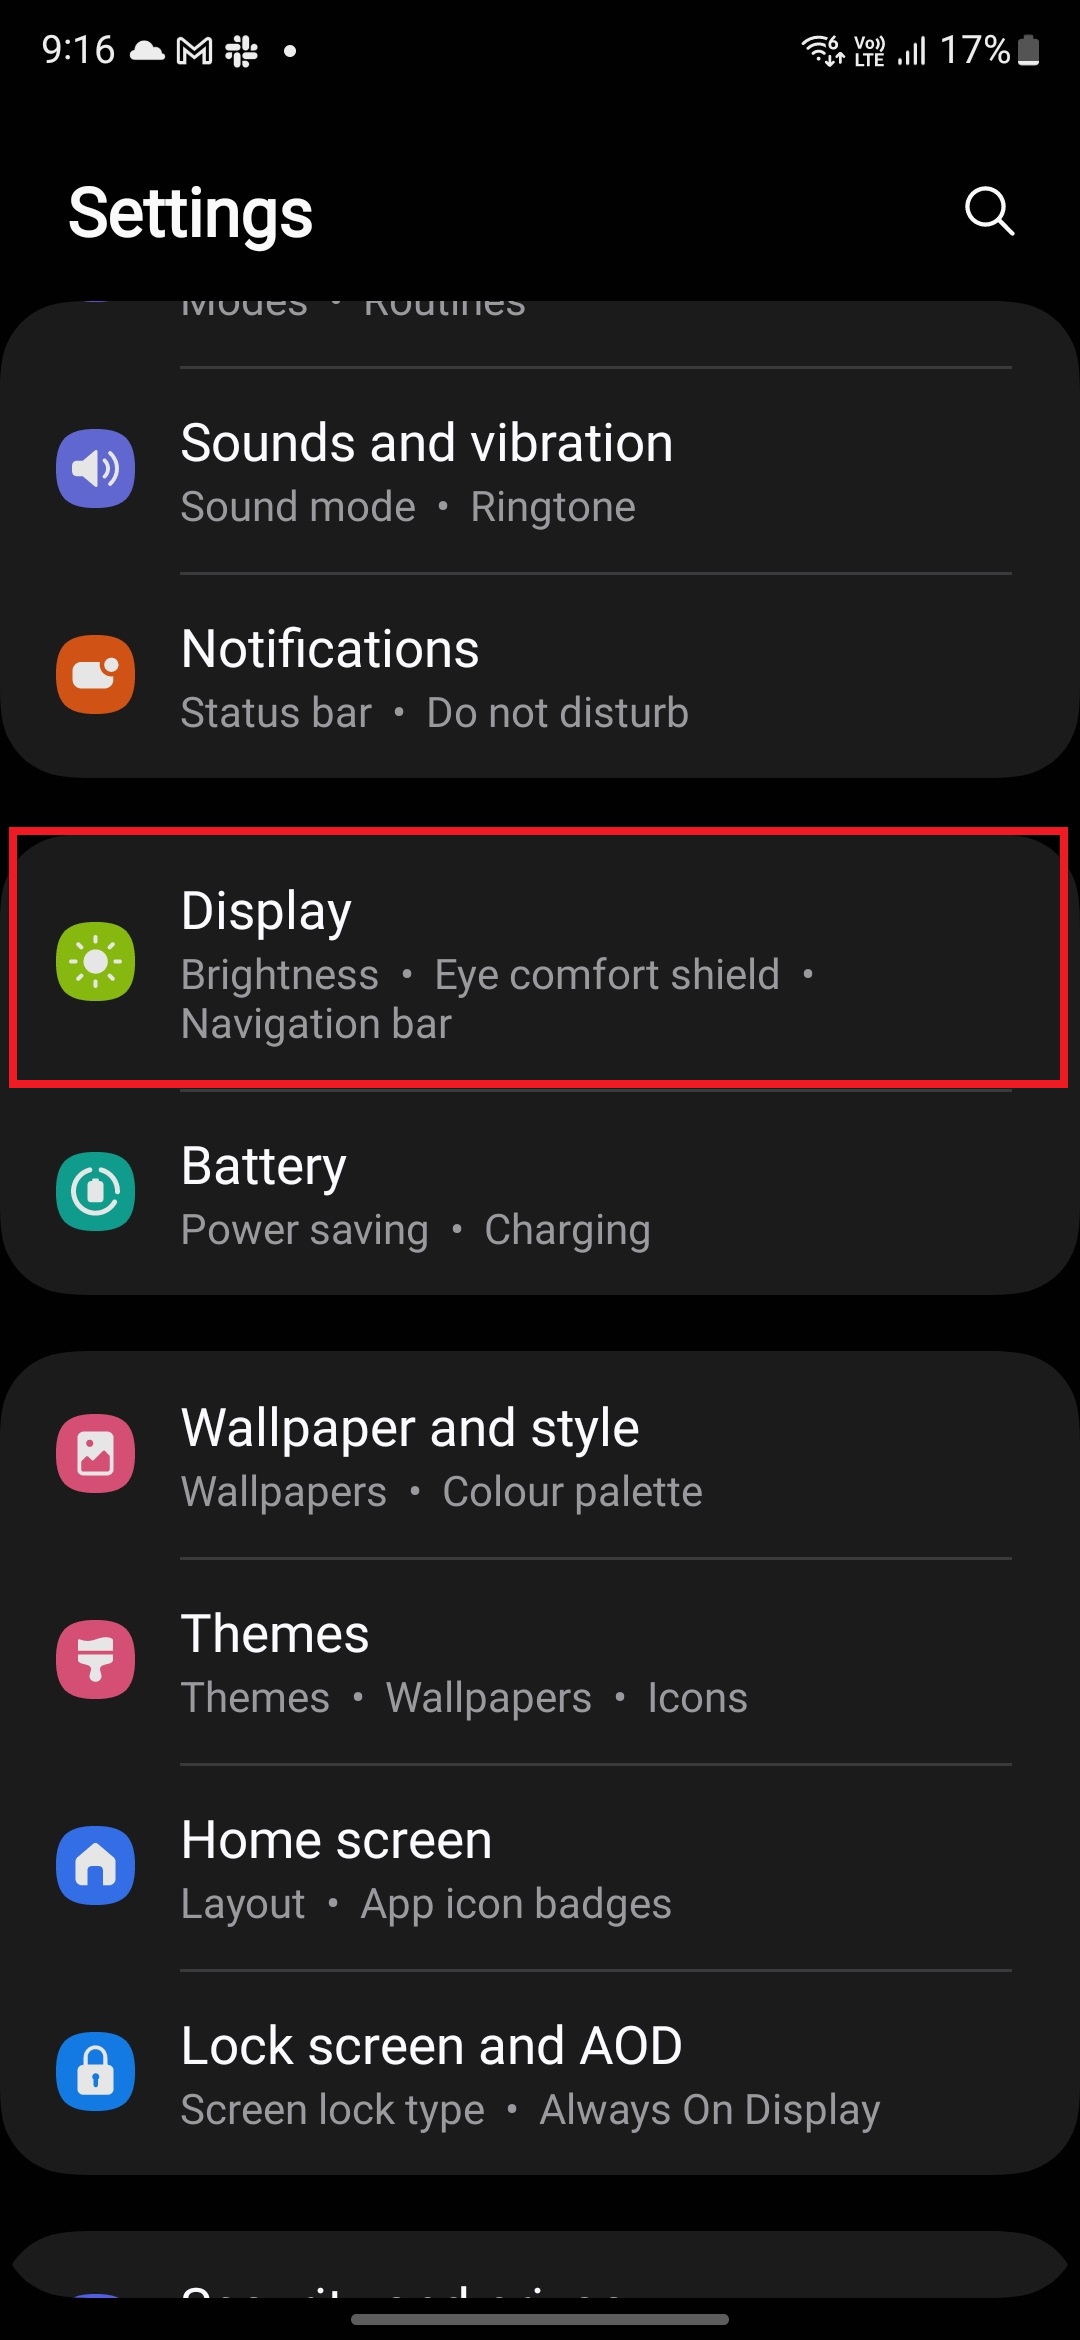
Step 1: Open the Settings app on your device.

Step 2: Go into the Display menu.

Enable S Pen with navigation gestures

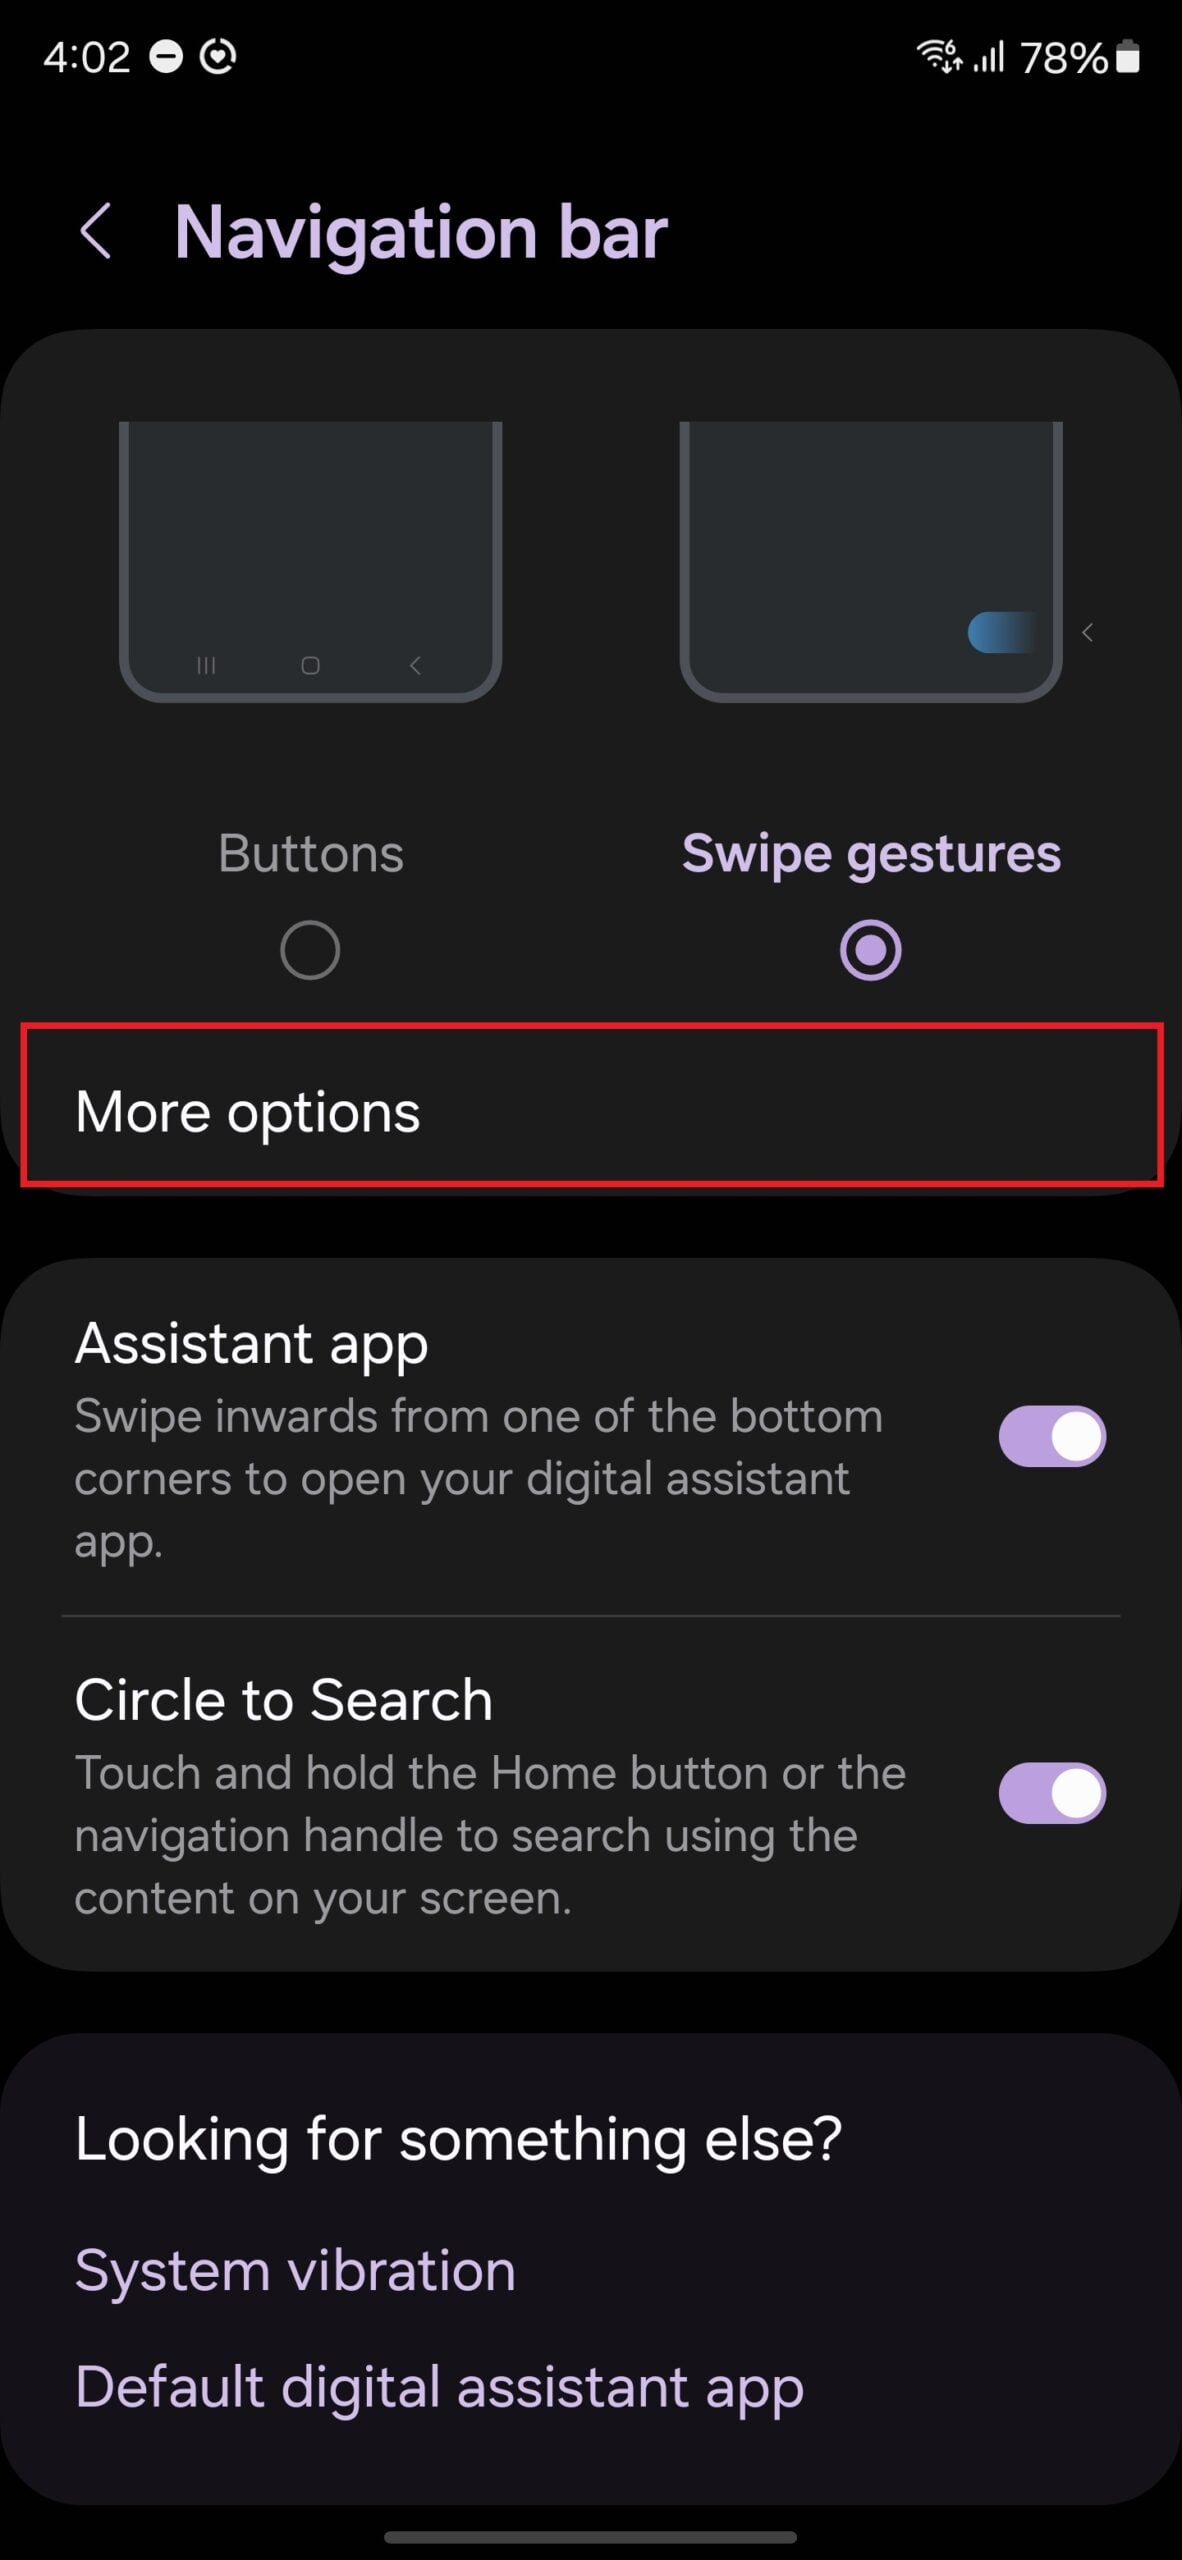
Step 3: Select Navigation bar.

Enable S Pen with navigation gestures

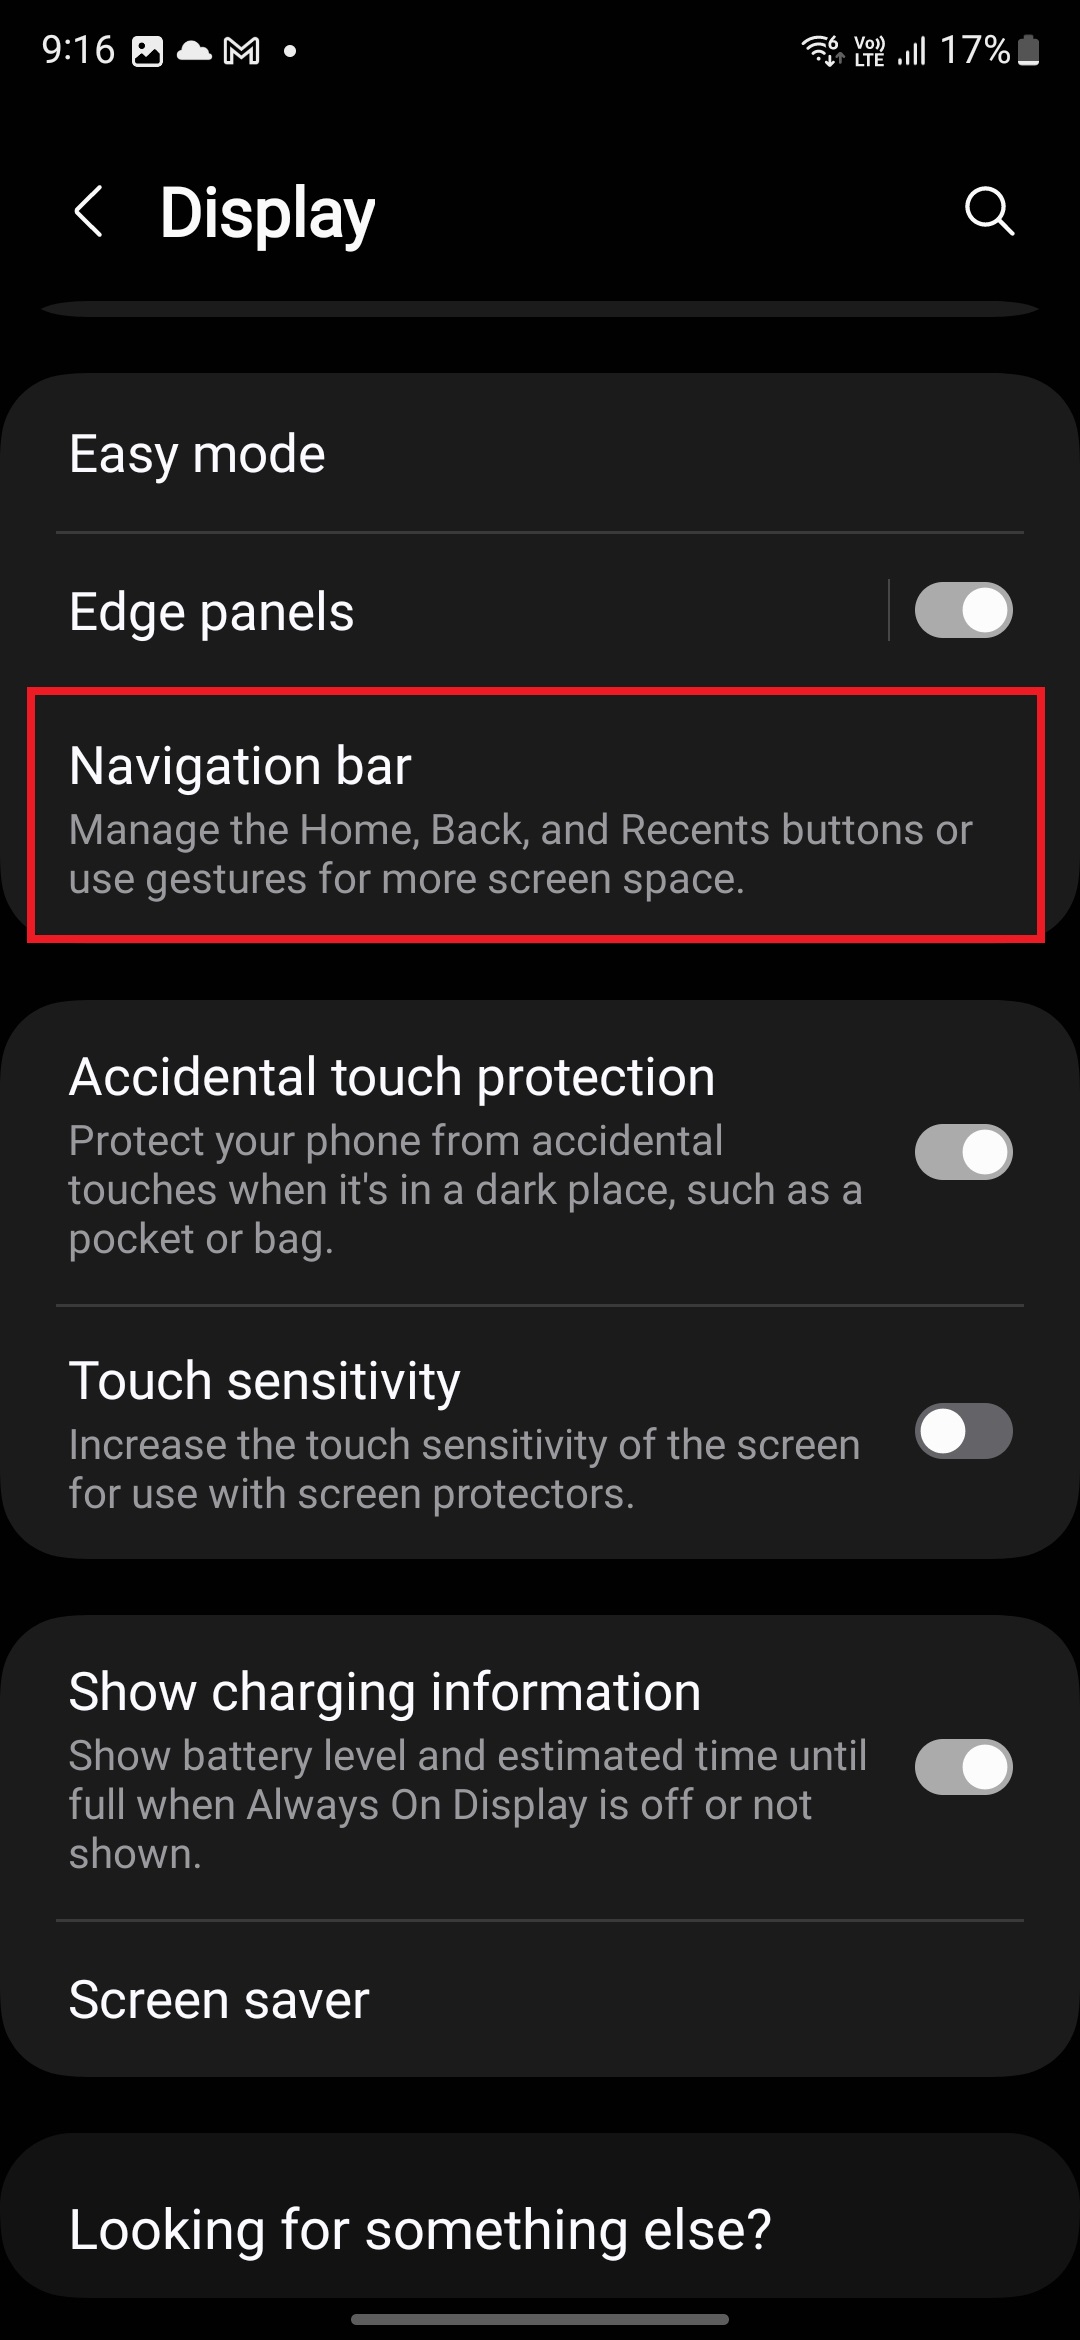
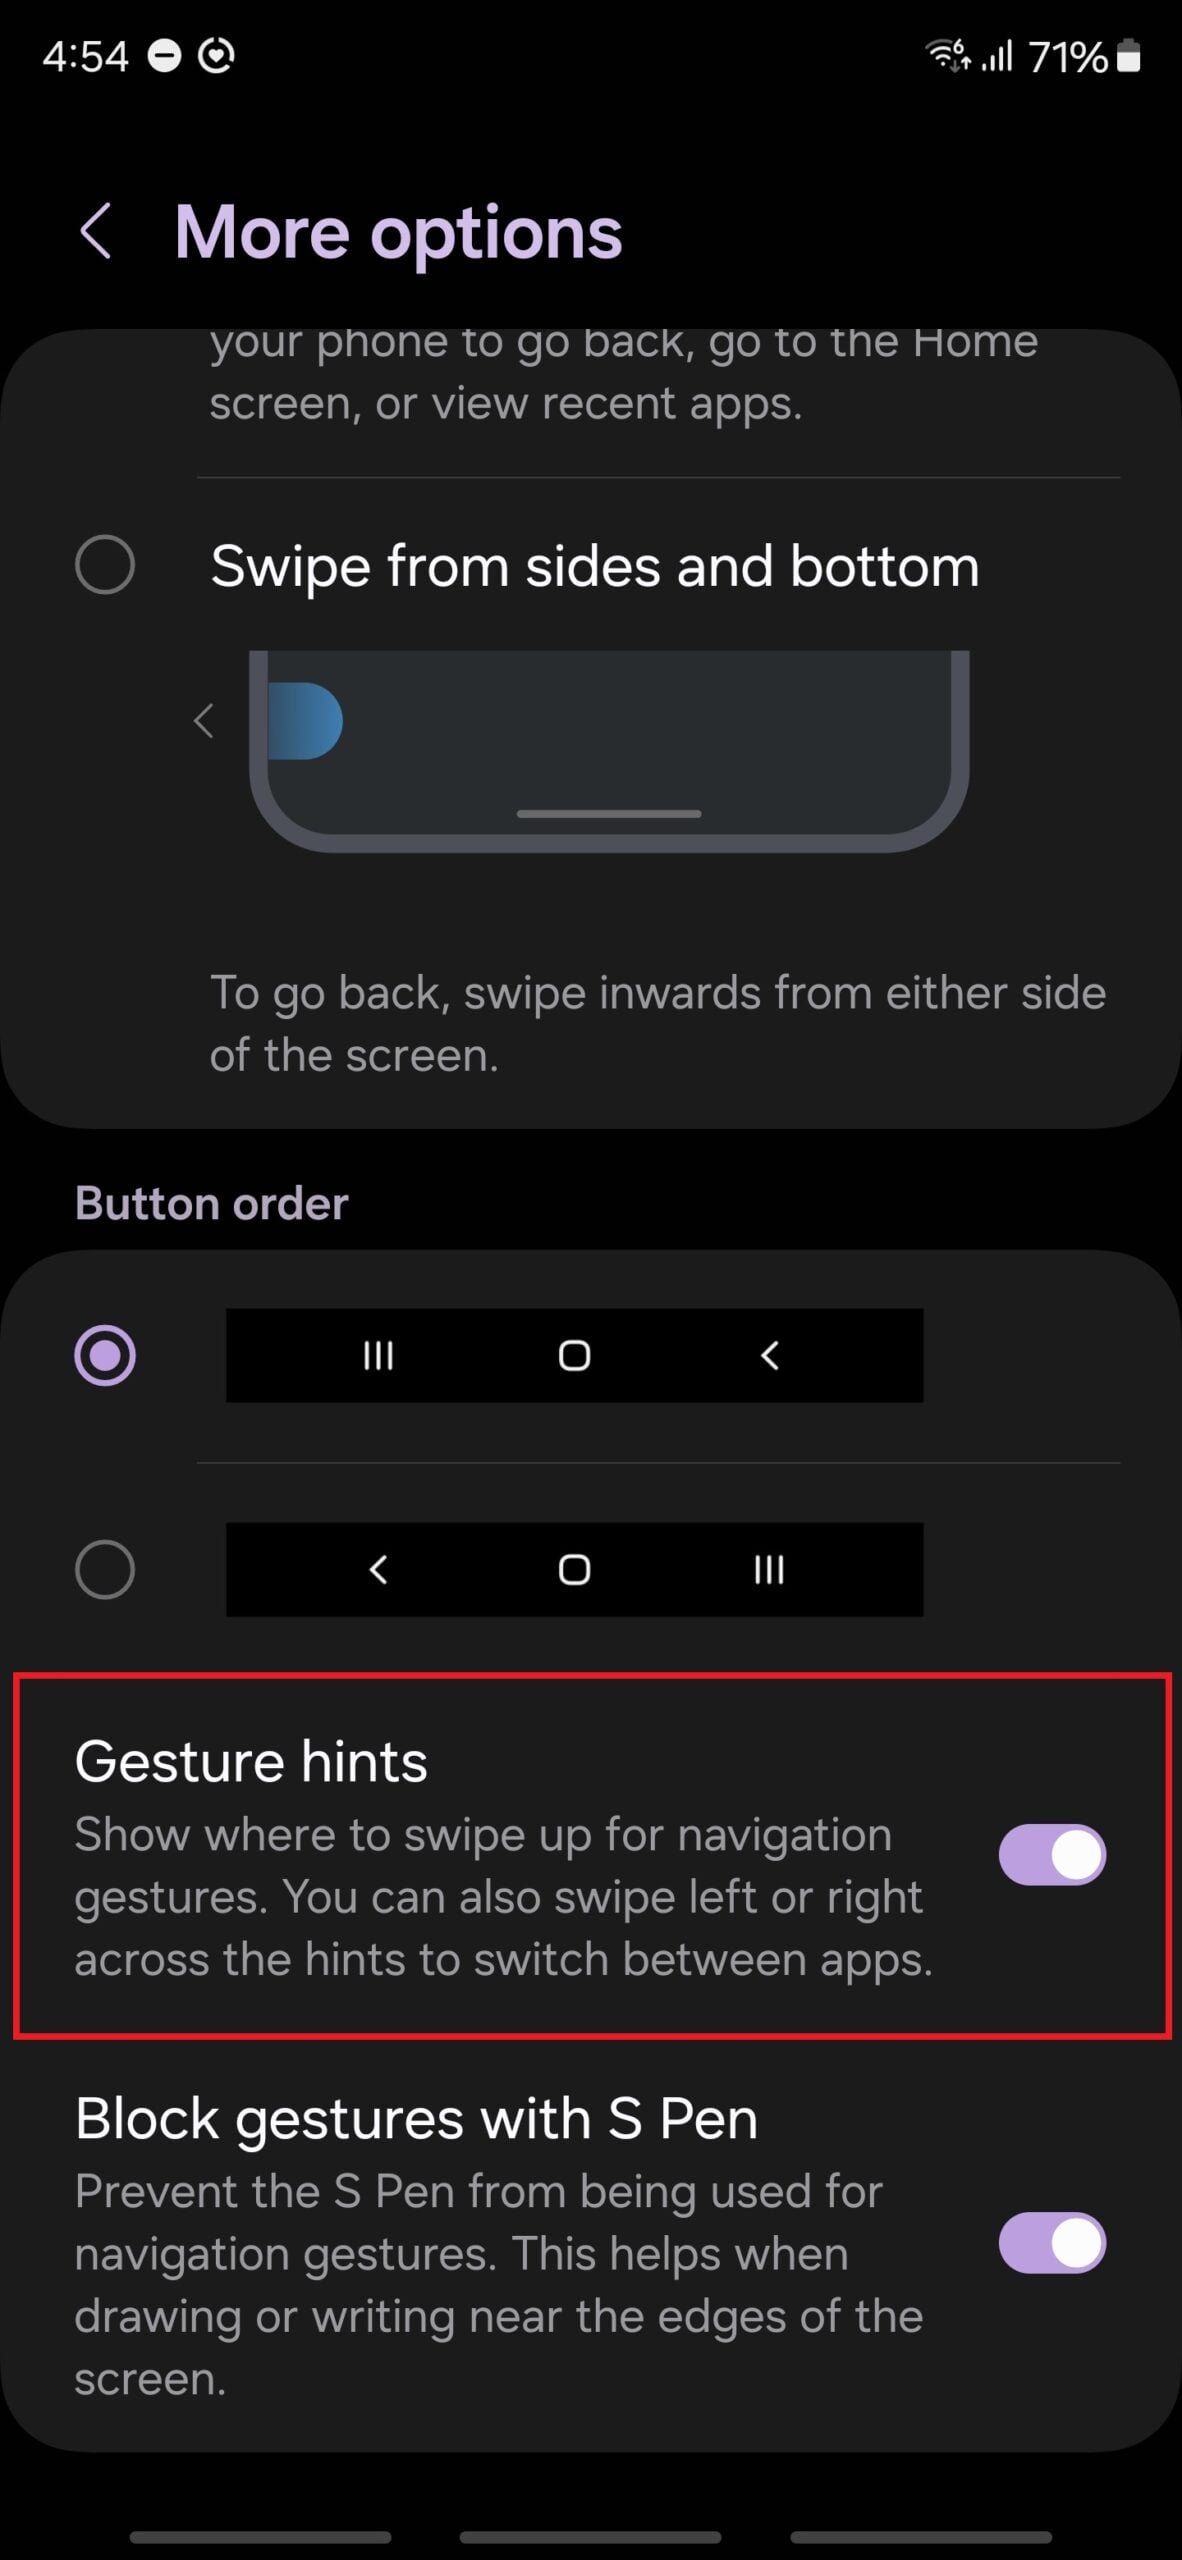
Step 4: Tap the Swipe gestures option if gestures aren’t already enabled, then tap the More options button.

Enable S Pen with navigation gestures

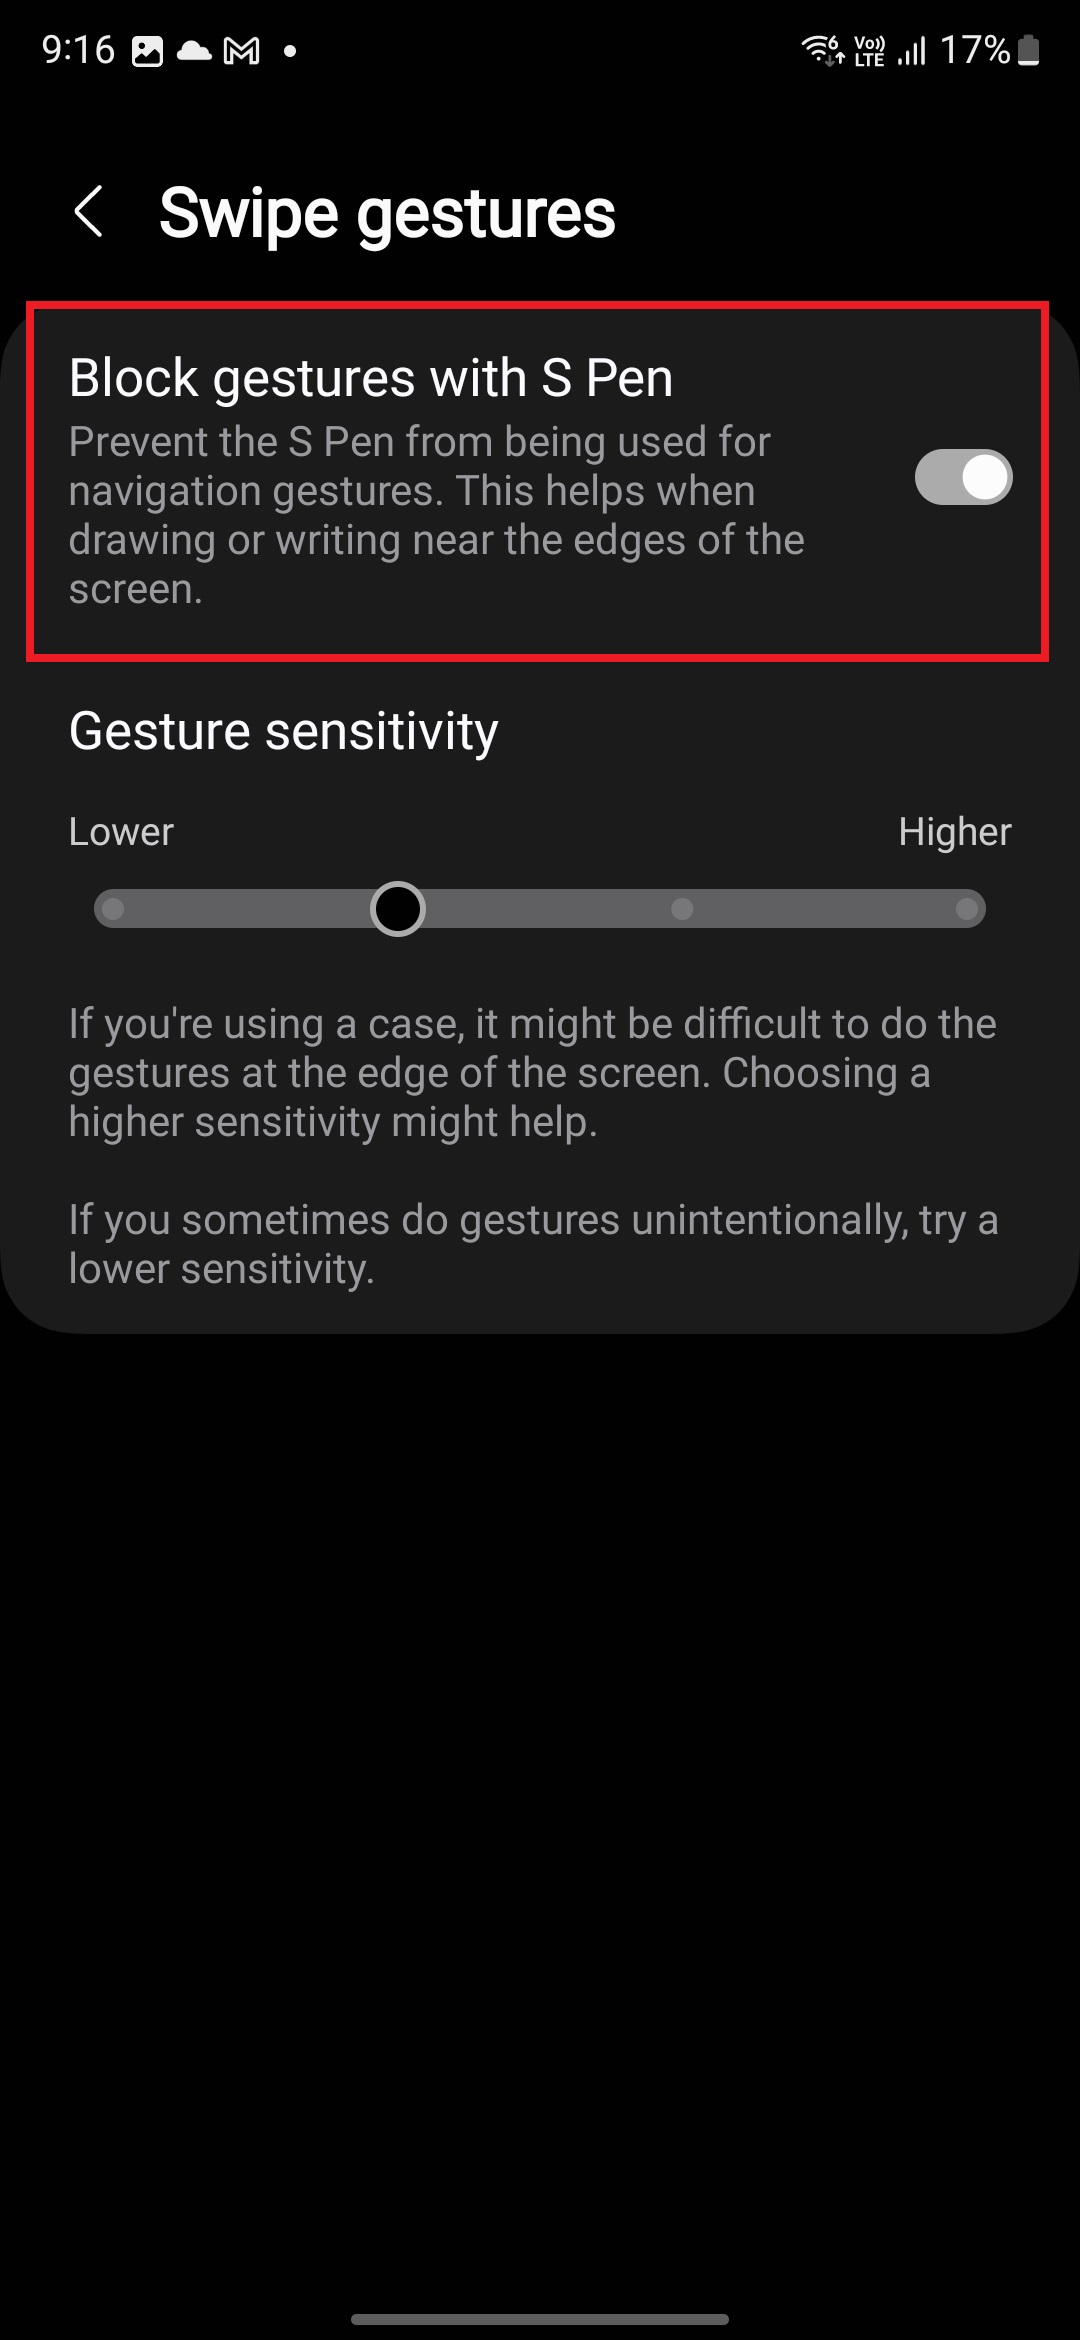
Step 5: Here, disable the Block gestures with S Pen option.

Enable S Pen with navigation gestures

On some older devices, especially those running Android 13 or earlier versions of the operating system, the Block gestures with S Pen option may be located in the Settings » Display » Navigation bar menu.

Samsung gestures may be better suited for the S Pen

Samsung smartphones and tablets launched before 2024 came with both Android’s stock navigation gestures and Samsung’s own solution. The latter is more suitable if you wish to have gestures enabled when using the S Pen.

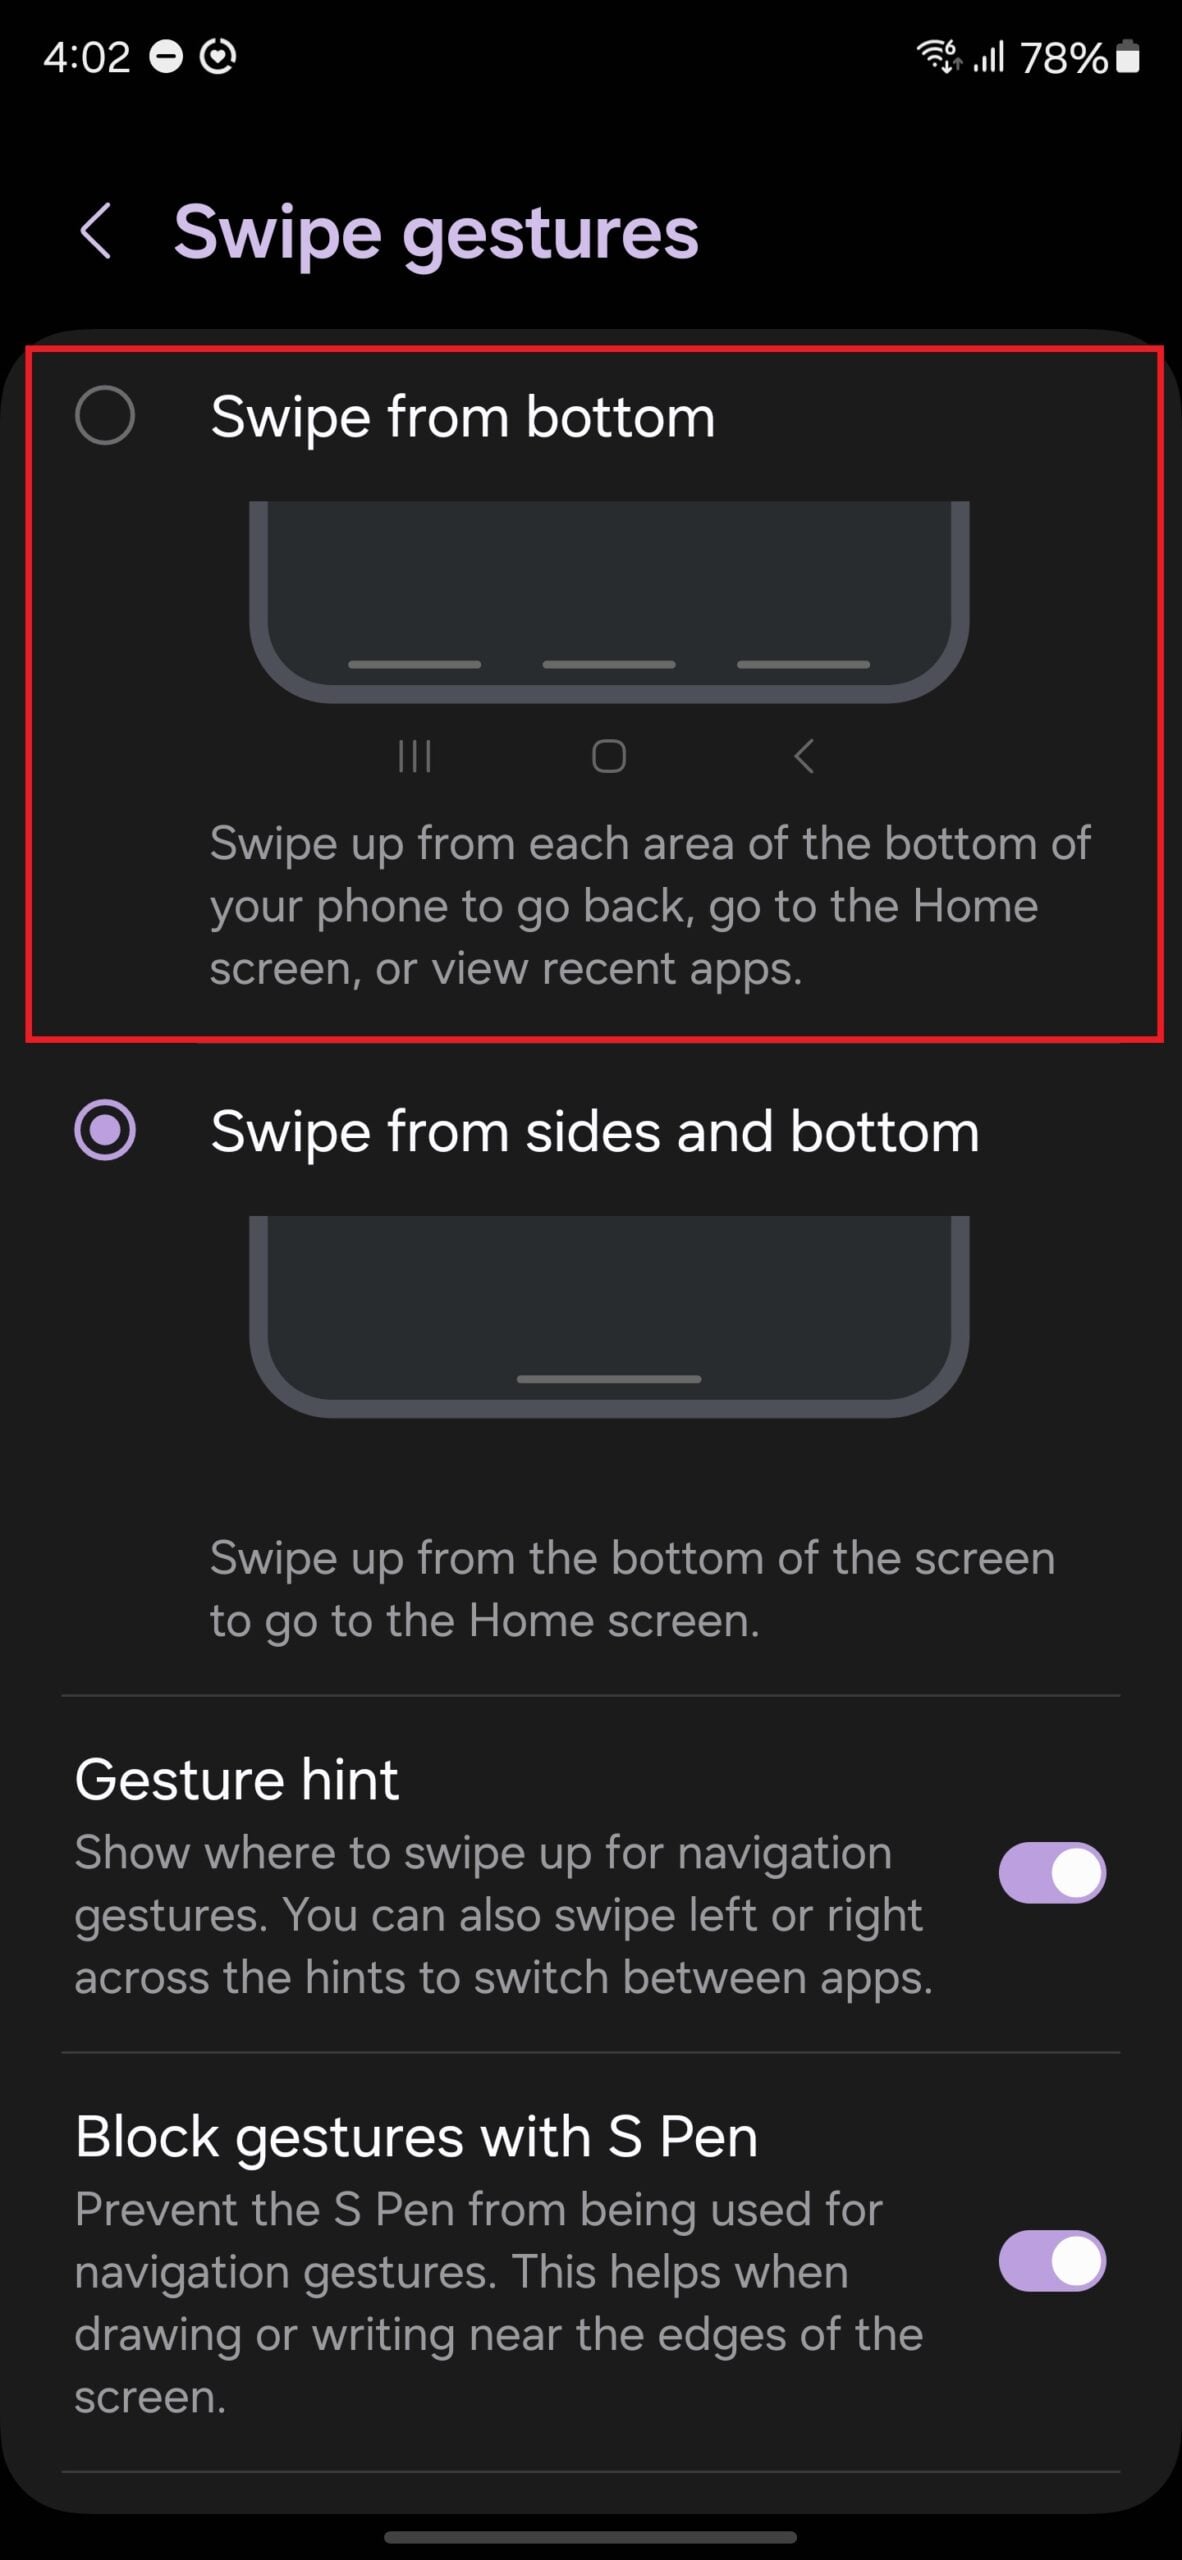
Samsung’s gestures require you to swipe up from the bottom of the screen whether you wish to go to the home screen, access the recent apps screen, or go back. The back gesture in Android’s gesture system, on the other hand, requires swiping in from the left or right side of the display.

To switch between Android and Samsung’s gestures, open your device’s Settings app, go into the Display menu, select Navigation bar, tap Swipe gestures, and hit the More options button. Here, select Swipe from bottom for Samsung’s gestures or Swipe from sides and bottom for Android’s gestures.

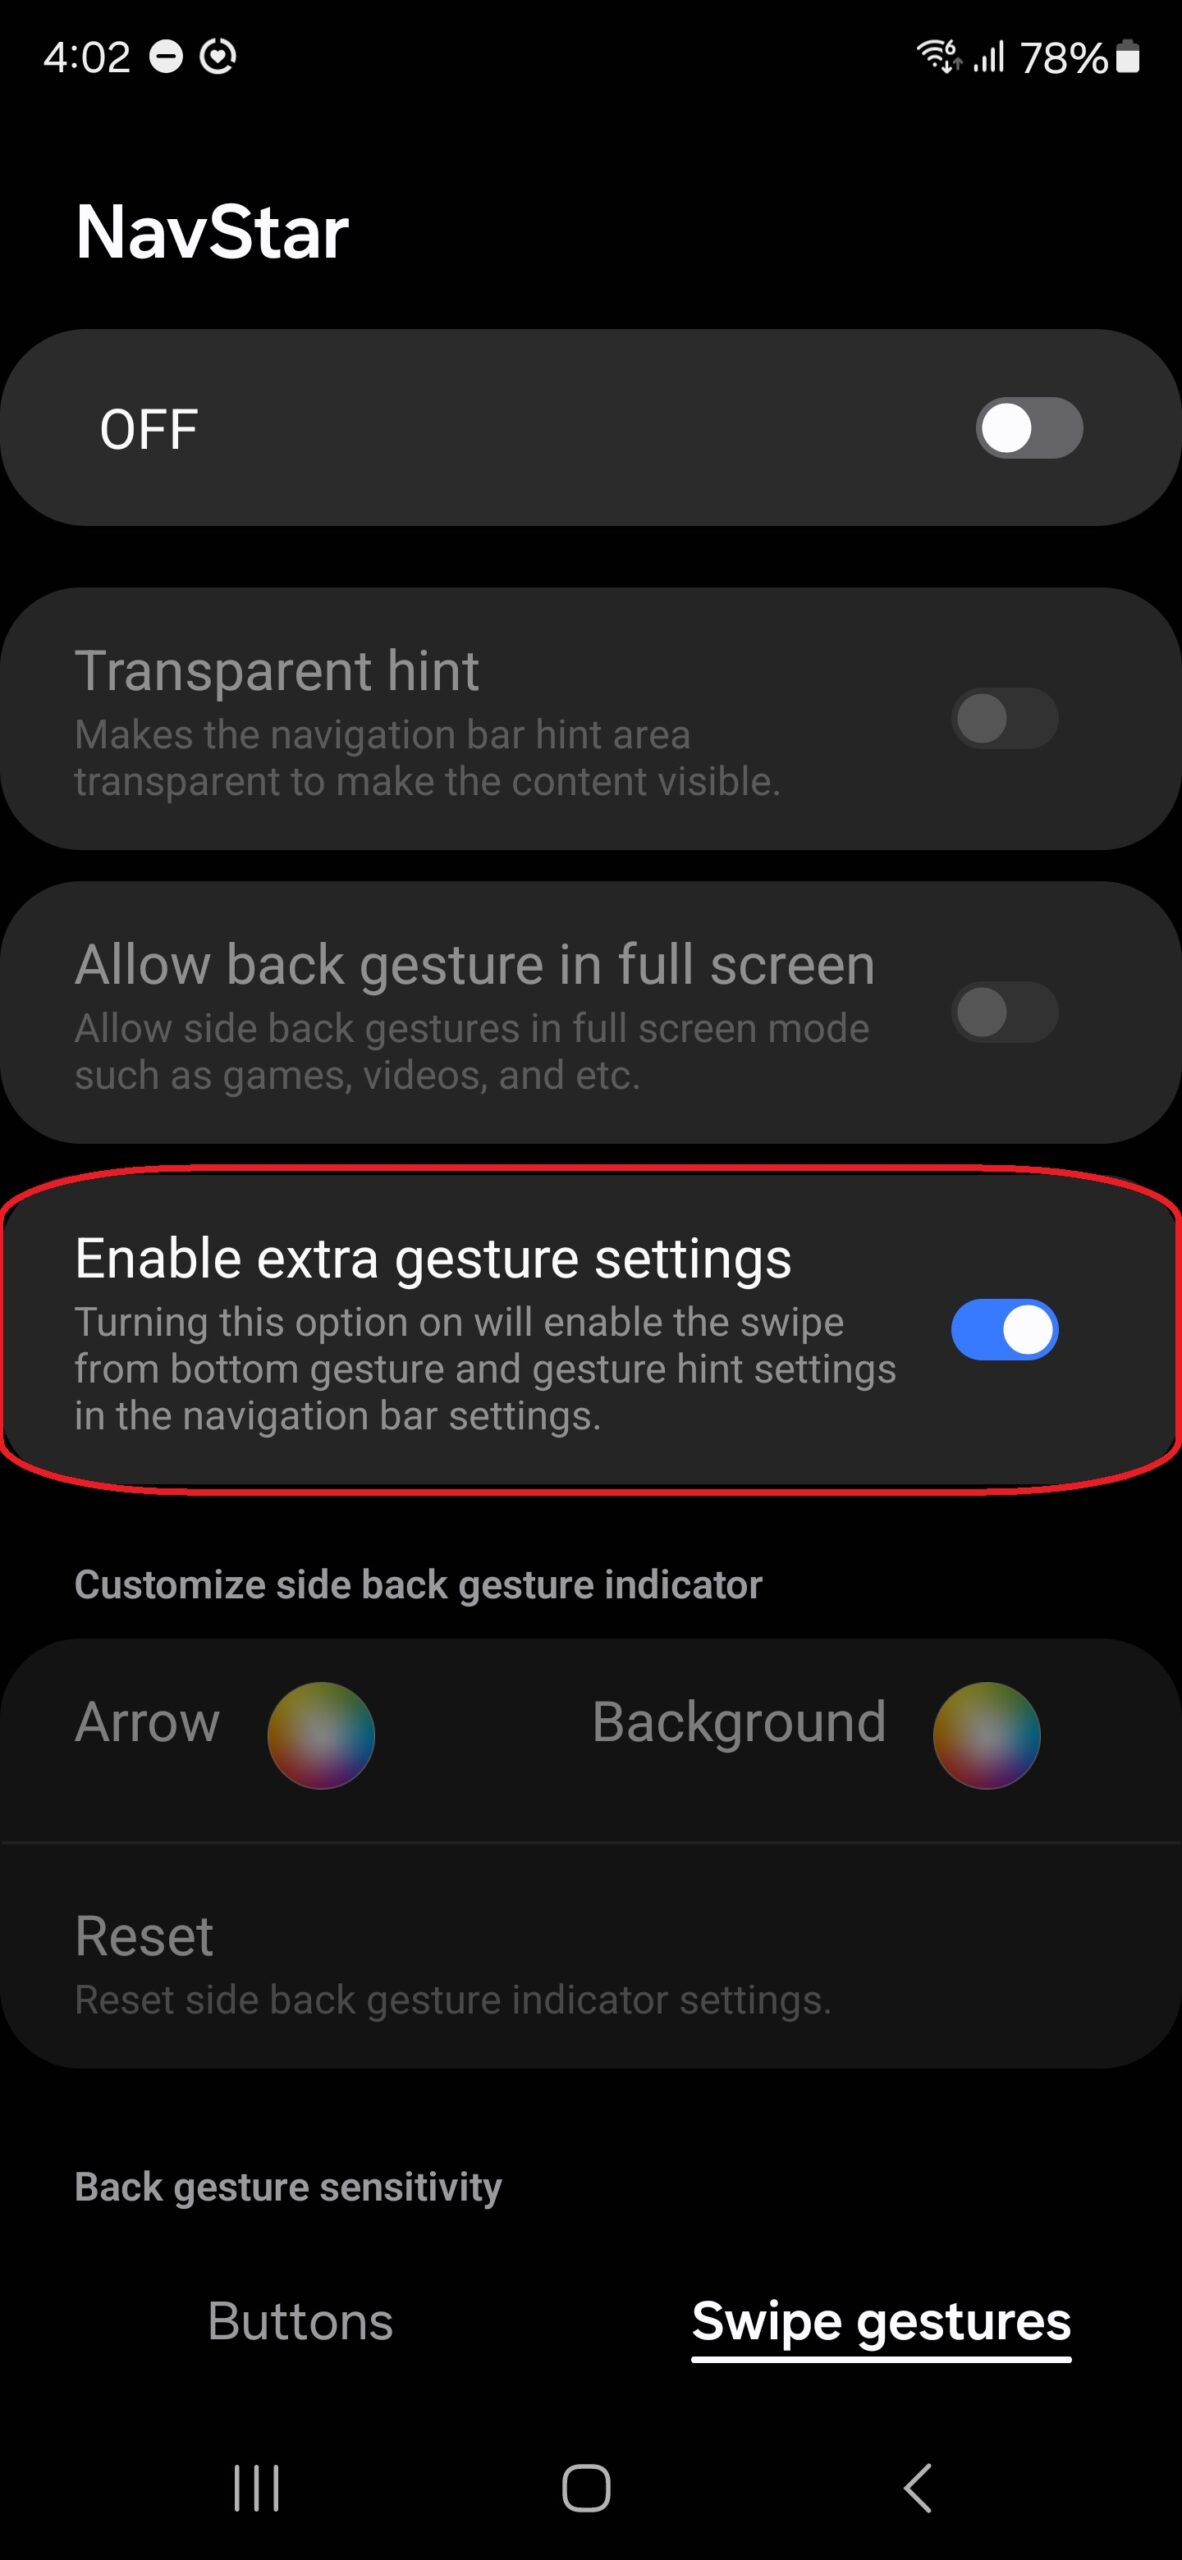
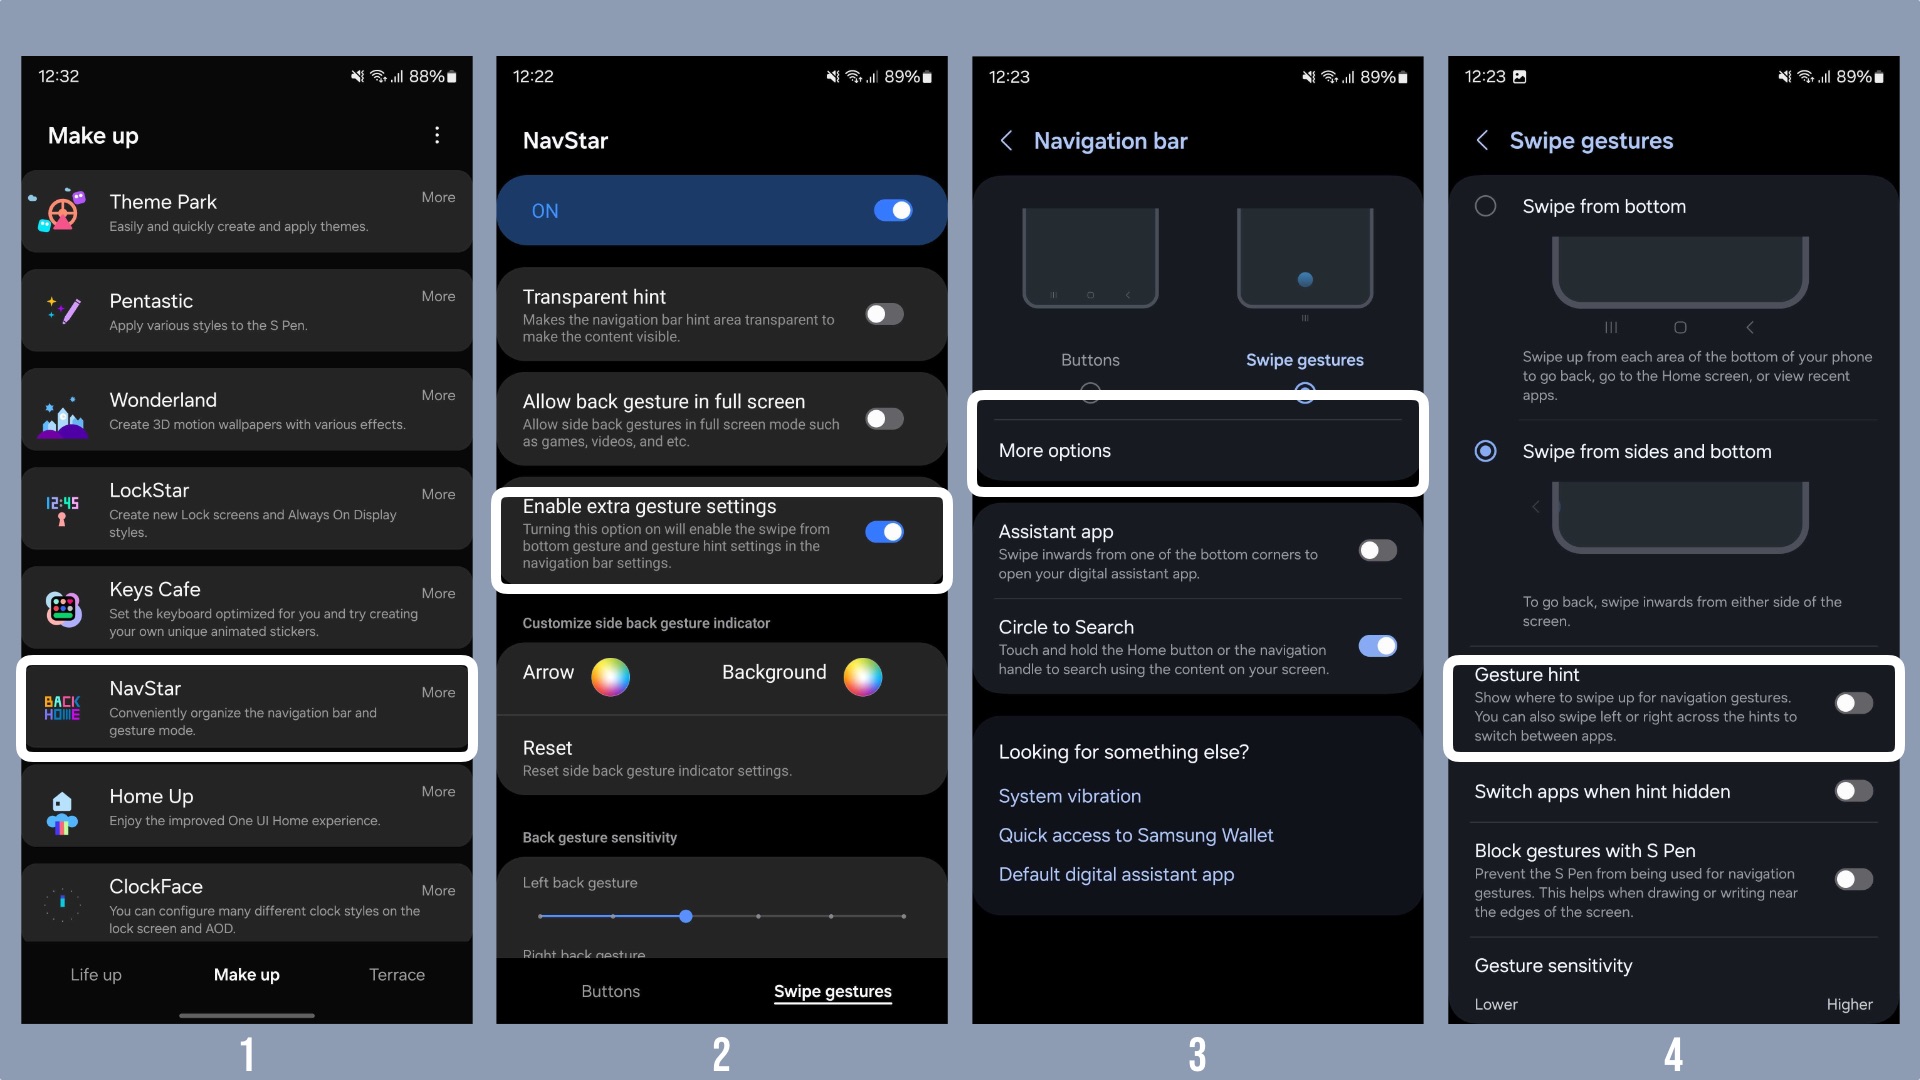
If your device is running One UI 6.1, you will not have Samsung’s gestures as an option in the navigation bar settings. But you can change that by following our easy guide here.

[ad_2]

Source Article Link

Categories
Business Industry

How to get Samsung navigation gestures back on One UI 6.1

[ad_1]

If you use Samsung’s navigation gestures on your Galaxy smartphone, you will not be happy when you update it to One UI 6.1. With One UI 6.1, you can only use Android’s stock navigation gestures, which means you will have to force yourself to adjust to a completely new way of operating your device.

That’s unless you have access to Good Lock. Samsung’s UI customization app lets you make some serious changes to how your phone works, and following the debut of One UI 6.1, Samsung updated Good Lock’s NavStar module with an option that can restore the old navigation gestures.

Good Lock is the only way you can get the old gestures back, and if it’s not available in your region, you can manually sideload it on your device. Manually installing apps is not something you may have done before, which is why we have put this guide together to help you through the entire process of installing Good Lock and getting back to those old gestures!

Part 1: Download and install Good Lock and NavStar

For restoring Samsung’s navigation gestures, you will need Good Lock and its NavStar module. If Good Lock is available in your country, you can install it directly from the Galaxy Store. Once installed, open Good Lock and install NavStar from the app’s Make up tab. Then, skip to part 2 of this guide.

If Good Lock isn’t available in your country, follow the steps below to manually download and install Good Lock and NavStar and then head to part 2 of the guide.

Step 1. First, let’s download and install Good Lock. Click this link in your mobile browser to open the Good Lock APKMirror page. On that page, scroll down to the All Versions section and hit the download button next to the latest version of the app.

Step 2. Scroll down to the Download Good Lock section and tap the download icon (highlighted in the screenshot below) once again.

Step 3. Scroll down once again and hit the DOWNLOAD APK button and the APK file should start downloading in a few seconds.

Step 4. Once the APK file is downloaded, open the My Files app on your device. The downloaded Good Lock file will show in the list of recent files at the top of My Files – tap it and follow the on-screen instructions to install the app.

Note: If you are installing an app manually for the first time, you will get a pop-up notification saying “your phone currently isn’t allowed to install unknown apps from this source.” To fix that, simply tap the Settings button on the pop-up notification, then tap the toggle button next to Allow Permission. 

Step 5. Now, it’s time to get NavStar. Click this link to visit the NavStar APKMirror page and then perform the same steps as you did earlier for Good Lock to download and install the latest version of NavStar.

Part 2: Restore and start using Samsung navigation gestures

With Good Lock and NavStar installed, you can bring Samsung’s navigation gestures back by following the steps below.

Step 1. Open the Good Lock app from the app drawer on your phone.

Step 2. In the Make Up section of the app, tap NavStar to open the NavStar module (the first time you open NavStar, allow all the permissions it asks for).

Step 3. Switch to the Swipe gestures section of NavStar.

Step 4. Then, tap the Enable extra gesture settings option to enable it.

Step 5. Now, exit NavStar and Good Lock and open your phone’s Settings app and navigate to the Display » Navigation bar menu.

Step 6. Here, select the Swipe gestures option at the top of the screen if it’s not already selected, then hit the More options button below it.

Step 7. Then, simply select the Swipe from bottom option to switch back to Samsung’s navigation gestures.

Optional: Disable gesture hints

In addition to removing Samsung’s navigation gestures, One UI 6.1 also removes the option to hide gesture hints, which are thin handles that show up at the bottom of the screen to help you remember where to swipe.

Not everyone needs these persistent hints, and you can disable them in the Settings » Display » Navigation bar » Swipe gestures menu, the same menu where you enabled Samsung’s gestures earlier.

You can still use Circle to Search when Samsung gestures are enabled

For select devices, One UI 6.1 brings the Circle to Search feature as part of Galaxy AI. Circle to Search allows you to do Google searches on things you see on your screen by simply tapping or circling around text and objects, and it is accessed by long pressing the home button.

But what if you have gestures enabled? Circle to Search can still be accessed whether you use the Samsung gestures or Android’s default gestures. To do so, just long press the bottom center edge of the screen, as shown in the GIF below (tap the image if it doesn’t automatically play).

How to revert to default gestures and/or remove Samsung gestures

If you wish to go back to using the default gestures, you can switch back to them from the Settings » Display » Navigation bar » Swipe gestures menu on your phone.

If you also wish to remove the old gestures from showing up in the navigation bar settings, simply uninstall NavStar by opening Good Lock, long pressing NavStar, and selecting Uninstall. You can also remove Good Lock by long pressing its icon in the app drawer and selecting the Uninstall button.

[ad_2]

Source Article Link

Categories
Business Industry

One UI 6.1 tip: How to hide navigation gesture bar on Galaxy devices

[ad_1]

Last updated: March 29th, 2024 at 08:36 UTC+01:00

Samsung released the much-awaited One UI 6.1 update to millions of high-end phones yesterday. After installing the One UI 6.1 update on their phones, some users have had issues with the UI navigation system and some new limitations that Samsung has imposed.

If you want to hide the UI navigation gesture bar on your phone running One UI 6.1, here’s how you can do it.

Hide UI navigation gesture bar in One UI 6.1

To hide the UI navigation gesture bar in One UI 6.1, you have to install the Good Lock app and the NavStar app from the Galaxy Store. Make sure that your phone is running version 6.1.05.40 of the NavStar app. If you can’t find that version on the Galaxy Store, download it from here and install it. Now, follow the steps mentioned below.

  1. Open the Good Lock app and then click on NavStar.
  2. Now, turn on the Enable Extra Gesture Settings option.
  3. Open the Settings app on your phone and navigate to Display » Navigation Bar » More Options.
  4. Now, turn off the Gesture Hint option.

Samsung One UI 6.1 Hide Navigation Gesture Bar NavStar

You can have a look at the screenshots above to get a proper idea of what you need to do to hide the UI navigation bar on your device running One UI 6.1.

Some people were confused after installing the One UI 6.1 update, as their phones reverted to on-screen buttons on Android’s navigation gesture system instead of Samsung’s navigation gesture system. We will explain how to revert to Samsung’s ‘Swipe From Bottom’ gesture system in a separate article.

What’s new with One UI 6.1?

One UI 6.1 brings several new features, including the ones powered by Galaxy AI, to the Galaxy S23 series, Galaxy Z Flip 5, Galaxy Z Fold 5, and the Galaxy Tab S9 series. You can have a look at all those features in our detailed video below.

[ad_2]

Source Article Link

Categories
News

Zoxide makes terminal navigation easy and supports all shells

Zoxide lets you navigate in the terminal more efficiently

If you spend a lot of time in the terminal, you’re probably familiar with the tedious task of navigating through directories using the ‘cd’ command. It can be slow and frustrating, especially when dealing with a complex file system. But what if there was a way to make this process faster and more intuitive? Enter Zoxide, a command-line tool designed to enhance the way you move around directories.

Installing Zoxide is straightforward. It’s supported by various package managers like cCargo and Pacman, which means it’s available for a wide range of operating systems. The integration process with your shell, whether you’re using bash, zsh, fish, or POSIX, is designed to be simple and without complications. You can find step-by-step instructions in the tool’s detailed documentation.

Zoxide supercharges cd terminal cmd

Once you have Zoxide set up, you’ll start using the ‘z’ command to navigate your file system. The tool is built to learn from your behavior. It tracks the directories you visit, learning your habits over time. This smart feature is what allows zoxide to speed up your navigation, taking you to your most-used directories quickly.

How to install and use Zoxide

Here are some other articles you may find of interest on the subject of coding :

The effectiveness of Zoxide lies in its sophisticated path matching algorithm. This algorithm includes features like case-insensitive searches, which means you don’t have to worry about whether you’ve used capital letters or not. It also has ordered term matching, which finds paths based on the order you type your input. The algorithm places extra weight on the last keyword you type, helping to match the final part of the path you’re looking for. Perhaps most importantly, Zoxideuses a ‘frecency‘ score—a clever combination of frequency and recency—to determine which directories to suggest first. This scoring system ensures that the directories you use most often are the easiest to access, which can be a big boost to your productivity.

For those who prefer a more visual approach, zoxide can be used with ‘fzf‘, a fuzzy finder tool. This combination provides a graphical interface that can make searching for and selecting directories even easier.

But Zoxide isn’t just about navigation. It also offers robust database management features. You can manage your directory entries with ease, performing tasks like creating, reading, updating, and deleting entries. This level of control means you can tailor your navigational database to suit your specific needs.

To make the transition to Zoxide smoother, you can set up an alias that replaces the ‘cd’ command. This way, you can start using Zoxide’s advanced features without changing your usual command-line habits.

Zoxide is a tool that can significantly improve your productivity if you’re someone who uses the terminal frequently. While it might take some time to get used to, the benefits in terms of time saved and reduced effort are substantial. However, it’s worth noting that when you’re on a system that doesn’t have Zoxide installed, you’ll need to revert to the standard navigation methods. But once you’ve experienced the efficiency of Zoxide, you’ll likely find it’s worth the effort to install it on any system you work with regularly.

Filed Under: Guides, Top News


Latest timeswonderful Deals

Disclosure: Some of our articles include affiliate links. If you buy something through one of these links, timeswonderful may earn an affiliate commission. Learn about our Disclosure Policy.

Categories
News

UBPet V10 powerful deep cleaning robot vacuum cleaner with LDS navigation from $349

UBPet V10 powerful deep cleaning robot vacuum cleaner with LDS navigation

The UBPet V10 robot vacuum cleaner is boastsan array of innovative features that redefine the standards of cleanliness and ease of use. One of the most striking features of the UBPet V10 is its powerful suction and cyclonic structure. The vacuum cleaner harnesses the power of a 100AW brushless high-speed fan, which generates an impressive 22,000Pa of suction power. This is a staggering ten times more powerful than conventional models, enabling it to effortlessly lift and remove stubborn dirt and debris. The cyclonic structure of the UBPet V10 plays a crucial role in maintaining this high suction power, effectively separating air from dust to optimize performance.

Reduced-price early bird pledges are now available for the different project from roughly $349 or £277 (depending on current exchange rates), offering a considerable discount of approximately 50% off the retail pricing, while the Kickstarter crowd funding is under way.

UBPet V10 robot vacuum cleaner features

Another advantage of the cyclonic structure is its impact on filter longevity. By efficiently separating air from dust, the UBPet V10 reduces the need for frequent filter replacements. This not only lowers the overall cost of maintaining the vacuum cleaner but also makes it a more environmentally friendly choice by reducing waste from discarded filters.

The UBPet V10’s suction power is comparable to that of Dyson’s vacuum cleaners, a brand renowned for their high-performance cleaning devices. This parity in performance underscores the UBPet V10’s ability to deliver top-tier cleaning results across various surfaces. Whether it’s hardwood floors or carpets, the UBPet V10 can effectively collect a wide range of waste, from coffee grounds and oats to chocolate chips.

Robot vacuum cleaner

When it comes to carpet cleaning, the UBPet V10 is particularly adept at navigating carpets with a height of under 0.7 inches. This feature ensures efficient cleaning of low-pile carpets, often found in many homes and offices. The UBPet V10’s ability to handle large volumes of pet hair is another testament to its cleaning prowess. Unlike traditional vacuum cleaners, where pet hair often tangles around the brushes and filters, reducing their cleaning efficiency, the UBPet V10 is designed to handle this challenge with ease.

If the UBPet V10 campaign successfully raises its required pledge goal and production progresses smoothly, worldwide shipping is expected to take place sometime around February 2024. To learn more about the UBPet V10 robot vacuum cleaner project assess the promotional video below.

The UBPet V10 doesn’t just excel in cleaning performance; it also showcases sophisticated navigation capabilities. The vacuum cleaner utilizes line laser sensors for precise obstacle avoidance. This advanced technology enables the UBPet V10 to seamlessly navigate around household items such as trash bins, shoes, and floor debris. This ensures a comprehensive cleaning coverage without the risk of damaging household items or the vacuum cleaner itself.

UBPet V10 robot vacuum cleaner in action

The UBPet V10 vacuum cleaner combines powerful suction, efficient cleaning, and advanced navigation to deliver a superior cleaning experience. Its impressive features, comparable to those of leading brands, make it a compelling choice for those seeking an effective and convenient solution to keeping their homes clean.

For a complete list of all available early bird pledges, stretch goals, extra media and functionality overview for the robot vacuum cleaner, jump over to the official UBPet V10 crowd funding campaign page by visiting the link below.

Source : Kickstarter

Disclaimer: Participating in Kickstarter campaigns involves inherent risks. While many projects successfully meet their goals, others may fail to deliver due to numerous challenges. Always conduct thorough research and exercise caution when pledging your hard-earned money.

Filed Under: Gadgets News, Top News


Latest timeswonderful Deals

Disclosure: Some of our articles include affiliate links. If you buy something through one of these links, timeswonderful may earn an affiliate commission. Learn about our Disclosure Policy.