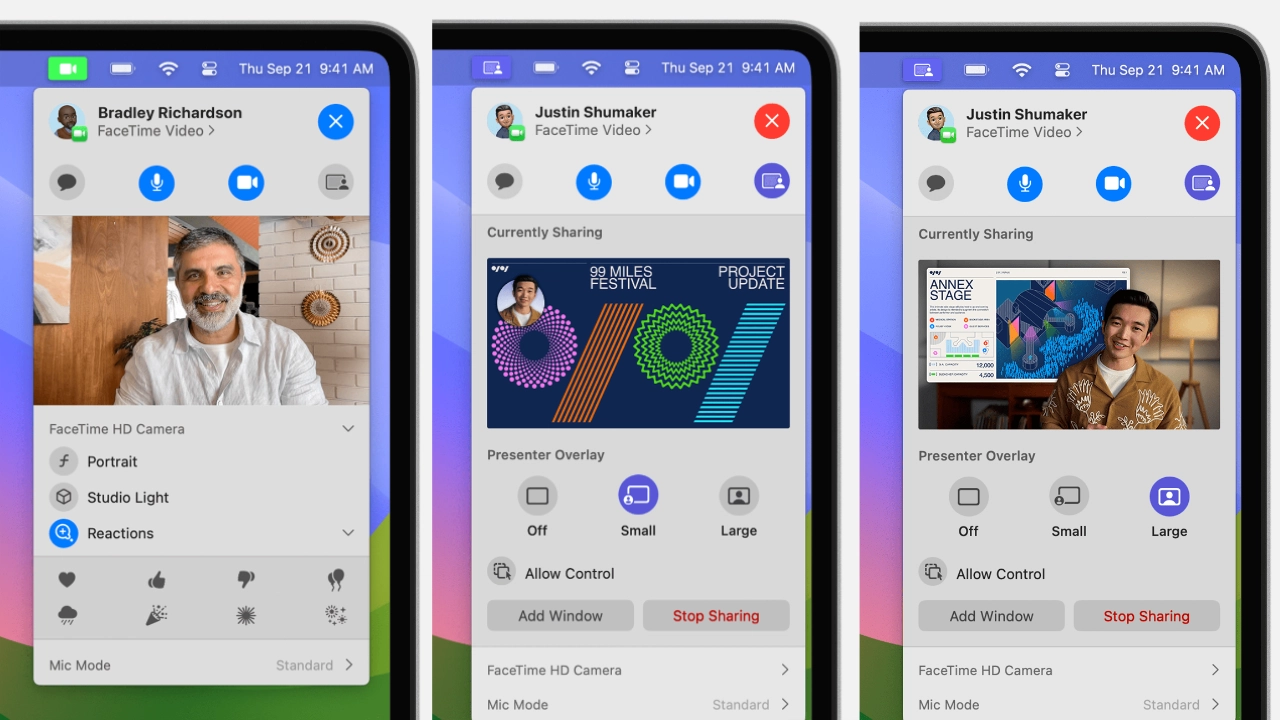
If you use your Mac or MacBook to create tutorial videos or presentations, it is definitely worth your while to learn more about how to use the Apple Mac Presenter Overlay features. Created by Apple and available on macOS Sonoma and later versions for Macs with Apple silicon, this functional and user-friendly tool is designed to enrich your video calls, streaming video recordings, and more. If you are a Mac user seeking to enhance your video presentations, this feature offers a fantastic and easy way to add professional overlay effects to your presentations.
Choose Between Large and Small Overlays
The Presenter Overlay on Mac offers two distinct styles: the large and the small overlay. Each style serves a unique purpose, catering to different presentation requirements.
- Large Overlay: This style places you, the presenter, prominently alongside the content you are sharing. It’s particularly useful when you want to maintain a strong presence during your presentation. The large overlay frames your shared screen next to you, allowing for a more immersive experience. Notably, this mode disables virtual backgrounds, showcasing your actual surroundings. It’s an excellent choice for presentations where body language and movement are integral.
- Small Overlay: If your content is the star of the show, the small overlay style is ideal. It displays your face in a compact, movable bubble. This gives prominence to the screen you’re sharing, while still keeping you visually present. You can effortlessly drag this bubble to any position on your screen, ensuring that it complements rather than obstructs your content.
Setting Up Overlays
Using these overlays is straightforward. Both styles are accessible via the screen-sharing menu in your video app. Simply select ‘Large’ or ‘Small’ from the menu, and use the video preview to ensure everything looks just right. If you opt for the large overlay and wish to reposition the shared screen, a simple click on the button with opposing arrows in the preview window does the trick.
1. Presenter Overlay
- Requirements: macOS Sonoma or later on a Mac with Apple silicon.
- Purpose: Elevates your presence by including you atop the content you’re sharing during a video call.
2. Presenter Overlay: Large
- Usage: Keeps you prominent with your shared screen framed beside you.
- Background: Your room is visible (virtual backgrounds disabled).
- Activation: Select ‘Large’ from the screen-sharing menu in your video app.
- Screen Movement: To move the shared screen, click the opposing arrows in the video preview’s lower-right corner.
3. Presenter Overlay: Small
- Usage: Shows your face in a movable bubble, giving more space to the shared screen.
- Activation: Select ‘Small’ from the screen-sharing menu in your video app.
- Bubble Movement: Drag the bubble to reposition it in your video window.
4. Camera Modes and Controls
- Center Stage: Keeps you centered as you move, available with Continuity Camera and iPhone 11 or later (excluding iPhone SE models).
- Portrait Mode: Blurs the background, focusing on you, requires Apple silicon Mac laptop or Continuity Camera with iPhone XR or later.
- Studio Light: Dims the background and illuminates your face, suitable for difficult lighting situations.
- Desk View: Shows your desk and your face simultaneously, ideal for DIY videos or live sketches.
5. Manual Framing Adjustments
- Requirements: macOS Sonoma or later with an Apple Studio Display or Continuity Camera with iPhone XR or later.
- Center Stage: Ensure it’s off for manual adjustments.
- Adjustments: Use zoom controls and pan within the video preview. Click ‘Recenter’ to center your face.
6. Mic Modes
- Activation: Select ‘Mic Mode’ from the Video or Audio menu in the menu bar.
- Voice Isolation: Prioritizes your voice while minimizing background noise.
- Wide Spectrum: Captures both your voice and surrounding sounds.
- Spatial Audio: Available on specific Mac models, enhances directional sound perception.
Keyboard Shortcuts
For frequent users, Apple offers the convenience of keyboard shortcuts. You can set these up through the Apple menu > System Settings > Keyboard, then navigate to Keyboard Shortcuts. Here, you can assign specific shortcuts to quickly toggle the Presenter Overlay on or off.
The Presenter Overlay feature is compatible with most video call applications that support screen sharing, making it a versatile tool for various platforms. Its primary benefit lies in making video calls more engaging and personalized. By allowing presenters to be visually part of their presentation, it fosters a more connected and interactive experience.
While the technology behind Presenter Overlay is sophisticated, its usage is designed to be simple and intuitive. This balance ensures that even users with minimal technical expertise can effectively leverage this feature to enhance their presentations.
The Presenter Overlay feature on Apple Mac is a valuable asset for anyone looking to make their video presentations more engaging and personal. Whether you prefer to be front and center or a subtle guide alongside your content, this feature offers the flexibility to suit your style. Remember, effective communication is not just about what you say but also how you present it. The Presenter Overlay feature ensures that your presence is felt, even through a screen.
If you would like to learn more about how to use your iPhone, iPad or MacBook. It might be worth your while jumping over to the official Apple support website. Or booking an appointment with an Apple Genius Bar representative who will be the able to provide further advice in person.
Filed Under: Apple, Guides, Top News
Latest timeswonderful Deals
Disclosure: Some of our articles include affiliate links. If you buy something through one of these links, timeswonderful may earn an affiliate commission. Learn about our Disclosure Policy.
